Page 120 of 434
119 Controls in detail
Lighting
Daytime running lamp mode�
Turn exterior lamp switch to
positionM orU.
When the engine is running, the low
beam headlamps are automatically
switched on. In low ambient light con-
ditions, the parking lamps will also
switch on.
Canada only:
When you shift from a driving position to
positionN orP, the low beam switches off
(with a three-minute delay).
For nighttime driving you should turn the
exterior lamp switch to positionB to
permit activation of the high beam head-
lamps.USA only:
The high beam headlamps can also be ac-
tivated when driving with the daytime run-
ning lamp mode activated and the exterior
lamp switch in positionM.
To activate the daytime running lamp
mode, see “Setting daytime running lamp
mode (USA only)” (
�page 142).
Locator lighting and night security
illumination
Locator lighting and night security illumi-
nation are described in the control system
section, see “Setting locator lighting”
(
�page 143) and "Exterior lamps delayed
switch-off" (
�page 143).
iWith the daytime running lamp mode
activated, the low beam headlamps will
not be switched off automatically.iThe front fog lamps and rear fog lamp
cannot be switched on manually with
exterior lamp switch in position U.
To activate the fog lamps turn exterior
lamp switch to position B.
iSee notes on the exterior lamp switch
(�page 117).
Page 121 of 434
120 Controls in detailLightingSwitching on fog lampsSwitching on front fog lamps
�
Make sure the low beam headlamps
are switched on.
�
Pull out exterior lamp switch to first
stop.
The green indicator lamp ‡ in the
lamp switch comes on.
Switching on rear fog lamp
�
Make sure the low beam headlamps
are switched on.
�
Pull out exterior lamp switch to second
stop.
The yellow indicator lamp † in the
lamp switch comes on.
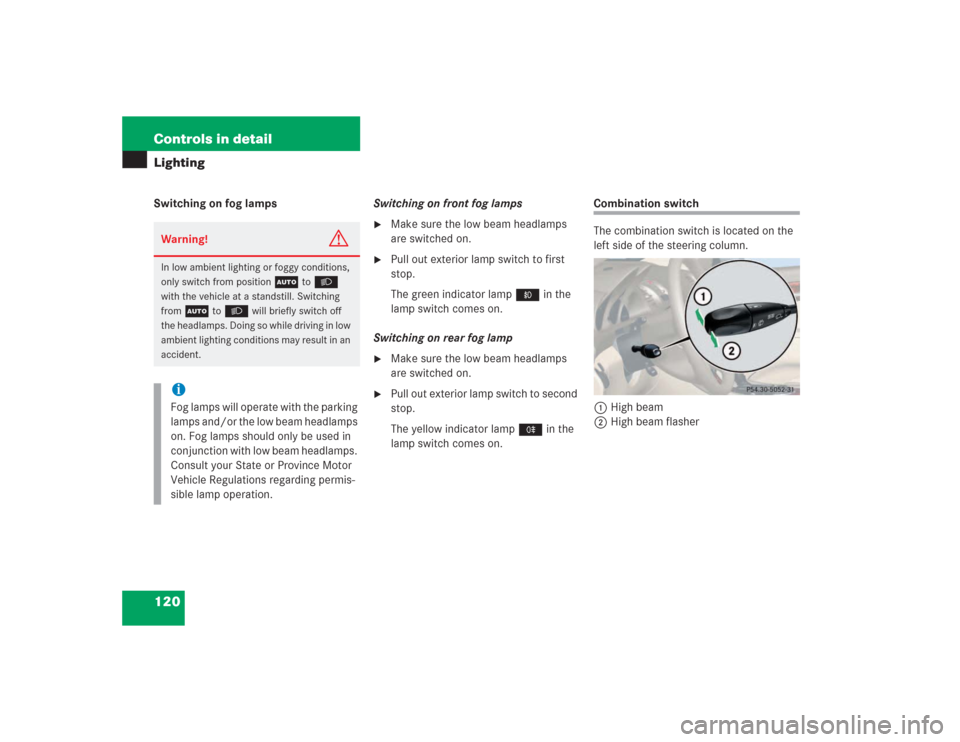
Combination switch
The combination switch is located on the
left side of the steering column.
1High beam
2High beam flasher
Warning!
G
In low ambient lighting or foggy conditions,
only switch from position
U
to
B
with the vehicle at a standstill. Switching
from
U
to
B
will briefly switch off
the headlamps. Doing so while driving in low
ambient lighting conditions may result in an
accident.
iFog lamps will operate with the parking
lamps and/or the low beam headlamps
on. Fog lamps should only be used in
conjunction with low beam headlamps.
Consult your State or Province Motor
Vehicle Regulations regarding permis-
sible lamp operation.
Page 313 of 434
312 Practical hintsWhat to do if …Left display
Right display
Possible cause
Possible solution
.
Brake lamp
Right
Back-up
lamp on!
The right brake lamp is malfunction-
ing. A backup bulb has been
brought into use.
�
Visit an authorized Mercedes-Benz Center as
soon as possible.
Brake light
!
Drive to
workshop!
Brake lamp illumination is delayed
or lamp is permanently on.
�
Visit an authorized Mercedes-Benz Center as
soon as possible.
Front foglamp
Left
The left front fog lamp is malfunc-
tioning.
�
Replace the bulb as soon as possible.
Front foglamp
Right
The right front fog lamp is malfunc-
tioning.
�
Replace the bulb as soon as possible.
Rear foglamp
Left
The left rear fog lamp is malfunc-
tioning.
�
Replace the bulb as soon as possible.
High beam
Left
The left high beam lamp is malfunc-
tioning.
�
Replace the bulb as soon as possible.
High beam
Right
The right high beam lamp is mal-
functioning.
�
Replace the bulb as soon as possible.
Left turn signal
Mirror
The left turn signal in the side mirror
is malfunctioning. This message will
only appear if all light emitting di-
odes have stopped working.
�
Have the LEDs replaced as soon as possible.
Page 333 of 434
332 Practical hintsReplacing bulbsFront lamps Rear lamps
Lamp
Type
1
Additional turn
signal
LED
2
Turn signal lamp
1156 NA
3
Low beam
1
1Vehicles with Bi-Xenon* headlamps: Low beam
and high beam use the same D2S-35W lamp. Do
not replace the Xenon and Bi-Xenon* bulbs your-
self. See an authorized Mercedes-Benz Center.
Xenon D2S-35 W
4
Xenon head-
lamps:
High beam, high
beam flasher
H7 (55 W)
Bi-Xenon* head-
lamps:
High beam
flasher
H7 (55 W)
Parking and
standing lamps
W 5 W
5
Fog lamp
HB4/9006 (55 W)
6
Side marker
lamp
W 5 W
Lamp
Type
7
Rear fog lamp,
driver’s side;
replacement
P 21 W
1156/32 cp
8
High mounted
brake lamp
LED
9
Backup lamp;
replacement
P 21 W
1156/32 cp
a
Tail, parking and
standing lamp,
side marker
LED
b
Tail, parking and
standing lamp,
brake lamp
LED
c
License plate
lamps
C 5 W
d
Turn signal
lamp;
replacement
P 21 W
1156/32 cp
Page 334 of 434
333 Practical hints
Replacing bulbs
Notes on bulb replacement�
Only use 12 volt bulbs of the same type
and with the specified watt rating.
�
Switch lights off before changing a bulb
to prevent short circuits.
�
Always use a clean lint-free cloth when
handling bulbs.
�
Your hands should be dry and free of oil
and grease.
�
If the newly installed bulb does not
come on, visit an authorized
Mercedes-Benz Center.Have the LEDs and bulbs for the following
lamps replaced by an authorized
Mercedes-Benz Center:
�
the additional turn signals in the exteri-
or rear view mirrors
�
the high mounted brake lamp
�
the brake lamps
�
the parking lamps and the side marker
lamps in the tail lamp assemblies
�
the rear fog lamps
�
the low beam (Xenon or Bi-Xenon*)
lamps
�
the front fog lamps
Warning!
G
Bulbs and bulb sockets can be very hot. Al-
low the lamp to cool down before changing
a bulb.
Keep bulbs out of reach of children.
Halogen lamps contain pressurized gas. A
bulb can explode if you:�
touch or move it when hot,
�
drop the bulb,
�
scratch the bulb.
Wear eye and hand protection.
Because of high voltage in Xenon lamps, it is
dangerous to replace the bulb or repair the
lamp and its components. We recommend
that you have such work done by a qualified
technician.
Page 336 of 434
335 Practical hints
Replacing bulbs
�
Turn locking mechanism 2 clockwise.
�
Plug the connector onto the bulb.
�
Align headlamp cover and click into
place.
Replacing parking and standing lamp
bulbs
�
Switch off the lights.
�
Open the hood (
�page 253).
�
Press ends of headlamp cover tab to-
gether and remove cover.
�
Pull out the bulb socket with the bulb.
�
Pull the bulb out of the bulb socket.
�
Insert a new bulb in the socket.
�
Reinstall the bulb socket.
�
Align headlamp cover and click into
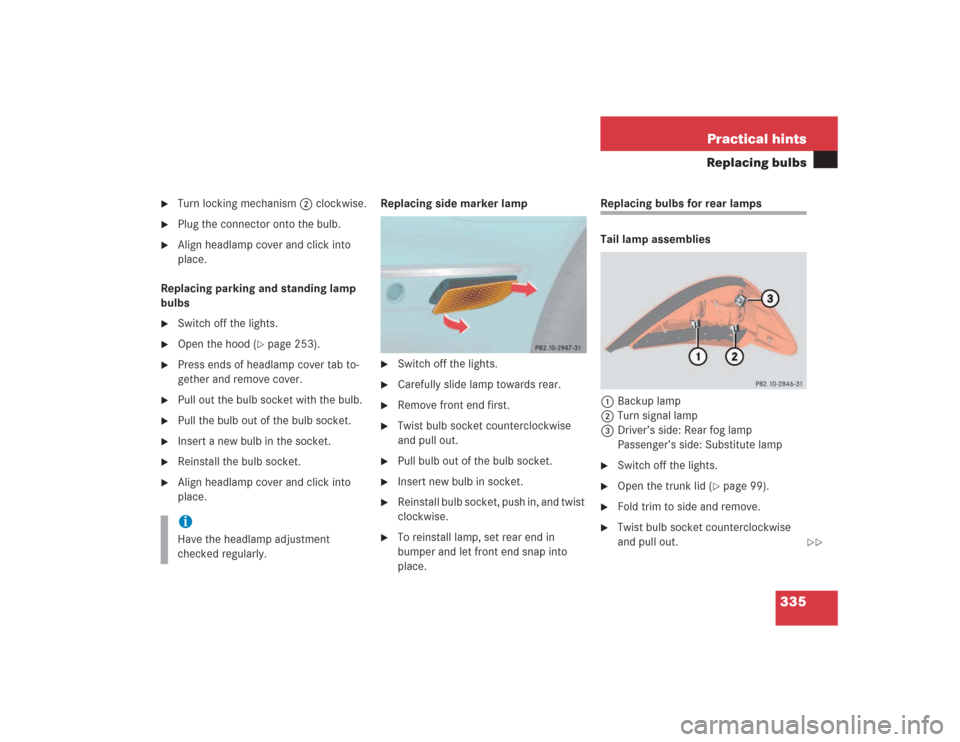
place.Replacing side marker lamp
�
Switch off the lights.
�
Carefully slide lamp towards rear.
�
Remove front end first.
�
Twist bulb socket counterclockwise
and pull out.
�
Pull bulb out of the bulb socket.
�
Insert new bulb in socket.
�
Reinstall bulb socket, push in, and twist
clockwise.
�
To reinstall lamp, set rear end in
bumper and let front end snap into
place.
Replacing bulbs for rear lamps
Tail lamp assemblies
1Backup lamp
2Turn signal lamp
3Driver’s side: Rear fog lamp
Passenger’s side: Substitute lamp�
Switch off the lights.
�
Open the trunk lid (
�page 99).
�
Fold trim to side and remove.
�
Twist bulb socket counterclockwise
and pull out.
iHave the headlamp adjustment
checked regularly.
��
Page 406 of 434
405 Index
Backrest supports
Lumbar region 109
Shoulder region 109
Backrest tilt 35
Backup lamp bulbs 332
Backup lamps 335
BAS 75, 77, 397
Batteries, SmartKey
Changing 328
Batteries, SmartKey with KEYLESS-GO*
Changing 329
Check lamp 98
Batteries, vehicle 260
Charging 361
Disconnecting 360
For electrical consumers 260, 324,
358
For starter 260, 358
Messages in display 297, 298
Reconnecting 361
Removing 361
Service 358Battery
For electrical consumers 324
Bi-Xenon* 397
Bi-Xenon* headlamps 397
Block heater 269
Brake fluid 252, 386, 389
Brake lamp bulb, high mounted 332
Brake lamp bulbs, left and right 332
Brake pads
Message in display 298
Brake system
Messages in display 302
Brakes 240
Warning lamp 284
Break-in period 238
Bulbs, replacing
Backup lamps 335
Brake lamps 332
Front lamps 331, 334
License plate lamps 336Parking lamps 335
Rear fog lamp 335
Standing lamps 335
Tail lamp assemblies 335
Turn signal lamps, front 334
Turn signal lamps, rear 335
C
CAC see Customer Assistance Center
CAN System 398
Capacities
Fuels, coolants, lubricants etc. 386
Catalytic converter 247
CD player
Operating 134
Center air vents 25
Center console
Lower part 26
Upper part 25
Centigrade
Setting temperature units 140
Page 411 of 434
410 IndexEngine oil 255, 388
Adding 257
Additives 388
Checking level 255
Consumption 255
Display messages 307
Filler neck 257
Messages in display 256
Engine oil level see Oil level
ESP 75, 78, 398
Control switch 26
Switching off 79
Switching on 80
Synchronizing 295
Warning lamp 78
ESP/ABS warning lamp 23
ETD see Emergency Tensioning Device
Express-close front side windows 182
Express-open front side windows 182F
Fahrenheit
Setting temperature units 140
Fastening the seat belts 40
Fine adjustment
Cruise control 195
First aid kit 323
Flat tire 339
Spare wheel 350
TIREFIT kit 340, 345
Flexible Service System (FSS) 271
Fluid level 258
Fog lamp, rear 120, 332
Replacing bulb 335
Fog lamps, front 120
Replacing bulbs 332
Front airbags 64
Front lamps 332
Replacing bulbs 334
FSS (Flexible Service System) 271, 399Fuel 250
Additives 390
Fuel reserve warning lamp 23, 287
Gasoline additives 390
Premium unleaded gasoline 251,
387, 389
Requirements 389
Fuel consumption statistics
After start 150
Since reset 151
Fuel filler flap 250
Locking 250
Opening 250
Unlocking 250
Fuel requirements 389
Fuel reserve tank
Message in display 309
Fuel tank
Filler flap 250
Fuels, coolants, lubricants etc. -
capacities 386
Functions (control system) 128
