Page 16 of 434

15 Introduction
Symbols
�Symbols
The following symbols are found in this
Operator’s Manual:
* Optional equipment is identified
with an asterisk. Since standard
equipment varies between models,
the descriptions and illustrations in
this manual may differ slightly from
the actual equipment of your vehi-
cle.
�
This symbol points to instructions for
you to follow.
�
A number of these symbols appearing
in succession indicates a multiple-step
procedure.
� Page This symbol tells you where to
look for further information on a
topic.
��This continuation symbol marks
an interrupted procedure which
will be continued on the next
page.
-> In the glossary of technical
terms, this symbol is used to in-
dicate cross-references to term
definitions.
Display
Words appearing in the multi-
function display are printed in
the type shown here.
Warning!
G
Warning notices draw your attention to haz-
ards that may endanger your health or life,
or the health or life of others.!Highlights hazards that may result in
damage to your vehicle.iHelpful hints or further information you
may find useful.
Page 55 of 434
54 Getting startedParking and lockingFor more information, see “Locking and
unlocking” (
�page 90).Turning off with KEYLESS-GO*
�
Place the gear selector lever inP.
�
Press the KEYLESS-GO start/stop but-
ton to shut off the engine.
With the driver's door closed, the start-
er switch is now in position1. With the
driver's door opened, the starter switch
is set to position0, same as SmartKey
removed from starter switch
(�page 31).
�
Press the seat belt release button
(�page 40).
Allow the retractor to completely re-
wind the seat belt by guiding the latch
plate.
Warning!
G
When leaving the vehicle, always remove the
SmartKey from the starter switch, take the
SmartKey with KEYLESS-GO* with you and
lock the vehicle. Do not leave children unat-
tended in the vehicle, or with access to an
unlocked vehicle. Unsupervised use of vehi-
cle equipment may cause an accident
and/or serious personal injury.
iIf you hear a warning signal you have
either�
forgotten to turn off the lights be-
fore opening the driver’s door
or
�
tried to turn off the engine while the
gear selector lever is not inP
Turn off the lights or place the gear se-
lector lever inP.
iOpening a door causes the windows on
that side of the car to open slightly.
They will return to the up position when
the door is closed.
Page 119 of 434
118 Controls in detailLighting
Manual headlamp mode
The low beam headlamps and parking
lamps can be switched on or off with the
exterior lamp switch.
Automatic headlamp mode
The parking lamps, low beam headlamps
and license plate lamps switch on and off
automatically depending on the brightness
of the ambient light.�
Turn the exterior lamp switch to U.
iIf you remove the SmartKey from the
starter switch and open the driver’s
door while the parking lamps or low
beam headlamps are switched on, then �
a warning sounds
�
$ appears in the speedometer
display field
�
the message
Turn lamps off
ap-
pears in the tachometer display
field
iWith the daytime running lamp mode
activated and the engine running, the
low beam headlamps cannot be
switched off manually.
To activate the daytime running lamp
mode, see “Setting daytime running
lamp mode (USA only)” (
�page 142).
Warning!
G
If the exterior lamp switch is set toU,�
the headlamps may switch off unexpect-
edly when the system senses bright am-
bient light, for example light from
oncoming traffic.
�
the headlamps will not be automatically
switched on under foggy conditions.
To minimize risk to you and to others, acti-
vate headlamps by turning exterior lamp
switch to
B
when driving or when traffic
and / or ambient lighting conditions require
you to do so.
In low ambient lighting conditions, only
switch from position
U
to
B
with the
vehicle at a standstill. Switching from U
to
B
will briefly switch off the head-
lamps. Doing so while driving in low ambient
lighting conditions may result in an acci-
dent.
The automatic headlamp feature is only an
aid to the driver. The driver is responsible for
the operation of the vehicle's lights at all
times.
Page 191 of 434
190 Controls in detailRetractable hardtopIndicator lamp in the retractable hard-
top switch lights when vehicle is
stopped
If the indicator lamp in the retractable
hardtop switch lights while the vehicle is
standing still and the switch was not acti-
vated, then the retractable hardtop is not
locked.�
Properly lock the retractable hardtop
(�page 187) before continuing to
drive.
The retractable hardtop will not lock
There is a malfunction in the retractable
hardtop system.
�
Notify an authorized Mercedes-Benz
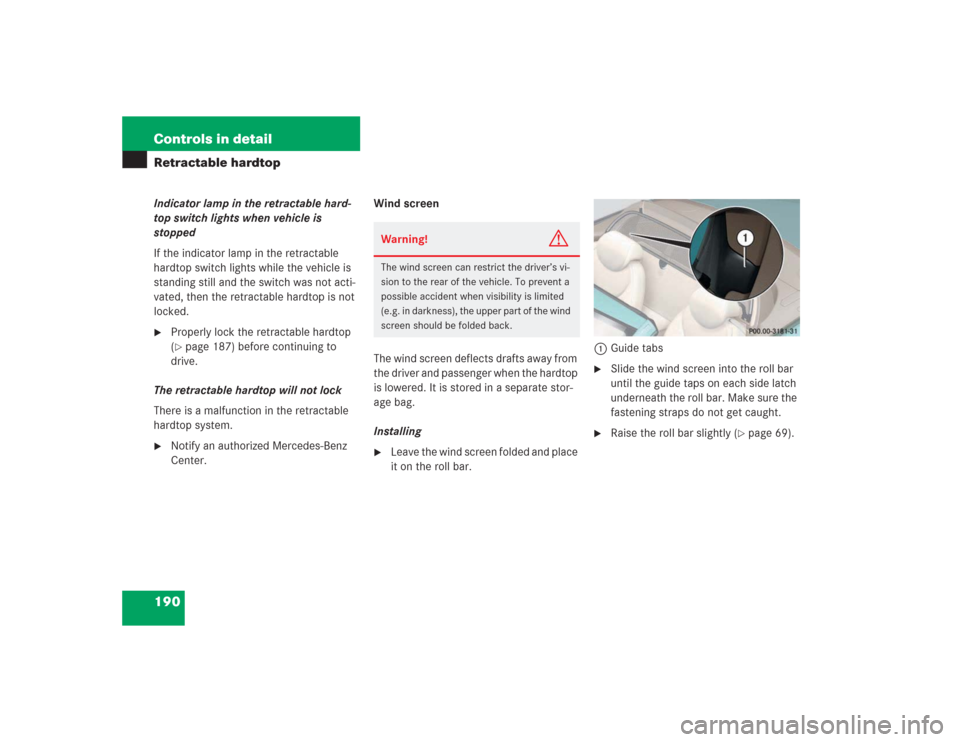
Center.Wind screen
The wind screen deflects drafts away from
the driver and passenger when the hardtop
is lowered. It is stored in a separate stor-
age bag.
Installing
�
Leave the wind screen folded and place
it on the roll bar.1Guide tabs
�
Slide the wind screen into the roll bar
until the guide taps on each side latch
underneath the roll bar. Make sure the
fastening straps do not get caught.
�
Raise the roll bar slightly (
�page 69).
Warning!
G
The wind screen can restrict the driver’s vi-
sion to the rear of the vehicle. To prevent a
possible accident when visibility is limited
(e.g. in darkness), the upper part of the wind
screen should be folded back.
Page 288 of 434

287 Practical hints
What to do if …
Problem
Possible cause
Suggested solution
E
The red DTR indicator lamp
comes on while driving.
You are too close to the vehicle in front of you
to maintain selected speed.
�
Apply the brakes immediately to in-
crease the following distance.
E
The red DTR indicator lamp
comes on while driving and you
hear a warning sound.
�
You are gaining too rapidly on the vehicle
ahead of you.
�
The distance warning system has recog-
nized a stationary obstacle on your prob-
able line of travel.
�
Apply the brakes immediately.
�
Carefully observe the traffic situation.
You may need to brake or maneuver
to avoid hitting an obstacle.
E
The white DTR indicator lamp
comes on while driving.
The Distronic* distance sensor has recog-
nized a vehicle in front of you.
A
The yellow fuel tank reserve
warning lamp lights while driv-
ing.
The fuel level has dropped below the reserve
mark.
�
Refuel at the next gas station
(�page 250).
The fuel cap is not closed tight.
�
Check the fuel cap (
�page 250).
Page 316 of 434
315 Practical hints
What to do if …
Left display
Right display
Possible cause
Possible solution
.
Tail lamp
Right
Back-up
lamp on!
The right tail lamp is malfunction-
ing. A backup bulb has been
brought into use.
�
Visit an authorized Mercedes-Benz Center as
soon as possible.
Turn signal
Rear left
Back-up
lamp on!
The left rear turn signal lamp is mal-
functioning. A backup bulb has
been brought into use.
�
Replace the bulb as soon as possible.
Turn signal
Rear right
Back-up
lamp on!
The right rear turn signal lamp is
malfunctioning. A backup bulb has
been brought into use.
�
Replace the bulb as soon as possible.
Turn signal
Front left
Back-up
lamp on!
The left front turn signal lamp is
malfunctioning. A backup bulb has
been brought into use.
�
Replace the bulb as soon as possible.
Turn signal
Front right
Back-up
lamp on!
The right front turn signal lamp is
malfunctioning. A backup bulb has
been brought into use.
�
Replace the bulb as soon as possible.
Visit workshop!
The display for the lights is malfunc-
tioning.
�
Visit an authorized Mercedes-Benz Center as
soon as possible.
Page 334 of 434
333 Practical hints
Replacing bulbs
Notes on bulb replacement�
Only use 12 volt bulbs of the same type
and with the specified watt rating.
�
Switch lights off before changing a bulb
to prevent short circuits.
�
Always use a clean lint-free cloth when
handling bulbs.
�
Your hands should be dry and free of oil
and grease.
�
If the newly installed bulb does not
come on, visit an authorized
Mercedes-Benz Center.Have the LEDs and bulbs for the following
lamps replaced by an authorized
Mercedes-Benz Center:
�
the additional turn signals in the exteri-
or rear view mirrors
�
the high mounted brake lamp
�
the brake lamps
�
the parking lamps and the side marker
lamps in the tail lamp assemblies
�
the rear fog lamps
�
the low beam (Xenon or Bi-Xenon*)
lamps
�
the front fog lamps
Warning!
G
Bulbs and bulb sockets can be very hot. Al-
low the lamp to cool down before changing
a bulb.
Keep bulbs out of reach of children.
Halogen lamps contain pressurized gas. A
bulb can explode if you:�
touch or move it when hot,
�
drop the bulb,
�
scratch the bulb.
Wear eye and hand protection.
Because of high voltage in Xenon lamps, it is
dangerous to replace the bulb or repair the
lamp and its components. We recommend
that you have such work done by a qualified
technician.
Page 335 of 434
334 Practical hintsReplacing bulbsReplacing bulbs for front lamps
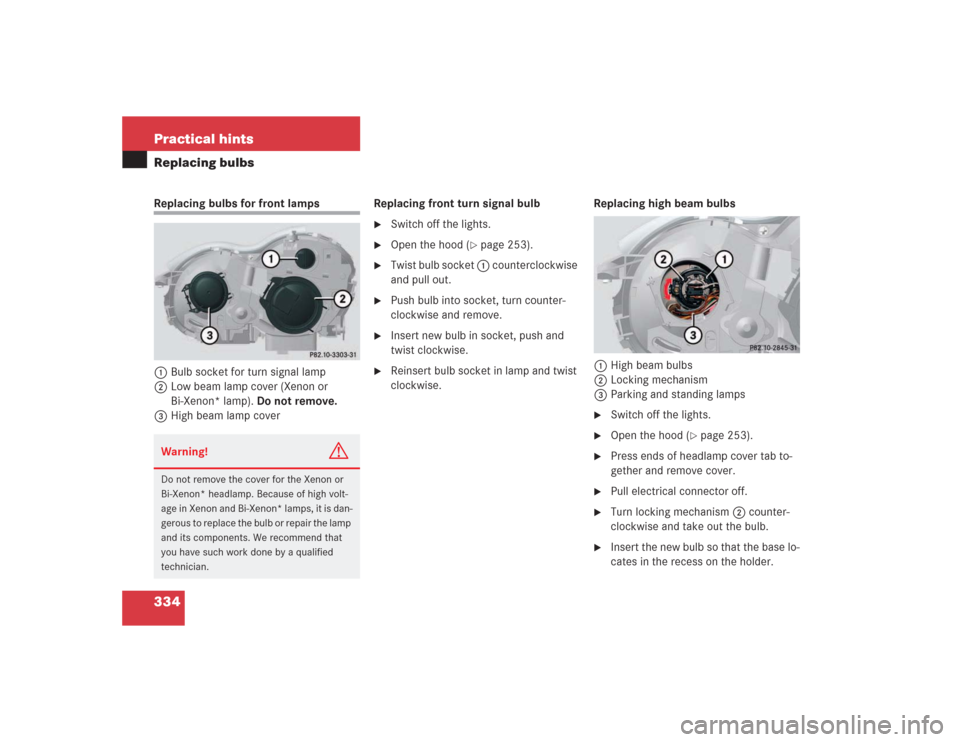
1Bulb socket for turn signal lamp
2Low beam lamp cover (Xenon or
Bi-Xenon* lamp). Do not remove.
3High beam lamp coverReplacing front turn signal bulb
�
Switch off the lights.
�
Open the hood (
�page 253).
�
Twist bulb socket 1 counterclockwise
and pull out.
�
Push bulb into socket, turn counter-
clockwise and remove.
�
Insert new bulb in socket, push and
twist clockwise.
�
Reinsert bulb socket in lamp and twist
clockwise.Replacing high beam bulbs
1High beam bulbs
2Locking mechanism
3Parking and standing lamps
�
Switch off the lights.
�
Open the hood (
�page 253).
�
Press ends of headlamp cover tab to-
gether and remove cover.
�
Pull electrical connector off.
�
Turn locking mechanism 2 counter-
clockwise and take out the bulb.
�
Insert the new bulb so that the base lo-
cates in the recess on the holder.
Warning!
G
Do not remove the cover for the Xenon or
Bi-Xenon* headlamp. Because of high volt-
age in Xenon and Bi-Xenon* lamps, it is dan-
gerous to replace the bulb or repair the lamp
and its components. We recommend that
you have such work done by a qualified
technician.