Page 119 of 434

118 Controls in detailLighting
Manual headlamp mode
The low beam headlamps and parking
lamps can be switched on or off with the
exterior lamp switch.
Automatic headlamp mode
The parking lamps, low beam headlamps
and license plate lamps switch on and off
automatically depending on the brightness
of the ambient light.�
Turn the exterior lamp switch to U.
iIf you remove the SmartKey from the
starter switch and open the driver’s
door while the parking lamps or low
beam headlamps are switched on, then �
a warning sounds
�
$ appears in the speedometer
display field
�
the message
Turn lamps off
ap-
pears in the tachometer display
field
iWith the daytime running lamp mode
activated and the engine running, the
low beam headlamps cannot be
switched off manually.
To activate the daytime running lamp
mode, see “Setting daytime running
lamp mode (USA only)” (
�page 142).
Warning!
G
If the exterior lamp switch is set toU,�
the headlamps may switch off unexpect-
edly when the system senses bright am-
bient light, for example light from
oncoming traffic.
�
the headlamps will not be automatically
switched on under foggy conditions.
To minimize risk to you and to others, acti-
vate headlamps by turning exterior lamp
switch to
B
when driving or when traffic
and / or ambient lighting conditions require
you to do so.
In low ambient lighting conditions, only
switch from position
U
to
B
with the
vehicle at a standstill. Switching from U
to
B
will briefly switch off the head-
lamps. Doing so while driving in low ambient
lighting conditions may result in an acci-
dent.
The automatic headlamp feature is only an
aid to the driver. The driver is responsible for
the operation of the vehicle's lights at all
times.
Page 120 of 434

119 Controls in detail
Lighting
Daytime running lamp mode�
Turn exterior lamp switch to
positionM orU.
When the engine is running, the low
beam headlamps are automatically
switched on. In low ambient light con-
ditions, the parking lamps will also
switch on.
Canada only:
When you shift from a driving position to
positionN orP, the low beam switches off
(with a three-minute delay).
For nighttime driving you should turn the
exterior lamp switch to positionB to
permit activation of the high beam head-
lamps.USA only:
The high beam headlamps can also be ac-
tivated when driving with the daytime run-
ning lamp mode activated and the exterior
lamp switch in positionM.
To activate the daytime running lamp
mode, see “Setting daytime running lamp
mode (USA only)” (
�page 142).
Locator lighting and night security
illumination
Locator lighting and night security illumi-
nation are described in the control system
section, see “Setting locator lighting”
(
�page 143) and "Exterior lamps delayed
switch-off" (
�page 143).
iWith the daytime running lamp mode
activated, the low beam headlamps will
not be switched off automatically.iThe front fog lamps and rear fog lamp
cannot be switched on manually with
exterior lamp switch in position U.
To activate the fog lamps turn exterior
lamp switch to position B.
iSee notes on the exterior lamp switch
(�page 117).
Page 123 of 434
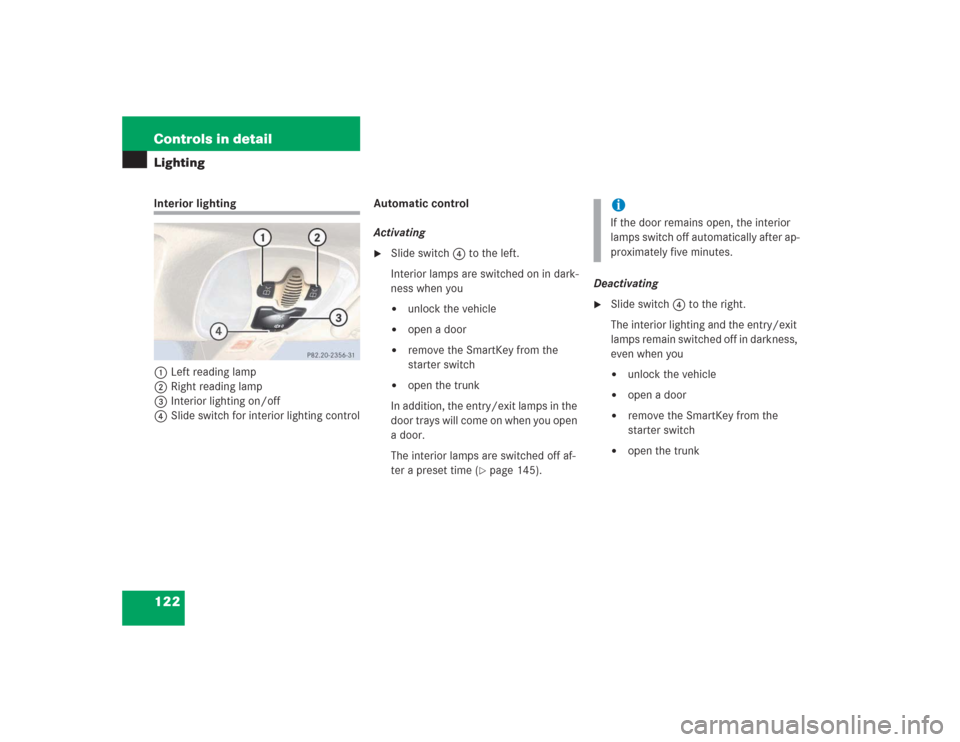
122 Controls in detailLightingInterior lighting
1Left reading lamp
2Right reading lamp
3Interior lighting on/off
4Slide switch for interior lighting controlAutomatic control
Activating
�
Slide switch4 to the left.
Interior lamps are switched on in dark-
ness when you �
unlock the vehicle
�
open a door
�
remove the SmartKey from the
starter switch
�
open the trunk
In addition, the entry/exit lamps in the
door trays will come on when you open
a door.
The interior lamps are switched off af-
ter a preset time (
�page 145).Deactivating
�
Slide switch4 to the right.
The interior lighting and the entry/exit
lamps remain switched off in darkness,
even when you�
unlock the vehicle
�
open a door
�
remove the SmartKey from the
starter switch
�
open the trunk
iIf the door remains open, the interior
lamps switch off automatically after ap-
proximately five minutes.
Page 124 of 434
123 Controls in detail
Lighting
Manual control
Switching lamps on�
Press switch3.
The interior lighting switches on.
Switching lamps off
�
Press switch3 again.
The interior lighting switches off.
Courtesy lighting
For better orientation in the dark, courtesy
lamps will illuminate the interior of your ve-
hicle as follows:
With parking lamps switched on:�
the door handles
�
the driver and passenger footwells
With SmartKey in starter switch position1:
�
the door handles
�
the center console
iThe setting selected for the interior
lighting is used for the trunk lighting as
well.
If you leave the trunk lid open for an ex-
tended period of time, the trunk light-
ing will switch off automatically after
approximately ten minutes.
iIf you turn the SmartKey in the starter
switch to position0 and switch off the
exterior headlamps, the door handle
lamps will remain lit for approximately
five minutes.
Page 135 of 434

134 Controls in detailControl system
Operate the CD player�
Turn on the radio and select the CD
player. Refer to the separate operating
instructions.
�
Press button è or ÿ repeatedly
until the settings for the CD currently
being played are shown in the right dis-
play field.
1Current track
2Current CD (for CD changer)
�
Press button k or j repeatedly
until the desired track is selected.
NAVI menu
The
NAVI
menu contains the functions
needed to operate your navigation system.
�
Press button è or ÿ repeatedly
until you see the message
NAVI
in the
left display.
The message shown in the right display
field depends on the status of the naviga-
tion system:
�
If the navigation system is off, the mes-
sage
NAVI OFF
is shown in the display.
�
If the navigation system is on, the mes-
sage
NAVI READY
is shown in the dis-
play.
Please refer to the COMAND manual for in-
structions on how to activate the route
guidance system.
iFeature description is based on prelim-
inary information available at time of
printing.
Additional optional satellite radio
equipment and a subscription to satel-
lite radio service provider are required
for satellite radio operation. At time of
printing, no date for the availability of
optional equipment required for satel-
lite radio operation had been set. Con-
tact an authorized Mercedes-Benz
Center for details and availability for
your vehicle.
For more information, refer to separate
COMAND operating instructions.
Page 138 of 434

137 Controls in detail
Control system
Settings menu
In the
Settings
menu there are two func-
tions:
�
The function
Reset
, with which you can
reset all the settings to those set at the
factory.
�
A collection of submenus with which
you can make individual settings for
your vehicle.
�
Press button è or ÿ repeatedly
until the
Settings...
menu appears in
the left display.The following settings and submenus are
available:Resetting all settings
You can reset all the functions of all sub-
menus to the factory settings.
�
Press the reset button in the instru-
ment cluster for approximately three
seconds.
In the right display you will see the re-
quest to press the reset button again to
confirm.
�
Press the reset button again.
The functions of all the submenus will
reset to factory settings.
Function
Page
Resetting all settings
137
Submenus in the Settings menu
138
Resetting the functions of a sub-
menu
138
Instrument cluster submenu
140
Lighting submenu
142
Vehicle submenu
145
Convenience submenu
148
iThe settings you have changed will not
be reset unless you confirm the action
by pressing the reset button a second
time.
Page 140 of 434
139 Controls in detail
Control system
The table below shows what settings can
be changed within the various menus. De-
tailed instructions on making individual
settings can be found on the following pag-
es.Instrument cluster
Lighting
Vehicle
Convenience
Select time display mode
Set daytime running
lamp mode (USA only)
Set station selection
mode (radio)
Activate easy-entry/exit
feature
Select temperature dis-
play mode
Set locator lighting
Set automatic locking
Set key-dependency
Select speedometer dis-
play mode
Exterior lamps delayed
switch-off
Tire pressure display*
Set parking position for
exterior rear view mirror
Select language
Interior lighting delayed
switch-off
Page 141 of 434

140 Controls in detailControl systemInstrument cluster submenu
Access the
Inst. cluster
menu via the
Settings
menu. Use the
Inst. cluster
submenu to change the instrument cluster
display settings. The following functions
are available:Selecting time display mode
�
Move the selection marker with the
æ or ç button to the
Inst.
cluster
submenu.
�
Press button j or k repeatedly
until you see this message in the left
display:
Clock
.
The selection marker is on the current
setting.
�
Press æ or ç to set the
12-hour
or
24-hour
time display mode.Selecting temperature display mode
�
Move the selection marker with button
æ or ç to the
Inst. cluster
submenu.
�
Press button j or k repeatedly
until you see this message in the left
display:
Temp. indicator
.
The selection marker is on the current
setting.
�
Press æ or ç to set temperature
unit to degrees Celsius (
°C) or degrees
Fahrenheit (
°F).
Function
Page
Select time display mode
140
Select temperature display
mode
140
Select speedometer display
mode
141
Select language
141
iFor information on setting the time, re-
fer to the separate COMAND operating
instructions.