Page 299 of 435
298 OperationVehicle careEngine cleaning
Prior to cleaning the engine compartment
make sure to protect electrical compo-
nents and connectors from the intrusion of
water and cleaning agents.
Corrosion protection, such as MB Anticor-
rosion Wax should be applied to the engine
compartment after every engine cleaning.
Before applying, all control linkage bush-
ings and joints should be lubricated. The
poly-V-belt and all pulleys should be pro-
tected from any wax.
Vehicle washing
Do not use hot water or wash your vehicle
in direct sunlight. Only use a mild car wash
detergent, such as Mercedes-Benz ap-
proved Car Shampoo.
Thoroughly spray the vehicle with a dif-
fused jet of water. Direct only a very weak
spray towards the ventilation intake. Use
plenty of water and rinse the sponge and
chamois frequently. Rinse with clear water and thoroughly dry
with a chamois. Do not allow cleaning
agents to dry on the finish.
Due to the width of the vehicle, fold in ex-
terior rear view mirrors prior to running the
vehicle through an automatic car wash to
prevent damage to the mirrors.
In the winter, thoroughly remove all traces
of road salt as soon as possible.
When washing the underbody, do not for-
get to clean the inner sides of the wheels.Ornamental moldings
For regular cleaning and care of very dirty
chrome-plated parts, use a chrome clean-
er.
Headlamps, tail lamps, side markers,
turn signal lenses
�
Use a mild car wash detergent, such as
Mercedes-Benz approved Car Sham-
poo, with plenty of water.
To prevent scratches, never apply strong
force and use only a soft, non-scratchy
cloth when cleaning the lenses. Do not at-
tempt to wipe dirty lenses with a dry cloth
or sponge.
iVehicles with KEYLESS-GO*:
If a door handle is hit by a strong jet of
water, and a SmartKey with
KEYLESS-GO* is in close proximity, i.e.
within approx. 3 ft. (approx. 1 m), the
vehicle could be inadvertently locked
or unlocked.
Page 313 of 435
312 Practical hintsWhat to do if …?Messages in the display
The control system shows warning and
malfunction messages in the multifunction
display.
Certain warning and malfunction messag-
es are accompanied by an audible signal.
Address these messages accordingly and
follow the additional instructions given in
this Operator’s Manual.
Selecting the malfunction memory menu in
the control system (
�page 134) displays
both cleared and uncleared messages.
High-priority messages appear in the mul-
tifunction display in red color.
Certain messages of high priority cannot
be cleared from the multifunction display
using the reset button (�page 22).
Other messages of high priority and mes-
sages of less immediate priority can be
cleared from the multifunction display us-
ing the reset button (
�page 22). These are
then stored in the malfunction message
memory (
�page 150).On the pages that follow, you will find a
compilation of the most important warning
and malfunction messages that may ap-
pear in the display. High priority messages
appear on a red background.
Warning!
G
All categories of messages contain impor-
tant information which should be taken note
of and, where a malfunction is indicated, ad-
dressed as soon as possible at an autho-
rized Mercedes-Benz Center.
Failure to repair condition noted may cause
damage not covered by the Mercedes-Benz
Limited Warranty, or result in property dam-
age or personal injury.Warning!
G
No messages will be displayed if either the
instrument cluster or the multifunction dis-
play is inoperative.
Contact your nearest authorized
Mercedes-Benz Center.
iTurning the SmartKey in the starter
switch to position2, or pressing the
KEYLESS-GO* start/stop button twice
causes all lamps as well as the multi-
function display to come on. Make sure
that they are all in working order before
starting your journey.
Page 333 of 435
332 Practical hintsWhat to do if …?Display symbol
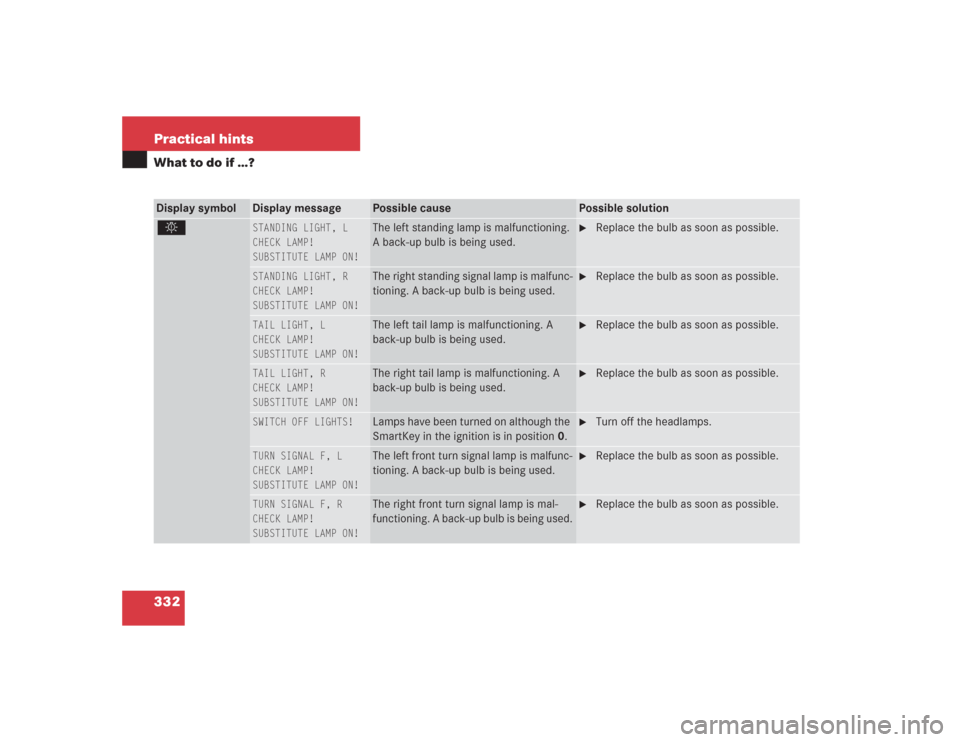
Display message
Possible cause
Possible solution
.
STANDING LIGHT, L
CHECK LAMP!
SUBSTITUTE LAMP ON!
The left standing lamp is malfunctioning.
A back-up bulb is being used.
�
Replace the bulb as soon as possible.
STANDING LIGHT, R
CHECK LAMP!
SUBSTITUTE LAMP ON!
The right standing signal lamp is malfunc-
tioning. A back-up bulb is being used.
�
Replace the bulb as soon as possible.
TAIL LIGHT, L
CHECK LAMP!
SUBSTITUTE LAMP ON!
The left tail lamp is malfunctioning. A
back-up bulb is being used.
�
Replace the bulb as soon as possible.
TAIL LIGHT, R
CHECK LAMP!
SUBSTITUTE LAMP ON!
The right tail lamp is malfunctioning. A
back-up bulb is being used.
�
Replace the bulb as soon as possible.
SWITCH OFF LIGHTS!
Lamps have been turned on although the
SmartKey in the ignition is in position 0.
�
Turn off the headlamps.
TURN SIGNAL F, L
CHECK LAMP!
SUBSTITUTE LAMP ON!
The left front turn signal lamp is malfunc-
tioning. A back-up bulb is being used.
�
Replace the bulb as soon as possible.
TURN SIGNAL F, R
CHECK LAMP!
SUBSTITUTE LAMP ON!
The right front turn signal lamp is mal-
functioning. A back-up bulb is being used.
�
Replace the bulb as soon as possible.
Page 334 of 435
333 Practical hints
What to do if …?
Display symbol
Display message
Possible cause
Possible solution
.
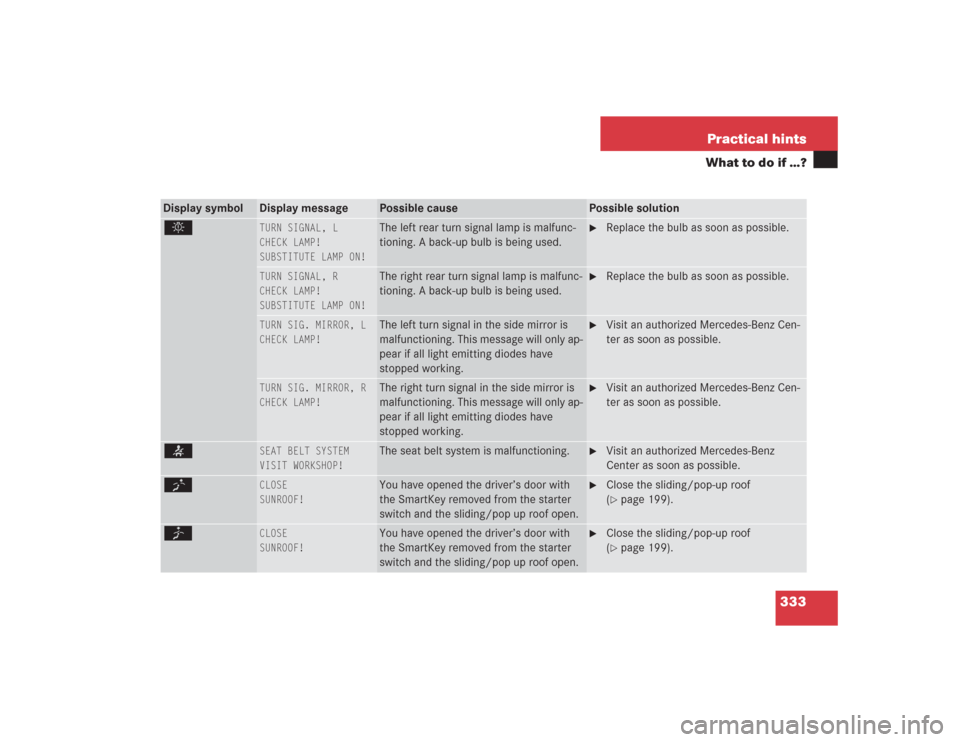
TURN SIGNAL, L
CHECK LAMP!
SUBSTITUTE LAMP ON!
The left rear turn signal lamp is malfunc-
tioning. A back-up bulb is being used.
�
Replace the bulb as soon as possible.
TURN SIGNAL, R
CHECK LAMP!
SUBSTITUTE LAMP ON!
The right rear turn signal lamp is malfunc-
tioning. A back-up bulb is being used.
�
Replace the bulb as soon as possible.
TURN SIG. MIRROR, L
CHECK LAMP!
The left turn signal in the side mirror is
malfunctioning. This message will only ap-
pear if all light emitting diodes have
stopped working.
�
Visit an authorized Mercedes-Benz Cen-
ter as soon as possible.
TURN SIG. MIRROR, R
CHECK LAMP!
The right turn signal in the side mirror is
malfunctioning. This message will only ap-
pear if all light emitting diodes have
stopped working.
�
Visit an authorized Mercedes-Benz Cen-
ter as soon as possible.
<
SEAT BELT SYSTEM
VISIT WORKSHOP!
The seat belt system is malfunctioning.
�
Visit an authorized Mercedes-Benz
Center as soon as possible.
K
CLOSE
SUNROOF!
You have opened the driver’s door with
the SmartKey removed from the starter
switch and the sliding/pop up roof open.
�
Close the sliding/pop-up roof
(�page 199).
J
CLOSE
SUNROOF!
You have opened the driver’s door with
the SmartKey removed from the starter
switch and the sliding/pop up roof open.
�
Close the sliding/pop-up roof
(�page 199).
Page 354 of 435
353 Practical hints
Replacing bulbs
�Replacing bulbs
Safe vehicle operation depends on proper
exterior lighting and signaling. It is there-
fore essential that all bulbs and lamp as-
semblies are in good working order at all
times.
Correct headlamp adjustment is extremely
important. Have headlamps checked and
readjusted at regular intervals and when a
bulb has been replaced. See an authorized
Mercedes-Benz Center for headlamp ad-
justment.
Bulbs Front lamps
iBackup bulbs will be brought into use
when the following lamps malfunction:�
Turn signal lamps
�
Brake lamps
�
Parking lamps
�
Tail lamps
Lamp
Type
1
Additional turn sig-
nal lamps
LED
2
Low beam
1
1Vehicles with Bi-Xenon headlamps*: Low beam
and high beam use the same D2S-35W lamp. Do
not replace the Bi-Xenon bulbs yourself. See an au-
thorized Mercedes-Benz Center.
H7-55 W
Bi -Xenon*
D2S-35 W
3
Turn signal lamp
2357 A
4
Fog lamp
H7-55 W
5
Parking and stand-
ing lamp
W5W
6
Side marker lamp
W5W
7
High beam
H7-55 W
Page 355 of 435
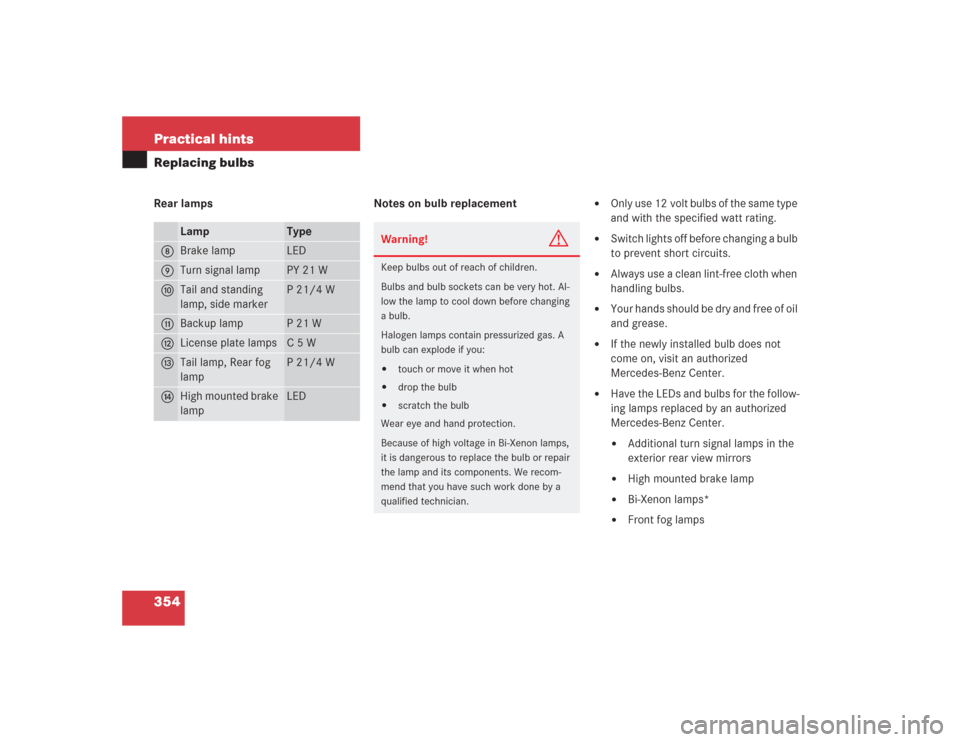
354 Practical hintsReplacing bulbsRear lamps Notes on bulb replacement
�
Only use 12 volt bulbs of the same type
and with the specified watt rating.
�
Switch lights off before changing a bulb
to prevent short circuits.
�
Always use a clean lint-free cloth when
handling bulbs.
�
Your hands should be dry and free of oil
and grease.
�
If the newly installed bulb does not
come on, visit an authorized
Mercedes-Benz Center.
�
Have the LEDs and bulbs for the follow-
ing lamps replaced by an authorized
Mercedes-Benz Center.�
Additional turn signal lamps in the
exterior rear view mirrors
�
High mounted brake lamp
�
Bi-Xenon lamps*
�
Front fog lamps
Lamp
Type
8
Brake lamp
LED
9
Turn signal lamp
PY 21 W
a
Tail and standing
lamp, side marker
P 21/4 W
b
Backup lamp
P21W
c
License plate lamps
C5W
d
Tail lamp, Rear fog
lamp
P 21/4 W
e
High mounted brake
lamp
LED
Warning!
G
Keep bulbs out of reach of children.
Bulbs and bulb sockets can be very hot. Al-
low the lamp to cool down before changing
a bulb.
Halogen lamps contain pressurized gas. A
bulb can explode if you:�
touch or move it when hot
�
drop the bulb
�
scratch the bulb
Wear eye and hand protection.
Because of high voltage in Bi-Xenon lamps,
it is dangerous to replace the bulb or repair
the lamp and its components. We recom-
mend that you have such work done by a
qualified technician.
Page 356 of 435
355 Practical hints
Replacing bulbs
Replacing bulbs for front lamps
1Headlamp cover for fog lamp
2Headlamp cover for high beam halogen
headlamp bulb, parking and standing
lamp
3Headlamp cover for Bi-Xenon* (low and
high beam) or halogen (low beam)
headlamp bulb4Bulb socket for fog lamp
5Bulb socket for parking and standing
lamp
6Electrical connector for high beam
halogen headlamp bulb
7Electrical connector for low beam
headlamp bulb
8Bulb socket for turn signal lampReplacing low beam bulbs
Bi-Xenon* headlamp
Halogen headlamp
�
Switch off the lights.
�
Open the hood (
�page 272).
�
Press the tab on cover3 and remove
cover.
�
Pull connector7 off of the lamp.
�
Release the retaining springs and take
out the bulb.Warning!
G
Do not remove the cover for the Bi-Xenon
headlamp. Because of high voltage in Xenon
lamps, it is dangerous to replace the bulb or
repair the lamp and its components. We rec-
ommend that you have such work done by a
qualified technician.
��
Page 357 of 435
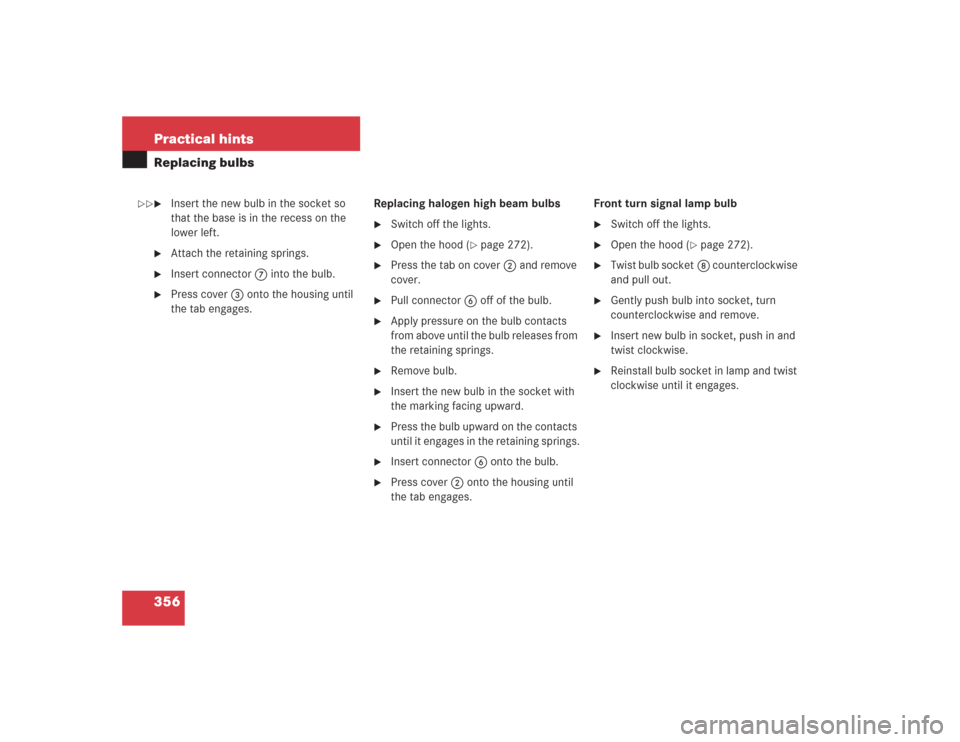
356 Practical hintsReplacing bulbs�
Insert the new bulb in the socket so
that the base is in the recess on the
lower left.
�
Attach the retaining springs.
�
Insert connector7 into the bulb.
�
Press cover3 onto the housing until
the tab engages.Replacing halogen high beam bulbs
�
Switch off the lights.
�
Open the hood (
�page 272).
�
Press the tab on cover2 and remove
cover.
�
Pull connector 6 off of the bulb.
�
Apply pressure on the bulb contacts
from above until the bulb releases from
the retaining springs.
�
Remove bulb.
�
Insert the new bulb in the socket with
the marking facing upward.
�
Press the bulb upward on the contacts
until it engages in the retaining springs.
�
Insert connector6 onto the bulb.
�
Press cover2 onto the housing until
the tab engages.Front turn signal lamp bulb
�
Switch off the lights.
�
Open the hood (
�page 272).
�
Twist bulb socket8 counterclockwise
and pull out.
�
Gently push bulb into socket, turn
counterclockwise and remove.
�
Insert new bulb in socket, push in and
twist clockwise.
�
Reinstall bulb socket in lamp and twist
clockwise until it engages.
��