Page 102 of 435

1Trunk lid closing switch�
Press trunk lid closing switch1 brief-
ly.
The trunk lid")
101 Controls in detail
Locking and unlocking
Closing the trunk lid from the outside
(vehicles without KEYLESS-GO*)
1Trunk lid closing switch�
Press trunk lid closing switch1 brief-
ly.
The trunk lid closes.
If the trunk lid comes into contact with an
object while closing (e.g. luggage that has
been piled too high), the closing procedure
is stopped and the trunk reopens slightly.
Warning!
G
Monitor the closing procedure carefully to
ensure that no one is in danger of being in-
jured. To prevent possible personal injury,
always keep hands and fingers away from
the trunk opening when closing the trunk.
Be especially careful when small children
are around. To stop the closing procedure,
press the remote trunk lid switch (on the
driver’s door), the trunk lid closing
switch1, or the Š button on the
SmartKey.
When leaving the vehicle, always remove the
SmartKey from the starter switch, take the
SmartKey with you and lock your vehicle. Do
not leave children unattended in the vehicle,
or with access to an unlocked vehicle. Unsu-
pervised use of vehicle equipment may
cause an accident and/or serious personal
injury.
Warning!
G
Only drive with the trunk closed as, among
other dangers such as visibility blockage,
exhaust fumes may enter the vehicle interi-
or.iDo not place the SmartKey in the open
trunk. You may lock yourself out.
Page 103 of 435

1Trunk lid closing switch�
Make sure you have the SmartKey with
KEYLESS-GO with you.
�
P")
102 Controls in detailLocking and unlockingClosing the trunk lid from the outside
(vehicles with KEYLESS-GO*)
1Trunk lid closing switch�
Make sure you have the SmartKey with
KEYLESS-GO with you.
�
Press trunk lid closing switch1 brief-
ly.
The trunk lid closes.
If the trunk lid comes into contact with an
object while closing (e.g. luggage that has
been piled too high), the closing procedure
is stopped and the trunk reopens slightly.
Warning!
G
Monitor the closing procedure carefully to
ensure that no one is in danger of being in-
jured. To prevent possible personal injury,
always keep hands and fingers away from
the trunk opening when closing the trunk.
Be especially careful when small children
are around. To stop the closing procedure,
press the trunk lid closing switch (on the
driver’s door), the trunk lid closing
switch
1
or the Š button on the
SmartKey.
When leaving the vehicle, always remove the
SmartKey from the starter switch, take the
SmartKey with KEYLESS-GO* with you, and
lock your vehicle. Do not leave children un-
attended in the vehicle, or with access to an
unlocked vehicle. Unsupervised use of vehi-
cle equipment may cause an accident
and/or serious personal injury.
Warning!
G
Only drive with the trunk closed as, among
other dangers such as visibility blockage,
exhaust fumes may enter the vehicle interi-
or.iTo prevent a possible inadvertent lock-
out, the trunk lid will open automatical-
ly if a SmartKey with KEYLESS-GO is
recognized inside the vehicle or in the
trunk.
Page 118 of 435
. The driver")
117 Controls in detailSeats
Seat ventilation*
The switch is located on the door. Seat
ventilation can be activated manually with
the SmartKey in starter switch position1
or2 (
�page 31). The driver’s seat ventila-
tion can be activated automatically by the
summer opening feature (
�page 197).
The blue indicator lamps on the switch
show the ventilation level selected:
1Seat ventilation switch
�
Switch on ignition.
Switching on seat ventilation
�
Press switch1.
Three blue indicator lamps above the
switch come on.
Continue pressing switch1 until the
desired seat ventilation level is
reached.Switching off seat ventilation
�
Press switch1 repeatedly until all in-
dicator lamps go out.
Level3
Three indicator lamps on
2
Two indicator lamps on
1
One indicator lamp on
off
No indicator lamp on
iThe seat ventilation for the driver’s seat
is automatically set to the highest level
if activated via summer opening fea-
ture (
�page 197).
!If one or all of the lamps on the seat
ventilation switch are flashing, there is
insufficient voltage since too many
electrical consumers are switched on.
The seat ventilation switches off auto-
matically.
The seat ventilation will switch back on
again automatically as soon as suffi-
cient voltage is available.
Page 125 of 435
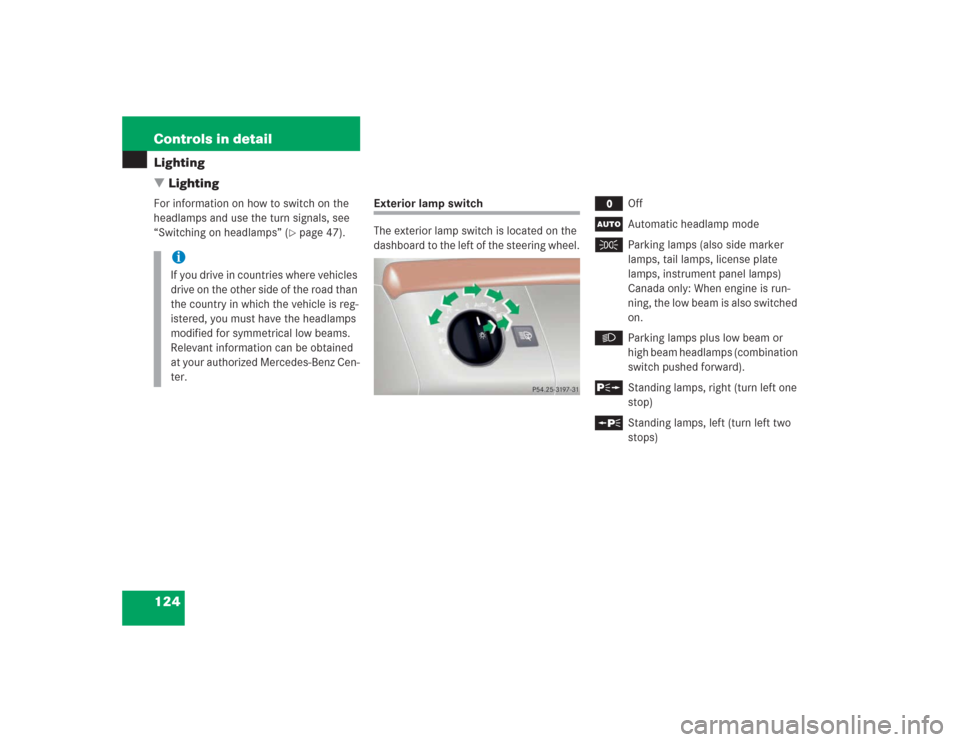
124 Controls in detailLighting
�LightingFor information on how to switch on the
headlamps and use the turn signals, see
“Switching on headlamps” (
�page 47).
Exterior lamp switch
The exterior lamp switch is located on the
dashboard to the left of the steering wheel.
M
Off
U
Automatic headlamp mode
C
Parking lamps (also side marker
lamps, tail lamps, license plate
lamps, instrument panel lamps)
Canada only: When engine is run-
ning, the low beam is also switched
on.
B
Parking lamps plus low beam or
high beam headlamps (combination
switch pushed forward).
ˆ
Standing lamps, right (turn left one
stop)
‚
Standing lamps, left (turn left two
stops)
iIf you drive in countries where vehicles
drive on the other side of the road than
the country in which the vehicle is reg-
istered, you must have the headlamps
modified for symmetrical low beams.
Relevant information can be obtained
at your authorized Mercedes-Benz Cen-
ter.
Page 127 of 435

126 Controls in detailLighting
Daytime running lamp mode�
Turn exterior lamp switch to
positionM orU.
When the engine is running, the low beam
headlamps are automatically switched on.
In low ambient light conditions, the parking
lamps will also switch on.
Canada only
When you shift from a driving position to
positionN orP, the low beam switches off
(with a three-minute delay).
For nighttime driving you should turn the
exterior lamp switch to positionB to
permit activation of the high beam head-
lamps.USA only
The high beam headlamps can also be ac-
tivated when driving with the daytime run-
ning lamp mode activated and exterior
lamp switch in positionM.
To activate the daytime running lamp
mode, see “Setting daytime running lamp
mode (USA only)” (
�page 156).
Locator lighting and night security illu-
mination
Locator lighting and night security illumi-
nation are described in the control system
section under “Setting locator lighting”
(
�page 156) and “Setting night security il-
lumination” (
�page 157).
iWith the daytime running lamp mode
activated, the low beam headlamps will
not switch off automatically.iThe front fog lamps and rear fog lamp
cannot be switched on manually with
exterior lamp switch in positionU.
To activate the fog lamps, turn exterior
lamp switch to positionB and pull
the exterior lamp switch to first or
second stop (
�page 127).
iSee notes on the exterior lamp switch
(�page 124).
Page 129 of 435
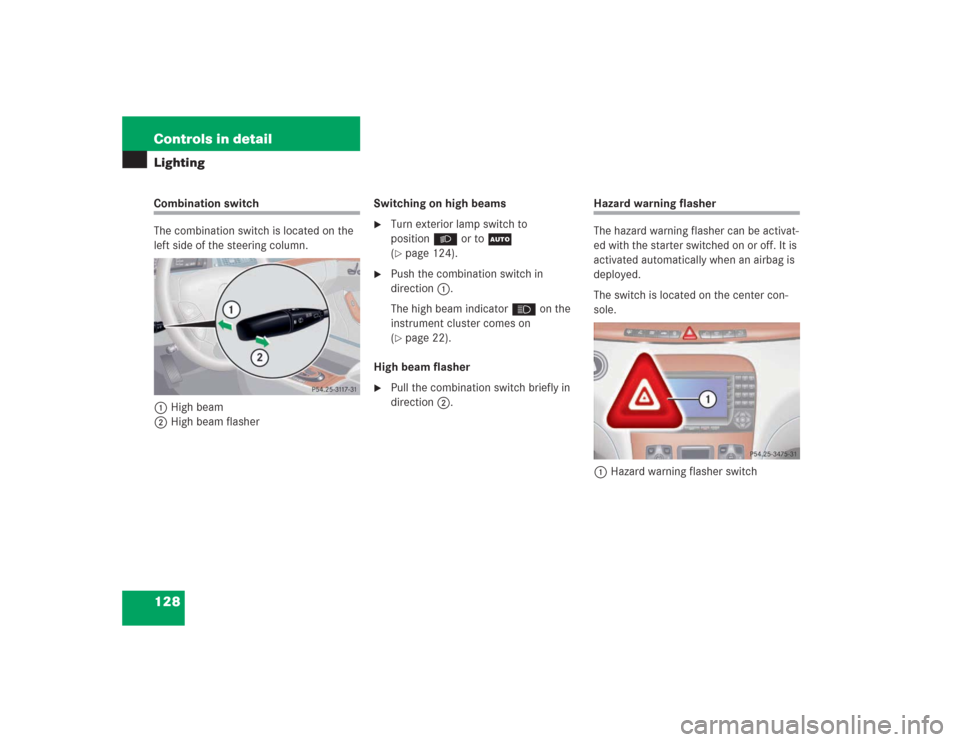
128 Controls in detailLightingCombination switch
The combination switch is located on the
left side of the steering column.
1High beam
2High beam flasherSwitching on high beams
�
Turn exterior lamp switch to
positionB or toU
(�page 124).
�
Push the combination switch in
direction1.
The high beam indicatorA on the
instrument cluster comes on
(�page 22).
High beam flasher
�
Pull the combination switch briefly in
direction2.
Hazard warning flasher
The hazard warning flasher can be activat-
ed with the starter switched on or off. It is
activated automatically when an airbag is
deployed.
The switch is located on the center con-
sole.
1Hazard warning flasher switch
Page 143 of 435

142 Controls in detailControl systemCD changer* operating mode
General notes
Should excessively high temperatures oc-
cur while in CD mode,
CD TEMP HIGH
will
appear on the display and muting will take
place. The unit will then switch back to the
last operating mode used until the temper-
ature has decreased to a safe operating
level.
Should excessively low temperatures oc-
cur while in CD mode,
CD TEMP LOW
will ap-
pear on the display, but the CD will
continue to play.
Handle CDs carefully to prevent interfer-
ence during playback. Avoid fingerprints
and dust on CDs. Do not write on CDs or
apply any label or other material to them.
Only use original CDs. Using copied CDs
may create problems during playback.Clean CDs from time to time with a com-
mercially available cleaning cloth. No sol-
vents, anti-static sprays, etc. should be
used for cleaning. Replace the CD in its
case after use. Protect CDs from heat and
direct sunlight.
Only use CDs, which bear the label shown
and that conform to the compact disc dig-
ital audio standard (IEC 60908).
Use of CDs which do not meet this stan-
dard may cause damage to the CD chang-
er. Do not play single-CDs (80 mm) with an
adapter.For information on operating the CD
changer, refer to the separate COMAND
operating instructions.
!Your CD drive has been designed to
play CDs which correspond to the IEC
60908 standard.
If you insert thicker data carriers,
e.g. ones that have data on both sides
(one side with DVD data, the other side
with audio data), they cannot be eject-
ed and will damage the drive.
Page 152 of 435

151 Controls in detail
Control system
�
Press buttonk orj.
The stored messages will now be dis-
played in the order in which the mal-
functions have occurred. See the
“Practical hints” section for malfunc-
tion and warning messages
(�page 312).
Should any malfunctions occur while driv-
ing, the number of malfunctions will reap-
pear in the display when the SmartKey in
the starter switch is turned to position0 or
removed from the starter switch.
Settings menu
In the
SETTINGS
menu there are two func-
tions:
�
The function
RESET WITH R BUTTON FOR
3 SEC.
, with which you can reset all
settings to the original factory settings.
�
A collection of submenus with which
you can make individual settings for
your vehicle.
�
Press buttonè orÿ repeatedly
until the
SETTINGS
menu appears in the
display.Resetting all settings
You can reset all the functions of all sub-
menus to the factory settings.
�
Press the reset button on the instru-
ment cluster (
�page 22) for approxi-
mately three seconds.
In the display you will see the request
to press the reset button again to con-
firm.
�
Press the reset button again.
The functions of all the submenus will
reset to factory settings.
iThe message memory will be cleared
when you turn the SmartKey in the
starter switch to position1 or2. You
will then only see high priority malfunc-
tions (
�page 312).
iThe settings you have changed will not
be reset unless you confirm the action
by pressing the reset button a second
time.
Due to safety reasons, resetting all of
the settings while driving will not reset
all of the values in the
LIGHTING
or the
VEHICLE
menu.