Page 113 of 227

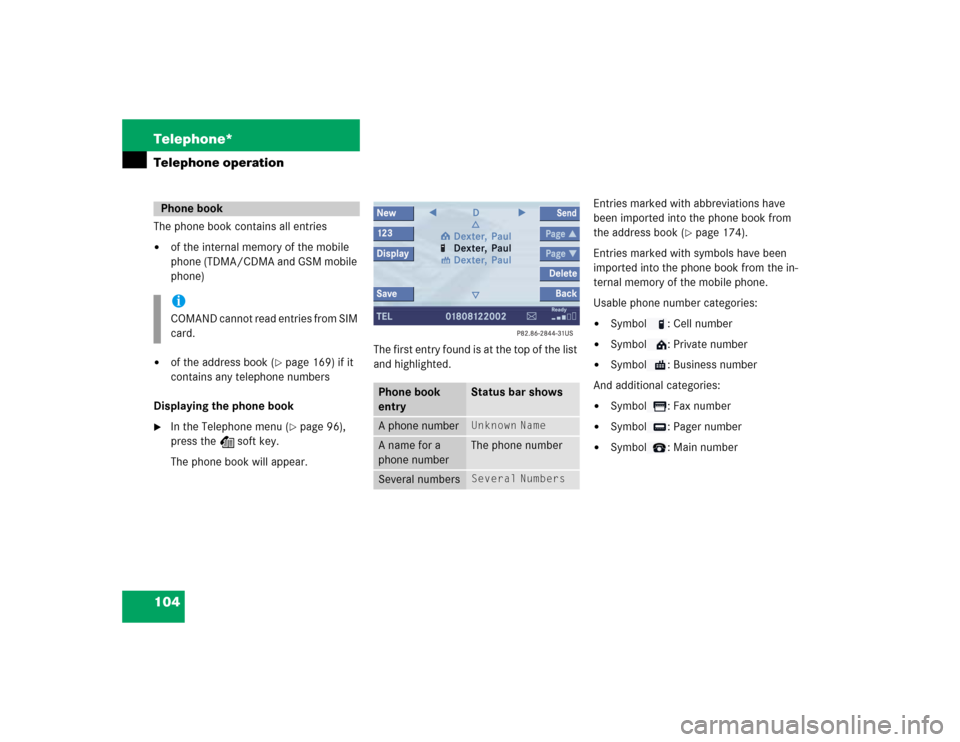
104 Telephone*Telephone operationThe phone book contains all entries�
of the internal memory of the mobile
phone (TDMA/CDMA and GSM mobile
phone)
�
of the address book (
�page 169) if it
contains any telephone numbers
Displaying the phone book
�
In the Telephone menu (
�page 96),
press the Z soft key.
The phone book will appear.The first entry found is at the top of the list
and highlighted. Entries marked with abbreviations have
been imported into the phone book from
the address book (
�page 174).
Entries marked with symbols have been
imported into the phone book from the in-
ternal memory of the mobile phone.
Usable phone number categories:
�
Symbol : Cell number
�
Symbol : Private number
�
Symbol : Business number
And additional categories:
�
Symbol : Fax number
�
Symbol : Pager number
�
Symbol : Main number
Phone bookiCOMAND cannot read entries from SIM
card.
Phone book
entry
Status bar shows
A phone number
Unknown
Name
A name for a
phone number
The phone number
Several numbers
Several
Numbers
Page 114 of 227

105 Telephone*
Telephone operation
You can select the following functions:�
Changing the phone book display at
the COMAND
�
Selecting a phone book entry and
dialing the number (
�page 105)
�
Entering and saving a new phone book
entry (
�page 106)
�
Deleting a phone book entry at the
COMAND (
�page 108)
Changing the phone book display
�
Open the phone book (
�page 104).
�
Press the
123
soft key.
The display changes to numbers. The
status bar displays the name of the
marked entry.
or
�
Press the
ABC
soft key.
The display changes to names. The
status bar displays the number of the
marked entry.
Selecting a phone book entry and
dialing the number
�
Open the phone book (
�page 104).
The list of phone book entries with
names starting with a certain letter is
displayed.
Changing the initial letters
�
Press H or h one or several times.
With every push of the button the
display changes to the next possible
letter. At the end of the letter list
follows the category
Other
.Category
Other
:
Here, all entries without names or with
names starting with a special character
(e.g. * or #) are put together.
Selecting an entry
�
Change the initial letter if required.
�
Use G or g to select a list entry.iIf you hold one of the buttons, scrolling
is accelerated.
Page 115 of 227

106 Telephone*Telephone operationBegin dialing�
Press k.
or
�
Press E.
If the selected entry is an address book
entry (several phone numbers): �
Use g or G to select
Home
,
Cell
or
Work
.
If the selected entry is a cell phone
entry (several phone numbers):
�
Use g or G to select one of the
phone number categories,
e.g. (
�page 104).
�
Press k.
or
�
Press E.
The telephone dials the number.New phone book entry
You can save entries from the following
lists as phone book entries in the internal
memory of the mobile phone or in the
address book:
�
Dialed numbers list (
�page 100)
�
Answered calls list (
�page 101)
�
Select the desired entry from one of
the lists.
�
Press the
Save
soft key.
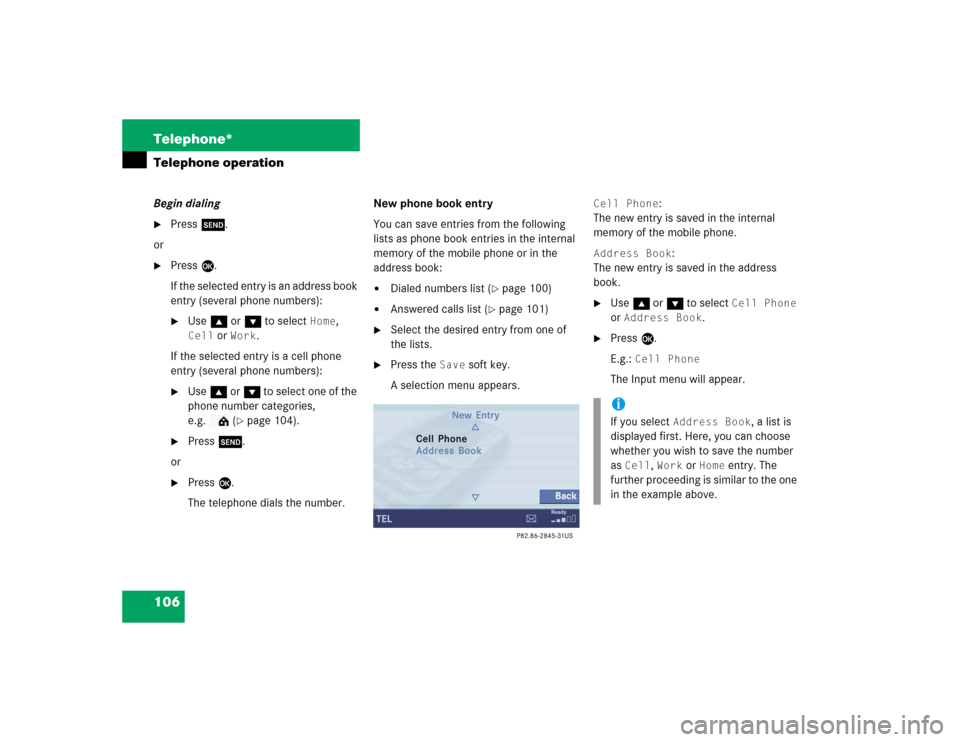
A selection menu appears.
Cell Phone
:
The new entry is saved in the internal
memory of the mobile phone.
Address Book
:
The new entry is saved in the address
book.
�
Use g or G to select
Cell Phone
or
Address Book
.
�
Press E.
E.g.:
Cell Phone
The Input menu will appear.iIf you select
Address Book
, a list is
displayed first. Here, you can choose
whether you wish to save the number
as
Cell
, Work
or
Home
entry. The
further proceeding is similar to the one
in the example above.
Page 116 of 227
107 Telephone*
Telephone operation
Input menu
The phone number is automatically en-
tered in the
Number
input field. The
Name field is automatically marked
and shows no name or the last name
entered.Entering a name or number
�
Use g or G to select the name or
the number field.
You can input data:�
using the selection menu
�
via the number keys 1 - #
Using the selection menu:
�
Press the
Keypad
soft key.
The selection menu appears.
Selection menu
�
Enter the data using the selection
menu (
�page 191).
After input using the selection menu,
the input menu is displayed again. You
can select the next data field and enter
data.
Input via the number keys 1 - #:
�
Use buttons 1 - # to enter the data
(�page 193).
Page 119 of 227

110 NavigationImportant notesWarning
G
For safety reasons, you should only enter a
destination when the vehicle is stationary.
When the vehicle is in motion, a passenger
should enter the destination. Study manual
and select route before driving.
Do not watch display screen or operate but-
tons while the vehicle is in motion - let voice
instructions guide you. Stop at a safe locati-
on before using buttons or making correc-
tions.
Traffic regulations always have priority over
any route recommendations given.
Bear in mind that at a speed of just 30 mph
(approximately 50 km/h), your car is co-
vering a distance of 50 feet (approximately
14 m) every second.
The route calculated by COMAND is a re-
commendation on how to best reach your
selected destination.
During route guidance, you will not receive
any information on�
Traffic lights
�
Stop and yield signs
�
Parking or stopping zones
�
One-way streets
�
Narrow bridges
�
Similar traffic regulation data
You should therefore always strictly observe
traffic regulations while driving. Drive care-
fully and always obey traffic laws and road
signs even if they contradict COMAND in-
structions.
Warning
G
The Navigation DVD module contains a
Class 1 laser product. There is a danger of
invisible laser radiation if the cover is ope-
ned or damaged.
Do not remove the cover. The Navigation
DVD module does not contain any parts ser-
viceable by the user. For safety reasons,
have any necessary service work performed
only by qualified personnel.
� Important notes
Page 121 of 227
112 NavigationImportant notesIf your vehicle has been transported (e.g.
by a car, train or ferry) the system may
make navigation announcements which do
not correspond to the vehicle’s position.
The system needs to redetermine its
position.
Determining the location after the
vehicle has been transported
The system will need some time to
determine its location after the car has
been transported. The time required for
the system to do so varies from case to
case.
�
Switch the COMAND on.
�
Activate the Navigation main menu
(�page 114).
The navigation DVD needs to be in the
navigation computer (
�page 111).
�
Drive and press c.
The display will change to the map
display.
Drive until the position or the road
indicated correspond to the real
circumstances. The system is now
correctly adjusted.
Route guidance after the vehicle has
been transported
Page 123 of 227
114 NavigationNavigation main menu�
Press b.
The Navigation main menu will appear.
�
Use G or g to select a menu item.
�
Press E.
or
�
Press one of the soft keys.
The selected menu or the function of
the selected soft key appears.Selectable Menu Items
�
Continue Route Guidance
:
Resumes interrupted or aborted route
guidance.
Activating the Navigation main
menu iIf a navigation submenu is displayed,
you need to press the button twice.
iIf route guidance is active, a message
appears instead asking you whether
you wish to resume route guidance
(�page 138).
If route guidance has been interrupted
for more than 2 hours, the entry
Continue Route Guidance
will be
on top of the list.
iThis menu item appears if you:�
have aborted route guidance
(�page 138) and less than 30
minutes have elapsed since the
guidance process was aborted
�
have interrupted your journey and
continue it after more than 2 hours
� Navigation main menu
Page 126 of 227

117 Navigation
Navigation main menu
You can set the following for the navigation
announcements:�
Bass and treble control (
�page 117)
�
Balance/fader (
�page 117)
�
Volume (
�page 118)
�
In the Navigation main menu
(�page 114), press the
Setting
soft
key.
The Settings menu will appear.
The announcement
Navigation Is
Not Active
is made.Adjusting bass and treble
�
In the Settings menu, press the
Bass
or
Treble
soft key.
�
Press H or h.
You adjust bass or treble.
�
Press E or the
Back
soft key.
�
Wait until the display changes.
The new setting is saved. The
Navigation main menu appears.
Adjusting balance and fader
�
In the Settings menu, press the
Bal/
Fad
soft key.
Cross-hairs are displayed. The vertical
line indicates the fader setting. The
horizontal line indicates the balance
setting.
�
Press H or h.
Move the cross-hairs horizontally and
adjust the balance.
or
�
Press g or G.
Move the cross-hairs vertically and
adjust the fader.
Audio settings for the navigation
announcements
iBalance defines the sound center
left/right
Fader defines the sound center
front/backiUse F and f to move the cross-
hairs diagonally.