Page 98 of 376
98 Controls in detailSeatsBackrest contour�
Adjust the contour of the backrest to
the desired position using switches2
and 3.
Backrest side bolsters
�
Adjust the backrest side bolsters so
that they provide good lateral support
using switch4.
Heated seats
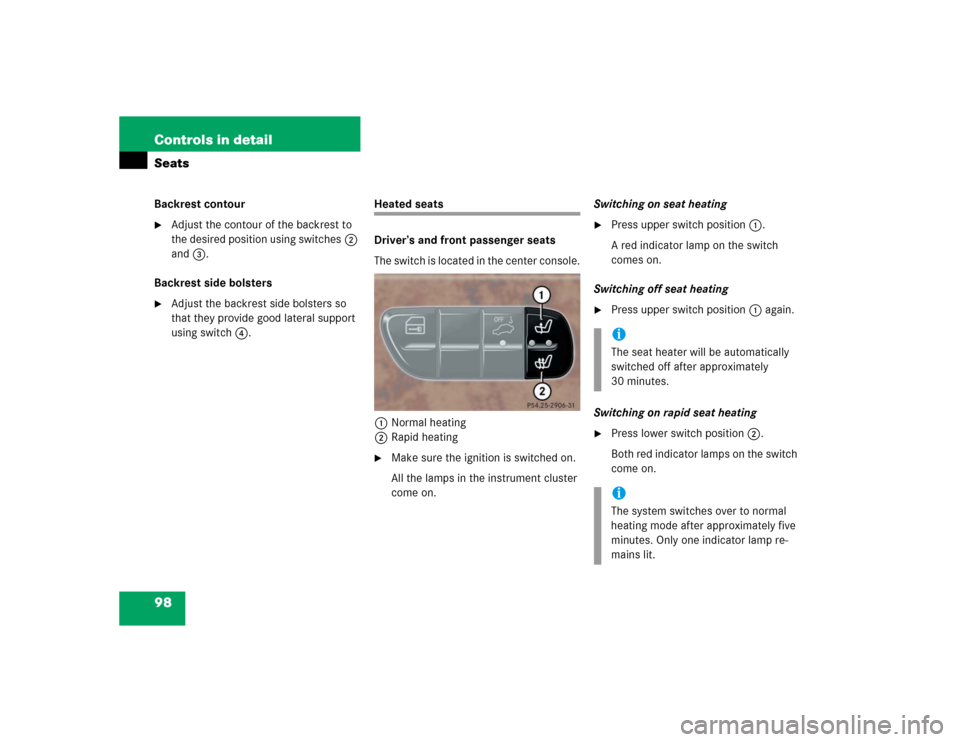
Driver’s and front passenger seats
The switch is located in the center console.
1Normal heating
2Rapid heating�
Make sure the ignition is switched on.
All the lamps in the instrument cluster
come on.Switching on seat heating
�
Press upper switch position1.
A red indicator lamp on the switch
comes on.
Switching off seat heating
�
Press upper switch position1 again.
Switching on rapid seat heating
�
Press lower switch position2.
Both red indicator lamps on the switch
come on.iThe seat heater will be automatically
switched off after approximately
30 minutes.iThe system switches over to normal
heating mode after approximately five
minutes. Only one indicator lamp re-
mains lit.
Page 99 of 376
 pil-
lar.
1Normal heating
2Rapid heating
�
Make sure")
99 Controls in detail
Seats
Switching off rapid seat heating�
Press lower switch position2 again.Rear seats
The switch is located on the B (center) pil-
lar.
1Normal heating
2Rapid heating
�
Make sure the ignition is switched on.
All the lamps in the instrument cluster
come on.Switching on seat heating
�
Press upper switch position1.
A red indicator lamp on the switch
comes on.
Switching off seat heating
�
Press upper switch position1 again.
Switching on rapid seat heating
�
Press lower switch position2.
Both red indicator lamps on the switch
come on.
iIf one or both of the lamps on the seat
heater switch are blinking, there is in-
sufficient voltage available as too many
electrical consumers are turned on.
The seat heater switches off automati-
cally.
The seat heater will switch back on
again automatically as soon as suffi-
cient voltage is available.
iThe seat heater will be automatically
switched off after approximately
30 minutes.iThe system switches over to normal
heating mode after approximately five
minutes. Only one indicator lamp re-
mains lit.
Page 100 of 376
100 Controls in detailSeatsSwitching off rapid seat heating�
Press lower switch position2 again.iIf one or both of the lamps on the seat
heater switch are blinking, there is in-
sufficient voltage available as too many
electrical consumers are turned on.
The seat heater switches off automati-
cally.
The seat heater will switch back on
again automatically as soon as suffi-
cient voltage is available.
Page 188 of 376

188 Controls in detailUseful featuresCigarette lighter
The lighter socket can be used to accom-
modate electrical accessories up to a
maximum of 180 W.
1Cigarette lighter�
Briefly touch the cover plate.
The ashtray opens automatically.
�
Turn the SmartKey in the starter switch
to position1 or2.
�
Push in cigarette lighter1.
The lighter will pop out automatically
when hot.
Electrical outletElectrical outletAn electrical outlet is located in the rear
passenger footwell.�
Turn the SmartKey in the starter switch
to position1 or2.
�
Flip up cover and insert electrical plug
(cigarette lighter type).
Warning!
G
Never touch the heating element or sides of
the lighter; they are extremely hot. Hold the
knob only.
When leaving the vehicle, always remove the
SmartKey from the starter switch. Do not
leave children unattended in the vehicle, or
with access to an unlocked vehicle. Unsu-
pervised use of vehicle equipment may
cause an accident and/or serious personal
injury.
iThe electrical outlet can be used to ac-
commodate electrical consumers (e.g.
air pump, auxiliary lamps) up to a max-
imum of 180 W.
N
Page 208 of 376
, it is advisable to brake the
vehicle with")
208 OperationDriving instructionsPower assistanceBrakesTo help prevent brake disk corrosion after
driving on wet road surfaces (particularly
salted roads), it is advisable to brake the
vehicle with considerable force prior to
parking. The heat generated serves to dry
the brakes.
If your brake system is normally only sub-
jected to moderate loads, you should occa-
sionally test the effectiveness of the
brakes by applying above-normal braking
pressure at higher speeds. This will also
enhance the grip of the brake pads.If the parking brake is released and the
brake warning lamp in the instrument clus-
ter stays on and there is no audible warn-
ing (EBB), the brake fluid level in the
reservoir is too low.
Brake pad wear or a leak in the system may
be the reason for low brake fluid in the res-
ervoir.
Have the brake system inspected immedi-
ately. Contact an authorized
Mercedes-Benz Light Truck Center.
All checks and service work on the brake
system should be carried out by by quali-
fied technicians only. Contact an autho-
rized Mercedes-Benz Light Truck Center.
Install only brake pads and brake fluid
recommended by Mercedes-Benz.Warning!
G
With the engine not running, there is no
power assistance for the brake and steering
systems. In this case, it is important to keep
in mind that a considerably higher degree of
effort is necessary to brake and steer the ve-
hicle.Warning!
G
After driving in heavy rain for some time
without applying the brakes or through wa-
ter deep enough to wet brake components
or salty road conditions, the first braking ac-
tion may be somewhat reduced and in-
creased pedal pressure may be necessary to
obtain expected braking effect. Maintain a
safe distance from vehicles in front.
Resting your foot on the brake pedal will
cause excessive and premature wear of the
brake pads.
It can also result in the brakes overheating,
thereby significantly reducing their effec-
tiveness. It may not be possible to stop the
vehicle in sufficient time to avoid an acci-
dent.
!Be very careful not to endanger other
road users when you apply the brakes.
Refer to the description of the Brake
Assist System (BAS) (
�page 76).
Page 209 of 376

209 Operation
Driving instructions
After hard braking, it is advisable to drive
on for some time, rather than immediately
parking, so the air stream will cool down
the brakes faster.Driving off
Apply the brakes to test them briefly after
driving off. Perform this procedure only
when the road is clear of other traffic.
Warm up the engine smoothly. Do not
place full load on the engine until the oper-
ating temperature has been reached.
When starting off on a slippery surface, do
not allow a drive wheel to spin for an ex-
tended period with the ESP switched off.
Doing so may cause serious damage to the
drivetrain which is not covered by the
Mercedes-Benz Limited Warranty.
To ensure sufficient traction during
off-road driving, activate differential locks
as needed (
�page 150).
Parking
Warning!
G
If other than recommended brake pads are
installed, or other than recommended brake
fluid is used, the braking properties of the
vehicle can be degraded to an extent that
safe braking is substantially impaired. This
could result in an accident.!When driving down long and steep
grades, relieve the load on the brakes
by selecting gear range3,2 or1 on the
automatic transmission to use the en-
gine’s braking power (
�page 142).
This helps prevent overheating of the
brakes and reduces brake pad wear.
Warning!
G
Do not park this vehicle in areas where com-
bustible materials such as grass, hay or
leaves can come into contact with the hot
exhaust system, as these materials could be
ignited and cause a vehicle fire.
To reduce the risk of personal injury as a re-
sult of vehicle movement, before
turning off
the engine and leaving the vehicle always:
�
Keep right foot on brake pedal.
�
Pull the parking brake lever up as many
notches as possible.
�
Move the selector lever to positionP.
�
Slowly release brake pedal.
�
When parked on an incline, turn front
wheel towards the road curb.
�
Turn the SmartKey to starter switch
position0 and remove.
�
Take the SmartKey and lock vehicle
when leaving.