Page 35 of 376

35 Getting started
Adjusting
Seat adjustment
The seat adjustment switches are located
in each front door.
1Head restraint height
2Seat backrest tilt
3Seat fore and aft adjustment
4Seat cushion tilt
5Seat height
�
Turn the SmartKey in the starter switch
to position1 or2 (
�page 33).
or
�
Open the driver’s or front passenger
door.
Seat fore and aft adjustment
�
Press the switch forward or back in the
direction of arrow3.
Adjust to a comfortable seating posi-
tion that still allows you to reach the
accelerator/brake pedal safely. The
position should be as far to the rear as
possible, consistent with ability to
properly operate controls.
A child’s risk of serious or fatal injuries is
significantly increased if the child restraints
are not properly secured in the vehicle and
the child is not properly secured in the child
restraint.
iWhen moving the seat, be sure that�
there are no items in the footwell or
behind the seats
�
the cup holder next to the armrest
is removed (
�page 185)
�
the cup holder in the front passen-
ger footwell is folded closed
(�page 185)
Otherwise you could damage the seats
and/or cup holders.
The memory function (
�page 101) lets
you store the setting for the seat posi-
tion together with the setting for the
steering wheel and the exterior rear
view mirrors.
Page 177 of 376
.
�
Pull release lever1 in direction of ar-
row and fold seat backrest forward un-
til it locks in p")
177 Controls in detail
Loading
Folding seat backrest forward�
Remove the head restraints
(�page 96).
�
Pull release lever1 in direction of ar-
row and fold seat backrest forward un-
til it locks in place.
Folding seat bench forward
�
Fold seat backrest forward.
�
Pull release lever2 in direction of ar-
row and fold seat bench forward to-
gether with the seat backrest.Returning seat bench and seat back-
rest to sitting position
�
Fold up seat bench until it locks in
place.
�
Pull release lever1 and raise seat
backrest until it locks in place.
�
Check to ensure the seat is locked by
pushing and pulling on the seat back-
rest.
Warning!
G
Failure to assure that seats and seat back-
rest are locked into place could result in an
increased chance of injury in an accident.
Never place hands under seat or near any
moving parts while a seat is being adjusted.
For safety reasons, the rear seat bench
must only be adjusted when the vehicle is
stationary.
Never ride vehicle with the tailgate open.
Deadly carbon monoxide (CO) gases may
enter vehicle interior resulting in uncon-
sciousness and death.!Before folding the seat backrest for-
ward and the rear seat bench down, be
sure that all containers in the rear cup
holder are removed.
Warning!
G
Failure to assure that seats and seat back-
rests are locked into place could result in an
increased chance of injury in an accident.
Page 178 of 376
178 Controls in detailLoadingPartition net* (MB Accessory)
Use of the partition net is a particularly im-
portant safety factor when the vehicle is
loaded higher than the top of the seat
backrests with smaller objects.
While the partition net will help protect you
from smaller objects, it cannot prevent the
movement of large, heavier objects into
the passenger area in an accident. Such
items must be properly secured using the
cargo tie-down rings in the cargo compart-
ment floor.The partition net can be installed behind
the seat backrests of the rear seat bench,
or behind the front seats if the rear seat
bench is folded down.Installation behind rear seat bench
1Partition net
2Mounting
�
Fold the rear seat bench forward
(�page 176).
�
Hook partition net1 in mountings2
on both sides.
iInstallation can be performed by open-
ing the rear doors.
iThis cannot be done by folding the rear
seat backrest forward.
Page 179 of 376
179 Controls in detail
Loading
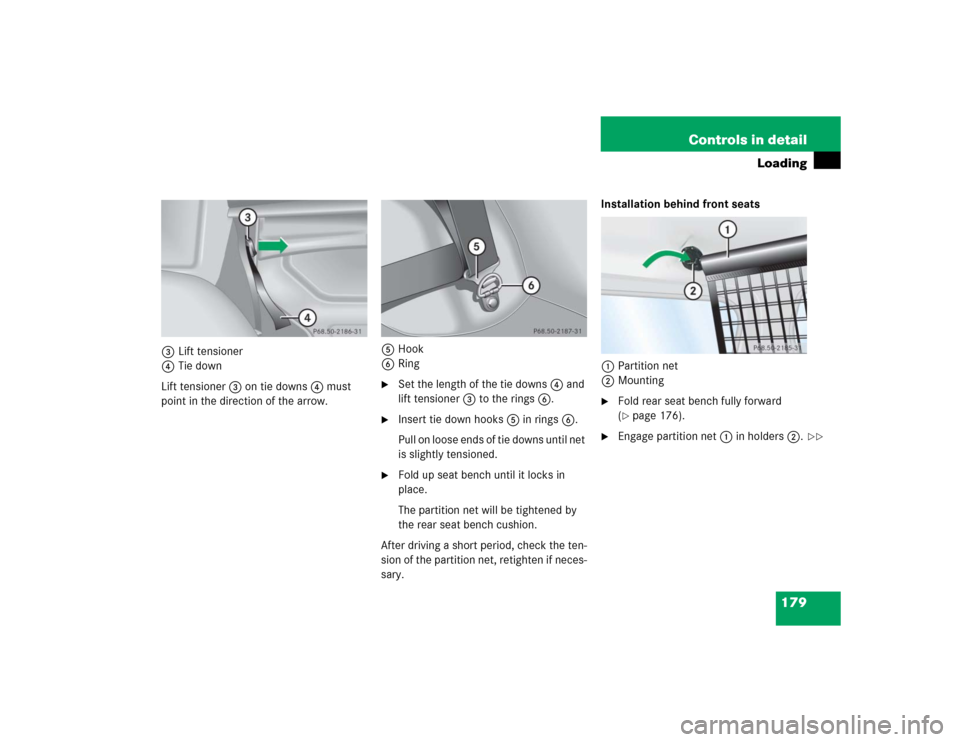
3Lift tensioner
4Tie down
Lift tensioner3 on tie downs4 must
point in the direction of the arrow.5Hook
6Ring
�
Set the length of the tie downs4 and
lift tensioner3 to the rings6.
�
Insert tie down hooks5 in rings6.
Pull on loose ends of tie downs until net
is slightly tensioned.
�
Fold up seat bench until it locks in
place.
The partition net will be tightened by
the rear seat bench cushion.
After driving a short period, check the ten-
sion of the partition net, retighten if neces-
sary.Installation behind front seats
1Partition net
2Mounting
�
Fold rear seat bench fully forward
(�page 176).
�
Engage partition net1 in holders2.
��
Page 181 of 376

181 Controls in detail
Loading
The handling characteristics of a fully load-
ed vehicle depend greatly on the load dis-
tribution. It is therefore recommended to
load the vehicle according to the illustra-
tions shown, with the heaviest items being
placed towards the front of the vehicle.
�
Always place items being carried
against front or rear seat backrests,
and fasten them as securely as possi-
ble.
�
The heaviest portion of the cargo
should always be kept as low as possi-
ble against front or rear seat backrest
since it influences the handling charac-
teristics of the vehicle.
�
For additional safety when transporting
cargo while the rear seats are unoccu-
pied, fasten the outer seat belts cross-
wise into the opposite side buckles.
�
Always pad off sharp edges.
Warning!
G
Always fasten items being carried as secure-
ly as possible using cargo tie-down rings and
fastening materials appropriate for the
weight and size of the load.
In an accident, during hard braking or sud-
den maneuvers, loose items will be thrown
around inside the vehicle, and can cause in-
jury to vehicle occupants unless the items
are securely fastened in the vehicle.
To help avoid personal injury during a colli-
sion or sudden maneuver, always use parti-
tion net when transporting cargo.
Never ride vehicle with the tailgate open.
Deadly carbon monoxide (CO) gases may
enter vehicle interior resulting in uncon-
sciousness and death.
iThe rear cargo compartment is the pre-
ferred place to carry objects. The en-
larged cargo compartment (rear seats
folded) should only be used for items
which do not fit in the rear cargo com-
partment alone.
Page 366 of 376
 346
Roof rack 175
Rotating wheels 238
Rubber parts
Cleaning 249
S
Safety
Occupant 56
Safety belts see Seat belts
Safety systems
Driving 74
Searching
Radio")
366 IndexRON 225
RON (Research Octane Number) 346
Roof rack 175
Rotating wheels 238
Rubber parts
Cleaning 249
S
Safety
Occupant 56
Safety belts see Seat belts
Safety systems
Driving 74
Searching
Radio station 121
Seat adjustment
Synchronizing 95
Seat backrest
Folding forward 177
Returning to sitting position 177
Seat belt force limiter 65Seat belt height adjustment 42
Seat belts 56, 62
Cleaning 248
Fastening 40
Height adjustment 42
Proper use of 42, 64
Safety guidelines 60
Warning lamp 258
Seat bench
Folding forward 177
Returning to sitting position 177
Seat cushion length
Adjusting 97
Seats 94
Adjusting 34
Easy entry/exit feature 94
Heater 98
Multicontour seat* 97
Split rear bench seat 176
Selecting
Display 129Selector lever 25
Lock 43
Position (automatic transmission) 25
Self-test
BabySmart
TM airbag deactivation
system 68
Tele Aid 191
Service
Calling up the service indicator 243
Major service (Service B) 242
Minor service (Service A) 242
Overdue 242
Spare parts 324
Types 242
When due 242
Service and Warranty Booklet
Loss of 325
Service indicator 242
Calling up 243
Clearing 242, 243

Use of the partition net is a particularly im-
portant safety factor when the vehicle is
loaded higher than the top of the seat
backrests w")