Page 7 of 376

Contents
Battery ............................................... 311
Charging the battery .................... 311
Disconnecting the battery ............ 312
Reconnecting the battery ............. 312
Jump starting ..................................... 313
Towing the vehicle ............................. 315
Transporting the vehicle............... 317
Towing the vehicle -
various problem scenarios ........... 317
Front towing eye .......................... 318
Rear towing eye ........................... 318
Freeing a stranded vehicle ........... 318
Fuses ................................................. 319
Fuse box in passenger
compartment ............................... 319
Fuse box in battery box................ 319
Fuse box in front passenger
footwell ........................................ 320
Fuse box in middle tunnel ............ 321
Technical data.................................. 323
Spare parts service............................. 324
Warranty coverage ............................. 325
Loss of Service and Warranty
Information Booklet ...................... 325
Identification labels ............................ 326
Layout of poly-V-belt drive .................. 327
G 500/G 55 AMG ......................... 327
Engine ................................................ 328
Rims and tires .................................... 329
Rims and Tires ............................. 329
Spare wheels ................................ 330
Electrical system ................................ 331
Main dimensions, vehicle weights
and ratings ......................................... 332
Main dimensions........................... 332
Vehicle weights and ratings .......... 332Fuels, coolants, lubricants, etc. .......... 333
Capacities ..................................... 333
Engine oils .................................... 334
Engine oil additives ....................... 335
Air conditioning refrigerant ........... 335
Brake fluid .................................... 335
Premium unleaded gasoline.......... 335
Fuel requirements......................... 336
Gasoline additives......................... 336
Coolants ....................................... 336
Anticorrosion/antifreeze .............. 337
Windshield/rear window washer
system and headlamp cleaning
system .......................................... 339
Consumer information........................ 340
Uniform tire quality grading .......... 340
Technical terms............................... 343Index................................................. 349
Page 243 of 376
.
�
Press buttonk orj on the mul-
tifunction steering w")
243 Operation
Maintenance
Calling up the service indicator�
Switch ignition on.
The standard display of the control sys-
tem appears (
�page 115).
�
Press buttonk orj on the mul-
tifunction steering wheel until the FSS
indicator appears in the multifunction
display.
Resetting the service indicator
In the event that the service on your vehi-
cle is not carried out by an authorized
Mercedes-Benz Light Truck Center, you
can reset the service indicator yourself.�
Switch ignition on.
The standard display of the control sys-
tem appears (
�page 115).
�
Press buttonk orj on the mul-
tifunction steering wheel until the FSS
indicator appears in the multifunction
display.
�
Press the reset button (
�page 25) for
about three seconds.
This message appears in the tachome-
ter:
SERVICE INTERVAL?
RESET WITH R BUTTON FOR 3 SEC.
�
To confirm, press reset button until you
hear a signal.
The service indicator now displays the
reset interval.
iIf the vehicle battery is disconnected,
the days of disconnection will not be in-
cluded in the count shown by the ser-
vice indicator. To arrive at the true
service deadline, you will need to sub-
tract these days from the days shown
in the service indicator.
Do not confuse the service indicator
with the engine oil level indicator :.
iIf the service indicator was inadvertent-
ly reset, have a Mercedes-Benz Light
Truck Center correct it.
Only reset if the proper service has
been performed. Resetting the system
without performing proper service as
called for by the FSS will cause the FSS
to incorrectly determine the next ser-
vice interval which will result in engine
damage not covered by the Mer-
cedes-Benz Limited Warranty.
Page 246 of 376

246 OperationVehicle careEngine cleaning
Prior to cleaning the engine compartment,
make sure to protect electrical compo-
nents and connectors from the intrusion of
water and cleaning agents.
Corrosion protection, such as MB Anticor-
rosion Wax should be applied to the engine
compartment after every engine cleaning.
Before applying, all control linkage bush-
ings and joints should be lubricated. The
poly-V-belt and all pulleys should be pro-
tected from any wax.Vehicle washing
Do not use hot water or wash your vehicle
in direct sunlight. Use only a mild car wash
detergent, such as Mercedes-Benz ap-
proved Car Shampoo.
Thoroughly spray the vehicle with a dif-
fused jet of water. Direct only a very weak
spray towards the ventilation intake. Use
plenty of water and rinse the sponge and
chamois frequently.
Rinse with clear water and thoroughly dry
with a chamois. Do not allow cleaning
agents to dry on the finish.
Due to the width of the vehicle, fold in ex-
terior rear view mirrors prior to running the
vehicle through an automatic car wash to
prevent damage to the mirrors.
In the winter, thoroughly remove all traces
of road salt as soon as possible.
When washing the underbody, do not for-
get to clean the inner sides of the wheels.Ornamental moldings
For regular cleaning and care of very dirty
chrome-plated parts, use a chrome clean-
er.
Headlamps, tail lamps, side marker,
turn signal lenses
�
Use a mild car wash detergent, such as
Mercedes-Benz approved Car Sham-
poo, with plenty of water.
To prevent scratches, never apply strong
force and use only a soft, non-scratchy
cloth when cleaning the lenses. Do not at-
tempt to wipe dirty lenses with a dry cloth
or sponge.
Page 251 of 376
251 Practical hints
What to do if …
Where will I find ...?
Unlocking/locking in an emergency
Opening/closing in an emergency
Brush guard*
Replacing bulbs
Replacing wiper blades
Flat tire
Battery
Jump starting
Towing the vehicle
Fuses
Page 319 of 376
319 Practical hintsFuses
�Fuses
The fuse box is located on the left side of
the cockpit in the passenger compart-
ment. It contains:�
a fuse chart
�
spare fuses
�
a special spare extractor
Additional fuses are located in:
�
battery box
�
front passenger footwell under the
cockpit
�
middle tunnel
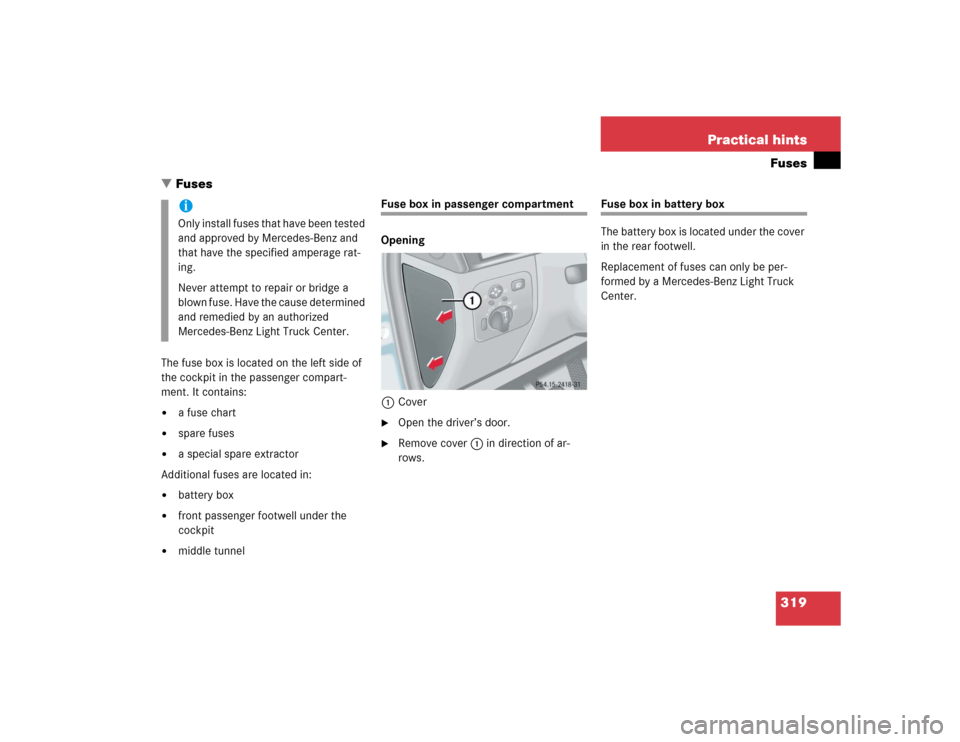
Fuse box in passenger compartment
Opening
1Cover�
Open the driver’s door.
�
Remove cover1 in direction of ar-
rows.
Fuse box in battery box
The battery box is located under the cover
in the rear footwell.
Replacement of fuses can only be per-
formed by a Mercedes-Benz Light Truck
Center.
iOnly install fuses that have been tested
and approved by Mercedes-Benz and
that have the specified amperage rat-
ing.
Never attempt to repair or bridge a
blown fuse. Have the cause determined
and remedied by an authorized
Mercedes-Benz Light Truck Center.
Page 320 of 376
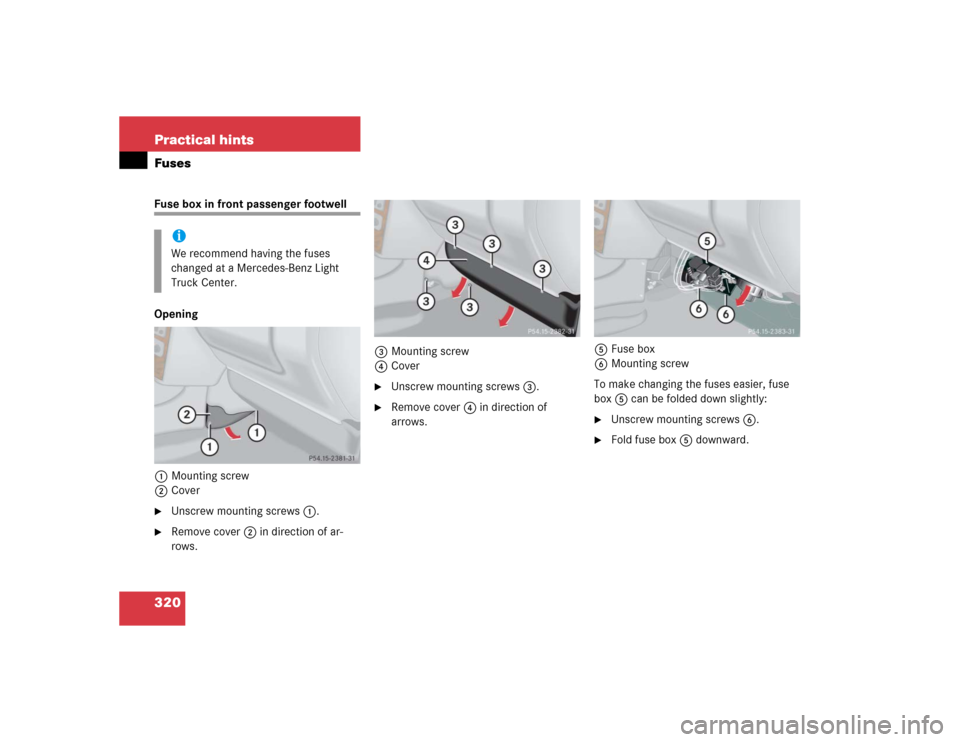
320 Practical hintsFusesFuse box in front passenger footwell
Opening
1Mounting screw
2Cover�
Unscrew mounting screws1.
�
Remove cover2 in direction of ar-
rows.3Mounting screw
4Cover
�
Unscrew mounting screws3.
�
Remove cover4 in direction of
arrows.5Fuse box
6Mounting screw
To make changing the fuses easier, fuse
box5 can be folded down slightly:
�
Unscrew mounting screws6.
�
Fold fuse box5 downward.
iWe recommend having the fuses
changed at a Mercedes-Benz Light
Truck Center.
Page 321 of 376
321 Practical hintsFuses
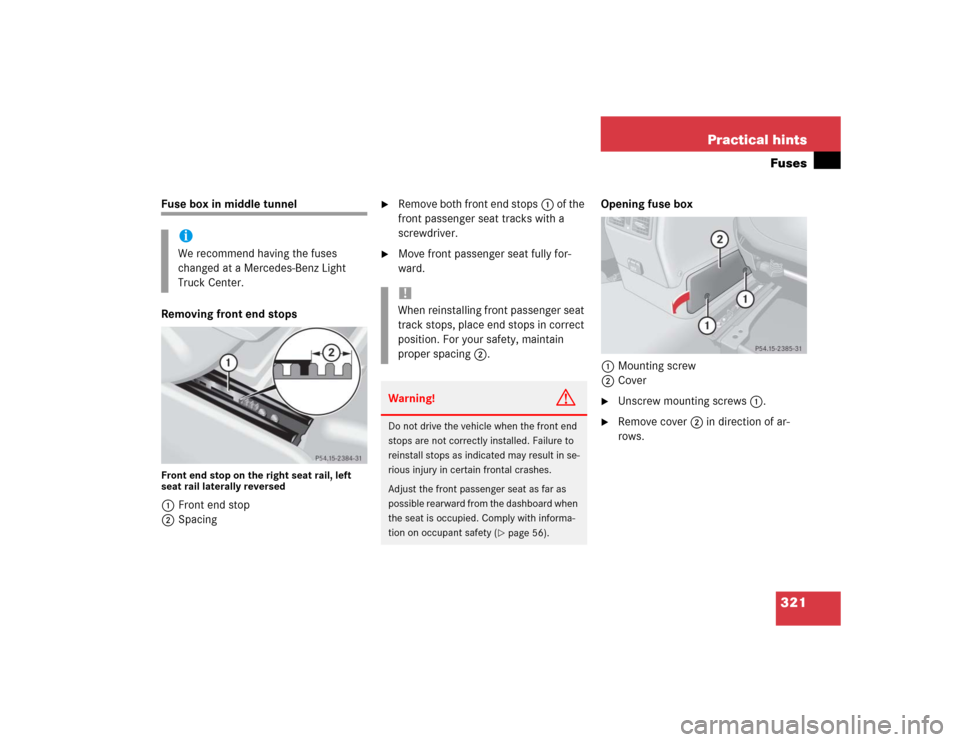
Fuse box in middle tunnel
Removing front end stopsFront end stop on the right seat rail, left
seat rail laterally reversed1Front end stop
2Spacing
�
Remove both front end stops1 of the
front passenger seat tracks with a
screwdriver.
�
Move front passenger seat fully for-
ward.Opening fuse box
1Mounting screw
2Cover
�
Unscrew mounting screws1.
�
Remove cover2 in direction of ar-
rows.
iWe recommend having the fuses
changed at a Mercedes-Benz Light
Truck Center.
!When reinstalling front passenger seat
track stops, place end stops in correct
position. For your safety, maintain
proper spacing2.Warning!
G
Do not drive the vehicle when the front end
stops are not correctly installed. Failure to
reinstall stops as indicated may result in se-
rious injury in certain frontal crashes.
Adjust the front passenger seat as far as
possible rearward from the dashboard when
the seat is occupied. Comply with informa-
tion on occupant safety (
�page 56).
Page 351 of 376

351 Index
Backup lamps 296
Bulbs 296
Replacing bulbs 302
BAS 74, 76, 343
Messages in display 261
Batteries, SmartKey
Changing 288
Check lamp 87
Checking 88
Battery box
Fuse box in 319
Battery discharged
Jump starting 313
Battery, vehicle 235, 311
Charging 311
Disconnecting 312
Messages in display 265, 266
Reconnecting 312
Block heater 240
Blocking rear door window operation 71B-pillar 326
Brake assist system (BAS) 343
Brake fluid 225, 335
Brake lamp bulbs, left and right 296
Brake lamp, high mounted 296
Brake pads
Message in display 266
Brakes 208
Warning lamp 254, 255
Break-in period 206
Brush guard* 293
Lowering 294
Raising and securing 294
Bulbs, replacing
Additional turn signals 295
Backup lamps 296, 302
Brake lamps 296, 302
Front fog lamps 295, 299
Front lamps 295
Front turn signal lamps 295, 300High and low beam 297
High beam lamps 295
High mounted brake lamp 296
License plate lamps 296, 303
Low beam lamps 295
Parking lamps 295, 296, 297
Rear fog lamp 296, 302
Rear turn signal lamps 296
Side marker lamps 295, 300
Standing lamps 295, 296, 297
Tail lamp assemblies 296, 301
C
CAC (Customer Assistance Center) 343
Calling up
Range (distance to empty) 137
Service indicator 243
CAN system 343
Capacities
Fuels, coolants, lubricants, etc. 333
Cargo area see Cargo compartment