Page 292 of 376
292 Practical hintsOpening/closing in an emergency
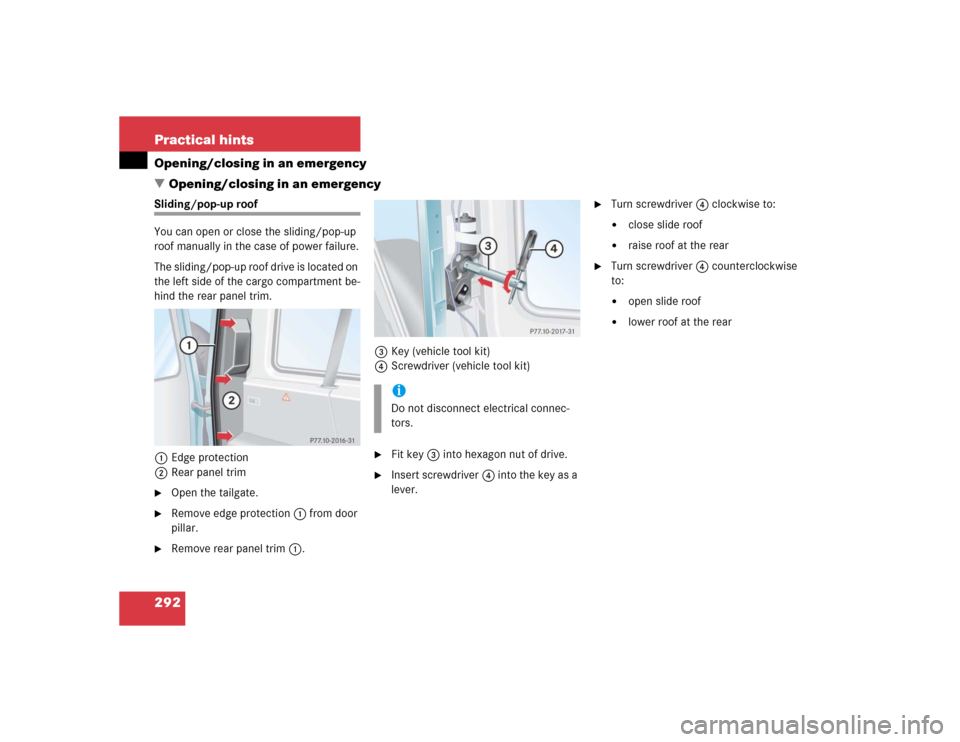
�Opening/closing in an emergencySliding/pop-up roof
You can open or close the sliding/pop-up
roof manually in the case of power failure.
The sliding/pop-up roof drive is located on
the left side of the cargo compartment be-
hind the rear panel trim.
1Edge protection
2Rear panel trim�
Open the tailgate.
�
Remove edge protection1 from door
pillar.
�
Remove rear panel trim1.3Key (vehicle tool kit)
4Screwdriver (vehicle tool kit)
�
Fit key3 into hexagon nut of drive.
�
Insert screwdriver4 into the key as a
lever.
�
Turn screwdriver4 clockwise to:�
close slide roof
�
raise roof at the rear
�
Turn screwdriver4 counterclockwise
to:�
open slide roof
�
lower roof at the rear
iDo not disconnect electrical connec-
tors.
Page 307 of 376
.
Lifting the vehicle
�
Prevent the vehicle from rolling away
by blocking wheels with wheel chocks
(not includ")
307 Practical hints
Flat tire
Mounting the spare wheel�
Prepare the vehicle (
�page 306).
Lifting the vehicle
�
Prevent the vehicle from rolling away
by blocking wheels with wheel chocks
(not included) or other sizable objects.
When changing wheel on a level surface:
�
Place one chock in front of and one be-
hind the wheel that is diagonally oppo-
site to the wheel being changed.
When changing wheel on a hill:
�
Place chocks on the downhill side
blocking both wheels of the other axle.
Wheel wrench�
On wheel to be changed, loosen but do
not yet remove the wheel bolts (ap-
proximately one full turn with wrench).
Warning!
G
The jack is designed exclusively for jacking
up the vehicle under the axle housing. To
help avoid personal injury, use the jack only
to lift the vehicle during a wheel change.
Never get beneath the vehicle while it is sup-
ported by the jack. Keep hands and feet
away from the area under the lifted vehicle.
Always firmly set parking brake and block
wheels before raising vehicle with jack.
Do not disengage parking brake while the
vehicle is raised. Be certain that the jack is
always vertical (plumb line) when in use, es-
pecially on hills. Always try to use the jack
on level surface. Make sure the jack is posi-
tioned correctly under the axle housing. Al-
ways lower the vehicle onto sufficient
capacity jackstands before working under
the vehicle.
If the vehicle is not raised as described, it
could slip off the jack as a result of vibra-
tions (e.g. opening or closing a door or the
tailgate).
Page 352 of 376

352 IndexCargo compartment
Tailgate 89, 90
Tie-down rings 182
Cargo compartment cover 175
Installing 176
Removing 176
Cargo tie-down rings 182
Catalytic converter 222
CD changer 284
CD player
Operating 121
Center console 27
AIRBAG OFF indicator lamp 259
Lower part 28
Upper part 27
Centigrade
Setting temperature units 127
Central locking
From inside 92
Switch 92Switching on/off (control
system) 133
Unlocking from inside 92
Certification label 326
Changing
Batteries (SmartKey) 288
Key setting 133
Charging
Vehicle battery 311
CHECK ENGINE malfunction indicator
lamp 256
Checking
Coolant level 225, 232
Oil level 226, 228
Checklist
Off-road driving 215
Child safety 65
Infant and child restraint systems 56,
62, 66
LATCH child seat anchors 70Child safety switch see Blocking of rear
door window operation
Cigarette lighter 188
Cleaning
Cup holders 248
Gear selector lever 248
Hard plastic trim items 248
Headlamps 153
Headliner 248
Illuminated door sill panels 249
Instrument cluster 248
Leather upholstery 249
Light alloy wheels 248
MB Tex upholstery 249
Plastic and rubber parts 249
Rear Parking Assist sensors* 247
Seat belts 248
Steering wheel 248
Windows 247
Windshield 48
Wiper blades 247
Wood trims 249
Page 353 of 376

353 Index
Climate control 156
Adjusting 159, 160
Defogging windshield 160
Defrosting 160
Rear window defroster 155
Setting the temperature 158
Clock 25
Closing
Glove box 183
Hood 228
Side windows 164
Sliding/pop-up roof 166, 292
Sliding/pop-up roof with
SmartKey 167
Tailgate 90
Windows 164
Windows with SmartKey 165
Closing sliding/pop-up roof
In an emergency 292
Cockpit 22, 343
Cockpit management and data system
(COMAND) 343
COMAND 343
COMAND see separate operating instruc-
tionsCombination switch 23, 107, 108
High beam flasher 47, 108
Turn signals 46
Windshield wipers 47
Control and operation of radio
transmitters 221
Control system 115, 343
AUDIO menu 120
Convenience submenu 133
Display digital speedometer 120
Functions 116, 119
Instrument cluster submenu 127
Lighting submenu 129
Malfunction memory menu 122
Menus 118, 119, 345
Multifunction display 115
Multifunction steering wheel 116
NAVI menu 122
Selecting radio system 121
Settings menu 123
Standard display menu 120Submenus 117, 119
TEL menu 137
Trip computer menu 136
Vehicle submenu 132
Convenience feature 165
Convenience submenu 133
Activating easy-entry/exit
feature 133
Setting key-dependency 135
Setting parking position for exterior
rear view mirror 135
Coolant 232, 336
Adding 233
Anticorrosion/antifreeze
quantity 337
Capacities 333
Checking level 232
Messages in display 268, 269
Temperature 223
Temperature display 112
Warning lamp 268
Coolant level
Checking 225, 232
Page 356 of 376
 144
Emergency operations
Closing sliding/pop-up roof 292
Locking the vehicle 288
Opening sliding/pop-up roof 292
Remote door unlock 197
Unlocking the tai")
356 IndexEmergency operation (Limp Home
Mode) 144
Emergency operations
Closing sliding/pop-up roof 292
Locking the vehicle 288
Opening sliding/pop-up roof 292
Remote door unlock 197
Unlocking the tailgate 287
Unlocking the vehicle 287
Emergency tensioning device see ETD
Emission control 222
Emission control label 326
Ending
A call (telephone) 138
Engine
Compartment 227
Message in display 256
Starting with the key 44
Technical data 328
Turning off with the key 52
Engine cleaning 246Engine compartment 227
Hood 227
Engine malfunction indicator lamp 25,
256
Engine number 344
Engine oil 228, 334
Adding 231
Additives 335, 340
Checking level 228
Consumption 228
Display messages 272
Messages in display 229, 271
Oil dipstick 232
Viscosity 344
Engine oil level see Oil level
Enlarged cargo compartment 176
ESP 25, 74, 78, 344
Messages in display 263
Switching off 79
Switching on 81
Synchronizing 263
Warning lamp 257ETD 56, 65, 344
Safety guidelines 60
Exterior lamp switch 104
Exterior lamps
Delayed switch-off 131
Exterior rear view mirrors
Adjusting 38
Parking position for 135
F
Fahrenheit
Setting temperature units 127
Fastening the seat belts 40
Fine adjustment
Cruise control 171
First aid kit 283
Flat tire 306
Lowering the vehicle 310
Mounting the spare wheel 307
Spare wheel 285
Page 361 of 376

361 Index
Lock button 345
Locking 51, 86
Fuel filler flap 224
Global, SmartKey 87
Separately the tailgate 90
Vehicle in an emergency 288
Loss of keys 88
Loss of Service and Warranty Information
Booklet 325
Low beam headlamps
Messages in display 276
Replacing bulbs 295, 297
LOW RANGE - ABS 75
Lowering
Vehicle 310
Lubricants
Technical data 333
M
Main dimensions 332
Maintenance 242Malfunction
Displaying 122
Rear Parking Assist* 174
Malfunction memory 122
Calling up 122
Clearing 123
Manual headlamp mode 105
Manual operations
Fuel filler flap 290
Interior lighting control 109
Locking the tailgate 90
Locking the vehicle 288
Sliding/pop-up roof 292
Unlocking the driver’s door 287
Unlocking the tailgate 91, 287
Unlocking transmission gear selector
lever 290
MB Tex upholstery
Cleaning 249
Mechanical key 287
Memory function 101, 345
Recalling positions from
memory 102Storing exterior rear view mirror park-
ing positions 103
Storing key dependent settings 102
Menus 116
AUDIO 120
Control system 345
In control system 118, 119
Malfunction memory 122
NAVI 122
Settings menu 123
Standard display 120
Submenus 117
TEL 137
Trip computer 136
Messages in the multifunction display
Symbol messages 265
Text messages 261
Middle tunnel
Fuse box in 321
Miles/kilometers in speedometer
Setting 128
Page 362 of 376

362 IndexMirrors
Activating exterior rear view mirror
parking position 153
Adjusting 38
Automatic antiglare for rear view
mirror 152
Exterior rear view mirror 38
Exterior rear view mirror parking
positions 135
Interior rear view mirror 38
Storing exterior rear view mirror park-
ing position 103
MON 225
MON (Motor Octane Number) 345
Monitoring reach
Rear Parking Assist* 173
Mph or km/h in speedometer
setting 128
Multicontour seat* 97
Multifunction display 115, 345
Selecting language 128
Standard display 119Multifunction display messages
ABS 261
BAS 261
Battery 265, 266
Brake fluid 266
Brake pads 266
Check engine 256
Coolant 268, 269
Display 282
Doors 271
Engine 256
Engine oil level 271
ESP 263
Fuel reserve tank 273
Hood 273
Key 273
Lamps 274, 276
Parking brake 267
Sunroof 281
Tailgate 282
Tele Aid 281
Telephone* 281
Washer fluid 282
Multifunction steering wheel 26, 116
Buttons 116N
Navigation system
Operating 122
See separate COMAND operating in-
structions
Night security illumination 106
Setting 131
O
Occupant safety 56
Airbags 57
Children in the vehicle 65
Fastening the seat belt 40
Infant and child restraint systems 66
LATCH child seat anchors 70
Seat belts 40, 60
Odometer, main 25
Off-road driving 213
Checklist 215
Crossing obstacles 218
Driving through water 217
Returning 220
Rules 214
Special driving features 214
Steep terrain 216
Page 363 of 376

363 Index
Oil
Adding 231
Consumption 228
Dipstick 228
Oil dipstick 232
Viscosity 344
Oil level
Checking 226
One-touch gearshifting 141
Canceling gear range limit 141
Downshifting 141
Upshifting 141
Opening
Ashtray 186
Doors from the inside 89
Fuel filler flap 224
Fuel filler flap manually 290
Glove box 183
Hood 227
Side windows 164
Sliding/pop-up roof 166, 292Sliding/pop-up roof in an
emergency 292
Sliding/pop-up roof with
SmartKey 167
Tailgate 89, 90
Windows 164
Windows with SmartKey 165
Operating
CD player 121
COMAND see separate operating in-
structions
Navigation system 122
Radio 121
Radio transmitters 221
Telephone 137
Operator’s Manual 10
Ornamental moldings 246
Outside temperature indicator 114
Overdue service 242
Overhead control panel 29
Overspeed range 345P
Paintwork 245
Panic alarm 73
Panic button on SmartKey 73
Parcel net
In front passenger footwell 186
Parking 51, 209
Parking brake 44, 51
Engaging 51
Message in display 267
Releasing 44
Parking lamp, front
Replacing bulbs 297
Parking lamps
Replacing bulbs 295, 296
Switching on 104
Parking position
Exterior rear view mirrors 103, 135,
153
Parktronic see Rear Parking Assist*
Partition net* 178
Installing behind front seats 179
Installing behind rear seat bench 178
Removing 180
Parts see Spare parts service