Page 260 of 376

260 Practical hintsWhat to do if …Messages in the multifunction display
The control system shows warning and
malfunction messages in the multifunction
display.
Certain warning and malfunction messag-
es are accompanied by an audible signal.
Address these messages accordingly and
follow the additional instructions given in
this Operator’s Manual.
Selecting the malfunction memory menu in
the control system (
�page 122) displays
both cleared and uncleared messages.
High-priority messages appear in the mul-
tifunction display in red colour.
Certain messages of high priority cannot
be cleared from the multifunction display
using the reset button (�page 112).
Other high-priority messages and messag-
es of less immediate priority (regular dis-
play colours) can be cleared from the
multifunction display using the reset but-
ton and are then stored in the malfunction
message memory (
�page 122).On the pages that follow, you will find a
compilation of the most important warning
and malfunction messages that may ap-
pear in the multifunction display. High-
priority messages appear on a red back-
ground.
Warning!
G
All categories of messages contain impor-
tant information which should be taken note
of and, where a malfunction is indicated, ad-
dressed as soon as possible at an autho-
rized Mercedes-Benz Light Truck Center.
Failure to repair condition noted may cause
damage not covered by the Mercedes-Benz
Limited Warranty, or result in property dam-
age or personal injury.Warning!
G
No messages will be displayed if either the
instrument cluster or the multifunction dis-
play is inoperative. Systems that have a sig-
nificant influence on handling performance
may not be functioning.
Contact your nearest authorized
Mercedes-Benz Light Truck Center.
iTurning the SmartKey in starter switch
to position2 causes all lamps as well
as the multifunction display to come
on. Make sure they are all in working
order before starting your journey.
Page 274 of 376

274 Practical hintsWhat to do if …Display symbol
Display message
Possible cause
Possible solution
.
3RD BRAKE LIGHT
CHECK LIGHT!
The high mounted brake lamp is malfunc-
tioning. This message will only appear if
all light emitting diodes have stopped
working.
�
Visit an authorized Mercedes-Benz
Center as soon as possible.
ADD. TURN SIG., L
CHECK LIGHT!
The left turn signal in the exterior rear
view mirror is malfunctioning. This mes-
sage will only appear if all light emitting
diodes have stopped working.
�
Have the LEDs replaced as soon as
possible.
ADD. TURN SIG., R
CHECK LIGHT!
The right turn signal in the exterior rear
view mirror is malfunctioning. This mes-
sage will only appear if all light emitting
diodes have stopped working.
�
Have the LEDs replaced as soon as
possible.
AUTOM. LIGHT ON
REMOVE KEY!
You have left the SmartKey in the starter
switch.
�
Remove the SmartKey from the starter
switch.
BRAKE LIGHT
DRIVE TO WORKSHOP!
Brake lamp illumination is delayed or
lamp is permanently on.
�
Visit an authorized Mercedes-Benz
Light Truck Center as soon as possi-
ble.
BRAKE LIGHT, L
CHECK LIGHT!
The left brake lamp is malfunctioning.
�
Visit an authorized Mercedes-Benz
Center as soon as possible.
Page 277 of 376

277 Practical hints
What to do if …
Display symbol
Display message
Possible cause
Possible solution
.
MARKER LIGHT, FL
CHECK LIGHT!
The left front side marker lamp is mal-
functioning.
�
Replace the bulb as soon as possible.
MARKER LIGHT, FR
CHECK LIGHT!
The right front side marker lamp is mal-
functioning.
�
Replace the bulb as soon as possible.
REAR FOGLIGHT
CHECK LIGHT!
The rear fog lamp is malfunctioning.
�
Replace the bulb as soon as possible.
REAR FOGLIGHT
TURN OFF
BACK-UP LIGHT ON!
A lamp is malfunctioning. A backup bulb
is being used.
�
Turn the rear fog lamp off.
REVERSE LIGHT, R
CHECK LIGHT!
The right backup lamp is malfunctioning.
�
Replace the bulb as soon as possible.
TAIL LIGHT, L
CHECK LIGHT!
BACK-UP LIGHT ON!
The left tail lamp is malfunctioning. A
backup bulb is being used.
�
Replace the bulb as soon as possible.
TAIL LIGHT, R
CHECK LIGHT!
BACK-UP LIGHT ON!
The right tail lamp is malfunctioning. A
backup bulb is being used.
�
Replace the bulb as soon as possible.
TURN SIG., LF
CHECK LIGHT!
BACK-UP LIGHT ON!
The left front turn signal lamp is malfunc-
tioning. A backup bulb is being used.
�
Replace the bulb as soon as possible.
Page 278 of 376

278 Practical hintsWhat to do if …Display symbol
Display message
Possible cause
Possible solution
.
TURN SIG., RF
CHECK LIGHT
!
BACK-UP LIGHT ON!
The right front turn signal lamp is mal-
functioning. A backup bulb is being
used.
�
Replace the bulb as soon as possi-
ble.
TURN SIG., LR
CHECK LIGHT
!
BACK-UP LIGHT ON!
The left rear turn signal lamp is malfunc-
tioning. A backup bulb is being used.
�
Replace the bulb as soon as possi-
ble.
TURN SIG., RR
CHECK LIGHT!
BACK-UP LIGHT ON!
The right rear turn signal lamp is mal-
functioning. A backup bulb is being
used.
�
Replace the bulb as soon as possi-
ble.
VISIT WORKSHOP!
DISPLAY MALFUNCTION
The display for the lamps or the system
is malfunctioning.
�
Visit an authorized Mercedes-Benz
Light Truck Center as soon as pos-
sible.
TURN SIG. MIRROR, L
CHECK LIGHT!
The left turn signal in the side mirror is
malfunctioning. This message will only
appear if all light emitting diodes have
stopped working.
�
Visit an authorized Mercedes-Benz
Light Truck Center as soon as pos-
sible.
TURN SIG. MIRROR, L
CHECK LIGHT!
The right turn signal in the side mirror is
malfunctioning. This message will only
appear if all light emitting diodes have
stopped working.
�
Visit an authorized Mercedes-Benz
Light Truck Center as soon as pos-
sible.
Page 295 of 376
295 Practical hints
Replacing bulbs
�Replacing bulbs
Safe vehicle operation depends on proper
exterior lighting and signaling. It is there-
fore essential that all bulbs and lamp as-
semblies are in good working order at all
times.
Correct headlamp adjustment is extremely
important. Have headlamps checked and
readjusted at regular intervals and when a
bulb has been replaced. See your autho-
rized Mercedes-Benz Light Truck Center
for headlamp adjustment.
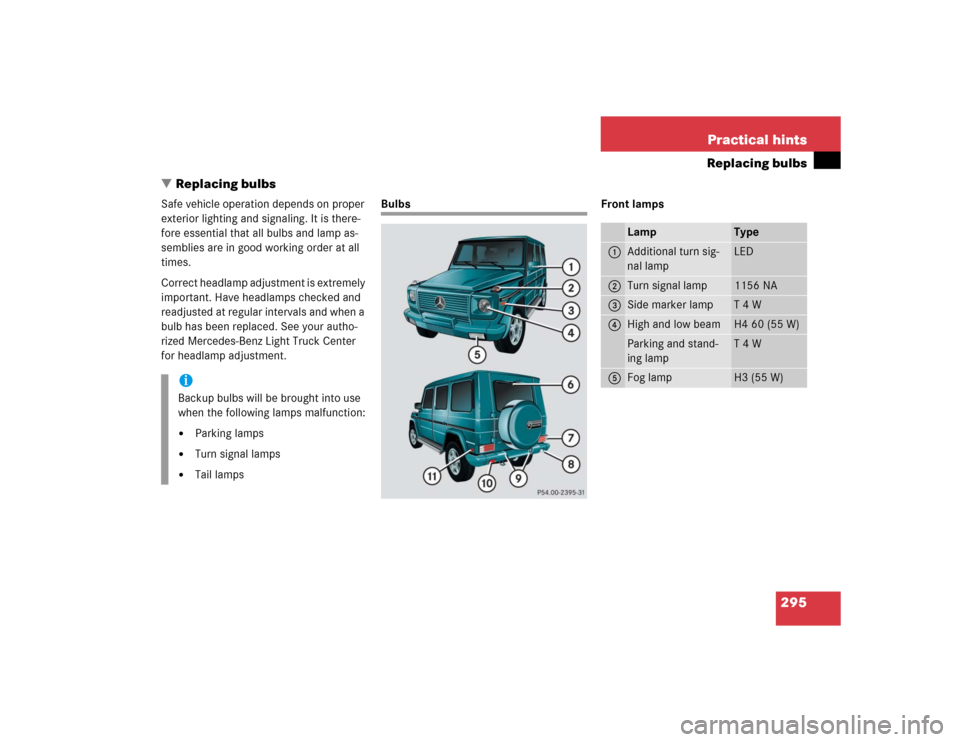
Bulbs Front lamps
iBackup bulbs will be brought into use
when the following lamps malfunction:�
Parking lamps
�
Turn signal lamps
�
Tail lamps
Lamp
Type
1
Additional turn sig-
nal lamp
LED
2
Turn signal lamp
1156 NA
3
Side marker lamp
T 4 W
4
High and low beam
H4 60 (55 W)
Parking and stand-
ing lamp
T 4 W
5
Fog lamp
H3 (55 W)
Page 296 of 376

296 Practical hintsReplacing bulbsRear lamps Notes on bulb replacement
�
Use only 12 volt bulbs of the same type
and with the specified watt rating.
�
Switch lights off before changing a bulb
to prevent short circuits.
�
Always use a clean lint-free cloth when
handling bulbs.
�
Your hands should be dry and free of oil
and grease.
�
If the newly installed bulb does not
come on, visit an authorized
Mercedes-Benz Light Truck Center.
�
Have the LEDs for the following lamps
replaced by an authorized
Mercedes-Benz Light Truck Center.�
The additional turn signals in the ex-
terior rear view mirrors
�
The high mounted brake lamp
Lamp
Type
6
High mounted brake
lamp
LED
7
Turn signal lamp
PY 21 W
Brake lamp
P 21 W
Tail, parking and
standing lamp
R 5 W
8
Backup lamp
P 21 W
9
License plate lamps
C 5 W
a
Rear fog lamp
P 21 W
b
Side marker lamp
T 4 W
Warning!
G
Keep bulbs out of reach of children.
Bulbs and bulb sockets can be very hot. Al-
low the lamp to cool down before changing
a bulb.
Halogen lamps contain pressurized gas. A
bulb can explode if you:�
touch or move it when hot
�
drop the bulb
�
scratch the bulb
Wear eye and hand protection.
iHave the headlamp settings checked
regularly by a Mercedes-Benz Light
Truck Center.
Do not turn the headlamp adjusting
screws. If the adjusting screws are
turned, the headlamp setting must be
checked by a Mercedes-Benz Light
Truck Center.
Page 300 of 376
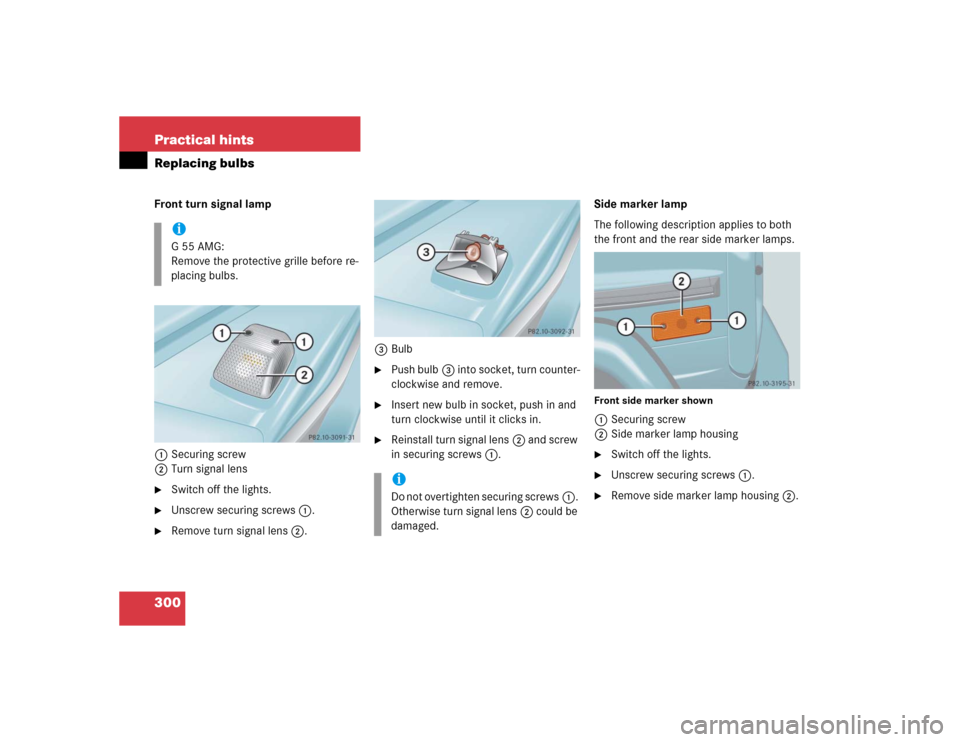
300 Practical hintsReplacing bulbsFront turn signal lamp
1Securing screw
2Turn signal lens�
Switch off the lights.
�
Unscrew securing screws1.
�
Remove turn signal lens2.3Bulb
�
Push bulb3 into socket, turn counter-
clockwise and remove.
�
Insert new bulb in socket, push in and
turn clockwise until it clicks in.
�
Reinstall turn signal lens2 and screw
in securing screws1.Side marker lamp
The following description applies to both
the front and the rear side marker lamps.
Front side marker shown1Securing screw
2Side marker lamp housing�
Switch off the lights.
�
Unscrew securing screws1.
�
Remove side marker lamp housing2.
iG55AMG:
Remove the protective grille before re-
placing bulbs.
iDo not overtighten securing screws1.
Otherwise turn signal lens2 could be
damaged.
Page 302 of 376
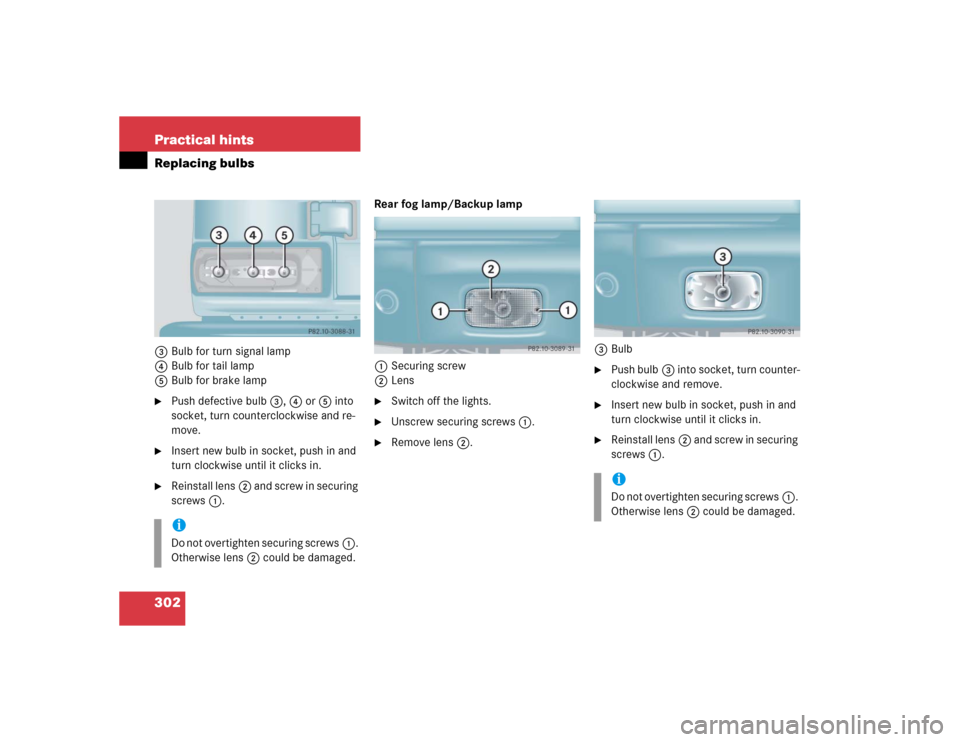
302 Practical hintsReplacing bulbs3Bulb for turn signal lamp
4Bulb for tail lamp
5Bulb for brake lamp�
Push defective bulb3, 4 or5 into
socket, turn counterclockwise and re-
move.
�
Insert new bulb in socket, push in and
turn clockwise until it clicks in.
�
Reinstall lens2 and screw in securing
screws1.Rear fog lamp/Backup lamp
1Securing screw
2Lens
�
Switch off the lights.
�
Unscrew securing screws1.
�
Remove lens2.3Bulb
�
Push bulb3 into socket, turn counter-
clockwise and remove.
�
Insert new bulb in socket, push in and
turn clockwise until it clicks in.
�
Reinstall lens2 and screw in securing
screws1.
iDo not overtighten securing screws1.
Otherwise lens2 could be damaged.
iDo not overtighten securing screws1.
Otherwise lens2 could be damaged.