Page 152 of 376
 and for
setting the exterior rear view mirrors, see
“Exterior r")
152 Controls in detailGood visibility
�Good visibilityFor information on windshield wipers, see
“Windshield wipers” (
�page 47) and for
setting the exterior rear view mirrors, see
“Exterior rear view mirror” (
�page 38).
Rear view mirror
Automatic antiglare rear view mirrors
The reflection brightness of the exterior
rear view mirrors and the interior rear view
mirror will respond automatically to glare
when �
the ignition is switched on, and
�
incoming light from headlamps falls on
the sensor in the interior rear view mir-
ror
The interior rear view mirror will not react if
�
reverse gear is engaged
�
the interior lighting is turned on
Warning!
G
The automatic antiglare function does not
react if incoming light is not aimed directly
at sensors in the interior rear view mirror.
The interior rear view mirror and the exterior
rear view mirrors do not react, for example,
if the cargo compartment is fully loaded.
Glare can endanger you and others.Warning!
G
Exercise care when using the passen-
ger-side exterior rear view mirror. The mirror
surface is convex (outwardly curved surface
for a wider field of view). Objects in mirror
are closer than they appear. Check your in-
side rear view mirror or glance over your
shoulder before changing lanes.
Warning!
G
In the case of an accident, liquid electrolyte
may escape from the mirror housing if the
mirror glass breaks.
Electrolyte has an irritating effect. Do not al-
low the liquid to come into contact with
eyes, skin, clothing, or the respiratory sys-
tem. In case it does, immediately flush af-
fected area with water, and seek medical
help if necessary.
Page 153 of 376

153 Controls in detail
Good visibility
Activating exterior rear view mirror
parking position
Follow these steps to activate the mirror
parking position so that the passen-
ger-side exterior rear view mirror will be
turned downward to the stored position.�
Make sure you stored a parking posi-
tion for the passenger-side exterior
rear view mirror (
�page 103).
�
Make sure the
MIRROR SETTING WHEN
PARKING
function, found under the
CON-
VENIENCE
submenu in the control sys-
tem, is switched to
ON (�page 135).
�
Switch on ignition.
�
Press button2 for the passenger-side
exterior rear view mirror.
�
Place the gear selector lever in reverse
gear R.
The passenger-side exterior rear view
mirror will be turned downward to the
stored position.1Driver’s side exterior rear view mirror
button
2Passenger-side exterior rear view mir-
ror button
The exterior rear view mirror returns to its
previously stored driving position:
�
10 seconds after you put the gear se-
lector lever out of position R
�
immediately once you exceed a vehicle
speed of approx. 6 mph (10 km/h)
�
immediately when you press button1
for driver’s side exterior rear view mir-
ror
Headlamp cleaning system
The switch is located to the left of the
steering column.
1Headlamp washer switch�
Switch on ignition.
�
Press switch1.
The headlamps will be cleaned with a
high-pressure water jet.
Page 154 of 376
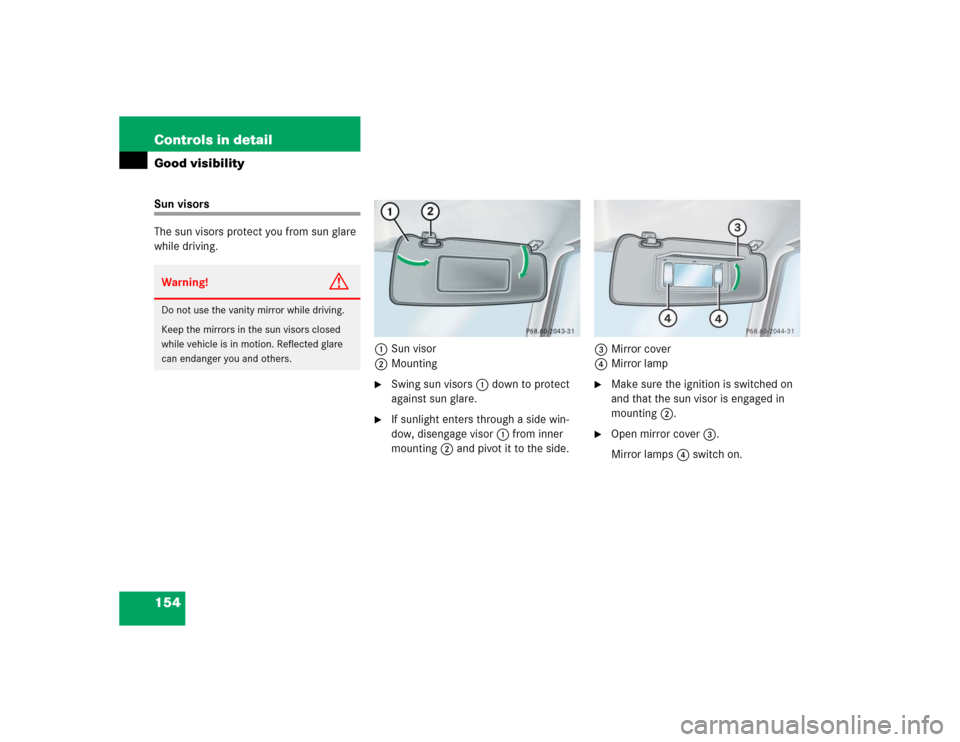
154 Controls in detailGood visibilitySun visors
The sun visors protect you from sun glare
while driving.
1Sun visor
2Mounting
�
Swing sun visors1 down to protect
against sun glare.
�
If sunlight enters through a side win-
dow, disengage visor1 from inner
mounting2 and pivot it to the side.3Mirror cover
4Mirror lamp
�
Make sure the ignition is switched on
and that the sun visor is engaged in
mounting2.
�
Open mirror cover3.
Mirror lamps4 switch on.
Warning!
G
Do not use the vanity mirror while driving.
Keep the mirrors in the sun visors closed
while vehicle is in motion. Reflected glare
can endanger you and others.
Page 172 of 376

172 Controls in detailDriving systemsRear Parking Assist*
The Rear Parking Assist system is an elec-
tronic aid designed to assist the driver dur-
ing parking maneuvers. It visually and
audibly indicates the relative distance be-
tween the rear of the vehicle and an obsta-
cle.
The Rear Parking Assist system is auto-
matically activated when you switch on the
ignition and shift the gear selector lever to
positionR.The Rear Parking Assist system monitors
the rear area of your vehicle by means of
four sensors in the rear bumper.
1SensorsWarning!
G
Rear Parking Assist (rear Parktronic) is a
supplemental system. It is not intended to,
nor does it replace, the need for extreme
care. The responsibility during parking and
other critical maneuvers always rests with
the driver.
Special attention must be paid to objects
with smooth surfaces or low silhouettes
(e.g. trailer couplings, painted posts, or
street curbs). Such objects may not be de-
tected by the system and can damage the
vehicle.
The operational function of the Rear Parking
Assist can be affected by dirty sensors, es-
pecially at times of snow and ice. See
“Cleaning the Rear Parking Assist sensors”
(�page 247).
Interference caused by other ultrasonic sig-
nals (e.g. working jackhammers or the air
brakes of trucks) can cause the system to
send erratic indications, and should be tak-
en into consideration.Warning!
G
Make sure no persons or animals are in the
area in which you are maneuvering. You
could otherwise injure them.
Page 174 of 376

174 Controls in detailDriving systemsWarning indicator
Visual signals indicate to the driver the rel-
ative distance between the sensors and an
obstacle. The warning indicator is located
next to the tailgate.Warning indicatorAs your vehicle approaches an object, one
or more segments will come on, depending
on the distance. When the sixth segment
lights, you have reached the minimum dis-
tance.An intermittent acoustic warning will
sound when the first yellow segment
comes on. This signal quickens with each
additional segment lit. When all segments
illuminate, the acoustic warning becomes
a constant signal. The signal is canceled
when the gear selector lever is placed in
position D or P.
Rear Parking Assist malfunction
There is a malfunction in the Rear Parking
Assist system if:
�
a low warning tone sounds while the
vehicle is reversing
The Rear Parking Assist sensors are
dirty or malfunctioning.�
Clean the Rear Parking Assist sys-
tem sensors (
�page 247).
�
Switch on the ignition again.
�
no segments come on and no warning
sounds
The Rear Parking Assist is malfunction-
ing.�
Have the Rear Parking Assist sys-
tem checked by an authorized
Mercedes-Benz Light Truck Center
as soon as possible.
Malfunction may also be caused by inter-
ference from other radio or ultrasonic sig-
nals.
�
Check the Rear Parking Assist opera-
tion at another location to rule out in-
terference from outside radio or
ultrasonic signals.
Page 199 of 376

199 Controls in detail
Useful features
Programming or reprogramming the in-
tegrated remote control
Step 1:�
Switch on ignition.
Step 2:
�
If you have previously programmed an
integrated signal transmitter button
and wish to retain its programming,
proceed to step 3. Otherwise, press
and hold the two outer signal transmit-
ter buttons2 and4 and release
them only when the indicator light be-
gins to flash after approximately 20
seconds (do not hold the button for
longer than 30 seconds). This proce-
dure erases any previous settings for
all three channels and initializes the
memory. If you later wish to program a
second and/or third hand-held trans-
mitter to the remaining two signal
transmitter buttons, do not repeat this
step and begin directly with step 3.
iCertain types of garage door openers
are incompatible with the integrated
opener. If you should experience diffi-
culties with programming the transmit-
ter, contact your authorized
Mercedes-Benz Light Truck Center, or
call Mercedes-Benz Customer Assis-
tance Center (in the USA only) at
1-800-FOR-MERCedes, or Customer
Service (in Canada) at
1-800-387-0100.
iFor operation in the USA only:
This device complies with Part 15 of
the FCC Rules. Operation is subject to
the following two conditions:
(1) This device may not cause harmful
interference, and
(2) this device must accept any inter-
ference received, including interfer-
ence that may cause undesired
operation.
Any unauthorized modification to this
device could void the user’s authority
to operate the equipment.
��
Page 202 of 376
 to activate the r")
202 Controls in detailUseful featuresOperation of integrated remote control�
Switch on ignition.
�
Select and press the appropriate inte-
grated signal transmitter button (2,
3 or4) to activate the remote con-
trolled device.
The integrated remote control trans-
mitter continues to send the signal as
long as the button is pressed – up to
20 seconds.Erasing the integrated remote control
memory
�
Switch on ignition.
�
Simultaneously hold down the signal
transmitter buttons2 and 4, for ap-
proximately 20 seconds, until the indi-
cator lamp1 blinks rapidly. Do not
hold for longer than 30 seconds.
The codes of all three channels are
erased.Reprogramming a single integrated sig-
nal transmitter button
To program a device using a signal trans-
mitter button previously trained, follow
these steps:
�
Press and hold the desired signal trans-
mitter button (2, 3 or4). Do not re-
lease the button.
�
The indicator lamp will begin to flash af-
ter 20 seconds. Without releasing the
integrated signal transmitter button,
proceed with programming starting
with step 3.
iIf you sell your vehicle, erase the codes
of all three channels.
Page 203 of 376
203 Controls in detail
Useful features
Heated steering wheel
The steering wheel heater warms up the
leather area of the steering wheel.
The stalk with the heated steering wheel
switch is on the lower left-hand side of the
steering wheel.
1Switching on
2Switching off
3Indicator lampSwitching on
�
Switch on the ignition.
All lamps in the instrument cluster
come on.
�
Turn switch at the tip of stalk in direc-
tion of arrow1.
The steering wheel is heated. Indicator
lamp3 comes on.
Switching off
�
Turn switch at the tip of stalk in direc-
tion of arrow2.
The steering wheel heater is turned off.
Indicator lamp3 goes out.iThe steering wheel heater does not
turn off automatically.