Page 342 of 442

342 Practical hintsWhat to do if …Display symbol
Display messages
Possible cause
Possible solution
H
Tire pres. monitor
Visit workshop!
The tire inflation pressure monitor is mal-
functioning.
A wheel without proper sensor was in-
stalled.
�
Have the tire inflation pressure moni-
tor checked by an authorized
Mercedes-Benz Center.
�
Change the wheel (
�page 370).
Tire pres.
Caution, tire defect!
The tire pressure has decreased signifi-
cantly in one or more tires.
�
Check and correct tire pressure as re-
quired (
�page 290).
Tire pres.
Caution, tire defect
One or more tires is deflating.
�
Carefully bring the vehicle to a halt,
avoiding abrubt steering and braking
maneuvers.
�
Change the wheel (
�page 370).
Tire pres.
Check tires!
The tire pressure in one or more tires is
already below the minimum value.
The tire pressure in one or more tires is
low.
�
Carefully bring the vehicle to a halt,
avoiding abrubt steering and braking
maneuvers.
�
Change the wheel (
�page 370).
Warning!
G
Do not drive with a flat tire. A flat tire affects
the ability to steer or brake the vehicle.
You may lose control of the vehicle. Contin-
ued driving with a flat tire will cause exces-
sive heat build-up and possibly a fire.
Page 343 of 442

343 Practical hints
What to do if …
Display symbol
Display messages
Possible cause
Possible solution
H
Tire pres. RL
Caution
Tire defect
The left rear tire is deflating.
�
Carefully bring the vehicle to a halt,
avoiding abrupt steering and braking
maneuvers.
�
Change the wheel (
�page 370).
Tire pres. RL
Check tires!
The left rear tire pressure is low.
�
Carefully bring the vehicle to a halt.
�
Check the tire pressure.
�
Change the wheel (
�page 370).
Tire pres. RR
Caution
Tire defect
The right rear tire is deflating.
�
Carefully bring the vehicle to a halt,
avoiding abrubt steering and braking
maneuvers.
�
Change the wheel (
�page 370).
Tire pres. RR
Check tires!
The right rear tire pressure is low.
�
Carefully bring the vehicle to a halt.
�
Check the tire pressure.
�
Change the wheel (
�page 370).
Warning!
G
Do not drive with a flat tire. A flat tire affects
the ability to steer or brake the vehicle.
You may lose control of the vehicle. Contin-
ued driving with a flat tire will cause exces-
sive heat build-up and possibly a fire.
Page 344 of 442

344 Practical hintsWhat to do if …Display symbol
Display messages
Possible cause
Possible solution
H
Tire pres. FL
Caution
Tire defect
The left front tire is deflating.
�
Carefully bring the vehicle to a halt,
avoiding abrupt steering and braking
maneuvers.
�
Change the wheel (
�page 370).
Tire pres. FL
Check tires!
The right rear tire pressure is low.
�
Carefully bring the vehicle to a halt.
�
Check the tire pressure.
�
Change the wheel (
�page 370).
Tire pres. FR
Caution
Tire defect
The right front tire is deflating.
�
Carefully bring the vehicle to a halt,
avoiding abrubt steering and braking
maneuvers.
�
Change the wheel (
�page 370).
Tire pres. FR
Check tires!
The right front tire pressure is low.
�
Carefully bring the vehicle to a halt.
�
Change the wheel (
�page 370).
Warning!
G
Do not drive with a flat tire. A flat tire affects
the ability to steer or brake the vehicle.
You may lose control of the vehicle. Contin-
ued driving with a flat tire will cause exces-
sive heat build-up and possibly a fire.
Page 348 of 442
348 Practical hintsWhat to do if …Display symbol
Display messages
Possible cause
Possible solution
@
Vehicle rising!
Your vehicle is adjusting to your level se-
lection.
Level selec. canceled
The “Raised” level setting is canceled at
vehicle speeds of over 75 mph
(120 km / h).
�
Reactivate the “Raised” level setting.
Stop, car too low!
The vehicle level control is malfunction-
ing.
Avoid excessive steering input. The fend-
er or tires could otherwise be damaged.
Listen for scraping noises.
Do not drive faster than 50 mph
(80 km / h).�
Drive to the side of the road and se-
lect a higher vehicle level. Depending
on the type of malfunction, this may
raise the vehicle’s level.
There is otherwise danger of an accident.
Visit workshop!
The system is functional only to a limited
extent.
The system display or the system is mal-
functioning.
�
Do not drive faster than 50 mph
(80 km / h).
�
Have the vehicle checked at an autho-
rized Mercedes-Benz Center.
Page 350 of 442
350 Practical hintsWhere will I find ...?
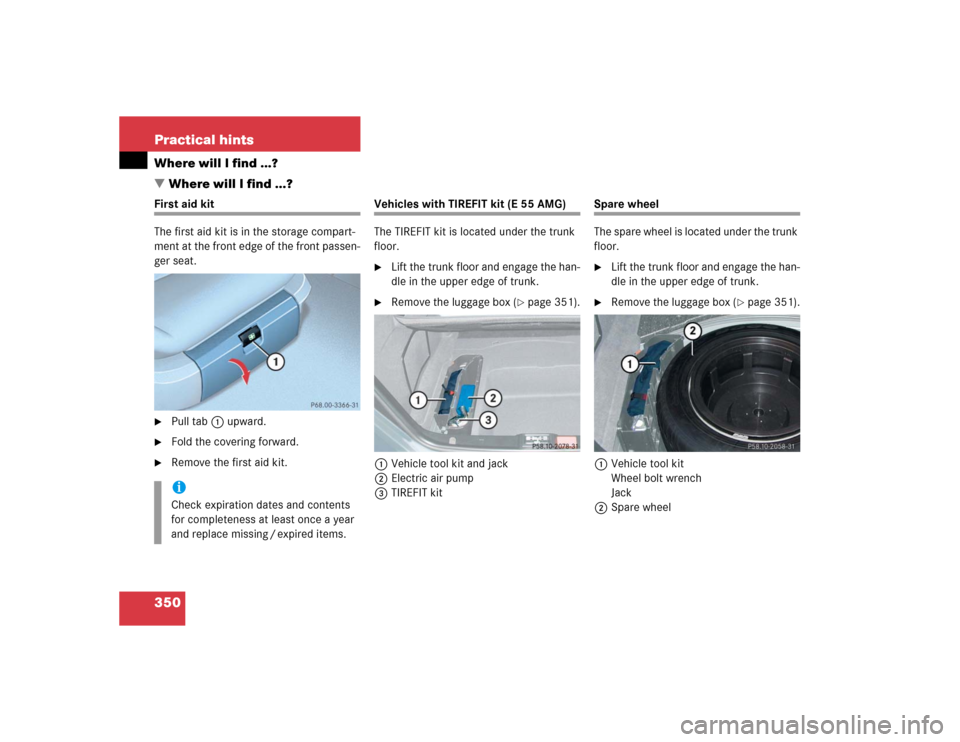
�Where will I find ...?First aid kit
The first aid kit is in the storage compart-
ment at the front edge of the front passen-
ger seat.�
Pull tab1 upward.
�
Fold the covering forward.
�
Remove the first aid kit.
Vehicles with TIREFIT kit (E 55 AMG)
The TIREFIT kit is located under the trunk
floor.�
Lift the trunk floor and engage the han-
dle in the upper edge of trunk.
�
Remove the luggage box (
�page 351).
1Vehicle tool kit and jack
2Electric air pump
3TIREFIT kit
Spare wheel
The spare wheel is located under the trunk
floor.�
Lift the trunk floor and engage the han-
dle in the upper edge of trunk.
�
Remove the luggage box (
�page 351).
1Vehicle tool kit
Wheel bolt wrench
Jack
2Spare wheel
iCheck expiration dates and contents
for completeness at least once a year
and replace missing / expired items.
Page 351 of 442

351 Practical hints
Where will I find ...?
Removing the spare wheel�
Turn luggage bowl counterclockwise.
�
Remove spare wheel2.
Storing the spare wheel
�
Place spare wheel2 in wheel well.
�
Turn luggage bowl clockwise to its stop
to secure the spare wheel.Minispare wheel
In the case of a flat tire, you may tempo-
rarily use the Minispare wheel when ob-
serving the following restrictions:
�
Do not exceed a vehicle speed of
50 mph (80 km / h).
�
Drive to the nearest tire repair facility
to have the flat tire repaired or re-
placed as appropriate.
�
Do not operate vehicle with more than
one spare wheel mounted.More information can be found in the
“Technical data” section (
�page 396).
Luggage box
Remove luggage box
1Fastening clip
2Luggage box�
Turn fastening clips1 to the left up-
wards from fastening bolts.
�
Lift luggage box in the area of the fas-
tening bolts and remove it from trunk.
!Always lower trunk floor before closing
trunk lid.
Warning!
G
The dimensions of the Minispare wheel are
different from those of the road wheels. As
a result, the vehicle handling characteristics
change when driving with a Minispare wheel
mounted.
The Minispare wheel should only be used
temporarily, and replaced with a regular
road wheel as quickly as possible.
Page 366 of 442

366 Practical hintsFlat tire
�Flat tirePreparing the vehicle�
Park the vehicle as far as possible from
moving traffic on a hard surface.
�
Turn on the hazard warning flashers.
�
Engage the steering wheel lock in the
straight-ahead position and set the
parking brake.
�
Move the selector lever toP.
�
Have any passenger exit the vehicle at
a safe distance from the roadway.
Sealing tires with TIREFIT (E 55 AMG) Small tire punctures, only those in the
tread, can be sealed with TIREFIT.
TIREFIT can be used in ambient tempera-
tures down to -4°F (-20°C).Warning!
G
Keep TIREFIT away from sparks, open flame
or heat source.
Do not smoke.
Warning!
G
Take care not to allow the contents of
TIREFIT to come in contact with hair, eyes or
clothing. TIREFIT is harmful if inhaled, swal-
lowed or absorbed through the skin. It caus-
es skin, eye and respiratory irritation.
Any contact with eyes or skin should be
flushed immediately with plenty of water.
If clothing comes in contact with TIREFIT,
change clothing as soon as possible.
In case of allergic reaction or rash, consult a
physician immediately.
Warning!
G
Keep TIREFIT out of reach of children.
If swallowed, rinse mouth immediately with
plenty of water and drink plenty of water.
Do not induce vomiting!
Consult a physician immediately.
Keep away from open flame or heat source.
Page 367 of 442
.
�
Foreign objects (e.g. screws or nails)
should not be removed from the tire.
�
Attach the sticker where it will be")
367 Practical hints
Flat tire
�
Take the TIREFIT kit out of the trunk
(�page 350).
�
Foreign objects (e.g. screws or nails)
should not be removed from the tire.
�
Attach the sticker where it will be easily
seen by the driver on the instrument
cluster.Preparing TIREFIT
1TIREFIT container
2Flap
3Notch
4Electrical plug
5Air hose
6Flange
�
Open flap2 on the electric air pump.
�
Pull plug4 and air hose5 out of the
pump housing.
�
Screw the air pump’s air hose5 onto
flange6 of the TIREFIT container.
�
Stick TIREFIT container1 upside
down into notch3 of the electric air
pump.
7Tire valve
8Electric air pump switch
9Air hose with pressure gauge and vent
screw
aFiller hose
Warning!
G
TIREFIT is a limited repair device. TIREFIT
cannot be used for:�
cuts or punctures larger than approxi-
mately 0.16 in (4 mm)
�
on a flat tire, or a damaged wheel
�
tire damage caused by driving with ex-
tremely low tire pressure
Do not drive the vehicle under such circum-
stances.
Contact your nearest Mercedes-Benz
Center for assistance or call Roadside Assis-
tance.
Warning!
G
Observe safety instructions on air pump la-
bel.