Page 133 of 442
133 Controls in detail
Control system
Menus, submenus and functions
Menu1
Menu2
Menu3
Menu4
Menu5
Menu6
Menu7
Menu8
Standard dis-
play
AUDIO
NAVI*
Distronic*
Malfunction
memory
Settings
Trip computer
Telephone
Commands/submenusDigital speed-
ometer
Select radio
station
Activate
route guid-
ance
Call up set-
tings
Call up malfunc-
tion messages
Reset to factory
settings
Fuel consumption
statistics after
start
Load phone
book
Call up FSS
PLUS
Operate CD
player
Instrument clus-
ter submenu
Fuel consumption
statistics since
the last reset
Search for
name in
phone book
Check tire pres-
sure*
Time/Date sub-
menu
Call up range
Check engine oil
level
Lighting sub-
menuVehicle sub-
menuConvenience
submenuDynamic seat*
submenu
Page 134 of 442

134 Controls in detailControl systemStandard display menu
You can select the functions in the stan-
dard display menu with buttonk
orj.
The following functions are available:Display digital speedometer
�
Press buttonj twice.
The current vehicle speed is shown in
the multifunction display.
AUDIO menu
The functions in the
Audio
menu operate
the audio equipment which you currently
have turned on.
If no audio equipment is currently turned
on, the message
AUDIO OFF
is shown in the
display.
The following functions are available:Select radio station
�
Turn on the radio. Refer to separate op-
erating instructions.
�
Press buttonè orÿ repeatedly
until you see the currently tuned sta-
tion in the display.
1Waveband setting
2Station frequency
�
Press buttonk orj repeatedly
until the desired station is found.
iThe headings used in the menus table
are designed to facilitate navigation
within the system and are not neces-
sarily identical to those shown in the
control system displays.
The first function displayed in each
menu will automatically show you
which part of the system you are in.
Function
Page
Call up digital speedometer
134
Call up FSS PLUS
297
Check tire pressure*
291
Check engine oil level
283
Function
Page
Select radio station
134
Select satellite radio station*
135
Operate CD player
135
Page 140 of 442

140 Controls in detailControl systemThe table below shows what settings can
be changed within the various menus. De-
tailed instructions on making individual
settings can be found on the following pag-
es.INSTRUMENT CLUSTER
TIME/DATE
LIGHTING
VEHICLE
CONVENIENCE
DYNAMIC SEAT*
Select temperature dis-
play mode
Synchronizing the
time
Set daytime running
lamp mode
(USA only)
Set automatic lock-
ing
Activate
easy-entry / exit
feature
Set level for dynam-
ic seat, driver
Select speedometer dis-
play mode
Set time (hours)
Set locator lighting
Set SmartKey-de-
pendency
Set level for dynam-
ic seat, passenger
Select language
Set time (minutes)
Ambient lighting
Set parking position
for exterior rear
view mirror
Select display (speed dis-
play or outside tempera-
ture) for status line
Set date (month)
Exterior lamps de-
layed shut-off
Select display (speed dis-
play or outside tempera-
ture) for basic display
Set date (day)
Interior lighting de-
layed shut-off
Tire pressure unit dis-
play*
Set date (year)
Page 141 of 442

141 Controls in detail
Control system
Instrument cluster submenu
Access the
Instr. cluster
submenu via
the
Settings
menu. Use the
Instr. clus-
ter
submenu to change the instrument
cluster display settings. The following
functions are available:Selecting temperature display mode
�
Move the selection marker with
theæ orç button to the
Instr.
cluster
submenu.
�
Press buttonj ork repeatedly
until you see this message in the dis-
play:
Temp. indicator
.
The selection marker is on the current
setting.
�
Pressæ orç to set the temper-
ature unit to degrees Celsius (°C) or
degrees Fahrenheit (°F).Selecting speedometer display mode
�
Move the selection marker with
theæ orç button to the
Instr.
cluster
submenu.
�
Press buttonj ork repeatedly
until you see this message in the dis-
play:
Display unit Speed-/odometer
.
The selection marker is on the current
setting.
�
Press æ or ç to set speedome-
ter unit to
km or
miles
.
Function
Page
Select temperature display
mode
141
Select speedometer display
mode
141
Select language
142
Select display (speed display or
outside temperature) for status
display
142
Select display (speed display or
outside temperature) for basic
display
143
Tire pressure display*
143
Page 143 of 442
 for basic display�
Move the selection marker with
theæ orç button to the
Instr.
cluster
submenu.")
143 Controls in detail
Control system
Selecting display (speed display or out-
side temperature) for basic display�
Move the selection marker with
theæ orç button to the
Instr.
cluster
submenu.
�
Press buttonj ork repeatedly
until you see this message in the dis-
play:
Basic display
.
The selection marker is on the current
setting.
�
Pressæ orç to select the dis-
play permanently shown in the multi-
function display.Tire pressure display*
Use this function to set the unit for the tire
pressure display.
�
Move the selection marker with the
æ or ç button to the
Instr,
cluster
submenu.
�
Press button j or k repeatedly
until you see this message in the dis-
play:
Display unit Tire pressure
.
The selection marker is on the current
setting.
�
Press æ or ç to select the de-
sired tire pressure unit.Time / Date submenu
Access the
Time/Date
submenu via the
Settings
menu. Use the
Time/Date
sub-
menu to change the time and date display
settings. The following functions are avail-
able:
Function
Page
Synchronizing the time
144
Set time (hours)
144
Set time (minutes)
144
Set date (month)
145
Set date (day)
145
Set date (year)
145
iInformation on setting the time, refer to
separate COMAND instructions.
Page 157 of 442
157 Controls in detail
Control system
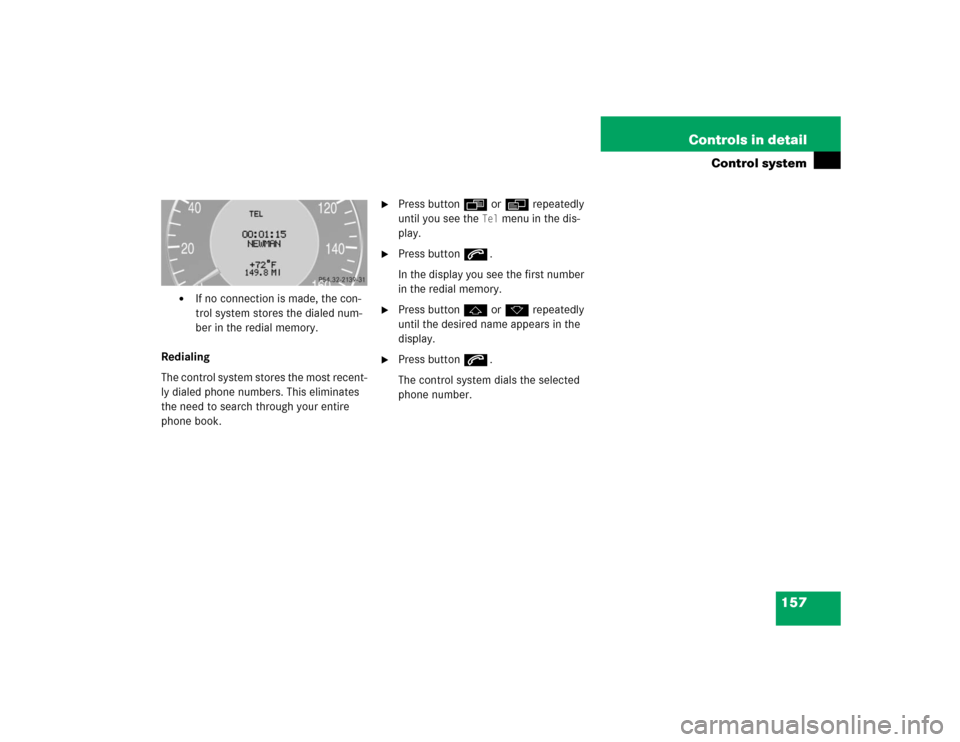
�
If no connection is made, the con-
trol system stores the dialed num-
ber in the redial memory.
Redialing
The control system stores the most recent-
ly dialed phone numbers. This eliminates
the need to search through your entire
phone book.
�
Press buttonÿ orè repeatedly
until you see the
Tel
menu in the dis-
play.
�
Press buttons.
In the display you see the first number
in the redial memory.
�
Press buttonj ork repeatedly
until the desired name appears in the
display.
�
Press buttons.
The control system dials the selected
phone number.
Page 178 of 442

178 Controls in detailClimate controlSetting the temperature
Use temperature controls1 and6 to
separately adjust the air temperature on
each side of the passenger compartment.
You should raise or lower the temperature
setting in small increments, preferably
starting at 72°F (22°C).
Increasing�
Turn the temperature control1 or6
slightly to the right.
The climate control system will corre-
spondingly adjust the interior air tem-
perature.Decreasing
�
Turn the temperature control1 or6
slightly to the left.
The climate control system will corre-
spondingly adjust the interior air tem-
perature.
Adjusting air distribution
Adjusting manually
Use air distribution control4
(�page 176) to adjust the air distribution.
�
Press the Ubutton.
The indicator lamp on the Ubutton
goes out.
�
Press air distribution rocker switch4
(�page 176) until the display shows
the desired setting.
The current air distribution appears in
the air distribution display9.
Adjusting automatically
�
Press the Ubutton.
The indicator lamp on the button
comes on. The air distribution and vol-
ume is adjusted automatically.
Symbol
Function
a
Directs air through the center,
side and rear passenger com-
partment air vents
Z
Directs air to the windows
X
Directs air into the entire
vehicle interior
Y
Directs air to the footwells
Page 189 of 442

189 Controls in detail
Automatic climate control*
Increasing�
Push top of temperature control rocker
switch3 and / or5.
The automatic climate control system
will correspondingly adjust the interior
air temperature.
Decreasing
�
Push bottom of temperature control
rocker switch3 and / or5.
The automatic climate control system
will correspondingly adjust the interior
air temperature.
Heating:
Only in manual air distribution mode is it
possible to lower the temperature in the
headroom by adding outside air using
thumbwheel7 (
�page 184) in the dash-
board.
Adjusting air distribution
Use the air distribution controls1 and7
(�page 176) to separately adjust the air
distribution on each side of the passenger
compartment. The following symbols are
found on the controls:Adjusting manually
�
Press left or rightU.
The indicator lamp in theU button
goes out.
�
Turn air distribution controls on each
side of the passenger compartment to
the desired symbol.
Adjusting automatically
�
Press left or rightU button again.
The indicator lamp in theU button
illuminates. The air distribution is ad-
justed automatically.
Windshield fogged on the outside
�
Switch the windshield wipers on.
�
Press the left or rightU button.
Symbol
Function
a
Directs air through the center,
side and rear passenger com-
partment air vents
Z
Directs air to the windows
X
Directs air into the entire vehi-
cle interior
Y
Directs air to the footwells