Page 172 of 442

172 Controls in detailGood visibilityRear window sunshade*
The switch is located in the center console.�
Turn the SmartKey to starter switch po-
sition 1 or 2. Vehicles with KEY-
LESS-GO*: press the start / stop
button once or twice.
�
Press the switch briefly at 1 to raise
the sunshade.
�
Press the switch briefly at 1 to lower
the sunshade.
Always raise the sunshade fully for its sup-
port against the window frame.
Roller sunblind* in the rear doors�
Pull the roller sunblind out using the
hooks.
�
Attach the hooks at the top.
iIf sunlight enters through a side win-
dow, disengage sun visor from
mounting1 and pivot to the side.
Mirror lamp3 will switch off.
Warning!
G
When operating the rear window sunshade,
be sure that there is no danger of anyone be-
ing harmed by the raising or lowering proce-
dure.
The raising or lowering procedure can be im-
mediately halted by briefly pressing
switch1. To reverse direction of move-
ment, press switch1 again.
Warning!
G
When leaving the vehicle, always remove the
SmartKey from starter switch, and lock your
vehicle. Do not leave children unattended in
the vehicle, or with access to an unlocked
vehicle. Unsupervised use of vehicle equip-
ment can cause an accident and / or serious
personal injury.
Page 178 of 442

178 Controls in detailClimate controlSetting the temperature
Use temperature controls1 and6 to
separately adjust the air temperature on
each side of the passenger compartment.
You should raise or lower the temperature
setting in small increments, preferably
starting at 72°F (22°C).
Increasing�
Turn the temperature control1 or6
slightly to the right.
The climate control system will corre-
spondingly adjust the interior air tem-
perature.Decreasing
�
Turn the temperature control1 or6
slightly to the left.
The climate control system will corre-
spondingly adjust the interior air tem-
perature.
Adjusting air distribution
Adjusting manually
Use air distribution control4
(�page 176) to adjust the air distribution.
�
Press the Ubutton.
The indicator lamp on the Ubutton
goes out.
�
Press air distribution rocker switch4
(�page 176) until the display shows
the desired setting.
The current air distribution appears in
the air distribution display9.
Adjusting automatically
�
Press the Ubutton.
The indicator lamp on the button
comes on. The air distribution and vol-
ume is adjusted automatically.
Symbol
Function
a
Directs air through the center,
side and rear passenger com-
partment air vents
Z
Directs air to the windows
X
Directs air into the entire
vehicle interior
Y
Directs air to the footwells
Page 197 of 442

197 Controls in detail
Power windows
�Power windows
Opening and closing the windows
The side windows can be opened and
closed electrically. The switches for all of
the side windows are on the driver’s door.
The switches for the respective windows
are on the front passenger door and the
rear doors.
1Rear window override switch
(
�page 72)
2Right front window
3Right rear window
4Left rear window
5Left front window
Warning!
G
When closing the windows, make sure that
there is no danger of anyone being harmed
by the closing procedure.
The closing of the door windows can be im-
mediately halted by releasing the switch or,
if switch was pulled past the resistance
point and released, by either pressing or
pulling the respective switch.
If the window encounters an obstruction
that blocks its path in a circumstance where
you pulled the switch past the resistance
point and released it to close the window,
the automatic reversal function will stop the
window and open it slightly.
If the window encounters an obstruction
that blocks its path in a circumstance where
you are closing the window by pulling and
holding the switch, by pressing and holding
button ‹ on the SmartKey, or by press-
ing and holding the lock button (vehicles
with KEYLESS-GO*) on the door handle,
the automatic reversal function will not op-
erate.
When leaving the vehicle, always remove the
SmartKey from starter switch, take the
SmartKey with KEYLESS-GO* with you, and
lock your vehicle. Do not leave children un-
attended in the vehicle, or with access to an
unlocked vehicle. Unsupervised use of vehi-
cle equipment can cause an accident
and/or serious personal injury.iYou can also open or close the win-
dows using the following:�
SmartKey (summer opening/con-
venience feature) (
�page 199)
�
ButtonO in the control panel of
the climate control (
�page 176)
�
Buttone in the control panel of
the automatic climate control
(�page 186)
Page 198 of 442

198 Controls in detailPower windows�
Turn SmartKey in the starter switch to
position1 or2 or press the KEY-
LESS-GO* start / stop button once or
twice.
Opening the windows
�
Press switch2 to 5 to the resistance
point.
The corresponding window will move
downwards until you release the
switch.
Closing the windows
�
Pull switch2 to 5 to the resistance
point.The corresponding window will move
upwards until you release the switch.
Fully opening the windows
(Express-open)
�
Press switch2 to 5 past the resis-
tance point and release.
The corresponding window opens com-
pletely.
Fully closing the windows
(Express-close)
�
Pull switch2 to 5 past the resis-
tance point and release.The corresponding window closes com-
pletely.
If the upward movement of the window is
blocked during the closing procedure, the
window will stop and open slightly.
iYou can still operate the windows when
the key is in starter switch position0 or
has been removed:�
until the driver’s or front passenger
door has been opened
�
though for no more than five min-
utes
Warning
G
If you pull and hold the switch up when clos-
ing the window, and upward movement of
the window is blocked by some obstruction
including but not limited to arms, hands, fin-
gers, etc., the automatic reversal will not op-
erate.
Warning!
G
Driver’s door only:
If within five seconds switch is again pulled
past the resistance point and released, the
automatic reversal will not operate.
Page 202 of 442

202 Controls in detailSliding / pop-up roof*�
Turn SmartKey in the starter switch to
position1 or2 or press the
KEYLESS-GO* start/stop button once
or twice.
Opening and closing the
sliding / pop-up roof
�
To open, close, raise or lower the
sliding/pop-up roof, move the switch
to resistance point in the required
direction1to4.
Release the switch when the roof has
reached the desired position.Fully opening (Express-open) and clos-
ing (Express-close) the
sliding/pop-up roof
�
To open, close, raise or lower the slid-
ing/pop-up roof, move the switch past
the resistance point in the required
direction1to4 and release.
The sliding/pop up roof opens or clos-
es completely.
Stopping the sliding / pop-up roof
�
Move the switch in any direction.Opening and closing the
sliding / pop-up roof with the SmartKey
The power windows (
�page 199) will also
be opened or closed when you operate the
sliding / pop-up roof with the SmartKey.
�
Aim transmitter eye at the front door
handle.
iIf the movement of the sliding/pop-up
roof is blocked during the closing pro-
cedure, the roof will stop and reopen
slightly.
Warning!
G
Never operate the windows or
sliding / pop-up roof if there is the possibility
of anyone being harmed by the opening or
closing procedure.
In case the procedure causes potential dan-
ger, the procedure can be immediately halt-
ed by releasing the remote control button.
To reverse direction of movement
pressŒ for opening or ‹ for closing.
Page 210 of 442

210 Controls in detailPanorama sliding / pop-up roof*�
Wait until the roller sunblinds are
closed and then keep the switch
pressed for approximately one second.
�
Move the switch in direction1
(�page 206).
�
Wait until the roller sunblinds are
opened.
�
Move the switch in direction3
(�page 206).
�
Wait until the panorama
sliding / pop-up roof is raised and then
keep the switch pressed for approxi-
mately one second.
�
Move the switch in direction2
(�page 206).
�
Wait until the panorama
sliding / pop-up roof is closed and then
keep the switch pressed for approxi-
mately one second.
The panorama sliding/pop up roof is
synchronized.
The synchronization must be repeated if
the panorama sliding / pop-up roof cannot
be fully opened (Express-open).
Solar panel*
A solar panel is available in combination
with the panorama sliding / pop-up roof.
The solar cells convert natural light into
electrical energy. When the engine is
switched off, the energy generated auto-
matically switches on the ventilation fan.
The constant air flow creates a cooler tem-
perature for cars parked in the sunlight.
The air flow depends on the intensity of the
solar radiation. The ventilation starts two
minutes after switching off the engine.
��
Page 237 of 442
237 Controls in detail
Loading
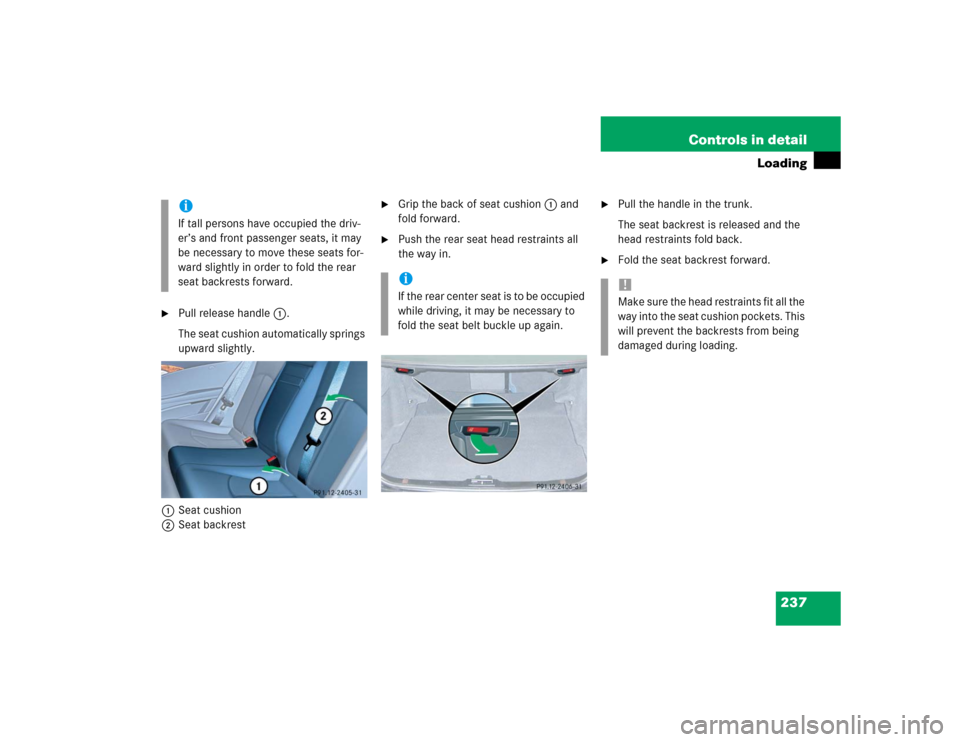
�
Pull release handle1.
The seat cushion automatically springs
upward slightly.
1Seat cushion
2Seat backrest
�
Grip the back of seat cushion1 and
fold forward.
�
Push the rear seat head restraints all
the way in.
�
Pull the handle in the trunk.
The seat backrest is released and the
head restraints fold back.
�
Fold the seat backrest forward.
iIf tall persons have occupied the driv-
er’s and front passenger seats, it may
be necessary to move these seats for-
ward slightly in order to fold the rear
seat backrests forward.
iI f t h e r e a r c e n t e r s e a t i s t o b e o c c u p i e d
while driving, it may be necessary to
fold the seat belt buckle up again.
!Make sure the head restraints fit all the
way into the seat cushion pockets. This
will prevent the backrests from being
damaged during loading.
Page 242 of 442

242 Controls in detailUseful features
�Useful featuresInterior storage spaces Parcel net in front passenger footwell
A small convenience parcel net is located
in the front passenger footwell. It is for
small and light items, such as road maps,
mail, etc.Glove box
1Glove box lid release
2Compartment for mobile
phone / glasses
Opening the glove box
�
Push lid release1.
The glove box lid opens downward.
Closing the glove box
�
Push lid up to close.
Warning!
G
To help avoid personal injury during a colli-
sion or sudden maneuver, exercise care
when stowing objects in the vehicle. Put lug-
g a g e o r c a r g o i n t h e t r u n k i f p o s s i b l e . D o n o t
pile luggage or cargo higher than the seat
backs. Do not place anything on the shelf
below the rear window.
Luggage nets cannot secure hard or heavy
objects.
Keep compartment lids closed. This will help
to prevent stored objects from being thrown
about and injuring vehicle occupants during
an accident.
Warning!
G
The parcel net is intended for storing
light-weight items only.
Heavy objects, objects with sharp edges or
fragile objects may not be transported in the
parcel net.
The parcel net cannot protect transported
goods in the event of an accident.