Page 138 of 442
")
138 Controls in detailControl system�
Press buttonk orj.
The stored messages will now be dis-
played in order. See the “Practical
hints” section for malfunction and
warning messages (
�page 318).
Should any malfunctions occur while driv-
ing, the number of malfunctions will reap-
pear in the display when the SmartKey in
the starter switch is turned to position0 or
removed from the starter switch.
Settings menu
In the
Settings
menu there are two func-
tions:
�
The function
To reset: Press reset
button for 3 seconds
, with which you
can reset all the settings to the original
factory settings.
�
A collection of submenus with which
you can make individual settings for
your vehicle.
�
Press buttonè orÿ repeatedly
until the
Settings
menu is seen in the
display.Resetting all settings
You can reset all the functions of all sub-
menus to the factory settings.
�
Press the reset button in the instru-
ment cluster (
�page 22) for approxi-
mately three seconds.
In the display you will see the request
to press the reset button again to con-
firm.
�
Press the reset button again.
The functions of all the submenus will
reset to factory settings.
iThe message memory will be cleared
when you turn the SmartKey in the
starter switch to position1 or2. You
will then only see high priority malfunc-
tions. These are highlighted by red
background (
�page 318).
iThe settings you have changed will not
be reset unless you confirm the action
by pressing the reset button a second
time.
Page 140 of 442

140 Controls in detailControl systemThe table below shows what settings can
be changed within the various menus. De-
tailed instructions on making individual
settings can be found on the following pag-
es.INSTRUMENT CLUSTER
TIME/DATE
LIGHTING
VEHICLE
CONVENIENCE
DYNAMIC SEAT*
Select temperature dis-
play mode
Synchronizing the
time
Set daytime running
lamp mode
(USA only)
Set automatic lock-
ing
Activate
easy-entry / exit
feature
Set level for dynam-
ic seat, driver
Select speedometer dis-
play mode
Set time (hours)
Set locator lighting
Set SmartKey-de-
pendency
Set level for dynam-
ic seat, passenger
Select language
Set time (minutes)
Ambient lighting
Set parking position
for exterior rear
view mirror
Select display (speed dis-
play or outside tempera-
ture) for status line
Set date (month)
Exterior lamps de-
layed shut-off
Select display (speed dis-
play or outside tempera-
ture) for basic display
Set date (day)
Interior lighting de-
layed shut-off
Tire pressure unit dis-
play*
Set date (year)
Page 146 of 442

146 Controls in detailControl systemLighting submenu
Access the
Lighting
submenu via the
Set-
tings
menu. Use the
Lighting
submenu
to change the lamp and lighting settings on
your vehicle. The following functions are
available:Setting daytime running lamp mode
(USA only)
�
Move the selection marker with
theæ orç button to the Lighting
submenu.
�
Press buttonj ork repeatedly
until you see this message in the dis-
play:
Lamp circuit headlamp
.
The selection marker is on the current
setting.
�
Pressæ orç to select
manual
or
daytime running lamp (
constant
)
mode. This function is not available in
countries where daytime running
lamps are mandatory.With daytime running lamp mode se-
lected and the exterior lamp switch at
position 0, the following lamps will
come on automatically when the en-
gine is turned on:
�
Parking lamps and low beam head-
lamps
�
License plate lamps (in low ambient
light conditions)
Function
Page
Set daytime running lamp mode
(USA only)
146
Set locator lighting
147
Ambient light level
147
Exterior lamps delayed shut-off
148
Interior lighting delayed shut-off
149
iIf you turn the exterior lamp switch to
another position, the corresponding
lamp(s) will switch on.
For safety reasons, resetting the Lighting
submenu to factory settings
(
�page 138) while driving will not re-
set the daytime running lamp mode.
In the display you will then see the mes-
sage:
Lighting
Page 147 of 442

147 Controls in detail
Control system
Setting locator lighting
During darkness, the following lamps will
come on when the exterior lamp switch is
in position
U
, the locator lighting fea-
ture is activated and the vehicle is un-
locked by SmartKey:
�
Parking lamps
�
Tail lamps
�
License plate lamps
�
Front fog lamps
The locator lighting switches off when the
driver’s door is opened. It switches off au-
tomatically after a period of approximately
40 seconds.
�
Move the selection marker with
theæ orç button to the
Light-
ing
submenu.
�
Press buttonj ork repeatedly
until you see this message in the dis-
play:
Function Surround lighting
.
The selection marker is on the current
setting.
�
Pressæ orç to select the de-
sired setting.
The locator lighting will be switched on
or off.
Ambient light level
Using this function, you can adjust the
brightness of the ambient lighting.
�
Move the selection marker with the
æ orç button to the Lighting
submenu.
�
Press button j ork repeatedly
until you see the message
Ambient
light Level
in the display.
The selection marker is on the current
setting.
�
Press æ orç to select the
brightness of the lighting. 1 represents
the darkest setting and 5 represents
the brightest setting.
The ambient light is switched off below
setting 1 or above setting 5. The selec-
tion marker points to off.
Page 148 of 442

Use the
Headlamps delayed shut-off
function to set whether and for how long
you would li")
148 Controls in detailControl systemSetting night security illumination (Exte-
rior lamps delayed shut-off)
Use the
Headlamps delayed shut-off
function to set whether and for how long
you would like the exterior lamps to illumi-
nate during darkness after all doors are
closed. When the delayed shut-off feature
is activated and the exterior lamp switch is
in position
U
, the following lamps will
remain lit after you remove the SmartKey
from the starter switch:
�
Parking lamps
�
Tail lamps
�
License plate lamps
�
Front fog lamps
�
Move the selection marker with
theæ orç button to the
Light-
ing
submenu.
�
Press buttonj ork repeatedly
until you see this message in the dis-
play:
Headlamps delayed shut-off
.
The selection marker is on the current
setting.
�
Pressæ orç to select the de-
sired lamp-on period.
You can select:�
0 s
, the delayed shut-off feature is
deactivated.
�
15 s
, 30 s
, 45 s
or
60 s
, the delayed
shut-off feature is activated.
�
Turn the exterior lamp switch to posi-
tion U.You can temporarily deactivate the de-
layed shut-off feature:
�
Before leaving the vehicle, turn the
SmartKey in the starter switch to
position0.
�
Then turn the SmartKey in the starter
switch to position2 and back to0.
The delayed shut-off feature is deacti-
vated. It will reactivate as soon as you
reinsert the SmartKey in the starter
switch.
Vehicles with KEYLESS-GO*:
�
Press the KEYLESS-GO start / stop but-
ton on the gear selector lever
(�page 33).
iYou can reactivate this function within
ten minutes by opening a door.
If you do not open a door after remov-
ing the SmartKey, the lamps will auto-
matically switch off after 60 seconds.
Page 149 of 442

149 Controls in detail
Control system
Interior lighting delayed shut-off
Use this function to set whether and for
how long you would like the interior light-
ing to remain lit during darkness after the
SmartKey is removed from the starter
switch.�
Move the selection marker with
theæ orç button to the
Light-
ing
submenu.
�
Press buttonj ork repeatedly
until you see this message in the dis-
play:
Interior lamp delayed
shut-off
.
The selection marker is on the current
setting.
�
Pressæ orç to select the de-
sired lamp-on time period. You can se-
lect:�
0 s
, the delayed shut-off feature is
deactivated.
�
5 s,
10 s
, 15 s
or
20 s
, the delayed
shut-off feature is activated.Vehicle submenu
Access the
Vehicle
submenu via the
Set-
tings
menu. Use the
Vehicle
submenu to
make general vehicle settings. The follow-
ing functions are available:
Setting automatic locking
Use this function to activate or deactivate
the automatic central locking. With the au-
tomatic central locking system activated,
the vehicle is centrally locked at vehicle
speeds of approximately 9 mph
(15 km / h).
Function
Page
Set automatic locking
149
Limiting opening height of trunk
lid*
150
Page 168 of 442
 and for setting the rear view
mirrors (
�page 38) is found in the “Get-
ting started” sectio")
168 Controls in detailGood visibility
�Good visibilityInformation on the windshield wipers
(�page 48) and for setting the rear view
mirrors (
�page 38) is found in the “Get-
ting started” section.
Rear view mirror
Automatic antiglare rear view mirror
The reflection brightness of the exterior
rear view mirror on the driver’s side and
the interior rear view mirror will respond
automatically to glare when:�
the ignition is switched on, and
�
incoming light from headlamps falls on
the sensor in the interior rear view mir-
ror
The rear view mirror will not react if
�
reverse gear is engaged
�
the interior lighting is turned on
Warning!
G
The automatic antiglare function does not
react if incoming light is not aimed directly
at sensors in the interior rear view mirror.
The interior rear view mirror and the exterior
rear view mirror on the driver’s side do not
react, for example, if the rear window sun-
shade is in raised position.
Glare can endanger you and others.Warning!
G
In the case of an accident liquid electrolyte
may escape from the mirror housing if the
mirror glass breaks.
Electrolyte has an irritating effect. Do not al-
low the liquid to come into contact with
eyes, skin, clothing, or respiratory system.
In case it does, immediately flush affected
area with water, and seek medical help if
necessary.
Warning!
G
Exercise care when using the passenger
side exterior rear view mirror. The mirror
surface is convex (outwardly curved surface
for a wider field of view). Objects in mirror
are closer than they appear. Check your in-
terior rear view mirror or glance over your
shoulder before changing lanes.!Electrolyte drops coming into contact
with the vehicle paint finish can be
completely removed only while in the
liquid state by applying plenty of water.
Page 171 of 442
171 Controls in detail
Good visibility
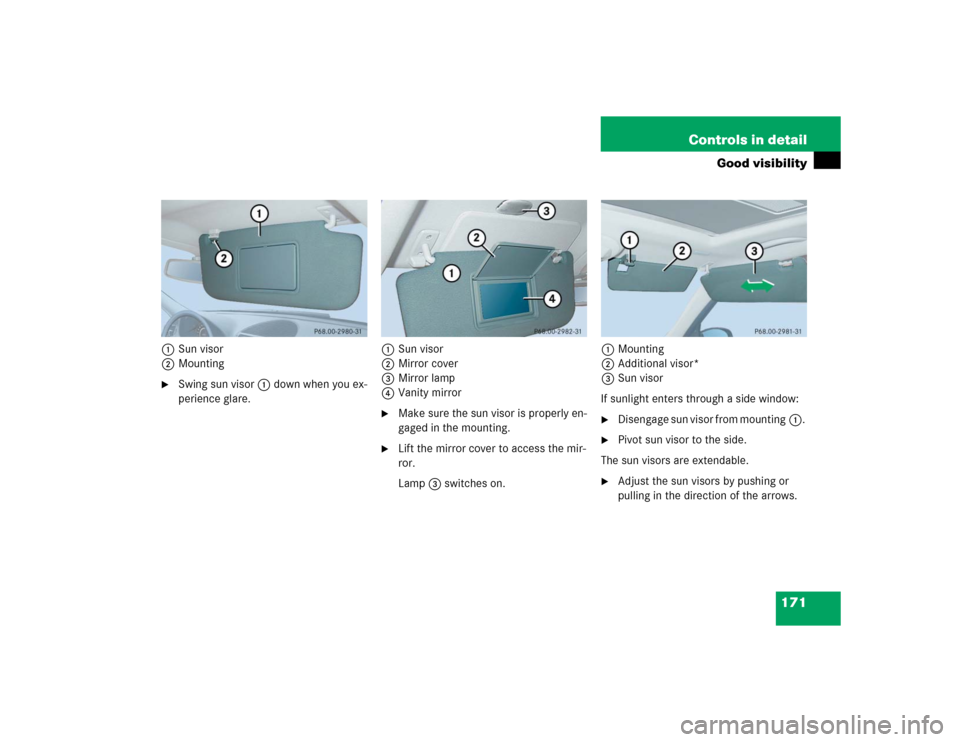
1Sun visor
2Mounting�
Swing sun visor1 down when you ex-
perience glare. 1Sun visor
2Mirror cover
3Mirror lamp
4Vanity mirror
�
Make sure the sun visor is properly en-
gaged in the mounting.
�
Lift the mirror cover to access the mir-
ror.
Lamp3 switches on.1Mounting
2Additional visor*
3Sun visor
If sunlight enters through a side window:
�
Disengage sun visor from mounting1.
�
Pivot sun visor to the side.
The sun visors are extendable.
�
Adjust the sun visors by pushing or
pulling in the direction of the arrows.