Page 47 of 442
47 Getting started
Driving
Switching on headlampsExterior lamp switch1Off
2Low beam headlamps on�
Turn the switch toB.
More information can be found in the
“Controls in detail” section (
�page 119).
Turn signals and high beam
The combination switch is located on the
left of the steering column.Combination switch1Turn signal, right
2Turn signal, left�
Press the combination switch up1 or
down2.
The corresponding turn signal indicator
lamp L or K flashes in the in-
strument cluster.High beam
�
Push the combination switch forward.
The high beam headlights are switched
on.
The high beam symbolA in the
tachometer comes on.
More information can be found in the
“Controls in detail” section (
�page 123).
iTo signal minor directional changes,
move combination switch to point of
resistance only and release. The turn
signal flashes three times.
Page 48 of 442

48 Getting startedDrivingWindshield wipers
The combination switch is located on the
left of the steering column.Combination switch1Single wipe
2Switching on windshield wipers�
Make sure the ignition is switched on.
All the lights in the instrument cluster
come on.Switching on windshield wipers
�
Turn the combination switch to the de-
sired position depending on the inten-
sity of the rain.
0Windshield wipers off
IIntermittent wiping (interval depen-
dent on wetness of windshield)
IINormal wiper speed
IIIFast wiper speediThe intermittent wiping interval is de-
pendent on wetness of windshield.
Wiping will not occur with a door open.
!Do not leave windshield wipers in inter-
mittent setting when the vehicle is tak-
en to an automatic car wash or during
windshield cleaning. Wipers will oper-
ate in the presence of water sprayed on
the windshield, and wipers may be
damaged as a result.
The switch should not be left in inter-
mittent setting as the wipers will wipe
the windshield once every time the en-
gine is started. Dust that accumulates
on the windshield might scratch the
glass and / or damage the wiper blades
when wiping occurs on a dry wind-
shield.
Page 54 of 442
.
1Lock button on the door handle
�
After exiting the vehicle, press lock
button1 on the door handle or on the
tr")
54 Getting startedParking and locking�
Press the seat belt release button
(�page 41).
1Lock button on the door handle
�
After exiting the vehicle, press lock
button1 on the door handle or on the
trunk lid.
All turn signal lamps flash three times.
The locking knobs on the doors move
down.
More information can be found in the
“Controls in detail” section (
�page 91).
!If you hear a warning signal, you have
either�
forgotten to switch off the vehicle’s
exterior lamps before opening the
driver’s door,
or
�
tried to turn off the engine while the
gear selector lever is not inP.
Turn off the lights or place the gear se-
lector lever inP.
iOpening a door causes the windows on
the side of the car to open slightly. They
will return to the up position when the
door is closed.
Warning!
G
To prevent possible personal injury, always
keep hands and fingers away from the door
openings when closing the doors. Be espe-
cially careful when small children are
around.
Before closing doors, make sure that there
is no possibility of someone getting caught
in a door during closing.
Warning!
G
When leaving the vehicle, always remove the
SmartKey from the starter switch, take the
SmartKey with KEYLESS-GO* with you, and
lock your vehicle. Do not leave children un-
attended in the vehicle, or with access to an
unlocked vehicle. Unsupervised use of vehi-
cle equipment may cause an accident
and/or serious personal injury.
��
Page 69 of 442

69 Safety and Security
Occupant safety
Installation of infant and child restraint
systems
This vehicle is equipped with tether an-
chorages for a top tether strap at each of
the rear seating positions.Not foldable rear seat backrest
1Cover
�
Remove cover1 from anchorage ring.
�
Guide tether strap between head re-
straint and top of the seat back.
�
Head restraint must be positioned such
that the top tether strap can pass freely
between the head restraint and the top
of the seat back.
Make sure the tether strap is not twist-
ed.
Warning!
G
When using a BabySmart
TM compatible
child seat on the front passenger seat, the
passenger front airbag will not deploy only if
the PASSENGER AIRBAG OFF indicator lamp
remains illuminated.
Please be sure to check the indicator every
time you use the special system child seat.
Should the light go out while the restraint is
installed, please check installation. If the
light remains out, do not use the
BabySmart
TM restraint to transport children
on the front passenger seat until the system
has been repaired.
Warning!
G
Do not place powered-on laptops, cell
phones and like electronic devices on the
front passenger seat. Signals from such de-
vices may interfere with the BabySmart
TM
system. Such signal interference may cause
the PASSENGER AIRBAG OFF indicator lamp
not to come on during self-test or be contin-
uously lit, indicating that the system is not
functioning.
��
Page 70 of 442
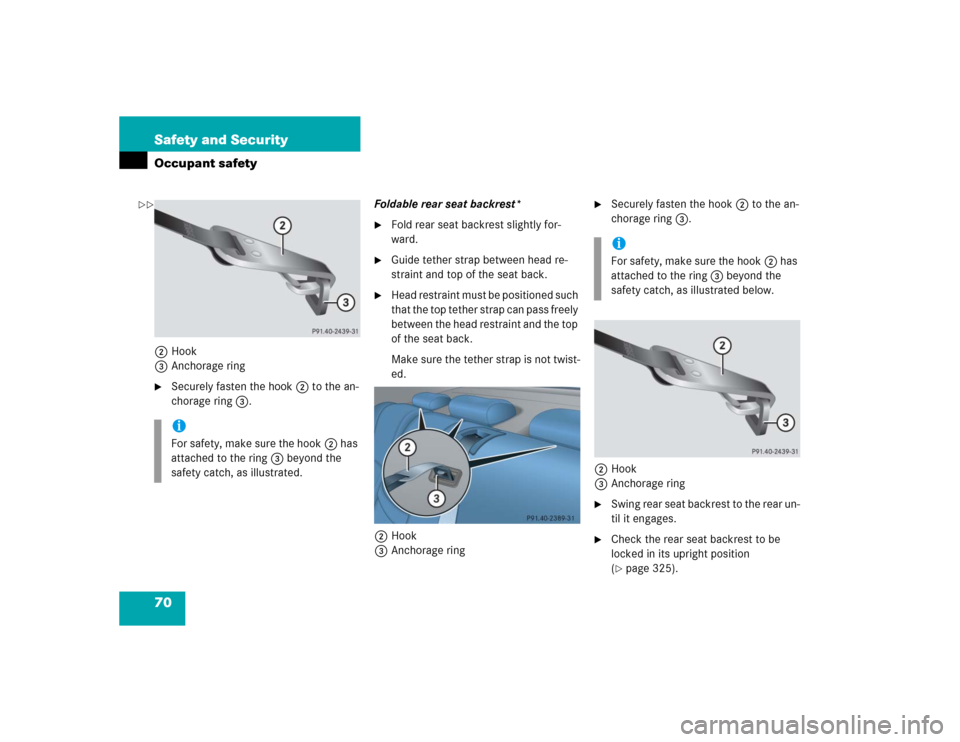
70 Safety and SecurityOccupant safety2Hook
3Anchorage ring�
Securely fasten the hook2 to the an-
chorage ring3.Foldable rear seat backrest*
�
Fold rear seat backrest slightly for-
ward.
�
Guide tether strap between head re-
straint and top of the seat back.
�
Head restraint must be positioned such
that the top tether strap can pass freely
between the head restraint and the top
of the seat back.
Make sure the tether strap is not twist-
ed.
2Hook
3Anchorage ring
�
Securely fasten the hook2 to the an-
chorage ring3.
2Hook
3Anchorage ring
�
S w i n g r e a r s e a t b a c k r e s t t o t h e r e a r u n -
til it engages.
�
Check the rear seat backrest to be
locked in its upright position
(�page 325).
iFor safety, make sure the hook2 has
attached to the ring3 beyond the
safety catch, as illustrated.
iFor safety, make sure the hook2 has
attached to the ring3 beyond the
safety catch, as illustrated below.
��
Page 74 of 442

�
BAS (B
rake A")
74 Safety and SecurityDriving safety systems
�Driving safety systemsIn this section you will find information on
the following driving safety systems:�
ABS (A
ntilock B
rake S
ystem)
�
BAS (B
rake A
ssist S
ystem)
�
ESP (E
lectronic S
tability P
rogram)
�
SBC (S
ensotronic B
rake C
ontrol)
�
4MATIC (Four Wheel Electronic
Traction System)
ABS
The Antilock Brake System (ABS) regulates
the brake pressure so that the wheels do
not lock during braking. This allows you to
maintain the ability to steer your vehicle.
The ABS is functional above a speed of ap-
proximately 5 mph (8 km/h) independent
of road surface conditions.
On slippery road surfaces, the ABS will re-
spond even with light brake pressure.
iIn winter operation, the maximum ef-
fectiveness of the ABS, the BAS, the
ESP, SBC and 4MATIC is only achieved
with winter tires (M + S tires), or snow
chains as required.Warning!
G
The following factors increase the risk of ac-
cidents:�
Excessive speed, especially in turns
�
Wet and slippery road surfaces
�
Following another vehicle too closely
The ABS, BAS, ESP, SBC and 4MATIC cannot
reduce this risk.
Always adjust your driving style to the pre-
vailing road and weather conditions.
Warning!
G
Do not pump the brake pedal. Use firm,
steady brake pedal pressure instead. Pump-
ing the brake pedal defeats the purpose of
the ABS and significantly reduces braking
effectiveness.
Page 87 of 442
87 Controls in detail
Locking and unlocking
Seats
Memory function
Lighting
Instrument cluster
Control system
Automatic transmission
Good visibility
Climate control
Automatic climate control*
Power windows
Sliding / pop-up roof*
Panorama sliding / pop-up roof*
Driving systems
Loading
Useful features
Page 100 of 442

100 Controls in detailLocking and unlocking�
Pull remote trunk lid switch1 until the
trunk begins to open.
The trunk lid opens automatically. The
indicator lamp in the switch comes on
and remains lit until the trunk is closed.The trunk can also be opened using the
SmartKey (
�page 90) or from its inside in
an emergency, see “Trunk lid emergency
release” (
�page 104).
Limiting opening height of trunk lid
The trunk lid opening height can be limited
when transporting goods on a roof rack
(e.g. presence of an MB sport luggage con-
tainer). When activated, the trunk lid opens
to approximately the height of the roof
edge.
You can activate the limiting opening
height of trunk lid using the control system
(
�page 150). Closing from the inside
�
Press the remote trunk lid switch
(�page 99) until the indicator lamp in
the switch goes out and the trunk lid is
closed.
To interrupt the closing procedure:
�
Release the remote trunk lid switch.
If the trunk lid comes into contact with an
object while closing (e.g. luggage that has
been piled too high), the closing procedure
is stopped and the trunk re-opens slightly.
!The trunk lid swings open upwards au-
tomatically. Always make sure there is
sufficient overhead clearance. To stop
the opening procedure, press or pull
the remote trunk lid switch.iIf the trunk lid does not open, it is still
locked separately (if applicable)
(�page 105).
If the vehicle was previously centrally
locked, the trunk lid will lock automati-
cally when closed (
�page 99). The
turn signals will flash three times to
confirm locking.
Warning!
G
Maintain sight of trunk area while operating
the door mounted switch. Monitor the clos-
ing procedure carefully to ensure that no
one is in danger of being injured.
To interrupt the closing procedure, release
the door mounted remote trunk lid switch.