Page 158 of 442
.
Your vehicle’s")
158 Controls in detailAutomatic transmission
�Automatic transmissionInformation on driving with an automatic
transmission is found in the “Getting
started” section (
�page 43).
Your vehicle’s transmission adapts its gear
shifting process to your individual driving
style by continually adjusting the shift
points up or down. These shift point adjust-
ments are performed based on current
operating and driving conditions.
If the operating conditions change, the
automatic transmission reacts by
adjusting its gear shift program.The automatic transmission selects indi-
vidual gears automatically, depending on:
�
the gear selector lever positionD with
gear ranges (
�page 160)
�
the selected shift program
(C/S)(
�page 164)
or
(C/S/M) (E 55 AMG only)
(
�page 165)
�
the position of the accelerator pedal
(�page 164)
�
the vehicle speed
The current gear selector lever position
and shift program (
C/S) or (
C/S/M) appear
in the multifunction display (
�page 129).
An additional indication of the current gear
selector lever position can be found on the
cover of the shifting-gate. The indicators
come on when you activate a switch (e.g.
unlocking the vehicle or opening a door)
and go out after approximately
15 minutes.When the gear selector lever is in
positionD, you can influence transmission
shifting by:
�
limiting the gear range
�
changing gears manually
iDuring the brief warm-up, transmission
upshifting is delayed. This allows the
catalytic converter to heat up more
quickly to operating temperature.
Warning!
G
It is dangerous to shift the gear selector
lever out ofP orN if the engine speed is
higher than idle speed. If your foot is not
firmly on the brake pedal, the vehicle could
accelerate quickly forward or reverse. You
could lose control of the vehicle and hit
someone or something. Only shift into gear
when the engine is idling normally and when
your right foot is firmly on the brake pedal.
Page 169 of 442

169 Controls in detail
Good visibility
Activating exterior rear view mirror
parking position
Follow these steps to activate the mirror
parking position so that the passen-
ger-side exterior rear view mirror will be
turned downward to the stored position.�
Make sure you have stored a parking
position for the passenger-side exterior
rear view mirror (
�page 118).
�
Make sure the
Mirror adjustment
parking aid function in the
Conve-
nience
submenu of the control system
is switched on (
�page 152).
�
Switch on ignition (if not already on).
�
Press button2 for the passenger-side
exterior rear view mirror.
�
Place the gear selector lever in reverse
gearR.
The passenger-side exterior rear view
mirror will be turned downward to the
stored position.1Driver’s side exterior rear view mirror
button
2Passenger-side exterior rear view
mirror button
The exterior rear view mirror returns to its
previously stored driving position:
�
ten seconds after you put the gear se-
lector lever out of positionR
�
immediately once your vehicle exceeds
a speed of approximately 6 mph
(10 km/h)
�
immediately when you press button1
for driver’s side mirror.
Windshield wipers
Information on the windshield wipers is
found in the “Getting started” section
(�page 48).
A rain sensor automatically controls the
windshield wipers depending on how wet
the windshield is.
�
Switch on ignition.
�
Set the wiper switch to positionI
(�page 48).
After the initial wipe, pauses between
wipes are automatically controlled by the
rain sensor.
iIntermittent wiping is interrupted when
the vehicle is at a standstill and a front
door is opened.
Page 171 of 442
171 Controls in detail
Good visibility
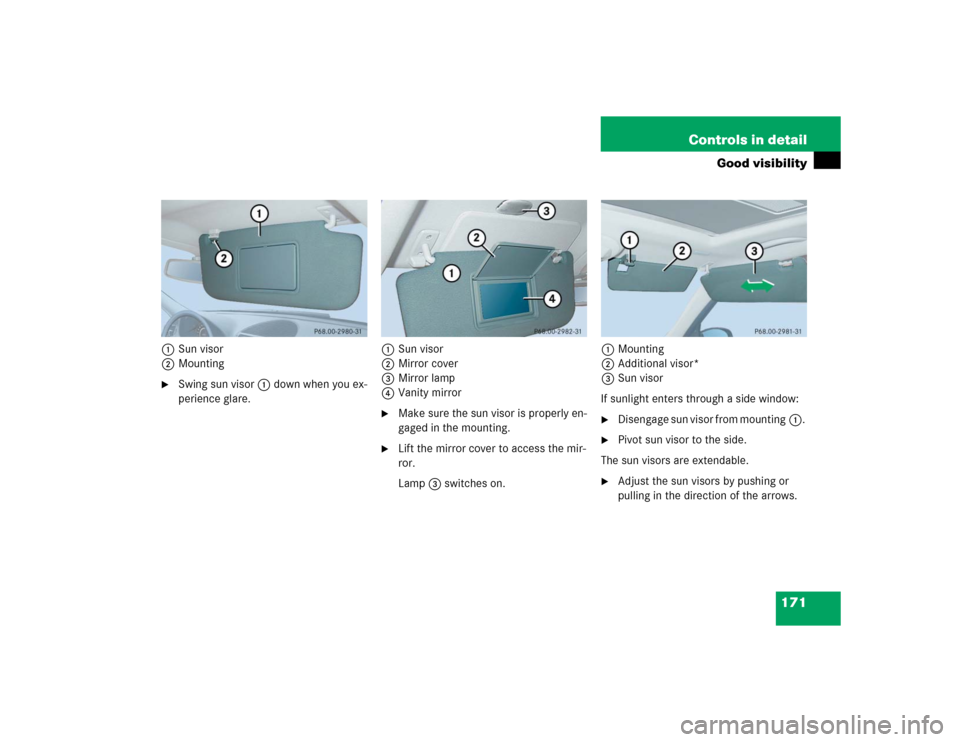
1Sun visor
2Mounting�
Swing sun visor1 down when you ex-
perience glare. 1Sun visor
2Mirror cover
3Mirror lamp
4Vanity mirror
�
Make sure the sun visor is properly en-
gaged in the mounting.
�
Lift the mirror cover to access the mir-
ror.
Lamp3 switches on.1Mounting
2Additional visor*
3Sun visor
If sunlight enters through a side window:
�
Disengage sun visor from mounting1.
�
Pivot sun visor to the side.
The sun visors are extendable.
�
Adjust the sun visors by pushing or
pulling in the direction of the arrows.
Page 175 of 442
175 Controls in detail
Climate control
Rear air vents
The storage compartment between the
front seats can be ventilated (
�page 244).
Item
1
Climate control panel
2
Thumbwheel for air volume control
for left center air vent
3
Left center air vent, adjustable
4
Center air vent, fixed
5
Right center air vent, adjustable
6
Thumbwheel for air volume control
for right center air vent
7
Thumbwheel for air volume control
for adding cold air
8
Thumbwheel for air volume control
for side air vent
9
Side defroster vent, fixed
a
Side air vent, adjustable
iFor draft-free ventilation, move the
sliders for the center vents 3 and 5
to the middle position.
Item
1
Left rear center air vent, adjustable
2
Right rear center air vent, adjust-
able
3
Thumbwheel for air volume control
for right rear center air vent
4
Thumbwheel for air volume control
for left rear center air vent
Page 178 of 442

178 Controls in detailClimate controlSetting the temperature
Use temperature controls1 and6 to
separately adjust the air temperature on
each side of the passenger compartment.
You should raise or lower the temperature
setting in small increments, preferably
starting at 72°F (22°C).
Increasing�
Turn the temperature control1 or6
slightly to the right.
The climate control system will corre-
spondingly adjust the interior air tem-
perature.Decreasing
�
Turn the temperature control1 or6
slightly to the left.
The climate control system will corre-
spondingly adjust the interior air tem-
perature.
Adjusting air distribution
Adjusting manually
Use air distribution control4
(�page 176) to adjust the air distribution.
�
Press the Ubutton.
The indicator lamp on the Ubutton
goes out.
�
Press air distribution rocker switch4
(�page 176) until the display shows
the desired setting.
The current air distribution appears in
the air distribution display9.
Adjusting automatically
�
Press the Ubutton.
The indicator lamp on the button
comes on. The air distribution and vol-
ume is adjusted automatically.
Symbol
Function
a
Directs air through the center,
side and rear passenger com-
partment air vents
Z
Directs air to the windows
X
Directs air into the entire
vehicle interior
Y
Directs air to the footwells
Page 179 of 442

179 Controls in detail
Climate control
Adjusting center air vents:
The thumbwheels for left2 and right6
center air vents are automatically posi-
tioned for optimum interior airflow. In this
position, center air vent4 and adjustable
left and right center vents3 and5 are
fully opened.
Heating:
Only in manual mode is it possible to lower
the temperature in the headroom by regu-
lating the cold-airflow using
thumbwheel7 (
�page 174).Windshield fogged on the outside
�
Switch the windshield wipers on
(�page 48).
�
Press the Ubutton.
The indicator lamp on the button
comes on.
Adjusting air volume
Adjusting manually
Five blower speeds are available.�
Press� to decrease orQ to in-
crease air volume to the desired level.
The
Auto
display disappears and the
automatic mode is switched off. The
selected blower speed is shown in the
display.Adjusting automatically
�
Press the U button.
The air volume is adjusted automatical-
ly.
Defrosting
Activating�
Press buttonP.
The indicator lamp on the button
comes on.
or
�
Switch off air recirculation, if selected.
Press buttonO.
The indicator lamp on the button goes
out.iThese settings should only be selected
for a short time.
��
Page 180 of 442
180 Controls in detailClimate control�
Close center air vents.
�
Open left and right side air vents and
adjust side air vents upwards.
Deactivating
�
Press buttonP.
The indicator lamp on the button goes
out. Defrosting is turned off.
Air recirculation mode
Switch to air recirculation mode to prevent
unpleasant odors from entering the vehicle
from the outside. This setting cuts off the
intake of outside air and recirculates the
air in the passenger compartment.Activating
�
Press buttonO.
The indicator lamp on the button
comes on.
Warning!
G
When the outside temperature is below
41°F (5°C), only switch to air recirculation
mode for short periods to prevent window
fogging.
iThe air recirculation mode is activated
automatically at high outside tempera-
tures.
If you have turned off the air condition-
ing (
�page 182) or the outside
temperature is below 41°F (5°C), the
air recirculation mode will not switch
on automatically.
��
Page 185 of 442
185 Controls in detail
Automatic climate control*
Item
1
Automatic climate control panel
2
Thumbwheel for air volume control
for left center air vent
3
Left center air vent, adjustable
4
Air vent, fixed
5
Right center air vent, adjustable
6
Thumbwheel for air volume control
for right center air vent
7
Thumbwheel for air volume control
for adding cold air
8
Thumbwheel for air volume control
for side air vent
9
Side defroster vent, fixed
a
Side air vent, adjustable
Item
1
Thumbwheel for air volume control
for side air vent
2
Side air vent, adjustable
Item
1
Left rear center air vent, adjustable
2
Right rear center air vent, adjust-
able
3
Air volume control for right rear
center air vent
4
Temperature rocker switch, right
5
Display
6
Temperature rocker switch, left
7
Air volume control for left rear cen-
ter air vent