Page 143 of 442
 for basic display�
Move the selection marker with
theæ orç button to the
Instr.
cluster
submenu.")
143 Controls in detail
Control system
Selecting display (speed display or out-
side temperature) for basic display�
Move the selection marker with
theæ orç button to the
Instr.
cluster
submenu.
�
Press buttonj ork repeatedly
until you see this message in the dis-
play:
Basic display
.
The selection marker is on the current
setting.
�
Pressæ orç to select the dis-
play permanently shown in the multi-
function display.Tire pressure display*
Use this function to set the unit for the tire
pressure display.
�
Move the selection marker with the
æ or ç button to the
Instr,
cluster
submenu.
�
Press button j or k repeatedly
until you see this message in the dis-
play:
Display unit Tire pressure
.
The selection marker is on the current
setting.
�
Press æ or ç to select the de-
sired tire pressure unit.Time / Date submenu
Access the
Time/Date
submenu via the
Settings
menu. Use the
Time/Date
sub-
menu to change the time and date display
settings. The following functions are avail-
able:
Function
Page
Synchronizing the time
144
Set time (hours)
144
Set time (minutes)
144
Set date (month)
145
Set date (day)
145
Set date (year)
145
iInformation on setting the time, refer to
separate COMAND instructions.
Page 146 of 442

146 Controls in detailControl systemLighting submenu
Access the
Lighting
submenu via the
Set-
tings
menu. Use the
Lighting
submenu
to change the lamp and lighting settings on
your vehicle. The following functions are
available:Setting daytime running lamp mode
(USA only)
�
Move the selection marker with
theæ orç button to the Lighting
submenu.
�
Press buttonj ork repeatedly
until you see this message in the dis-
play:
Lamp circuit headlamp
.
The selection marker is on the current
setting.
�
Pressæ orç to select
manual
or
daytime running lamp (
constant
)
mode. This function is not available in
countries where daytime running
lamps are mandatory.With daytime running lamp mode se-
lected and the exterior lamp switch at
position 0, the following lamps will
come on automatically when the en-
gine is turned on:
�
Parking lamps and low beam head-
lamps
�
License plate lamps (in low ambient
light conditions)
Function
Page
Set daytime running lamp mode
(USA only)
146
Set locator lighting
147
Ambient light level
147
Exterior lamps delayed shut-off
148
Interior lighting delayed shut-off
149
iIf you turn the exterior lamp switch to
another position, the corresponding
lamp(s) will switch on.
For safety reasons, resetting the Lighting
submenu to factory settings
(
�page 138) while driving will not re-
set the daytime running lamp mode.
In the display you will then see the mes-
sage:
Lighting
Page 147 of 442

147 Controls in detail
Control system
Setting locator lighting
During darkness, the following lamps will
come on when the exterior lamp switch is
in position
U
, the locator lighting fea-
ture is activated and the vehicle is un-
locked by SmartKey:
�
Parking lamps
�
Tail lamps
�
License plate lamps
�
Front fog lamps
The locator lighting switches off when the
driver’s door is opened. It switches off au-
tomatically after a period of approximately
40 seconds.
�
Move the selection marker with
theæ orç button to the
Light-
ing
submenu.
�
Press buttonj ork repeatedly
until you see this message in the dis-
play:
Function Surround lighting
.
The selection marker is on the current
setting.
�
Pressæ orç to select the de-
sired setting.
The locator lighting will be switched on
or off.
Ambient light level
Using this function, you can adjust the
brightness of the ambient lighting.
�
Move the selection marker with the
æ orç button to the Lighting
submenu.
�
Press button j ork repeatedly
until you see the message
Ambient
light Level
in the display.
The selection marker is on the current
setting.
�
Press æ orç to select the
brightness of the lighting. 1 represents
the darkest setting and 5 represents
the brightest setting.
The ambient light is switched off below
setting 1 or above setting 5. The selec-
tion marker points to off.
Page 153 of 442

153 Controls in detail
Control system
Adjusting the dynamic seat
The function dynamic seat adjustment lets
you determine the way the seat adjusts
while driving.�
Move the selection marker with
theæ orç button to the Dynamic Seat
submenu.
�
Press buttonj ork repeatedly
until you see this message in the dis-
play:
Dyn. Multi-cont. Seat, driver
for the driver seat or Dyn. Multi-cont. Seat, fr. pass.
for the passenger seat.
The selection marker is on the current
setting.
�
Pressæ orç to switch function Level 1
or
Level 2
.
Trip computer menu
Use the trip computer menu to call up sta-
tistical data on your vehicle. The following
information is available:Fuel consumption statistics after start
�
Press buttonÿ orè repeatedly
until you see the first function of the
Trip computer menu.
�
Press buttonj ork repeatedly
until you see this message in the left
display:
After start
.
1Distance driven since start
2Time elapsed since start
3Average speed since start
4Average fuel consumption since start
Function
Page
Fuel consumption statistics after
start
153
Fuel consumption statistics
since last reset
154
Call up range (distance to empty)
154
Page 154 of 442

154 Controls in detailControl systemFuel consumption since last reset�
Press buttonÿ orè repeatedly
until you see the first function of the
Trip computer menu.
�
Press buttonj ork repeatedly
until you see this message in the dis-
play:
After reset
.
1Distance driven since last reset
2Time elapsed since last reset
3Average speed since last reset
4Average fuel consumption since last re-
setResetting fuel consumption statistics
�
Press buttonÿ orè repeatedly
until you see the first function of the
Trip computer menu.
�
Press buttonj ork repeatedly
until you see the reading that you want
to reset in the display.
�
Press and hold the reset button in the
instrument cluster (
�page 22) until
the value is reset to 0.Call up range (distance to empty)
�
Press buttonÿ orè repeatedly
until you see the first function of the
Trip computer menu.
�
Press buttonj ork repeatedly
until you see this message in the dis-
play:
Range:
In the display you will see the calculat-
ed range based on the current fuel tank
level.
iAll statistics stored since the last en-
gine start will be reset approximately
four hours after the SmartKey in the
starter switch is turned to position0 or
removed from the starter switch.
Resetting will not occur if you turn the
SmartKey back to position1 or2 with-
in this time period.
Page 155 of 442

155 Controls in detail
Control system
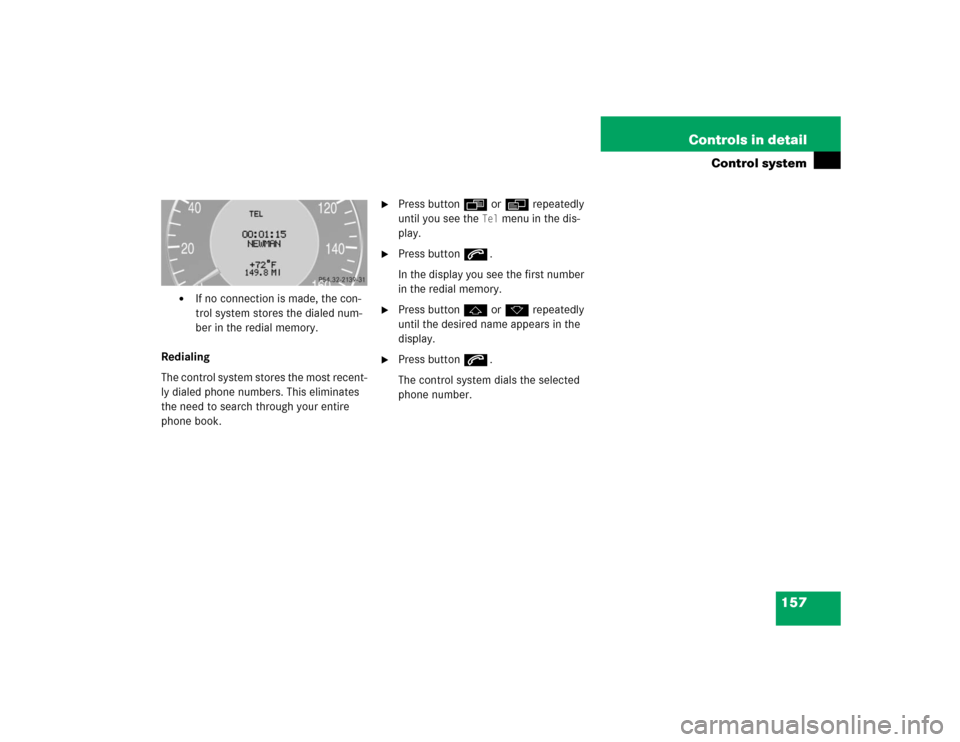
TEL menu*
You can use the functions in the
TEL
menu
to operate your telephone, provided it is
connected to a hands-free system and
switched on.
�
Switch on the telephone and COMAND.
�
Press buttonÿ orè on the
steering wheel repeatedly until you see
the
Tel
menu in the display.
Which messages will appear in the display
field depends on whether your telephone is
switched on or off:
�
If the telephone is off, the message in
the multifunction display is:
PHONE OFF
.
�
If the telephone is on:
The telephone will then search for a
network. During this time the display is
empty.
As soon as the telephone has found a
network,
READY
appears in the display.
This standby message indicates that your
telephone is ready for use and you can op-
erate it using the control system.
Warning!
G
A driver’s attention to the road must always
be his / her primary focus when driving. For
your safety and the safety of others, we rec-
ommend that you pull over to a safe location
and stop before placing or taking a tele-
phone call. If you choose to use the tele-
phone while driving, please use the
hands-free device and only use the tele-
phone when weather, road and traffic condi-
tions permit.
Some jurisdictions prohibit the driver from
using a cellular telephone while driving a ve-
hicle.
Bear in mind that at a speed of just 30 mph
(approximately 50 km / h), your vehicle is
covering a distance of approximately
44 feet (approximately 13.5 m) every sec-
ond.
Never operate radio transmitters equipped
with a built-in or attached antenna (i.e. with-
out being connected to an external antenna)
from inside the vehicle while the engine is
running. Doing so could lead to a malfunc-
tion of the vehicle’s electronic system, pos-
sibly resulting in an accident and / or
personal injury.
Page 156 of 442

156 Controls in detailControl systemAnswering a call
When your telephone is ready to receive
calls, you can answer a call at any time. In
the display you will then see the message:�
Press buttons.
You have answered the call. In the dis-
play you see the length of the call.Ending a call
�
Press buttont.
You have ended the call. In the display
you will again see the standby mes-
sage.
Dialing a number from the phone book
If your telephone is ready to receive calls,
you may select and dial a number from the
phone book at any time.
�
Press buttonÿ orè repeatedly
until you see the
Tel
menu in the dis-
play.
�
Press buttonj ork.
The control system reads the phone
book which is stored in the telephone.
This may take up to 30 seconds. In the
display you will see the message Please wait
.
When the message
Please wait
disap-
pears, the phone book has been load-
ed.
�
Press buttonj ork repeatedly
until the desired name appears in the
display.
The stored names are displayed in as-
cending or descending alphabetical or-
der.
�
Press buttons.
The system dials the selected phone
number.�
If the connection is successful, the
name of the party you called and
the duration of the call will appear
in the display.
iIf you do not wish to accept a call,
press buttont.
iIf you press and holdj ork for
longer than one second, the system
scrolls rapidly through the list of names
until you release the button again.
Cancel the quick search mode by
pressingt.
Page 157 of 442
157 Controls in detail
Control system
�
If no connection is made, the con-
trol system stores the dialed num-
ber in the redial memory.
Redialing
The control system stores the most recent-
ly dialed phone numbers. This eliminates
the need to search through your entire
phone book.
�
Press buttonÿ orè repeatedly
until you see the
Tel
menu in the dis-
play.
�
Press buttons.
In the display you see the first number
in the redial memory.
�
Press buttonj ork repeatedly
until the desired name appears in the
display.
�
Press buttons.
The control system dials the selected
phone number.