Page 4 of 442

ContentsSafety and Security........................... 55
Occupant safety................................... 56
Airbags ........................................... 57
Seat belts ....................................... 62
Children in the vehicle .................... 65
Blocking of rear door window
operation ........................................ 72
Panic alarm .......................................... 73
Activating ....................................... 73
Deactivating ................................... 73
Driving safety systems ......................... 74
ABS ................................................ 74
BAS ................................................ 76
ESP ................................................. 76
The SBC brake system ................... 79
Four wheel electronic traction
system (4MATIC) with the ESP ....... 82
Anti-theft systems................................ 83
Immobilizer..................................... 83
Anti-theft alarm system .................. 84
Tow-away alarm ............................. 85
Controls in detail............................... 87
Locking and unlocking ......................... 88
SmartKey ....................................... 88
SmartKey with KEYLESS-GO* ........ 91
Opening the doors from the inside . 97
Opening the trunk .......................... 97
Closing the trunk............................ 99
Trunk lid opening / closing
system* ......................................... 99
Trunk lid emergency release ........ 104
Separately locking the trunk ........ 105
Separately unlocking the trunk .... 106
Automatic central locking ............ 106
Locking and unlocking from
the inside ..................................... 107
Seats ................................................. 108
Easy-entry / exit feature* ............. 108
Removing and installing front
seat head restraints ..................... 109
Rear seat head restraints ............. 110
Multicontour seat* ....................... 111
Drive - Dynamic seat* ................... 112
Heated seats* .............................. 113
Seat ventilation* .......................... 114Memory function ............................... 116
Storing positions in memory ........ 117
Recalling positions from
memory........................................ 117
Storing exterior rear view
mirror parking position ................ 118
Lighting ............................................. 119
Exterior lamp switch .................... 119
Combination switch ..................... 123
Hazard warning flasher ................ 123
Interior lighting ............................ 124
Door entry lamps ......................... 125
Trunk lamp ................................... 125
Instrument cluster ............................. 126
Instrument cluster illumination .... 126
Coolant temperature gauge ......... 127
Trip odometer .............................. 127
Tachometer .................................. 128
Outside temperature indicator ..... 128
Page 25 of 442
25 At a glance
Center console
�Center console
Upper part
Item
Page
1
Automatic climate control*
184
2
COMAND system, see sep-
arate operating instruc-
tions
3
Seat heater*, front passen-
ger side
113
4
Electronic Stability Pro-
gram (ESP) control switch
78
5
Central locking switch
107
6
Opening/closing button
for storage tray or CD
changer*, see separate op-
erating instructions
243
7
Rear seat head restraints
switch, folding down
110
Item
Page
8
Rear window sunshade*
78
9
Seat heater*, driver’s side
113
a
Hazard warning flasher
switch
123
b
PASSENGER AIRBAG OFF
indicator lamp
67
Page 35 of 442

35 Getting started
Adjusting
Seat adjustment
The seat adjustment switches are located
on the front doors.
1Head restraint height
2Seat height
3Seat cushion tilt
4Seat fore and aft adjustment
5Backrest tilt
�
Turn the SmartKey in the starter switch
to position1 or2 (
�page 31)
or
�
Press the KEYLESS GO* start/stop
button once or twice (
�page 33).
or
�
Open the driver’s or passenger door.Seat fore and aft adjustment
�
Press the switch forward or backward
in the direction of arrow4.
Adjust a comfortable seating position
that still allows you to reach the
accelerator / brake pedal safely. The
position should be as far to the rear as
possible, consistent with ability to
properly operate controls.
A child’s risk of serious or fatal injuries is
significantly increased if the child restraints
are not properly secured in the vehicle and
the child is not properly secured in the child
restraint.
iWhen moving the seat, be sure there
are no items in the footwell or behind
the seats. Otherwise you could damage
the seats.
The memory function (
�page 116) lets
you store the setting for the seat posi-
tion together with the setting for the
steering wheel and the exterior rear
view mirrors.
Page 36 of 442

36 Getting startedAdjustingSeat cushion tilt�
Press the switch up or down in the di-
rection of arrow3 until your upper
legs are lightly supported.
Backrest tilt
�
Press the switch forward or backward
in the direction of arrow5 until your
arms are slightly angled when holding
the steering wheel.
Seat height
�
Press the switch up or down in the di-
rection of arrow2.Head restraint height
�
Press the switch up or down in the di-
rection of arrow5.Head restraint tilt
Manually adjust the angle of the head re-
straint.
�
Push or pull on the lower edge of the
head restraint cushion.
More information on seats can be found in
the “Controls in detail” section
(
�page 108).
Warning!
G
For your protection, drive only with properly
positioned head restraints.
Adjust head restraint so that the center of
the head restraint supports the back of the
head at eye level. This will reduce the poten-
tial for injury to the head and neck in the
event of an accident or similar situation.
Do not drive the vehicle without the seat
head restraints. Head restraints are intend-
ed to help reduce injuries during an acci-
dent.
Page 109 of 442
.
Front seat hea")
109 Controls in detailSeats
Removing and installing front seat head restraints
Information on head restraint adjustment
can be found in the “Getting started” sec-
tion (
�page 36).
Front seat head restraints
Removing front head restraints
�
Press switch1upwards and hold until
the head restraint is fully extended.
�
Pull out head restraint.Installing front head restraints:
�
Press switch1upwards and hold for
about five seconds.
�
Push the head restraint down until it
engages.
�
Adjust head restraint to desired posi-
tion (
�page 36).
Warning!
G
For your protection, drive only with properly
positioned head restraints.
Adjust head restraint so that the center of
the head restraint supports the back of the
head at eye level. This will reduce the poten-
tial for injury to the head and neck in the
event of an accident or similar situation.
Do not drive the vehicle without the seat
head restraints. Head restraints are intend-
ed to help reduce injuries during an acci-
dent.
iTilt the backrest to the rear for easier
removal and installation of the head re-
straints.
Page 110 of 442
110 Controls in detailSeatsRear seat head restraints
Folding head restraints back with
switch in the center console
The rear seat head restraints can be folded
backward for increased visibility.
1Head restraint release switch
�
Make sure the ignition is switched on.
All the lights in the instrument cluster
come on.
�
Press the symbol-side on rocker
switch1to release the head re-
straints.
The head restraints will fold backward.Placing head restraints upright
�
Pull the head restraint forward until it
locks into position.
!The rear seat head restraints cannot be
adjusted.
Warning!
G
For safety reasons, always drive with the
rear head restraints in the upright position
when the rear seats are occupied.
Keep the area around head restraints clear
of articles (e.g. clothing) to not obstruct the
folding operation of the head restraints.
!Make sure the head restraints engage
when placing them upright. Otherwise
their protective function cannot be as-
sured.
Page 111 of 442

Multicontour s")
111 Controls in detailSeats
Removing and installing rear seat head
restraints
For removing and installing rear seat head
restraints, see “Expanding the cargo ar-
ea*” (
�page 239)
Multicontour seat*
The multicontour seat has a movable seat
cushion and inflatable air cushions built
into the backrest to provide additional lum-
bar and side support.
The seat cushion movement, backrest
cushion height and curvature can be con-
tinuously varied with switches on the right
side of the seat after turning the SmartKey
in the starter switch to position2 or press-
ing the KEYLESS-GO* start/stop button
twice.1Seat cushion depth
2Backrest bottom
3Backrest center
4Backrest side bolster adjustment
�
Make sure the ignition is switched on.
All lights in the instrument cluster
come on.Seat cushion depth
�
Adjust the seat cushion depth to the
length of your upper leg using
switch1.
Backrest contour
�
Adjust the contour of the backrest to
the desired position using æ or
ç.
�
Move the backrest support to the bot-
tom by using button2 or to the center
by using button3.
Backrest side bolsters
�
Adjust the side bolsters so that they
provide good lateral support using
switch4.
Page 237 of 442
237 Controls in detail
Loading
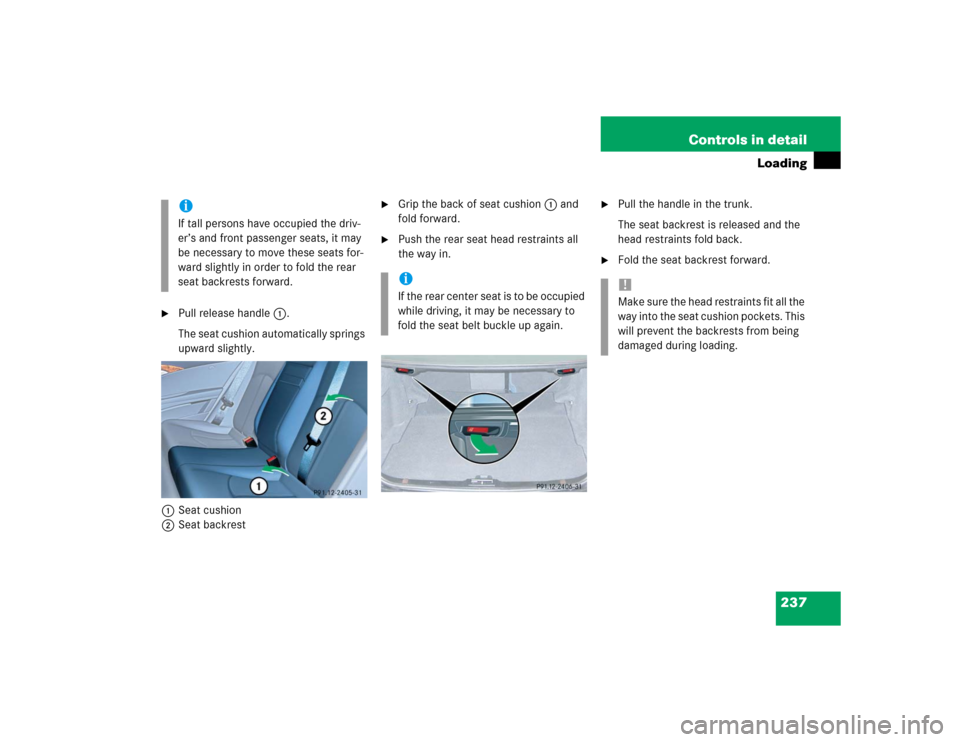
�
Pull release handle1.
The seat cushion automatically springs
upward slightly.
1Seat cushion
2Seat backrest
�
Grip the back of seat cushion1 and
fold forward.
�
Push the rear seat head restraints all
the way in.
�
Pull the handle in the trunk.
The seat backrest is released and the
head restraints fold back.
�
Fold the seat backrest forward.
iIf tall persons have occupied the driv-
er’s and front passenger seats, it may
be necessary to move these seats for-
ward slightly in order to fold the rear
seat backrests forward.
iI f t h e r e a r c e n t e r s e a t i s t o b e o c c u p i e d
while driving, it may be necessary to
fold the seat belt buckle up again.
!Make sure the head restraints fit all the
way into the seat cushion pockets. This
will prevent the backrests from being
damaged during loading.