Page 7 of 442

Contents
At the gas station .............................. 278
Check regularly and before
a long trip..................................... 279
Engine compartment ......................... 281
Hood ............................................ 281
Engine oil ..................................... 282
Transmission fluid level ................ 285
Coolant level ................................ 285
Battery ......................................... 287
Windshield washer system and
headlamp cleaning system* ......... 288
Tires and wheels ................................ 289
Important guidelines .................... 289
Life of tire..................................... 290
Direction of rotation ..................... 290
Checking tire inflation pressure ... 290
Rotating wheels ........................... 293Winter driving ..................................... 295
Winter tires ................................... 295
Block heater* (Canada only) ......... 296
Snow chains.................................. 296
Maintenance....................................... 297
Flexible Service System PLUS
(FSS PLUS).................................... 297
Clearing the service indicator ....... 298
Service term exceeded ................. 298
Calling up the service indicator..... 298
Resetting the service indicator ..... 298
Setting the date for special
works ............................................ 300
Calling up the service data
information ................................... 301
Vehicle care........................................ 302
Cleaning and care of vehicle ......... 302
Practical hints.................................. 309
What to do if … ................................... 310
Lamps in instrument cluster ......... 310
Lamp in center console ................ 317
Messages in the display................ 318
Where will I find ...? ............................ 350
First aid kit.................................... 350
Vehicles with TIREFIT kit
(E 55 AMG) ................................... 350
Spare wheel .................................. 350
Luggage box ................................. 351
Vehicle tool kit.............................. 352
Unlocking / locking in an emergency .. 353
Unlocking the vehicle ................... 353
Locking the vehicle ....................... 354
Changing batteries in the
SmartKey/ SmartKey with
KEYLESS-GO* ............................... 355
Fuel filler flap emergency release . 357
Manually unlocking the
transmission selector lever ........... 357
Opening / closing in an emergency..... 358
Sliding / pop-up roof* or panorama
sliding / pop-up roof* .................... 358
Page 21 of 442
21 At a glance
Cockpit
Item
Page
1
Parking brake pedal
45, 51
2
Hood lock release
281
3
Steering wheel adjustment
stalk
37
Heated steering wheel*
248
4
Parking brake release
45
5
Combination switch�
Turn signals
47
�
Windshield wipers
48
�
High beam
47
6
Door control panel
28
7
Exterior lamp switch
119
Item
Page
8
Headlamp washer button*
170
9
Cruise control lever�
Cruise control
218
�
Distronic*
214
a
Instrument cluster
22,
126
b
Multifunction steering
wheel
24,
130
c
Horn
d
Lever for voice control sys-
tem*, see separate
operating instructions
Item
Page
e
Starter switch
31
f
Front Parktronic* warning
indicator
229
g
Overhead control panel
27
h
Mobile phone/Glasses box
242
j
Glove box lid release, glove
box lock
242
k
Glove box
242
l
Center console
25
Page 281 of 442

281 Operation
Engine compartment
�Engine compartment
Hood
Opening
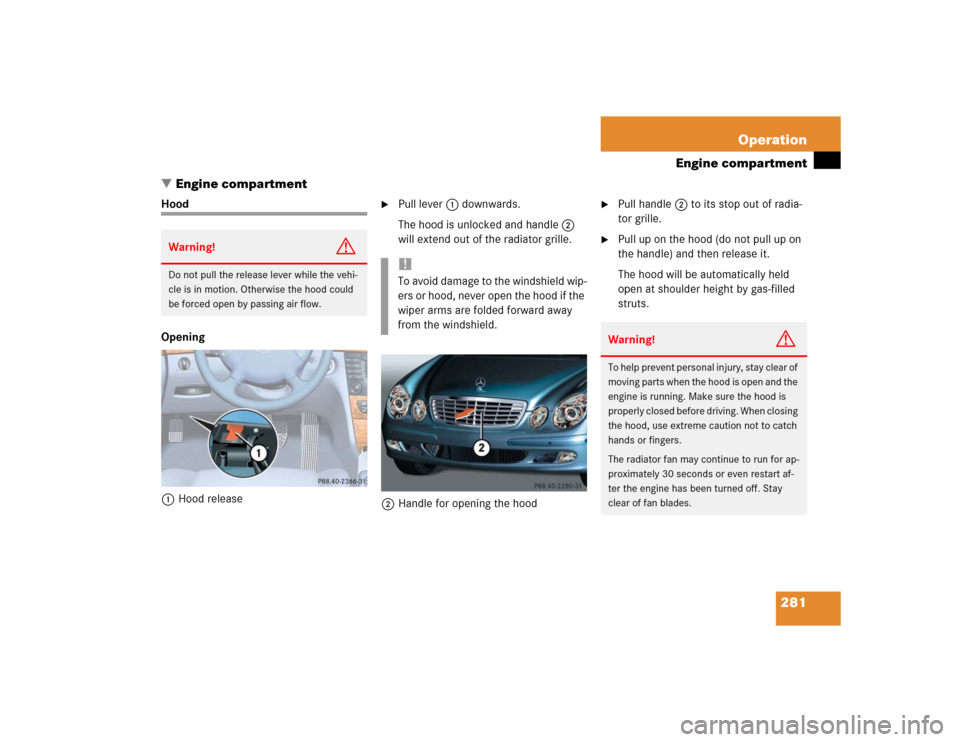
1Hood release
�
Pull lever1 downwards.
The hood is unlocked and handle2
will extend out of the radiator grille.
2Handle for opening the hood
�
Pull handle2 to its stop out of radia-
tor grille.
�
Pull up on the hood (do not pull up on
the handle) and then release it.
The hood will be automatically held
open at shoulder height by gas-filled
struts.
Warning!
G
Do not pull the release lever while the vehi-
cle is in motion. Otherwise the hood could
be forced open by passing air flow.
!To avoid damage to the windshield wip-
ers or hood, never open the hood if the
wiper arms are folded forward away
from the windshield.
Warning!
G
To help prevent personal injury, stay clear of
moving parts when the hood is open and the
engine is running. Make sure the hood is
properly closed before driving. When closing
the hood, use extreme caution not to catch
hands or fingers.
The radiator fan may continue to run for ap-
proximately 30 seconds or even restart af-
ter the engine has been turned off. Stay
clear of fan blades.
Page 306 of 442

306 OperationVehicle care�
Clean the wiper blade inserts with a
clean cloth and detergent solution.Window cleaning
�
Turn on the wipers and place it in a ver-
tical position.
For information on placing the wipers in a
vertical position, see “Replacing wiper
blades” (
�page 364).Use a window cleaning solution on all glass
surfaces. An automotive glass cleaner is
recommended.
Warning!
G
For safety reasons, switch off wipers and re-
move SmartKey from starter switch before
cleaning the wiper blades, otherwise the
wiper motor might suddenly turn on and
cause injury.!Fold the windshield wiper arms back
onto the windshield before turning the
SmartKey in the starter switch.
Hold on to the wiper when folding the
wiper arm back. If released, the force
of the impact from the tensioning
spring could crack the windshield.
!Fold the windshield wiper arms away
from the windshield to a vertical posi-
tion only. They could otherwise dam-
age the hood. Warning!
G
For safety reasons, switch off wipers and re-
move SmartKey from starter switch before
cleaning the windshield, otherwise the wiper
motor might suddenly turn on and cause in-
jury.
!Fold the windshield wiper arms back
onto the windshield before turning the
SmartKey in the starter switch.
Hold on to the wiper when folding the
wiper arm back. If released, the force
of the impact from the tensioning
spring could crack the windshield.
��
Page 361 of 442
361 Practical hints
Replacing bulbs
Replacing bulbs for front lamps
1Bulb socket for turn signal lamp
2High beam halogen bulb
3Bulb socket for parking and standing
lamp
4Cover for Bi-Xenon* (low beam and
high beam) or halogen (low beam)
headlampBi-Xenon* headlamps Low beam halogen bulb
�
Switch off the lights.
�
Open the hood (
�page 281).
�
Turn the locking mechanism counter-
clockwise and remove headlamp
cover4.
�
Pull electrical connector off.
�
Release the retaining springs and take
out the bulb.
�
Insert the new bulb in the socket so
that the base is in the recess on the
lower left.
�
Attach the retaining springs.
�
Insert connector into the bulb.
�
Align headlamp cover and click into
place.
Warning!
G
Do not remove the cover4 for the Bi-Xe-
non headlamp. Because of high voltage in
Xenon lamps, it is dangerous to replace the
bulb or repair the lamp and its components.
We recommend that you have such work
done by a qualified technician.
Page 365 of 442
365 Practical hints
Replacing wiper blades
Installing wiper blades�
Slide wiper blade onto wiper arm until
it locks in place.
�
Rotate wiper blade into position paral-
lel to wiper arm.
�
Fold the wiper arm backward to rest on
the windshield. Make sure you hold on
to the wiper when folding the wiper arm
back.
!Never open the hood when the wiper
arm is folded forward.
Hold on to the wiper when folding the
wiper arm back. If released, the force
of the impact from the tensioning
spring could crack the windshield.
Do not allow the wiper arms to contact
the windshield glass without a wiper
blade inserted.
Make certain that the wiper blades are
properly installed. Improperly installed
wiper blades may cause windshield
damage.
For your convenience, we recommend
that you have this work carried out by
an authorized Mercedes-Benz Center.