Page 91 of 400

91 Controls in detail
Locking and unlocking
Locking and unlocking from the inside
You can lock or unlock the doors and the
trunk from inside using the central locking
switch. This can be useful, for example, if
y o u w a n t t o l o c k t h e v e h i c l e b e f o r e s t a r t i n g
to drive.
The fuel filler flap will not be locked or
unlocked with the central locking switch.The switch is located in the center console.
Central locking switch1Locking
2Unlocking
Locking�
Press upper switch position1 of
central locking switch.
If all doors are closed, the vehicle
locks.Unlocking
�
Press lower switch position2 of
central locking switch.
The vehicle unlocks.
Warning!
G
When leaving the vehicle, always remove the
SmartKey from the starter switch, take it
with you and lock the vehicle. Do not leave
children unattended in the vehicle, or with
access to an unlocked vehicle. Unsuper-
vised use of vehicle equipment may cause
an accident and/or serious personal injury.
iYou can open a locked door from the
inside. Open door only when conditions
are safe to do so.
If the vehicle was previously centrally
locked using the SmartKey, it will not
unlock using the central locking switch.
If the vehicle was previously locked
with the central locking switch�
while in the selective remote con-
trol mode, only the door opened
from the inside is unlocked.
�
while in the global remote control
mode, the complete vehicle is
unlocked when a door is opened
from the inside.
Page 108 of 400

108 Controls in detailLightingSwitching rear interior lights on and off�
Press buttonV.
The lights in the rear passenger
compartment come on.
�
Press buttonV again.
The lights in the rear passenger
compartment go out.
Switching right front reading lamp on
and off
�
Press right buttonX.
The right reading lamp comes on.
�
Press right buttonX again.
The right reading lamp goes out.
Switching left front reading lamp on and
off
�
Press left buttonX.
The left reading lamp comes on.
�
Press left buttonX again.
The left reading lamp goes out.
Door entry lamps
The appropriate door entry lamp switches
on if a door is opened in darkness and if
the interior lighting is switched to auto-
matic function.
The entry lamp switches off automatically
when the door is closed.
Trunk lamp
The trunk lamp switches on if the trunk lid
is opened.
If you leave the trunk open for an extended
period of time, the trunk lamp will switch
off automatically after approximately ten
minutes.
iIf you turn the SmartKey in the starter
switch to position0 and switch off the
exterior headlamps, the door entry
lamps will remain lit for approximately
five minutes.
Page 209 of 400
209 Controls in detail
Loading
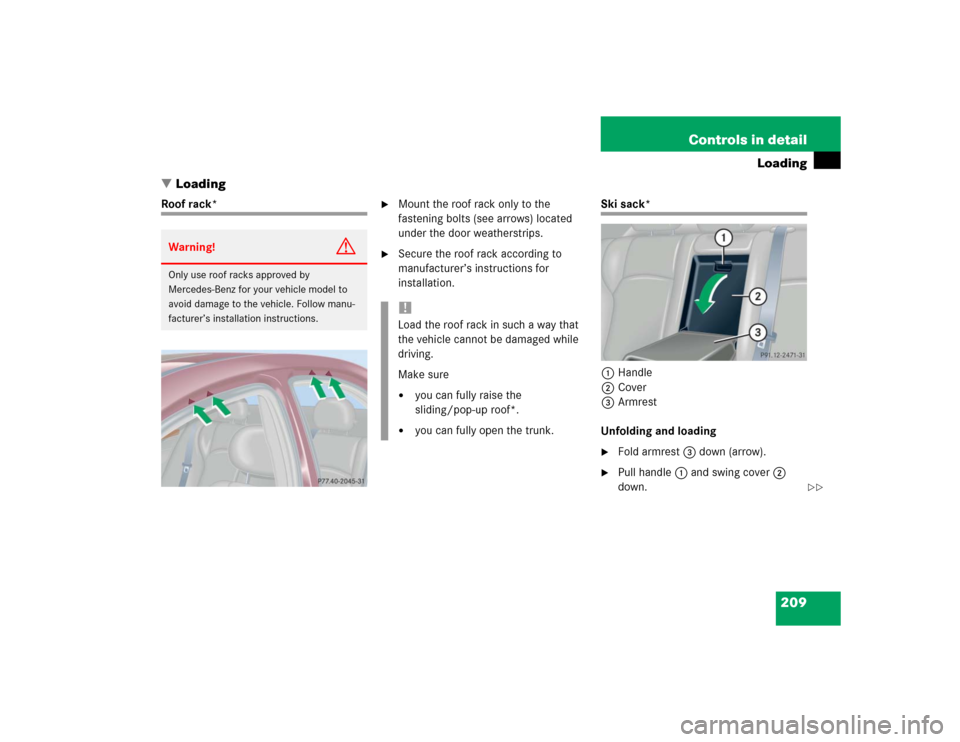
�Loading
Roof rack*
�
Mount the roof rack only to the
fastening bolts (see arrows) located
under the door weatherstrips.
�
Secure the roof rack according to
manufacturer’s instructions for
installation.
Ski sack*
1Handle
2Cover
3Armrest
Unfolding and loading�
Fold armrest3 down (arrow).
�
Pull handle1 and swing cover2
down.
Warning!
G
Only use roof racks approved by
Mercedes-Benz for your vehicle model to
avoid damage to the vehicle. Follow manu-
facturer’s installation instructions.
!Load the roof rack in such a way that
the vehicle cannot be damaged while
driving.
Make sure�
you can fully raise the
sliding/pop-up roof*.
�
you can fully open the trunk.
��
Page 210 of 400
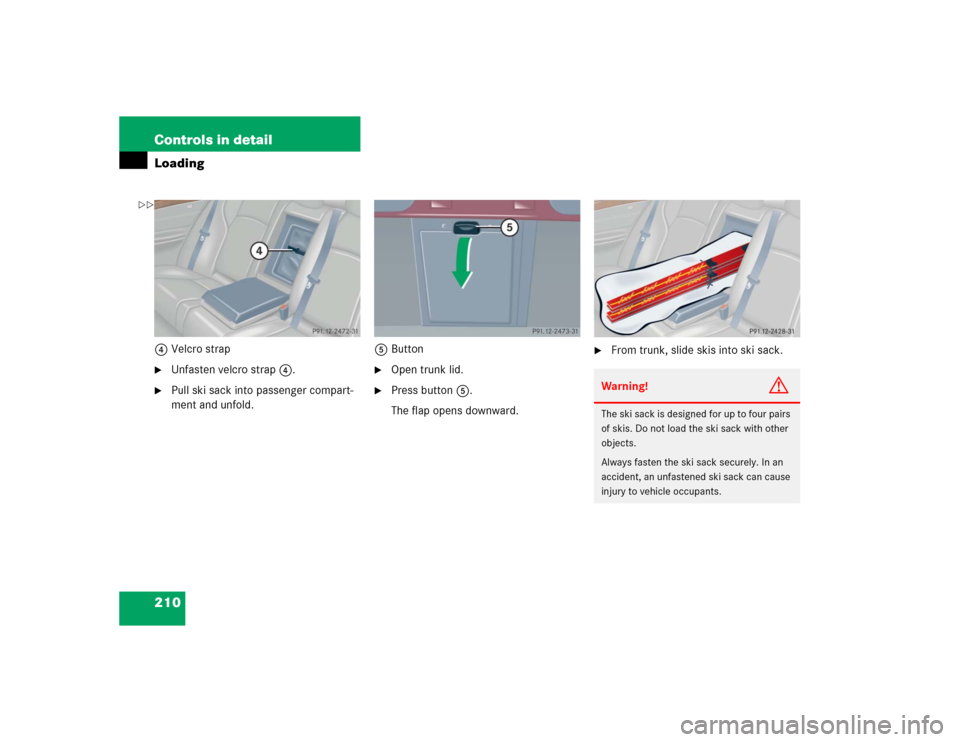
210 Controls in detailLoading4Velcro strap�
Unfasten velcro strap4.
�
Pull ski sack into passenger compart-
ment and unfold.5Button
�
Open trunk lid.
�
Press button5.
The flap opens downward.
�
From trunk, slide skis into ski sack.Warning!
G
The ski sack is designed for up to four pairs
of skis. Do not load the ski sack with other
objects.
Always fasten the ski sack securely. In an
accident, an unfastened ski sack can cause
injury to vehicle occupants.
��
Page 211 of 400
211 Controls in detail
Loading
6Strap�
Tighten strap6 by pulling at the loose
end (arrow) until the skis in the ski sack
are tightly secured.7Hook
8Eye
�
Connect hook7 to eye8.
Tighten strap by pulling at the loose
end (arrow).Unloading and folding
�
Loosen the straps.
�
Disconnect hook7 from eye8.
�
Unload skis.
�
Close flap in trunk.
�
Fold and flatten ski sack lengthwise.
�
Place folded ski sack inside recess of
backrest.
�
Fasten velcro strap.
�
Close ski sack compartment cover.
Page 212 of 400

212 Controls in detailLoadingRemoving the ski sack
You can remove the ski sack for cleaning
or drying.
1Button
2Ski sack frame
3Flap�
Open trunk lid.
�
Press button1.
The flap3 opens downward.
�
Press button1 firmly until ski sack
frame2 is released.
�
Pull ski sack frame2 with ski sack
out.Installing the ski sack
Install the ski sack in the reverse order.
�
Push ski sack frame2 with ski sack
inward until the ski sack frame snaps
into place.
�
Close flap3.
�
Close trunk lid.
Split rear bench seat*
To expand the cargo area, you can fold
down the left and right rear seat backrests.
The two sections can be folded down
separately.
Warning!
G
Never drive vehicle with trunk open while
the ski sack is removed. Deadly carbon
monoxide (CO) gases may enter vehicle in-
terior, resulting in unconsciousness and
death.iTo prevent unauthorized persons from
accessing the trunk, always close the
flap.
Warning!
G
When expanding the luggage area, always
fold the seat cushions fully forward.
Unless you are transporting cargo, the
backrests must remain properly locked in
the upright position.
In an accident, during hard braking or
sudden maneuvers, loose items will be
thrown around inside the vehicle, and cause
injury to vehicle occupants unless the items
are securely fastened in the vehicle.
Page 213 of 400
213 Controls in detail
Loading
Folding the backrest forward
The release handle1 is located in the
trunk.�
Pull release handle1.
�
Fully retract and fold rearward head
restraints (
�page 95).
�
Pull release handle2.
�
Fold seat cushion3 forward.
�
Fold backrest4 forward.Setting up rear seat bench
�
Fold backrest4 rearward until it
engages.
�
Fold seat cushion3 rearward until it
locks into position.
Page 214 of 400

214 Controls in detailLoadingIf the backrest is not locked into position,
a red indicator5 will be visible.�
Check for secure locking by pushing
and pulling on the backrest.
Loading instructions
The total load weight including vehicle oc-
cupants and luggage/cargo should not ex-
ceed the vehicle capacity weight indicated
on the certification tag which can be found
on the left door pillar.
The handling characteristics of a fully load-
ed vehicle depend greatly on the load dis-
tribution. It is therefore recommended to
load the vehicle according to the illustra-
tions shown, with the heaviest items being
placed towards the front of the vehicle.
Warning!
G
If a red indicator is visible with the backrest
up, then the backrest is not properly locked
into position.
Always lock backrest in its upright position
when rear seat bench is occupied, cargo is
being carried in the trunk, or the extended
cargo compartment is not in use. Check for
secure locking by pushing and pulling on the
backrest.
In an accident, during hard braking or sud-
den maneuvers, loose items will be thrown
around inside the vehicle, and cause injury
to vehicle occupants unless the items are
securely fastened in the vehicle.
To help avoid personal injury during a
collision or sudden maneuver, exercise care
when transporting cargo.iTo prevent unauthorized persons from
access to the trunk, always lock
backrest in its upright position.