Page 96 of 400

and tilt the head restraint to the
desired position.R")
96 Controls in detailSeatsHead restraint tilt
Two different head restraint angle
positions are available.�
Press the release button (
�page 95)
and tilt the head restraint to the
desired position.Removing and installing rear seat head
restraints (outer seats)
1Release button
Removing rear seat head restraints
�
Fold back head restraint (
�page 95).
�
Pull head restraint to its highest
position.
�
Push release button1 and pull out
head restraint.
!Make sure the head restraints engage
when placing them upright. Otherwise
their protective function cannot be as-
sured.
Warning!
G
For your protection, drive only with properly
positioned head restraints.
Adjust head restraint so that the head re-
straint supports the back of the head at eye
level. This will reduce the potential for injury
to the head and neck in the event of an ac-
cident or similar situation.
Do not drive the vehicle without the seat
head restraints. Head restraints are intend-
ed to help reduce injuries during an acci-
dent.
Do not interchange head restraints from
front and rear seat.!The center rear seat head restraint
cannot be removed.
Page 97 of 400
97 Controls in detail
Seats
Installing rear seat head restraints�
Insert head restraint and push it down
until it engages.
�
Push button1 and adjust head
restraint to desired position.
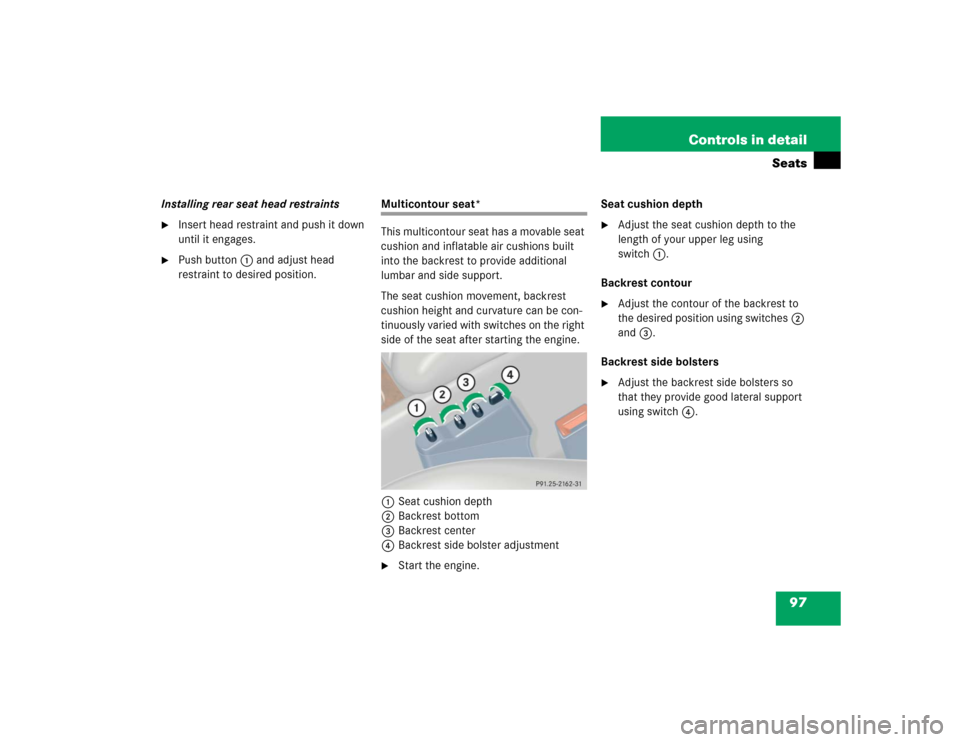
Multicontour seat*
This multicontour seat has a movable seat
cushion and inflatable air cushions built
into the backrest to provide additional
lumbar and side support.
The seat cushion movement, backrest
cushion height and curvature can be con-
tinuously varied with switches on the right
side of the seat after starting the engine.
1Seat cushion depth
2Backrest bottom
3Backrest center
4Backrest side bolster adjustment�
Start the engine.Seat cushion depth
�
Adjust the seat cushion depth to the
length of your upper leg using
switch1.
Backrest contour
�
Adjust the contour of the backrest to
the desired position using switches2
and3.
Backrest side bolsters
�
Adjust the backrest side bolsters so
that they provide good lateral support
using switch4.
Page 99 of 400

99 Controls in detail
Memory function*
�Memory function*
The memory button and stored position
switch are located on the door.
You can store up to three different settings
per SmartKey.
The following settings are saved for each
stored position:�
Driver’s seat and backrest position
�
Steering wheel position
�
Driver’s side exterior rear view mirror
position
�
Passenger side exterior rear view mir-
ror position
�
Front passenger seat position
These key-dependent memory settings
can be deactivated if desired
(
�page 135).
!Prior to operating the vehicle, the driv-
er should check and adjust the seat
height, seat position fore and aft, and
seat backrest angle if necessary, to
ensure adequate control, reach and
comfort. The head restraint should also
be adjusted for proper height. See also
the section on airbags (
�page 55) for
proper seat positioning.
In addition, adjust the steering wheel to
ensure adequate control, reach, opera-
tion and comfort. Both the interior and
exterior rear view mirrors should be
adjusted for adequate rear vision.
Fasten seat belts. Infants and small
children should be seated in a properly
secured restraint system that complies
with U.S. Federal Motor Vehicle Safety
Standards 213 and 225 and Canadian
Motor Vehicle Safety Standards 213
and 210.2.
Warning!
G
Do not activate the memory function while
driving. Activating the memory function
while driving could cause the driver to lose
control of the vehicle.
Page 100 of 400

100 Controls in detailMemory function*The memory button and stored position
button are located on the door.
1Memory button
2Stored position button�
Make sure the ignition is switched on
or the relevant door is open and the
SmartKey is inserted in the starter
switch.
Storing positions into memory�
Adjust the seats, steering wheel and
rear view mirrors to the desired posi-
tion (
�page 32).
�
Turn button2 to selected memory
position.
�
Press memory button1.
�
Release memory button and push
button2 within three seconds.
All the settings are stored at the
selected position.
Recalling positions from memory�
Turn button2 to selected memory
position.
�
Press and hold button2 until the seat,
steering wheel and rear view mirrors
have fully moved to the stored posi-
tions.iReleasing the button immediately
stops movement to the stored posi-
tions.Warning!
G
Do not operate the power seats using the
memory button if the seat backrest is in an
excessively reclined position. Doing so
could cause damage to front or rear seats.
First move backrest to an upright position.
Page 101 of 400

101 Controls in detail
Memory function*
Storing exterior rear view mirror parking position
For easier parking, you can adjust the
passenger-side exterior rear view mirror so
that you can see the right rear wheel as
soon as you engage reverse gearR.
For information on activating the parking
position feature, see “Setting parking posi-
tion* for exterior rear view mirror”
(�page 136).1Memory button
2Adjustment button
3Passenger-side exterior rear view
mirror button
�
Stop the vehicle.
�
Switch on ignition (if not already on).
�
Press button3.
The passenger-side exterior rear view
mirror is selected.
�
Adjust the exterior rear view mirror
with button2 so that you see the rear
wheel and the road curb.
�
Press memory button1.
�
Within three seconds, press bottom of
adjustment button2.
The parking position is stored if the
mirror does not move.
iYou can store a parking position for the
passenger-side exterior rear view
mirror for each SmartKey.
iIf the mirror does move, repeat the
above steps. After the setting is stored,
you can move the mirror again.
Page 108 of 400

108 Controls in detailLightingSwitching rear interior lights on and off�
Press buttonV.
The lights in the rear passenger
compartment come on.
�
Press buttonV again.
The lights in the rear passenger
compartment go out.
Switching right front reading lamp on
and off
�
Press right buttonX.
The right reading lamp comes on.
�
Press right buttonX again.
The right reading lamp goes out.
Switching left front reading lamp on and
off
�
Press left buttonX.
The left reading lamp comes on.
�
Press left buttonX again.
The left reading lamp goes out.
Door entry lamps
The appropriate door entry lamp switches
on if a door is opened in darkness and if
the interior lighting is switched to auto-
matic function.
The entry lamp switches off automatically
when the door is closed.
Trunk lamp
The trunk lamp switches on if the trunk lid
is opened.
If you leave the trunk open for an extended
period of time, the trunk lamp will switch
off automatically after approximately ten
minutes.
iIf you turn the SmartKey in the starter
switch to position0 and switch off the
exterior headlamps, the door entry
lamps will remain lit for approximately
five minutes.
Page 109 of 400
.
The instrument cluster is activated when
you")
109 Controls in detail
Instrument cluster
�Instrument cluster
For a full view illustration of the instrument
cluster, see “At a glance” (
�page 22).
The instrument cluster is activated when
you
�
open a door
�
turn on the ignition
�
press the reset button (
�page 22)
�
switch on the exterior lamps
You can change the instrument cluster
settings in the Instrument cluster submenu
of the control system (
�page 126).
Instrument cluster illumination
Use the reset button (
�page 22) to adjust
the illumination brightness for the instru-
ment cluster.To brighten illumination
�
Turn the reset button in the instrument
cluster clockwise (
�page 22).
The instrument cluster illumination will
brighten.
To dim illumination
�
Turn the reset button in the instrument
cluster counterclockwise (
�page 22).
The instrument cluster illumination will
dim.
iThe instrument cluster illumination is
dimmed or brightened automatically to
suit ambient light conditions.
The instrument cluster illumination will
also be adjusted automatically when
you switch on the vehicle’s exterior
lamps.
Page 110 of 400

110 Controls in detailInstrument clusterCoolant temperature display
Turn the SmartKey in the starter switch to
position1 or2.
�
Call up the trip odometer and main
odometer by pressing buttonè
orÿ on the multifunction steering
wheel (
�page 114).
�
Press buttonj ork until the
coolant temperature display appears.During severe operating conditions, e.g.
stop-and-go traffic, the coolant tempera-
ture may rise close to 248°F (120°C).
The engine should not be operated with
the coolant temperature above 248°F
(120°C). Doing so may cause serious en-
gine damage which is not covered by the
Mercedes-Benz Limited Warranty.
Warning!
G
�
Driving when your engine is badly
overheated can cause some fluids which
may have leaked into the engine
compartment to catch fire. You could be
seriously burned.
�
Steam from an overheated engine can
cause serious burns and can occur just
by opening the hood. Stay away from
the engine if you see or hear steam com-
ing from it.
Turn off the engine, get out of the vehicle
and do not stand near the vehicle until the
engine has cooled down.
iExcessive coolant temperature triggers
a warning in the multifunction display.