Page 299 of 400

299 Practical hints
What to do if …
Display symbol
Display message
Possible cause
Possible solution
K
CLOSE
SUNROOF!
You have opened the driver’s door with
the SmartKey removed from the starter
switch and the sliding/pop-up roof open.
�
Close the sliding/pop-up roof
(�page 199).
J
CLOSE
SUNROOF!
You have opened the driver’s door with
the SmartKey removed from the starter
switch and the sliding/pop-up roof open.
�
Close the sliding/pop-up roof
(�page 199).
L
TELE AID
DRIVE TO WORKSHOP!
One or more main functions of the Tele
Aid system* are malfunctioning.
�
Have the Tele Aid system* checked by
an authorized Mercedes-Benz Center.
ì
FUNCTION
NOT AVAILABLE!
This display appears if buttonì
orí on the multifunction steering
wheel is pressed and the vehicle is not
equipped with a telephone*.
Ê
TRUNK OPEN!
This message will appear whenever the
tailgate is open.
�
Close the tailgate.
W
WASHER FLUID
CHECK LEVEL!
The fluid level has dropped to
about
1/3of total reservoir capacity.
�
Add washer fluid (
�page 259).
Page 305 of 400
305 Practical hints
Unlocking/locking in an emergency
�Unlocking/locking in an emergency
Unlocking the vehicle
If you are unable to unlock the vehicle with
the SmartKey, open the driver’s door using
the mechanical key and the tailgate using
the emergency release.
The passenger door cannot be unlocked
manually.
1Mechanical key locking tab
2Mechanical key
�
Move locking tab1 in direction of
arrow and slide mechanical key2 out
of the housing.Unlocking the driver’s door
1Unlocked
2Locked
�
Unlock the door with the mechanical
key. To do so, push the mechanical key
in the lock until it stops and turn it to
the left1.
iUnlocking your vehicle with the
mechanical key will trigger the
anti-theft alarm system.
To cancel the alarm, do one of the
following:�
Press buttonŒ or‹ on the
SmartKey
�
Insert the SmartKey in the starter
switch
Page 306 of 400
 is required to open the tailgate.
The emergency release is located on the
in")
306 Practical hintsUnlocking/locking in an emergencyUnlocking the tailgate
A minimum height clearance of 6.40 ft
(1.95 m) is required to open the tailgate.
The emergency release is located on the
inside of the tailgate.
1Release lever
2Cover�
Remove cover2 from the trim on the
tailgate.
�
Push release lever1 all the way to the
right.
�
Open the tailgate.
Locking the vehicle
If you are unable to lock the vehicle with
the SmartKey, lock it with the mechanical
key as follows:�
Close the passenger doors and the
tailgate.
�
Press the central locking switch in the
cockpit (
�page 89).
�
Check to see whether the locking
knobs on the passenger doors are
down. If necessary push them down
manually.
�
Slide mechanical key out of the
SmartKey (
�page 305).
�
Lock the driver’s door with the
mechanical key (
�page 305).
Changing batteries in the SmartKey
If the batteries in the SmartKey are
discharged, the vehicle can no longer be
locked or unlocked. It is recommended to
have the batteries replaced at an
authorized Mercedes-Benz Center.
Batteries contain materials that can harm
the environment if disposed of improperly.
Recycling of batteries is the preferred
method of disposal. Many states require
sellers of batteries to accept old batteries
for recycling.
!The tailgate swings open upwards
automatically. Always make sure there
is sufficient overhead clearance.
Warning!
G
Keep the batteries out of reach of children.
If a battery is swallowed, seek medical help
immediately.
Page 308 of 400

308 Practical hintsUnlocking/locking in an emergencyFuel filler flap
In case the central locking system does
not release the fuel filler flap, you can open
it manually.�
Open the tailgate.
�
Press button1.
�
Fold down trim panel2.
�
Reach inside through opening3 in
direction of arrow.
�
Turn release knob4 clockwise
(arrow).
The fuel filler flap can now be opened.Manually unlocking the transmission
gear selector lever
In the case of power failure the transmis-
sion gear selector lever can be manually
unlocked, e.g. to tow the vehicle.
1Coin holder
2Tool
�
Open the storage compartment in front
of the center armrest (
�page 217).
�
Release coin holder1 (e.g. using a
small coin).
�
Swing coin holder1 aside.
�
Insert a tool2 (e.g. flat blade
screwdriver) into the opening.
�
Perform the following two steps
simultaneously:�
Push tool2 down.
�
Move gear selector lever from
positionP.
�
Reinstall coin holder1 after removing
tool2 from the opening.iThe gear selector lever is locked again
when moving it to positionP.
Page 315 of 400
315 Practical hints
Replacing bulbs
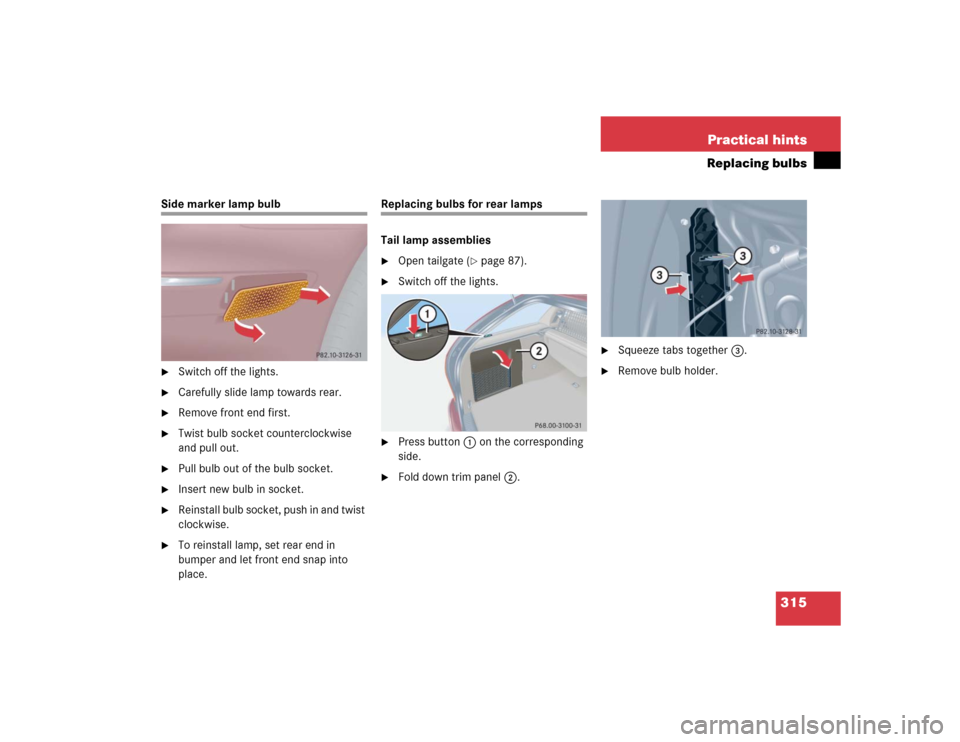
Side marker lamp bulb�
Switch off the lights.
�
Carefully slide lamp towards rear.
�
Remove front end first.
�
Twist bulb socket counterclockwise
and pull out.
�
Pull bulb out of the bulb socket.
�
Insert new bulb in socket.
�
Reinstall bulb socket, push in and twist
clockwise.
�
To reinstall lamp, set rear end in
bumper and let front end snap into
place.
Replacing bulbs for rear lamps
Tail lamp assemblies�
Open tailgate (
�page 87).
�
Switch off the lights.
�
Press button1 on the corresponding
side.
�
Fold down trim panel2.
�
Squeeze tabs together3.
�
Remove bulb holder.
Page 367 of 400

367 Index
Storage compartment inside 209
Tailgate 87
Tie-down rings 214
Cargo tie-down rings 214
Cassette operation
Playing cassettes 182
Cassette player
Operating 119
Catalytic converter 246
CD changer* 185
CD operation 185
CD player
Operating 118
Center console 25
Lower part 26
PASS. AIRBAG OFF
indicator lamp 279
Upper part 25
Centigrade
Setting temperature units 125Central locking
Automatic 88
From inside 89
Switch 89
Switching on/off
(control system) 131
Unlocking from inside 89
Central locking switch 89
Certification label 338
Changing
Key setting 132
Changing CDs 185
Charcoal filter 165
Charging
Vehicle battery 325
CHECK ENGINE
malfunction indicator lamp 23, 276
Checking
Coolant level 257
Oil level 251, 254
Tire inflate pressure 251
Vehicle lighting 251Child safety 65
Airbags 58
Infant and child
restraint systems 62, 65
LATCH-type child seat anchors 71
Child safety switch see
Blocking of rear door window operation
Cigarette lighter 220
Cleaning
Cloth upholstery 272
Cup holder 271
Gear selector lever 271
Hard plastic trim items 271
Headlamps 145
Headliner and shelf
below rear window 271
Instrument cluster 270
Leather upholstery 271
Light alloy wheels 270
MB Tex upholstery 272
Plastic and rubber parts 272
Seat belts 271
Steering wheel 271
Page 368 of 400

368 Index
Upholstery 271
Windows 270
Windshield 48
Wiper blades 270
Wood trims 272
Climate control 150
Adjusting 153
Defogging windshield 153
Defrosting 154
Setting the temperature 152
Clock 23, 124
Closing
Glove box 215
Hood 253
Side windows 197
Sliding/pop-up roof 199, 309
Sliding/pop-up roof with
SmartKey 200
Tailgate 88
Windows 196
Windows with SmartKey 198Closing sliding/pop-up roof
In an emergency 309
Cloth upholstery
Cleaning 272
Cockpit 20, 357
Cockpit management and
data system (COMAND*) 358
COMAND*
See separate operating instructions
Combination switch 103
High beam flasher 47, 104
Turn signals 46
Windshield wipers 47
Comfort driving
Transmission program mode 143
Consumer information 355
Control and operation of radio
transmitter 246
Control system 111, 358
AUDIO menu 116
Convenience submenu 132
Display digital speedometer 116Functions 112, 115
Instrument cluster submenu 124
Lighting submenu 127
Malfunction memory menu 120
Menus 114, 115
Multifunction display 111
Multifunction steering wheel 112
NAVI menu 119
Selecting radio system 117
Selecting satellite radio* system 117
Settings menu 121
Standard display menu 116
Submenus 113, 115
TEL* menu 136
Trip computer menu 134
Vehicle submenu 131
Convenience submenu 132
Activating easy-entry/exit
feature 132
Setting key dependency 133
Setting parking position for
exterior rear view mirror 134
Page 379 of 400

379 Index
N
Navigation system
Operating 119
See separate COMAND*
operating instructions
Night security illumination 102
Setting 129
O
Occupant safety 56
Airbags 57
Children and airbags 58
Children in the vehicle 65
Fastening the seat belt 40
Infant and child restraint systems 65
LATCH-type child seat anchors 71
Seat belts 40, 60
Odometer, main 23
Oil
Adding 256
Consumption 254
Filler neck 256Oil level
Checking 251
One-touch gearshifting 140
Canceling gear range limit 140
Downshifting 140
Upshifting 140
Opening
Ashtray 219
Doors from the inside 87
Fuel filler flap 250
Fuel filler flap manually 308
Glove box 215
Hood 252
Side windows 197
Sliding/pop-up roof 199, 309
Sliding/pop-up roof in an
emergency 309
Sliding/pop-up roof with
SmartKey 200
Tailgate 87
Windows 196
Windows with SmartKey 198Operating
Audio system 169
Cassette player 119
CD player 118
COMAND* see separate
operating instructions
Navigation system 119
Radio 117
Radio transmitter 246
Telephone* 136, 169, 189
Vehicle outside
the USA and Canada 13
Operating safety
Audio system 169
Operator’s Manual 10
Ornamental moldings 269
Outer seats
Rear seat head restraints 94
Outside temperature indicator 109
Overdue service 265
Overhead control panel 27