Page 105 of 400

105 Controls in detail
Lighting
Interior lighting
The controls are located in the overhead
control panel.
1Rear interior lights
2Right front reading lamp
3Rocker switch for automatic control
system
4Left front reading lampActivating automatic control
�
Press rocker switch3 to center
position.
Interior lamps are switched on in
darkness, even when you:�
unlock the vehicle
�
open a door
�
remove the SmartKey from the
starter switch
�
open the tailgate
The interior lamps are switched off after a
preset time (
�page 130).Deactivating automatic control
�
Press the= symbol on rocker
switch3.
The interior lighting remains switched
off, even when you:�
unlock the vehicle
�
open a door
�
remove the SmartKey from the
starter switch
�
open the tailgate
Manual control
Switching all front interior lights on and
off
�
Press theW symbol on rocker
switch3.
The front interior lights come on.
�
Press rocker switch3 to center
position to activate the automatic
control.
iIf the door remains open, the interior
lamps switch off automatically after
approximately five minutes, when the
SmartKey is removed or in starter
switch position0.
An interior lamp switched on manually
does not go out automatically.
Page 106 of 400

106 Controls in detailLightingSwitching rear interior lights on and off�
Press buttonV.
The lights in the rear passenger
compartment come on.
�
Press buttonV again.
The lights in the rear passenger
compartment go out.Switching right front reading lamp on
and off
�
Press right buttonX.
The right reading lamp comes on.
�
Press right buttonX again.
The right reading lamp goes out.
Switching left front reading lamp on and
off
�
Press left buttonX.
The left reading lamp comes on.
�
Press left buttonX again.
The left reading lamp goes out.
Door entry lamps
The appropriate door entry lamp switches
on if a door is opened in darkness and if
the interior lighting is switched to auto-
matic function.
The entry lamp switches off automatically
when the door is closed.
iThe setting selected for the interior
lighting is used for the cargo compart-
ment lighting as well.
If you leave the tailgate open for an
extended period of time, the cargo
compartment lighting will switch off
automatically after approximately ten
minutes
iIf you turn the SmartKey in the starter
switch to position0 and switch off the
exterior headlamps, the door entry
lamps will remain lit for approximately
five minutes.
Page 205 of 400
205 Controls in detail
Loading
�Loading
Roof rack*�
Attach the roof rack only to the roof
rails.
�
Secure the roof rack according to
manufacturer’s instructions for
installation.
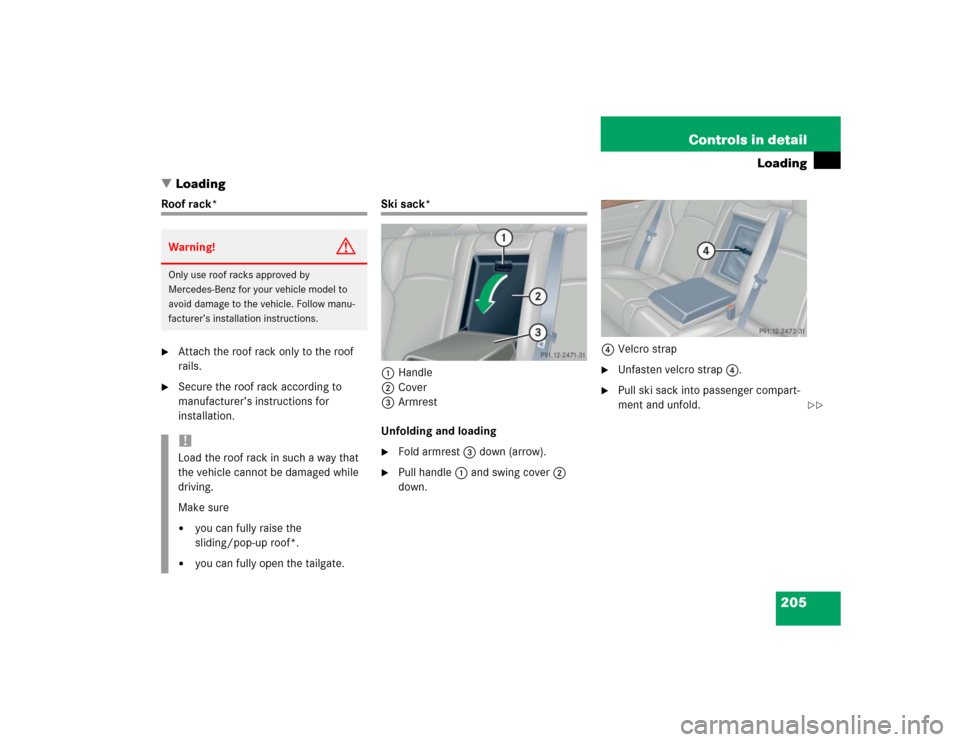
Ski sack*
1Handle
2Cover
3Armrest
Unfolding and loading�
Fold armrest3 down (arrow).
�
Pull handle1 and swing cover2
down.4Velcro strap
�
Unfasten velcro strap4.
�
Pull ski sack into passenger compart-
ment and unfold.
Warning!
G
Only use roof racks approved by
Mercedes-Benz for your vehicle model to
avoid damage to the vehicle. Follow manu-
facturer’s installation instructions.!Load the roof rack in such a way that
the vehicle cannot be damaged while
driving.
Make sure�
you can fully raise the
sliding/pop-up roof*.
�
you can fully open the tailgate.
��
Page 206 of 400
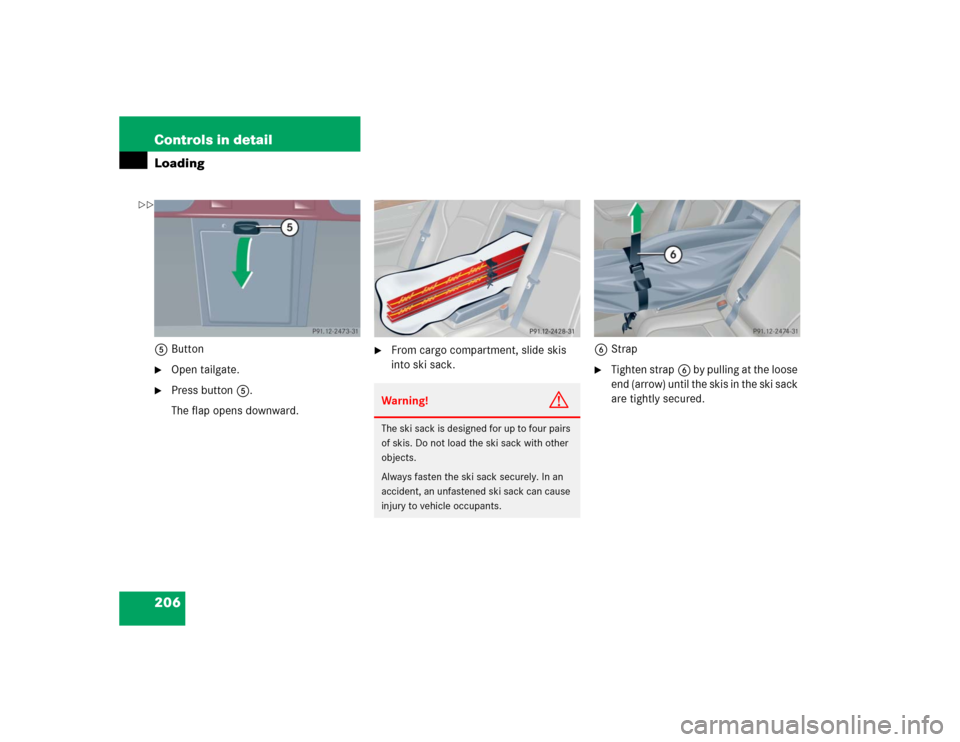
206 Controls in detailLoading5Button�
Open tailgate.
�
Press button5.
The flap opens downward.
�
From cargo compartment, slide skis
into ski sack.6Strap
�
Tighten strap6 by pulling at the loose
end (arrow) until the skis in the ski sack
are tightly secured.
Warning!
G
The ski sack is designed for up to four pairs
of skis. Do not load the ski sack with other
objects.
Always fasten the ski sack securely. In an
accident, an unfastened ski sack can cause
injury to vehicle occupants.
��
Page 207 of 400
207 Controls in detail
Loading
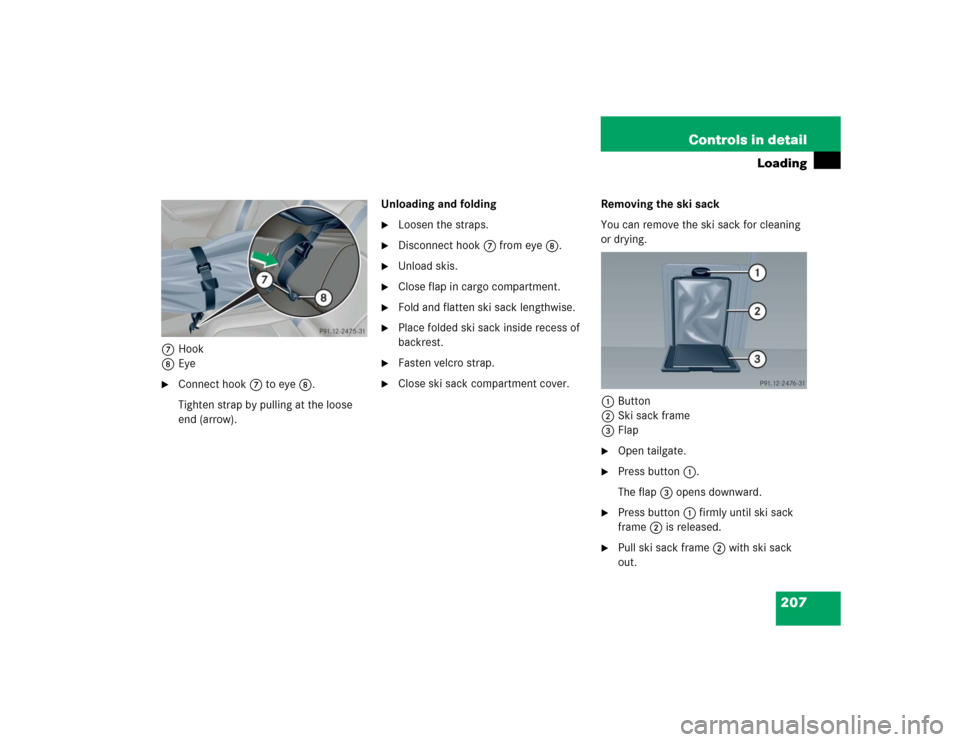
7Hook
8Eye�
Connect hook7 to eye8.
Tighten strap by pulling at the loose
end (arrow).Unloading and folding
�
Loosen the straps.
�
Disconnect hook7 from eye8.
�
Unload skis.
�
Close flap in cargo compartment.
�
Fold and flatten ski sack lengthwise.
�
Place folded ski sack inside recess of
backrest.
�
Fasten velcro strap.
�
Close ski sack compartment cover.Removing the ski sack
You can remove the ski sack for cleaning
or drying.
1Button
2Ski sack frame
3Flap
�
Open tailgate.
�
Press button1.
The flap3 opens downward.
�
Press button1 firmly until ski sack
frame2 is released.
�
Pull ski sack frame2 with ski sack
out.
Page 208 of 400

208 Controls in detailLoadingInstalling the ski sack
Install the ski sack in the reverse order.�
Push ski sack frame2 with ski sack
inward until the ski sack frame snaps
into place.
�
Close flap3.
�
Close tailgate.
Parcel net in cargo compartment
There is a parcel net located on left side of
the cargo compartment. Dependent on the
equipment of your vehicle, there is another
parcel net located on right side of the car-
go compartment.
Removal of parcel net
�
Slide rails1 upward and remove.
Installation of parcel net
�
Place mounting lugs2 in opening.
�
Slide rails1 down as far as they can
go.
Warning!
G
Never drive vehicle with tailgate open while
the ski sack is removed. Deadly carbon
monoxide (CO) gases may enter vehicle in-
terior, resulting in unconsciousness and
death.
Warning!
G
T he p ar c el n e t i s de s ign e d on l y t o ca r ry li gh t
loads.
Do not place heavy or fragile objects, or ob-
jects having sharp edges, in the parcel net.
In an accident, during hard braking or sud-
den maneuvers, they could be thrown
around inside the vehicle, and cause injury
to vehicle occupants.
Page 214 of 400

214 Controls in detailLoadingThe handling characteristics of a fully load-
ed vehicle depend greatly on the load dis-
tribution. It is therefore recommended to
load the vehicle according to the illustra-
tions shown, with the heaviest items being
placed towards the front of the vehicle.
Always place items being carried against
front or rear seat backrests, and fasten
them as securely as possible.
The heaviest portion of the cargo should al-
ways be kept as low as possible since it in-
fluences the handling characteristics of
the vehicle.
Cargo tie-down rings
Four rings1 are located in the cargo
compartment.�
Carefully secure cargo by applying
even load on all rings with rope of suffi-
cient strength to hold down the cargo.
Always follow loading instructions
(�page 213).
Warning!
G
Always fasten items being carried as secure-
ly as possible.
In an accident, during hard braking or sud-
den maneuvers, loose items will be thrown
around inside the vehicle and can cause in-
jury to vehicle occupants unless the items
are securely fastened in the vehicle.
To help avoid personal injury during a colli-
sion or sudden maneuver, exercise care
when transporting cargo.
Never drive vehicle with tailgate open.
Deadly carbon monoxide (CO) gases may
enter vehicle interior resulting in uncon-
sciousness and death.
Page 229 of 400
,
and the reserve SmartKey is not handy:�
Contact the Me")
229 Controls in detail
Useful features
Remote door unlock
In case you have locked your vehicle unin-
tentionally (e.g. SmartKey inside vehicle),
and the reserve SmartKey is not handy:�
Contact the Mercedes-Benz Response
Center at 1-800-756-9018 (in the USA)
or 1-888-923-8367 (in Canada).
You will be asked to provide your pass-
word which you provided when you
completed the subscriber agreement.
�
Then return to your vehicle and pull the
tailgate recessed handle for a minimum
of 20 seconds until the SOS button is
flashing.
The message
EMERGENCY CALL –
CALL CONNECTED appears in the multi-
function display.
As an alternative, you may unlock the vehi-
cle via Internet using the ID and password
sent to you shortly after the completion of
your acquaintance call.The Response Center will then unlock your
vehicle with the remote door unlocking
feature.
iWhen a Tele Aid call has been initiated,
the audio system or the COMAND* sys-
tem audio is muted and the selected
mode (radio, tape or CD) pauses. The
optional cellular phone (if installed)
switches off. If you must use this
phone, the vehicle must be parked. Dis-
connect the coiled cord and place the
call. The COMAND* navigation system
(if engaged) will continue to run. The
display in the instrument cluster is
available for use, and spoken com-
mands are only available by pressing
the RPT button on the COMAND* unit.
A pop-up window will appear in the
COMAND* display to indicate that a
Tele Aid call is in progress.
iThe remote door unlock feature is avail-
able if the relevant cellular phone net-
work is available.
The SOS button will flash and the
message
EMERGENCY CALL –
CALL CONNECTED
will appear in the
multifunction display to indicate
receipt of the door unlock command.
Once the vehicle is unlocked, a
Response Center specialist will
attempt to establish voice contact with
the vehicle occupants.
If the tailgate recessed handle was
pulled for more than 20 seconds
before door unlock authorization was
received by the Response Center, you
must wait 15 minutes before pulling
the tailgate recessed handle again.