Page 212 of 400

212 Controls in detailLoadingRemoving the ski sack
You can remove the ski sack for cleaning
or drying.
1Button
2Ski sack frame
3Flap�
Open trunk lid.
�
Press button1.
The flap3 opens downward.
�
Press button1 firmly until ski sack
frame2 is released.
�
Pull ski sack frame2 with ski sack
out.Installing the ski sack
Install the ski sack in the reverse order.
�
Push ski sack frame2 with ski sack
inward until the ski sack frame snaps
into place.
�
Close flap3.
�
Close trunk lid.
Split rear bench seat*
To expand the cargo area, you can fold
down the left and right rear seat backrests.
The two sections can be folded down
separately.
Warning!
G
Never drive vehicle with trunk open while
the ski sack is removed. Deadly carbon
monoxide (CO) gases may enter vehicle in-
terior, resulting in unconsciousness and
death.iTo prevent unauthorized persons from
accessing the trunk, always close the
flap.
Warning!
G
When expanding the luggage area, always
fold the seat cushions fully forward.
Unless you are transporting cargo, the
backrests must remain properly locked in
the upright position.
In an accident, during hard braking or
sudden maneuvers, loose items will be
thrown around inside the vehicle, and cause
injury to vehicle occupants unless the items
are securely fastened in the vehicle.
Page 213 of 400
213 Controls in detail
Loading
Folding the backrest forward
The release handle1 is located in the
trunk.�
Pull release handle1.
�
Fully retract and fold rearward head
restraints (
�page 95).
�
Pull release handle2.
�
Fold seat cushion3 forward.
�
Fold backrest4 forward.Setting up rear seat bench
�
Fold backrest4 rearward until it
engages.
�
Fold seat cushion3 rearward until it
locks into position.
Page 252 of 400

252 OperationEngine compartment
�Engine compartmentHood
Opening
1Hood release�
Pull lever1 downwards.
The hood is unlocked and handle2
will extend out of the radiator grille. 2Handle for opening the hood
�
Pull handle2 to its stop out of
radiator grille.
�
Pull up on the hood (do not pull up on
the handle) and then release it.
The hood will be automatically held
open at shoulder height by gas-filled
struts.
Warning!
G
Do not pull the release lever while the
vehicle is in motion. Otherwise the hood
could be forced open by passing air flow.
!To avoid damage to the windshield
wipers or hood, never open the hood if
the wiper arms are folded forward away
from the windshield.
Warning!
G
To help prevent personal injury, stay clear of
moving parts when the hood is open and the
engine is running. Make sure the hood is
properly closed before driving. When closing
the hood, use extreme caution not to catch
hands or fingers.
The radiator fan may continue to run for
approximately 30 seconds or even restart
after the engine has been turned off. Stay
clear of fan blades.Warning!
G
If you see flames or smoke coming from the
engine compartment, or if the coolant tem-
perature gauge indicates that the engine is
overheated, do not open the hood. Move
away from vehicle and do not open the hood
until the engine has cooled. If necessary,
call the fire department.
Page 269 of 400

269 Operation
Vehicle care
Engine cleaning
Prior to cleaning the engine compartment,
make sure to protect electrical compo-
nents and connectors from the intrusion of
water and cleaning agents.
Corrosion protection, such as MB Anticor-
rosion Wax, should be applied to the
engine compartment after every engine
cleaning. Before applying, all control
linkage bushings and joints should be
lubricated. The poly-V-belt and all pulleys
should be protected from any wax.Vehicle washing
Do not use hot water or wash your vehicle
in direct sunlight. Only use a mild car wash
detergent, such as Mercedes-Benz
approved Car Shampoo.
Thoroughly spray the vehicle with a dif-
fused jet of water. Direct only a very weak
spray towards the ventilation intake. Use
plenty of water and rinse the sponge and
chamois frequently.
Rinse with clear water and thoroughly dry
with a chamois. Do not allow cleaning
agents to dry on the finish.
Due to the width of the vehicle, fold in
outside mirrors prior to running the vehicle
through an automatic car wash to prevent
damage to the mirrors.
In the winter, thoroughly remove all traces
of road salt as soon as possible.
When washing the underbody, do not
forget to clean the inner sides of the
wheels.Ornamental moldings
For regular cleaning and care of very dirty
chrome-plated parts, use a chrome
cleaner.
Headlamps, tail lamps, side markers,
turn signal lenses
Use a mild car wash detergent, such as
Mercedes-Benz approved Car Shampoo,
with plenty of water.
To prevent scratches, never apply strong
force and only use a soft, non-scratchy
cloth when cleaning the lenses. Do not
attempt to wipe dirty lenses with a dry
cloth or sponge.
Page 270 of 400

270 OperationVehicle careWiper blades�
Fold wiper arms forward.
�
Clean the wiper blade inserts with a
clean cloth and detergent solution.Window cleaning
�
Fold wiper arms forward.
�
Use a window cleaning solution on all
glass surfaces.
An automotive glass cleaner is
recommended.Light alloy wheels
Mercedes-Benz approved Wheel Care
should be used for regular cleaning of the
light alloy wheels.
If possible, clean wheels once a week with
Mercedes-Benz approved Wheel Care,
using a soft bristle brush and a strong
spray of water.
Follow the instructions on container.
Instrument cluster
Use a gentle dishwashing detergent or
mild detergent for delicate fabrics as a
washing solution. Wipe with a cloth moist-
ened in lukewarm solution. Do not use
scouring agents.
Warning!
G
For safety reasons, switch off wipers and
remove SmartKey from starter switch
before cleaning the wiper blades, otherwise
the wiper motor might suddenly turn on and
cause injury.!Fold the windshield wiper arms back
onto the windshield before turning the
SmartKey in the starter switch.
Hold on to the wiper when folding the
wiper arm back. If released, the force
of the impact from the tensioning
spring could crack the windshield.
Warning!
G
For safety reasons, switch off wipers and
remove SmartKey from starter switch
before cleaning the windshield, otherwise
the wiper motor might suddenly turn on and
cause injury.!Fold the windshield wiper arms back
onto the windshield before turning the
SmartKey in the starter switch.
Hold on to the wiper when folding the
wiper arm back. If released, the force
of the impact from the tensioning
spring could crack the windshield.
iOnly use acid-free cleaning materials.
Acid may cause corrosion or damage
the clear coat.
Page 302 of 400
302 Practical hintsWhere will I find ...?The vehicle jack is located in the storage
compartment underneath the trunk floor
together with the vehicle tool kit in the
vehicle tool kit storage well casing.Storage position�
Remove vehicle jack from its
compartment.
�
Push crank handle up.
Operational position�
Turn crank handle clockwise until it
engages (operational position).
Before storing the vehicle jack in its
compartment:
�
It should be fully collapsed.
�
The handle must be folded in (storage
position).
Minispare wheel
The Minispare wheel is located in the
storage compartment underneath the
trunk floor.
Removing the Minispare wheel�
Lift up trunk floor cover and engage
trunk floor handle in upper edge of
trunk.
�
Loosen the retaining screw
(�page 300) in the middle of storage
well casing.
�
Remove the storage well casing
(�page 300).
Page 308 of 400

308 Practical hintsUnlocking/locking in an emergency�
Slide mechanical key1 back into the
SmartKey.
Fuel filler flap
In case the central locking system does
not release the fuel filler flap, you can open
it manually.�
Open the trunk lid.
�
Fold away right-side tail lamp trim.
�
Reach inside through opening2 in
direction of arrow.
�
Turn release knob1 clockwise
(arrow).
The fuel filler flap can now be opened.
Manually unlocking the transmission
gear selector lever
In the case of power failure the transmis-
sion gear selector lever can be manually
unlocked, e.g. to tow the vehicle.
1Coin holder
2Tool
�
Open the storage compartment in front
of the center armrest (
�page 218).
�
Release coin holder1 (e.g. using a
small coin).
�
Swing coin holder1 aside.
�
Insert a tool2 (e.g. flat blade
screwdriver) into the opening.
�
Perform the following two steps
simultaneously:�
Push tool2 down.
�
Move gear selector lever from
positionP.
�
Reinstall coin holder1 after removing
tool2 from the opening.
iWhen inserting the batteries, make
sure they are clean and free of lint.
iThe gear selector lever is locked again
when moving it to positionP.
��
Page 315 of 400
315 Practical hints
Replacing bulbs
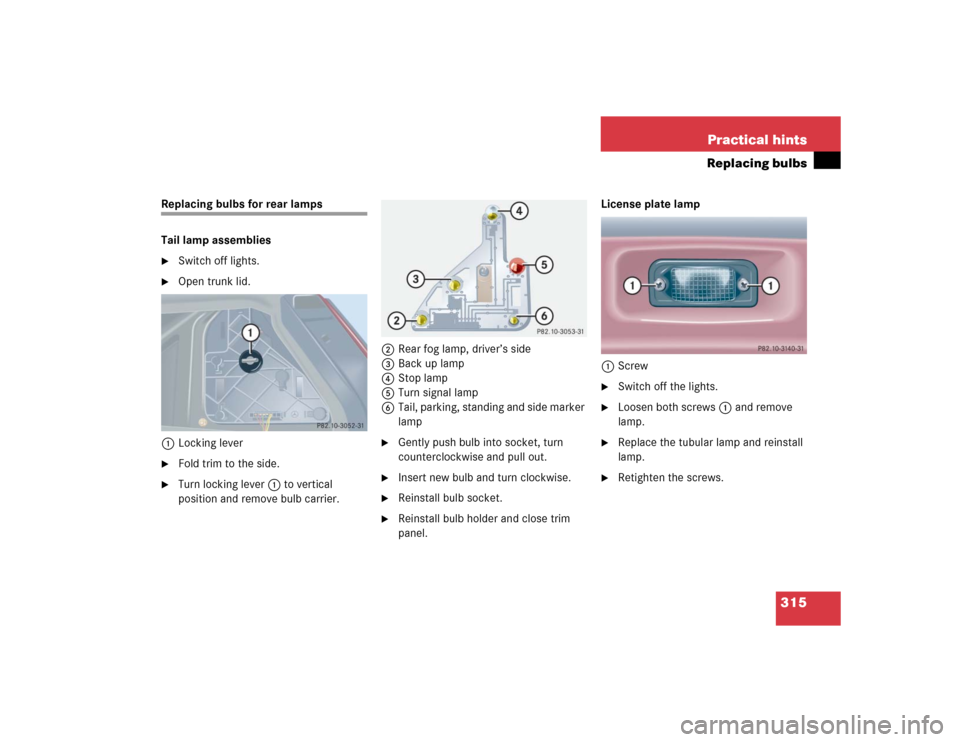
Replacing bulbs for rear lamps
Tail lamp assemblies�
Switch off lights.
�
Open trunk lid.
1Locking lever
�
Fold trim to the side.
�
Turn locking lever1 to vertical
position and remove bulb carrier.2Rear fog lamp, driver’s side
3Back up lamp
4Stop lamp
5Turn signal lamp
6Tail, parking, standing and side marker
lamp
�
Gently push bulb into socket, turn
counterclockwise and pull out.
�
Insert new bulb and turn clockwise.
�
Reinstall bulb socket.
�
Reinstall bulb holder and close trim
panel.License plate lamp
1Screw
�
Switch off the lights.
�
Loosen both screws1 and remove
lamp.
�
Replace the tubular lamp and reinstall
lamp.
�
Retighten the screws.