Page 69 of 400

type anchors (at each of the outer rear")
69 Safety and Security
Occupant safety
Child seat anchors – LATCH-type
This vehicle is equipped with two LATCH-
(Lower A
nchors and T
ethers for CH
ildren)
type anchors (at each of the outer rear
seats) for the installation of a LATCH-type
child seat with the matching mounting
fittings.
If a child seat is not installed, the
LATCH-type anchors can be folded back
between the seat cushion and the
backrest.
1Anchors
2Button
�
Grip inner side of anchors1 and fold
forward until they audibly lock in place.
�
Install child seat according to the
manufacturer’s instructions.
To fold anchors back
�
Press down button2 on each anchor
and return anchor1 to its catch.iThe child seat must be firmly attached
in the right and left side anchors1.
With a child seat installed in the left
rear seat, the seat belt for the center
seat occupied by a passenger must op-
erate freely. Guide seat belt between
its seat cushion mount and backrest
mount along outside of right side child
seat anchor.iNon-LATCH-type child seats may also
be used and can be installed using the
vehicle’s seat belt system. Install child
seat according to the manufacturer’s
instructions.
Warning!
G
Children too big for child restraint systems
must ride in back seats using regular seat
belts. Position shoulder belt across chest
and shoulder, not face or neck. A booster
seat may be necessary to achieve proper
belt positioning for children from 41 lbs until
they reach a height where a lap/shoulder
belt fits properly without a booster.
Before installing the child seat, make sure
anchors1 are folded out and locked in
place.
Install child seat according to manufactur-
er’s instructions.
��
Page 95 of 400
95 Controls in detail
Seats
Folding head restraints back with
release button
T h e r e a r s e a t h e a d r e s t r a i n t s c a n b e f o l d e d
backward for increased visibility.
1Release button�
Push release button1.
The head restraints will fold backward.Folding head restraints back with
switch in the center console
1Head restraint release switch
�
Start the engine.
�
Press the symbol-side on the rocker
switch1 to release the head
restraints.
The head restraints will fold backward.Placing head restraints upright
�
Pull the head restraint forward until it
locks into position.
iYou can also fold the head restraints
back using the switch in the center
console (
�page 95).
Warning!
G
For safety reasons, always drive with the
rear head restraints in the upright position
when the rear seats are occupied.
Keep the area around head restraints clear
of articles (e.g. clothing) to not obstruct the
folding operation of the head restraints.
Page 96 of 400

and tilt the head restraint to the
desired position.R")
96 Controls in detailSeatsHead restraint tilt
Two different head restraint angle
positions are available.�
Press the release button (
�page 95)
and tilt the head restraint to the
desired position.Removing and installing rear seat head
restraints (outer seats)
1Release button
Removing rear seat head restraints
�
Fold back head restraint (
�page 95).
�
Pull head restraint to its highest
position.
�
Push release button1 and pull out
head restraint.
!Make sure the head restraints engage
when placing them upright. Otherwise
their protective function cannot be as-
sured.
Warning!
G
For your protection, drive only with properly
positioned head restraints.
Adjust head restraint so that the head re-
straint supports the back of the head at eye
level. This will reduce the potential for injury
to the head and neck in the event of an ac-
cident or similar situation.
Do not drive the vehicle without the seat
head restraints. Head restraints are intend-
ed to help reduce injuries during an acci-
dent.
Do not interchange head restraints from
front and rear seat.!The center rear seat head restraint
cannot be removed.
Page 186 of 400

186 Controls in detailAudio systemCassette operation
Playing cassettes�
Press3 button.
The display panel folds down and the
cassette compartment becomes ac-
cessible.
�
Insert cassette into the cassette com-
partment until it engages and tap it
gently.
The cassette will be pulled in automati-
cally. The system switches to cassette
mode. Side 1 will be played and
SIDE 1
appears in the display. Side 1 is the
side of the cassette which is facing up-
ward. The cassette deck will automati-
cally detect the type of tape.
�
Fold display panel back up and press
gently on the display panel frame to
lock it in place.
or
�
If a cassette is already in the
mechanism, pressj button.Track selection
�
Press the
TRK
key.
The current track will be displayed as
SIDE 1
or
SIDE 2
.
�
You can switch sides at any time.
The side will be changed automatically
at the end of the tape.
!Do not press directly on the display
face. Otherwise the display will be
damaged.
iA warning signal will sound after 20
seconds if the display panel is left in
the down position. Fold display panel
back up. If the display panel is not
closed, a warning signal will sound and
the radio will be muted.
Page 187 of 400

187 Controls in detail
Audio system
Cassette eject�
Press eject button3.
The display folds down and the cas-
sette is ejected. The system will switch
back to radio mode automatically.
�
Fold display panel back up and press
gently on the display panel frame to
lock it.Track search
Track search forward
�
Pressf button.SEEK FWD
will appear in the display.
Track search will run the tape forward
to the start of the next track and switch
to Play.Track search backward
�
Presse button.SEEK RWD
will appear on the display.
Track search will run the tape back-
ward to the start of the track currently
playing and switch to Play.
Stopping track search
�
Pressd, c, f or
ebutton.
The cassette will switch over to Play.
!Do not press directly on the display
face. Otherwise the display will be
damaged.iThe cassette will not be ejected when
the system is switched off or switched
to another operating mode.
iThe beginning of a track can only be
found if there is pause of at least
four seconds between tracks.
Page 209 of 400
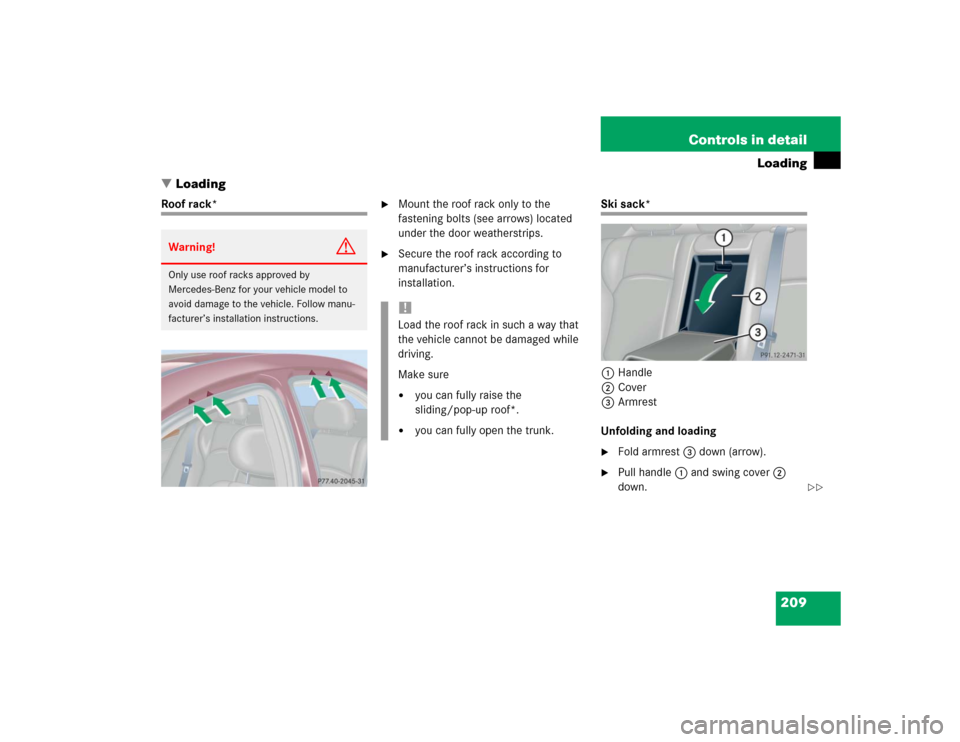
209 Controls in detail
Loading
�Loading
Roof rack*
�
Mount the roof rack only to the
fastening bolts (see arrows) located
under the door weatherstrips.
�
Secure the roof rack according to
manufacturer’s instructions for
installation.
Ski sack*
1Handle
2Cover
3Armrest
Unfolding and loading�
Fold armrest3 down (arrow).
�
Pull handle1 and swing cover2
down.
Warning!
G
Only use roof racks approved by
Mercedes-Benz for your vehicle model to
avoid damage to the vehicle. Follow manu-
facturer’s installation instructions.
!Load the roof rack in such a way that
the vehicle cannot be damaged while
driving.
Make sure�
you can fully raise the
sliding/pop-up roof*.
�
you can fully open the trunk.
��
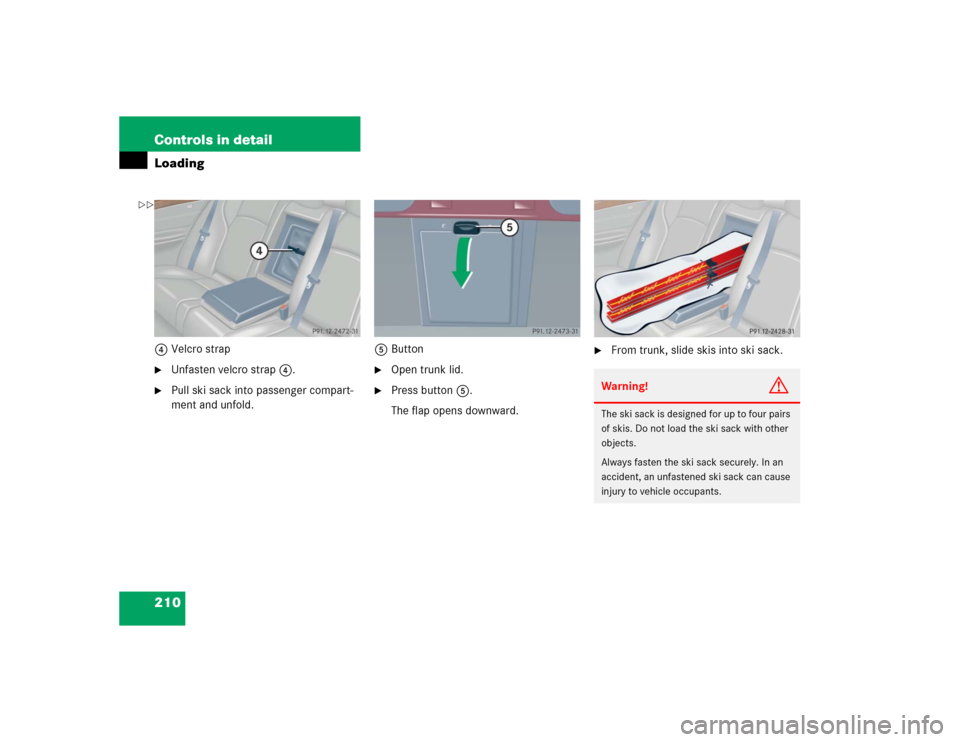
Page 210 of 400
210 Controls in detailLoading4Velcro strap�
Unfasten velcro strap4.
�
Pull ski sack into passenger compart-
ment and unfold.5Button
�
Open trunk lid.
�
Press button5.
The flap opens downward.
�
From trunk, slide skis into ski sack.Warning!
G
The ski sack is designed for up to four pairs
of skis. Do not load the ski sack with other
objects.
Always fasten the ski sack securely. In an
accident, an unfastened ski sack can cause
injury to vehicle occupants.
��
Page 211 of 400
211 Controls in detail
Loading
6Strap�
Tighten strap6 by pulling at the loose
end (arrow) until the skis in the ski sack
are tightly secured.7Hook
8Eye
�
Connect hook7 to eye8.
Tighten strap by pulling at the loose
end (arrow).Unloading and folding
�
Loosen the straps.
�
Disconnect hook7 from eye8.
�
Unload skis.
�
Close flap in trunk.
�
Fold and flatten ski sack lengthwise.
�
Place folded ski sack inside recess of
backrest.
�
Fasten velcro strap.
�
Close ski sack compartment cover.