Page 204 of 376

204 Controls in detailUseful featuresRemoving ashtray insert�
Secure vehicle from movement by set-
ting the parking brake. Move the gear
selector lever to positionN.
Now you have more room to take out
the insert.
�
Slide ashtray insert in direction of
arrow 2 until it disengages.
�
Grip ashtray at indents (arrows 3) and
remove insert from ashtray frame.
Reinstalling the ashtray insert
�
Install insert by pushing back into
frame until it engages again. Rear seat ashtray
Opening ashtray
�
Pull at top of cover
2 to open ashtray.
Removing ashtray insert
�
Press latch 1 to disengage ashtray in-
sert and remove it.
Reinstalling the ashtray insert
�
Install ashtray insert.
�
Close the ashtray.
Cigarette lighter
1 Cigarette lighter
2 Cover�
Turn SmartKey in the starter switch to
position 1 or 2.
�
Slide cover 2 rearward.
�
Push in cigarette lighter 1.
The cigarette lighter will pop out auto-
matically when hot.
Warning!
G
Remove front ashtray only with vehicle
standing still. Set the parking brake to se-
cure vehicle from movement. Move gear se-
lector lever to position
N. With gear selector
lever in position
N, turn off the engine.
Page 230 of 376

230 OperationDriving instructionsPassenger compartmentDriving abroad
Abroad, there is an extensive
Mercedes-Benz service network at your
disposal. If you plan to drive into areas
which are not listed in the index of your
Mercedes-Benz Center directory, you
should request pertinent information from
your authorized Mercedes-Benz Center.Control and operation of radio trans-
mitter
COMAND*, radio and telephone*
Telephones and two-way radios
Radio transmitters, such as a portable tele-
phone or a citizens band unit should only
be used inside the vehicle if they are con-
nected to an antenna that is installed on
the outside of the vehicle.
Refer to the radio transmitter operation in-
structions regarding use of an external
antenna.
Warning!
G
Always fasten items being carried as secure-
ly as possible.
In an accident, during hard braking or sud-
den maneuvers, loose items will be thrown
around inside the vehicle, and cause injury
to vehicle occupants unless the items are
securely fastened in the vehicle.
The trunk is the preferred place to carry ob-
jects.
Warning!
G
Please do not forget that your primary re-
sponsibility is to drive the vehicle safely.
Only operate the COMAND (Cockpit Man-
agement and Data System), radio or tele-
phone
1 if road, weather and traffic
conditions permit.
Bear in mind that at a speed of just 30 mph
(approximately 50 km / h), your vehicle is
covering a distance of approximately
44 feet (approximately 13.5 m) every sec-
ond.
1Observe all legal requirements
Warning!
G
Never operate radio transmitters equipped
with a built-in or attached antenna (i.e. with-
out being connected to an external antenna)
from inside the vehicle while the engine is
running. Doing so could lead to a malfunc-
tion of the vehicle’s electronic system, pos-
sibly resulting in an accident and/or
personal injury.
Page 284 of 376
284 Practical hintsWhere will I find ...?
�Where will I find ...?First aid kit
The first aid kit is stored in the trunk be-
hind the left trim panel.�
Turn handles 2.
�
Remove the trim panel 1.
�
Loosen the securing strap 2.
�
Remove first aid kit 1.
iCheck expiration dates and contents
for completeness at least once a year
and replace missing/expired items.
Page 285 of 376
285
Practical hints
Where will I find ...?
Spare wheel
The spare wheel is located under the trunk
floor.
Removing the spare wheel�
Lift trunk floor and engage handle in
the upper edge of the trunk.
1 Spare wheel
2 Storage tray with vehicle tool kit
3 Mounting screw for spare wheel/cover
for vehicle tools
�
Turn the mounting screw 3 counter-
clockwise.
�
Remove the spare wheel 1. Storing the spare wheel
�
Place spare wheel
1 in wheel well.
�
Turn mounting screw 3 clockwise to
its stop to secure the spare wheel.
�
Lower the trunk floor before closing the
trunk lid.
Vehicle tool kit
The vehicle tool kit and air pump are stored
in the wheel well below the trunk floor.
1 Vehicle jack
2 Air pump
3 Alignment bolt
4 Wheel wrench
5 Towing eye bolt
6 Spare wheel bolts
Page 307 of 376

307
Practical hints
Battery
� Battery
The battery is located in the engine com-
partment on the right hand side.
Removal of filter box:�
Release the three clamps 1.
�
Remove filter box.
Installation of filter box:
�
Insert filter box properly.
�
Secure it with the three clamps 1.
Warning!
G
Failure to follow these instructions can re-
sult in severe injury or death.
Never lean over batteries while connecting,
you might get injured.
Battery fluid contains sulfuric acid. Do not
allow this fluid to come in contact with eyes,
skin or clothing. In case it does, immediately
flush affected area with water and seek
medical help if necessary.
A battery will also produce hydrogen gas,
which is flammable and explosive. Keep
flames or sparks away from battery, avoid
improper connection of jumper cables,
smoking, etc.
!Never loosen or detach battery termi-
nal clamps while the engine is running
or the SmartKey is in the starter switch.
Otherwise the alternator and other
electronic components could be se-
verely damaged.
Have the battery checked regularly by
an authorized Mercedes-Benz Center.
Refer to Service Booklet for mainte-
nance intervals or contact your autho-
rized Mercedes-Benz Center for further
information.Warning!
G
Do not place metal objects on the battery as
this could result in a short circuit.
Use leak-proof battery only to avoid the risk
of acid burns in the event of an accident.
Page 308 of 376
.
�
Remove the filter box (
�page 307).
�
Disconnect the battery negative lead.
�
Re")
308 Practical hintsBatteryDisconnecting the battery�
Turn off all electrical consumers.
�
Open the hood (
�page 236).
�
Remove the filter box (
�page 307).
�
Disconnect the battery negative lead.
�
Remove the cover from the positive ter-
minal.
�
Disconnect the battery positive lead.
Removing the batteries�
Remove the screw-nuts securing the
battery.
�
Remove the battery bracket.
�
Take out the battery.
Charging and reinstalling batteries�
Charge battery in accordance with the
instructions of the battery charger
manufacturer.
�
Reinstall the charged battery. Follow
the previously described steps in re-
verse order.
Reconnecting the batteries�
Turn off all electrical consumers.
�
Connect the positive lead and fasten its
cover.
�
Connect the negative lead.
�
Reinstall the filter box (
�page 307).
Warning!
G
With a disconnected battery�
you will no longer be able to turn the
SmartKey in the starter switch
�
the gear selector lever will remain
locked in position
P
Warning!
G
Never charge a battery while still installed in
the vehicle. Gases may escape during charg-
ing and cause explosions that may result in
paint damage, corrosion or personal injury.
!NEVER invert the terminal connections!!The battery, its filler caps and the vent
tube must always be securely installed
when the vehicle is in operation.
Page 318 of 376
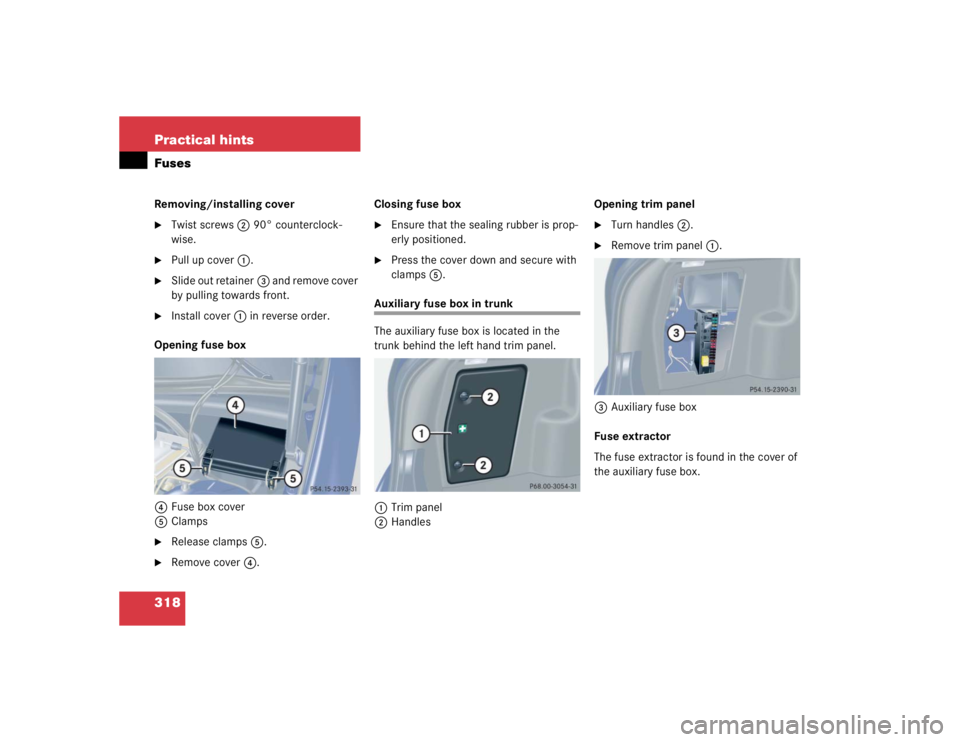
318 Practical hintsFusesRemoving/installing cover�
Twist screws2 90° counterclock-
wise.
�
Pull up cover 1.
�
Slide out retainer 3 and remove cover
by pulling towards front.
�
Install cover 1 in reverse order.
Opening fuse box
4 Fuse box cover
5 Clamps
�
Release clamps 5.
�
Remove cover 4. Closing fuse box
�
Ensure that the sealing rubber is prop-
erly positioned.
�
Press the cover down and secure with
clamps
5.
Auxiliary fuse box in trunk
The auxiliary fuse box is located in the
trunk behind the left hand trim panel.
1 Trim panel
2 Handles Opening trim panel
�
Turn handles
2.
�
Remove trim panel 1.
3 Auxiliary fuse box
Fuse extractor
The fuse extractor is found in the cover of
the auxiliary fuse box.
Page 360 of 376
 125
Trunk 104
Limiting the gear range 141
Limp Home Mode 145
Loading 197 Instructions 199
Roof ra")
360 Index
Night security illumination 100
Parking lamps 98
Rear fog lamp 101
Settings (control system) 125
Trunk 104
Limiting the gear range 141
Limp Home Mode 145
Loading 197 Instructions 199
Roof rack 197
Split rear bench seat 197
Locator lighting 100 Setting 126
Lock button 343
Lock buttons 343
Locking 52, 82 Fuel filler flap 233
Global, SmartKey 83
Vehicle in an emergency 289
Loss of keys 84 Loss of Service and Warranty
Information Booklet 321
Low beam headlamps Messages in display 279
Replacing bulbs 293, 295
Lowering Vehicle 306
Lubricants Technical data 330
Luggage cover 197
M
Main dimensions 328
Maintenance 249 Vehicles with E85 fuel 335
Malfunction Displaying 118
Malfunction memory 117 Calling up 117
Manual headlamp mode 99
Manual operations Fuel filler flap 291 Interior lighting control 103
Locking the vehicle 289
Sliding/pop-up roof 292
Unlocking gear selector lever 291
Unlocking the driver’s door 288
Unlocking the trunk lid 289
Manual seat Adjusting 33
Adjusting backrest tilt 33
Adjusting head restraint height 34
Adjusting head restraint tilt 34, 36
Adjusting seat cushion tilt 33
Adjusting seat height 33
Front seat head restraints 90
Seat fore and aft adjustment 33
Manual transmission 137 Shifting into reverse 138
Starting with 44
MB Tex upholstery Cleaning 256