Page 216 of 372
7-2
In Case of an Emergency
Form No. 8S18-EA-03I
Parking in an Emergency
The hazard warning lights should always
be used when you stop on or near a
roadway.
The hazard warning lights warn other
drivers that your vehicle is a traffic hazard
and that they must take extreme caution
when near it.
Depress the hazard warning flasher and
all four turn signals will flash.
Parking in an Emergency
NOTE
•The turn signals don
’t work when
the hazard warning lights are on.
• Check local regulations about the
use of hazard warning lights while
the vehicle is being towed. They
may forbid it.
Hazard warning flasher
J48C_8S18-EA-03I_Edition3.book Page 2 Monday, February 9, 2004 8:41 PM
Black process 45.0 ° 240.0 LPI
Page 221 of 372
,")
7-7
In Case of an Emergency
Flat Tire
Form No. 8S18-EA-03I
1. Park on a level surface off the right-of-way and firmly set the parking brake.
2. Put a vehicle with an automatic transaxle in Park (P), a manual
transaxle in Reverse (R) or 1, and turn
off the engine.
3. Turn on the hazard warning flasher.
4. Have everyone get out of the vehicle and away from the vehicle and traffic.
5. Remove the jack, tool, and spare tire (page 7-3). 6. Block the wheel diagonally opposite
the flat tire. When blocking a wheel,
place a block both in front and behind
the tire.
�Removing a Flat Tire
1. If your vehicle is equipped with a
wheel cover, pry off the wheel cover
with the beveled end of the lug wrench.
(With Tire Pressure Monitoring
System)
The wheels equipped on your Mazda
are specially designed for installation
of the tire pressure sensors. Do not use
non-genuine wheels, otherwise it may
not be possible to install the tire
pressure sensors.
NOTE
• Make sure the jack is well
lubricated before using it.
(With Tire Pressure Monitoring
System)
•Be sure to register the tire pressure
sensor ID signal code whenever
tires or wheels are changed (page
5-24).
CAUTION
NOTE
When blocking a tire, use rocks or
wood blocks of sufficient size to hold
the tire in place.
Wheel cover
Lug wrench
J48C_8S18-EA-03I_Edition3.book Page 7 Monday, February 9, 2004 8:41 PM
Black process 45.0 ° 240.0 LPI
Page 274 of 372
8-36
Maintenance and Care
Owner Maintenance
Form No. 8S18-EA-03I
Light Bulbs
Side turn signal lightsFront turn signal lights/
Side-marker lights
Rear turn signal lightsLicense plate light
Overhead light/Map lights (Front)*
Headlights (Low beam)
Headlights
(High beam)
Fog lights* Brake lights/Taillights
Reverse light
High-mount brake light
Trunk light
4 Door
5 Door Overhead light (Rear)
Overhead light/Map lights (Front)*
Headlights (Low beam)
Headlights
(High beam)
Side turn signal lights Fog lights*
License plate light
High-mount brake light
Luggage compartment
lightOverhead light (Rear)
Rear turn signal lights
Brake lights/Taillights
Reverse light
Front turn signal lights/
Side-marker lights
*Some models.
J48C_8S18-EA-03I_Edition3.book Page 36 Monday, February 9, 2004 8:41 PM
Black process 45.0 ° 240.0 LPI
Page 277 of 372

8-39
Maintenance and Care
Owner Maintenance
Form No. 8S18-EA-03I
6. Replace the bulb.
7. Install the new bulb in the reverse order of removal.
Replacing a fog light bulb*
1. Turn the screw counterclockwise and remove it and partially peel back the
mudguard.
2. Turn the socket and bulb assembly counterclockwise and remove it.
Carefully remove the fog light bulb
from its socket in the reflector by
gently pulling it straight backward out
of the socket. 3. Disconnect the bulb from the electrical
connector by pressing the tab on the
connector with your finger and pulling
the bulb upward.
4. Install the new bulb in the reverse order of removal.
Front turn signal lights/Side-marker
lights
Due to the complexity and difficulty of
the procedure, the bulbs should be
replaced by an Authorized Mazda Dealer.
NOTE
• To replace the bulb, contact an
Authorized Mazda Dealer.
• Use the protective cover and carton
for the replacement bulb to dispose
of the old bulb promptly and out of
the reach of children.
• When reinstalling the sealing cover,
make sure faces up.
NOTE
To replace the bulb, contact an
Authorized Mazda Dealer.
Socket
Ta b
*Some models.
J48C_8S18-EA-03I_Edition3.book Page 39 Monday, February 9, 2004 8:41 PM
Black process 45.0 ° 240.0 LPI
Page 278 of 372
8-40
Maintenance and Care
Owner Maintenance
Form No. 8S18-EA-03I
Side turn signal lights
1. Slide the unit as shown in the figure to remove it.
2. Detach the electrical connector from the unit by pulling it to the rear.
3. Install the new side turn signal unit in the reverse order of removal. Brake lights/Taillights, Rear turn signal lights (4 Door)
1. Pull the center of each plastic retainer
and remove the retainers and the trunk
end trim.
2. Pull the center of each plastic retainer and remove the retainers and partially
open the trunk side trim.
3. Turn the socket and bulb assembly counterclockwise and remove it.
NOTE
Bulb replacement is not possible
because it is built into the unit. Replace
the unit.
Removal
Installation Trunk end trim
Trunk side trim
Removal Installation
J48C_8S18-EA-03I_Edition3.book Page 40 Monday, February 9, 2004 8:41 PM
Black process 45.0 ° 240.0 LPI
Page 279 of 372
8-41
Maintenance and Care
Owner Maintenance
Form No. 8S18-EA-03I
4. Disconnect the bulb from the socket.
5. Install the new bulb in the reverse order of removal. Brake lights/Taillights, Rear turn signal
lights (5 Door)
1. Remove the cover.
2. Turn the socket and bulb assembly
counterclockwise and remove it.
3. Disconnect the bulb from the socket.
NOTE
To replace the bulb, contact an
Authorized Mazda Dealer.
Socket
Brake lights/Taillights
Rear turn signal lights
Left side
Right side
Socket
Brake lights/Taillights
Rear turn signal lights
J48C_8S18-EA-03I_Edition3.book Page 41 Monday, February 9, 2004 8:41 PM
Black process 45.0 ° 240.0 LPI
Page 287 of 372

37 38 39 40 41 42
43 44 45 46
47 48 49 50 51
52 53 54 55 56 57 58
59 60 61 62 63 64
65 66 67 68 69 70
7")
8-49
Maintenance and Care
Owner Maintenance
Form No. 8S18-EA-03I
Fuse block (Passenger’s side)
37 38 39 40 41 42
43 44 45 46
47 48 49 50 51
52 53 54 55 56 57 58
59 60 61 62 63 64
65 66 67 68 69 70
71 72 73 74 75 76 77 78 79 80 81 82 83 84 85 86
DESCRIPTIONFUSE
RATINGPROTECTED
COMPONENT
37 D/LOCK 2 15A Power door lock
38 —— —
39 HEAD
HIGH L 10AHeadlight high
beams (LH)
40 HEAD
HIGH R 10AHeadlight high
beams (RH)
41 —— —
42 —— —
43 CIGAR 15A Lighter
44 RADIO 7.5A Audio system
45 MIRROR 10A Power control
mirror
46 TAIL R 7.5A Taillight (RH),
Parking lights (RH)
License plate lights
47 OBD 10A For protection of
various circuits
48 —— —
49 TR/LOCK 20A —
50 CPU PWR 10A Control unit
51 HAZARD 15A
Turn signals, Hazard
warning flashers
DESCRIPTIONFUSE
RATINGPROTECTED
COMPONENT
52 SUN
RO O F 20A
Moonroof
*
53 WASHER 20A Front washer, Rear
window wiper and
washer
54 —— —
55 P/WIND R 30A —
56 P/WIND L 30A —
57 ALARM 7.5A —
58 M/DEF 7.5A Mirror Defroster
59 —— —
60 HEAD
LOW R 15AHeadlight low
beams (RH),
Headlight leveling
*
61
HEAD
LOW L 15A
Headlight low
beams (LH)
62 —— —
63 —— —
64 —— —
65 SAS 10A Supplemental
restraint system
*Some models.
J48C_8S18-EA-03I_Edition3.book Page 49 Monday, February 9, 2004 8:41 PM
Black process 45.0 ° 240.0 LPI
Page 323 of 372
10-7
Specifications
Form No. 8S18-EA-03I
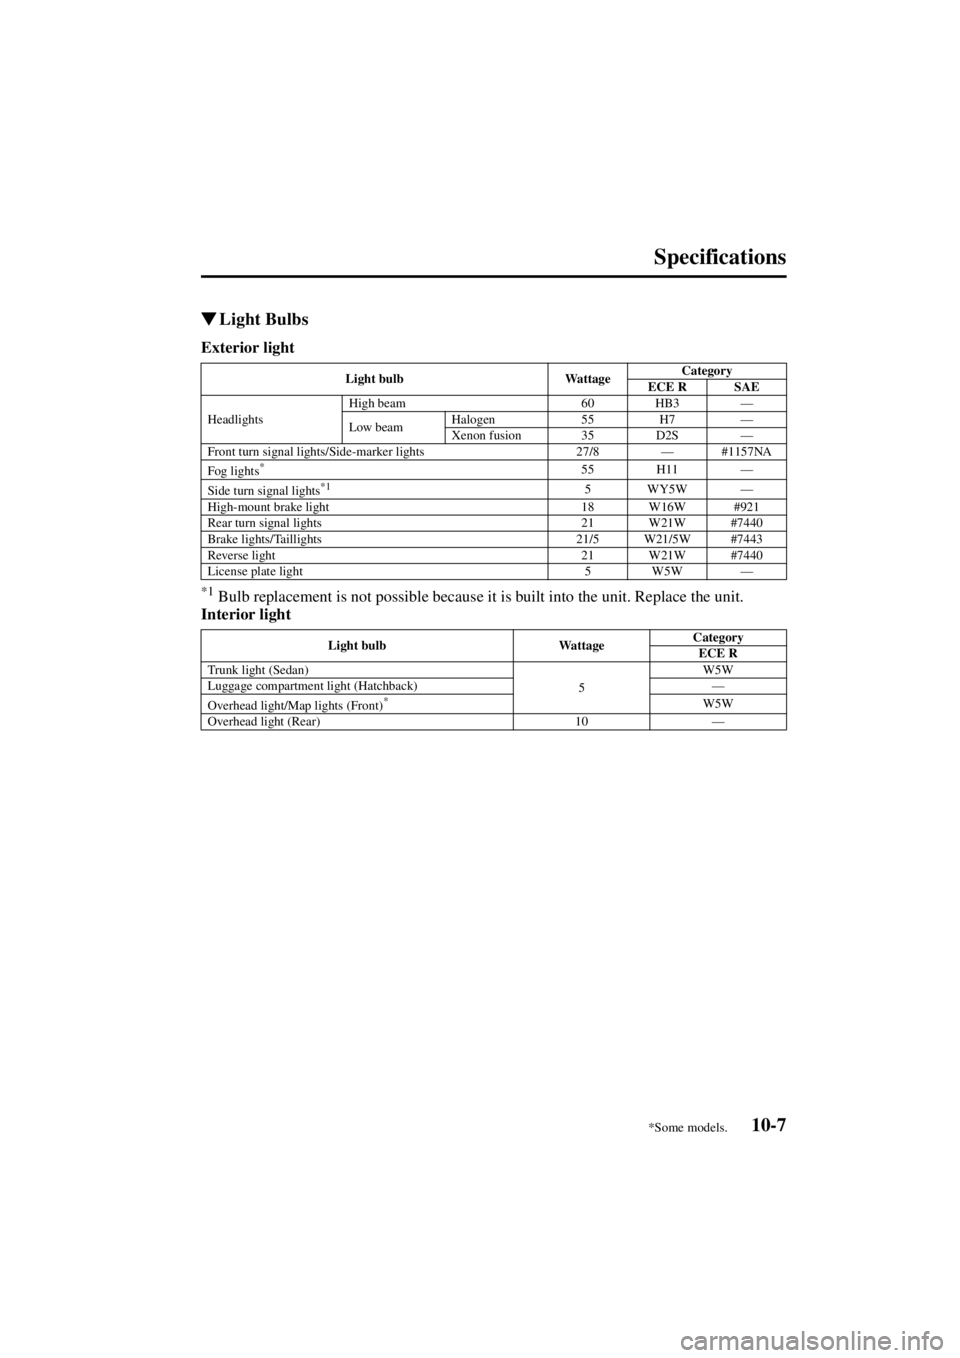
�Light Bulbs
Exterior light
*1 Bulb replacement is not possible because it is built into the unit. Replace the unit.
Interior light
Light bulb WattageCategory
ECE R SAE
Headlights High beam
60 HB3—
Low beam Halogen
55H7 —
Xenon fusion 35 D2S —
Front turn signal lights/Side-marker lights 27/8—#1157NA
Fog lights
*55 H11 —
Side turn signal lights*15WY5W —
High-mount brake light 18 W16W #921
Rear turn signal lights 21 W21W #7440
Brake lights/Taillights 21/5 W21/5W #7443
Reverse light 21 W21W #7440
License plate light 5 W5W—
Light bulb WattageCategory
ECE R
Trunk light (Sedan)
5W5W
Luggage compartment light (Hatchback) —
Overhead light/Map lights (Front)
*W5W
Overhead light (Rear) 10—
*Some models.
J48C_8S18-EA-03I_Edition3.book Page 7 Monday, February 9, 2004 8:41 PM
Black process 45.0 ° 240.0 LPI