Page 163 of 336
To return the seatback to the
upright position:
1. Pull the lever and lift the
seatback toward the rear of the
vehicle.
2. Rotate the seatback until you
hear a click, locking it in the upright
position.
3rd row stow feature
The 3rd row seat has a tip/stow feature to increase cargo space without
removing the seat from the vehicle.
Lower the head restraints before putting the seat in the stowed position.
To put seat in stowed position:
1. Pull the seat release lever located
on top of the seatback while
pushing the seatback down onto the
seat cushion.
2. The seatback will latch into place.
Seating and Safety Restraints
163
Page 166 of 336

Safety belts and seats can become hot in a vehicle that has been
closed up in sunny weather; they could burn a small child. Check
seat covers and buckles before you place a child anywhere near them.
Combination lap and shoulder belts
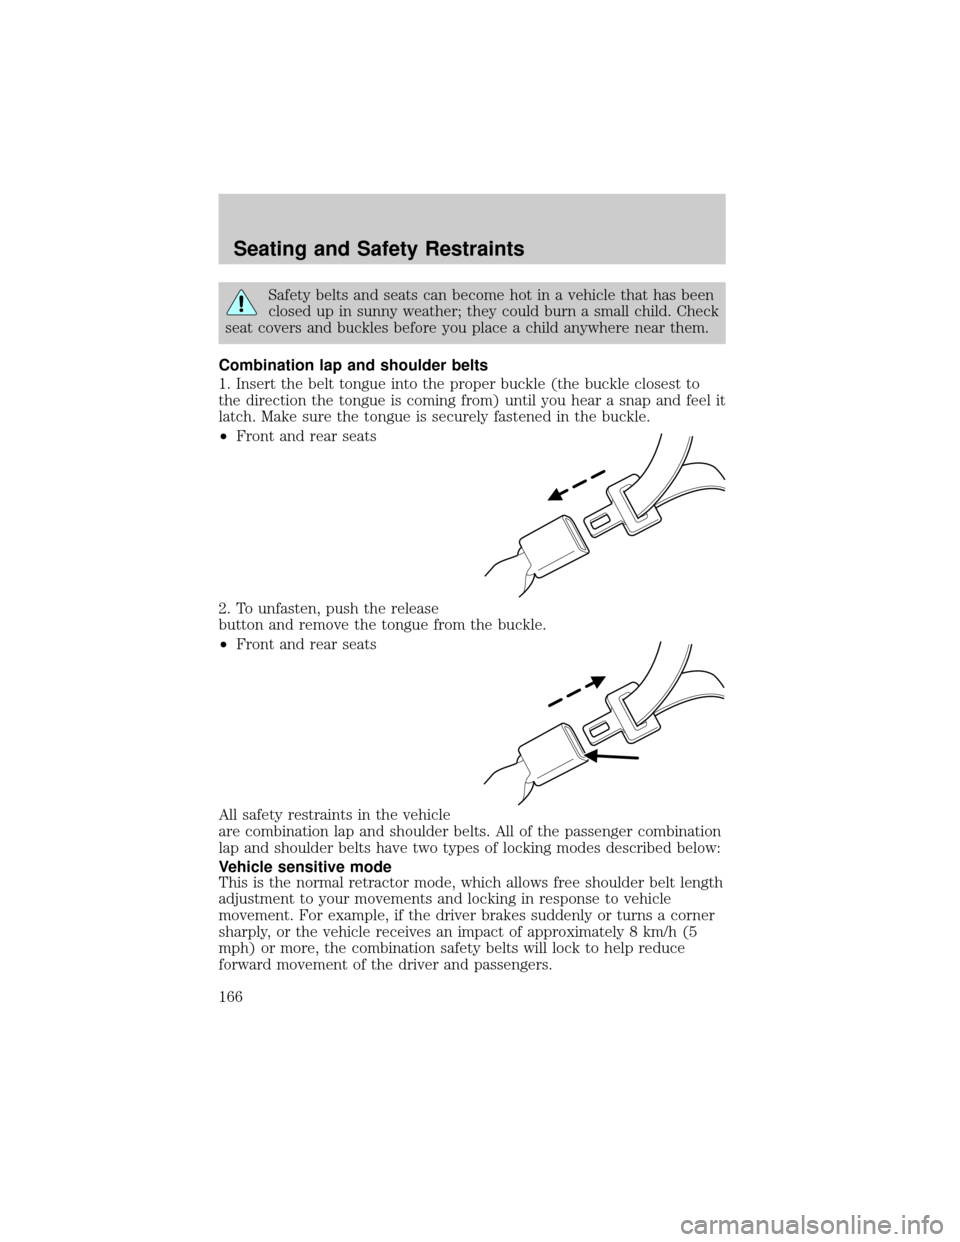
1. Insert the belt tongue into the proper buckle (the buckle closest to
the direction the tongue is coming from) until you hear a snap and feel it
latch. Make sure the tongue is securely fastened in the buckle.
²Front and rear seats
2. To unfasten, push the release
button and remove the tongue from the buckle.
²Front and rear seats
All safety restraints in the vehicle
are combination lap and shoulder belts. All of the passenger combination
lap and shoulder belts have two types of locking modes described below:
Vehicle sensitive mode
This is the normal retractor mode, which allows free shoulder belt length
adjustment to your movements and locking in response to vehicle
movement. For example, if the driver brakes suddenly or turns a corner
sharply, or the vehicle receives an impact of approximately 8 km/h (5
mph) or more, the combination safety belts will lock to help reduce
forward movement of the driver and passengers.
Seating and Safety Restraints
166
Page 185 of 336

When installing a child safety seat:
²Review and follow the information
presented in theAir bag
supplemental restraint system
(SRS) section in this chapter.
²Use the correct safety belt buckle
for that seating position (the
buckle closest to the direction the
tongue is coming from).
²Insert the belt tongue into the
proper buckle until you hear a
snap and feel it latch. Make sure
the tongue is securely fastened in
the buckle.
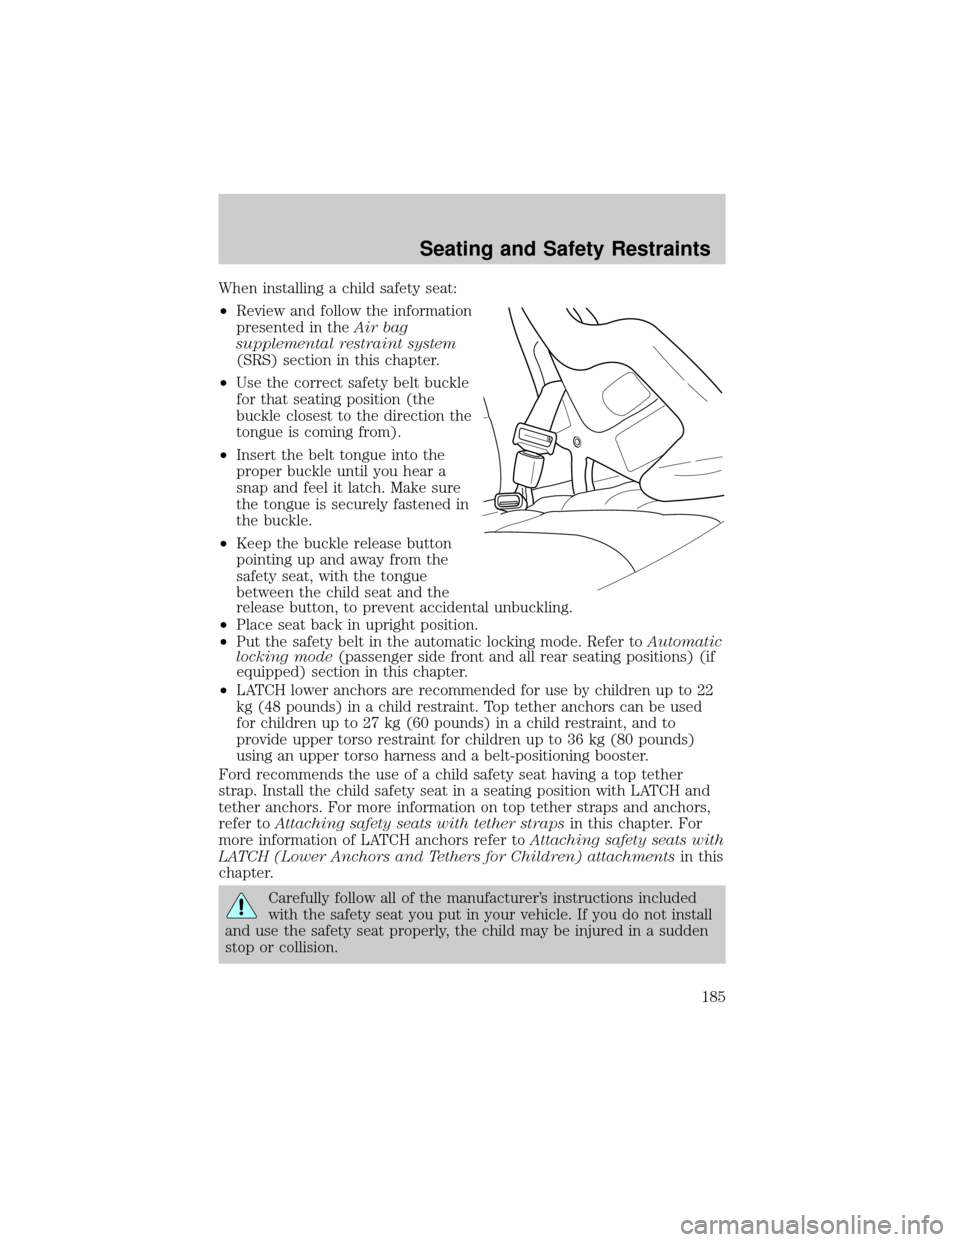
²Keep the buckle release button
pointing up and away from the
safety seat, with the tongue
between the child seat and the
release button, to prevent accidental unbuckling.
²Place seat back in upright position.
²Put the safety belt in the automatic locking mode. Refer toAutomatic
locking mode(passenger side front and all rear seating positions) (if
equipped) section in this chapter.
²LATCH lower anchors are recommended for use by children up to 22
kg (48 pounds) in a child restraint. Top tether anchors can be used
for children up to 27 kg (60 pounds) in a child restraint, and to
provide upper torso restraint for children up to 36 kg (80 pounds)
using an upper torso harness and a belt-positioning booster.
Ford recommends the use of a child safety seat having a top tether
strap. Install the child safety seat in a seating position with LATCH and
tether anchors. For more information on top tether straps and anchors,
refer toAttaching safety seats with tether strapsin this chapter. For
more information of LATCH anchors refer toAttaching safety seats with
LATCH (Lower Anchors and Tethers for Children) attachmentsin this
chapter.
Carefully follow all of the manufacturer's instructions included
with the safety seat you put in your vehicle. If you do not install
and use the safety seat properly, the child may be injured in a sudden
stop or collision.
Seating and Safety Restraints
185
Page 190 of 336
²At the rear of the cargo area
4. Clip the tether strap to the
anchor.
If the tether strap is clipped incorrectly, the child safety seat
may not be retained properly in the event of a collision.
5. Install the child safety seat tightly using the LATCH anchors or safety
belts. Follow the instructions in this chapter.
6. Tighten the child safety seat tether strap according to the
manufacturer's instructions.
If the safety seat is not anchored properly, the risk of a child
being injured in a collision greatly increases.
Seating and Safety Restraints
190
Page 192 of 336

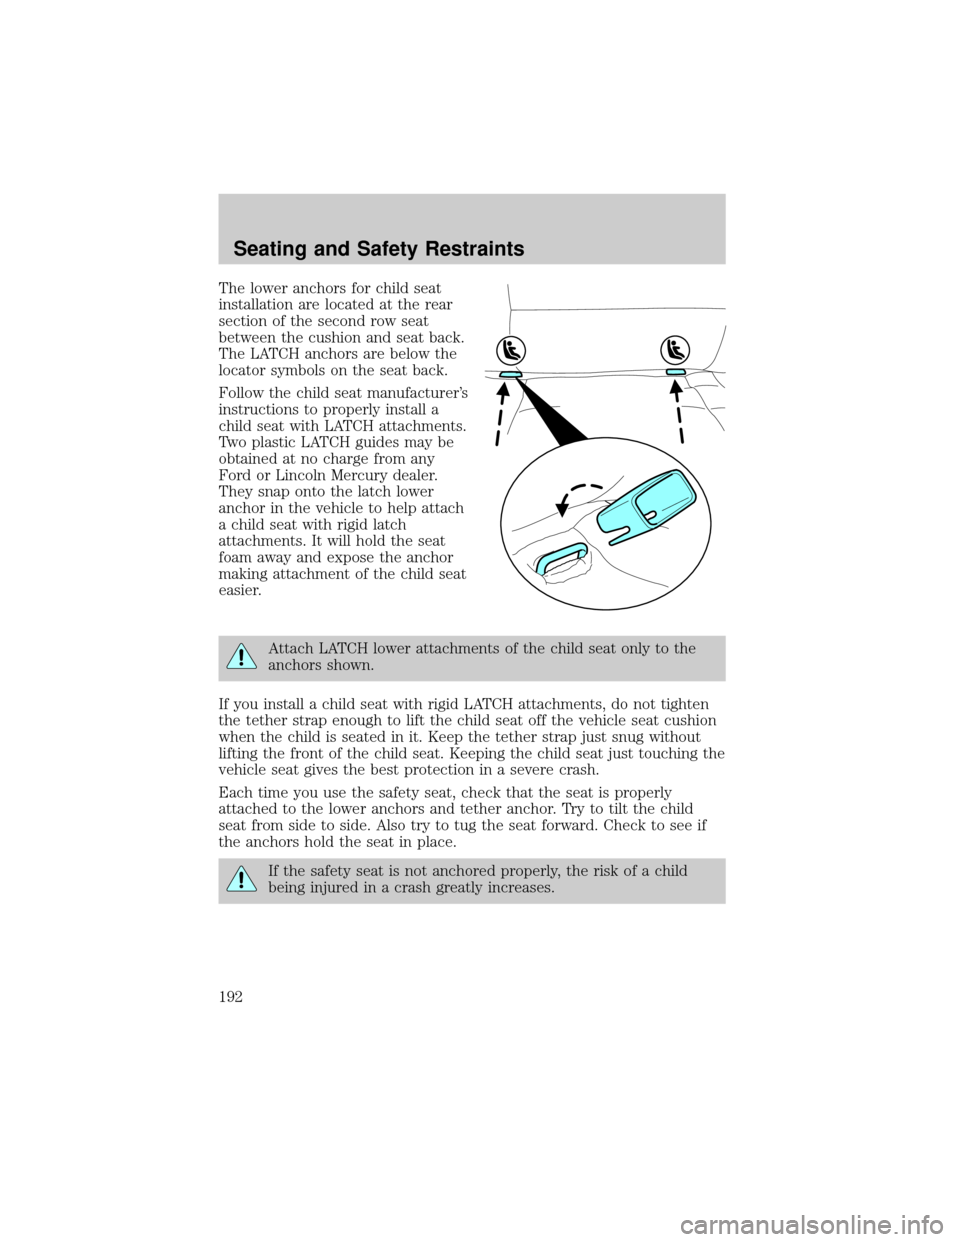
The lower anchors for child seat
installation are located at the rear
section of the second row seat
between the cushion and seat back.
The LATCH anchors are below the
locator symbols on the seat back.
Follow the child seat manufacturer's
instructions to properly install a
child seat with LATCH attachments.
Two plastic LATCH guides may be
obtained at no charge from any
Ford or Lincoln Mercury dealer.
They snap onto the latch lower
anchor in the vehicle to help attach
a child seat with rigid latch
attachments. It will hold the seat
foam away and expose the anchor
making attachment of the child seat
easier.
Attach LATCH lower attachments of the child seat only to the
anchors shown.
If you install a child seat with rigid LATCH attachments, do not tighten
the tether strap enough to lift the child seat off the vehicle seat cushion
when the child is seated in it. Keep the tether strap just snug without
lifting the front of the child seat. Keeping the child seat just touching the
vehicle seat gives the best protection in a severe crash.
Each time you use the safety seat, check that the seat is properly
attached to the lower anchors and tether anchor. Try to tilt the child
seat from side to side. Also try to tug the seat forward. Check to see if
the anchors hold the seat in place.
If the safety seat is not anchored properly, the risk of a child
being injured in a crash greatly increases.
Seating and Safety Restraints
192
Page 199 of 336

The BRAKE warning lamp in the
instrument cluster illuminates and
remains illuminated (when the
ignition is turned ON) until the
parking brake is released.
Always set the parking brake fully and make sure that the
gearshift is securely latched in P (Park).
If the parking brake is fully released, but the brake warning lamp
remains illuminated, the brakes may not be working properly.
See your dealer or a qualified service technician.
The parking brake is not recommended to stop a moving vehicle.
However, if the normal brakes fail, the parking brake can be used to stop
your vehicle in an emergency. Since the parking brake applies only the
rear brakes, the vehicle's stopping distance will increase greatly and the
handling of your vehicle will be adversely affected.
Pull the release lever to release the
brake. Driving with the parking
brake on will cause the brakes to
wear out quickly and reduce fuel
economy.
ADVANCETRACYSTABILITY ENHANCEMENT SYSTEM
(IF EQUIPPED)
The AdvanceTracysystem provides a stability enhancement feature as
well as a traction enhancement feature. It helps your vehicle maintain
traction, when driving on slippery and/or hilly road surfaces, by detecting
and controlling wheel spin. Excessive wheel spin is controlled by
momentarily reducing engine power and rapidly applying the anti-lock
brakes. The system is a driver aid which makes your vehicle easier to
handle primarily on snow and ice-covered roads.
P!
BRAKE
Driving
199
Page 207 of 336
P (Park)
This position locks the transmission and prevents the rear wheels from
turning.
To put your vehicle in gear:
²Start the engine
²Depress the brake pedal
²Move the gearshift lever into the desired gear
To put your vehicle in P (Park):
²Come to a complete stop
²Move the gearshift lever and securely latch it in P (Park)
Always set the parking brake fully and make sure the gearshift is
latched in P (Park). Turn the ignition to the LOCK position and
remove the key whenever you leave your vehicle.
R (Reverse)
With the gearshift lever in R (Reverse), the vehicle will move backward.
Always come to a complete stop before shifting into and out of R
(Reverse).
N (Neutral)
With the gearshift lever in N (Neutral), the vehicle can be started and is
free to roll. Hold the brake pedal down while in this position.
D (Drive) with Overdrive
The normal driving position for the
best fuel economy. Transmission
operates in gears one through five.
Driving
207