Page 297 of 315
Maintenance
52
7
1 23456789
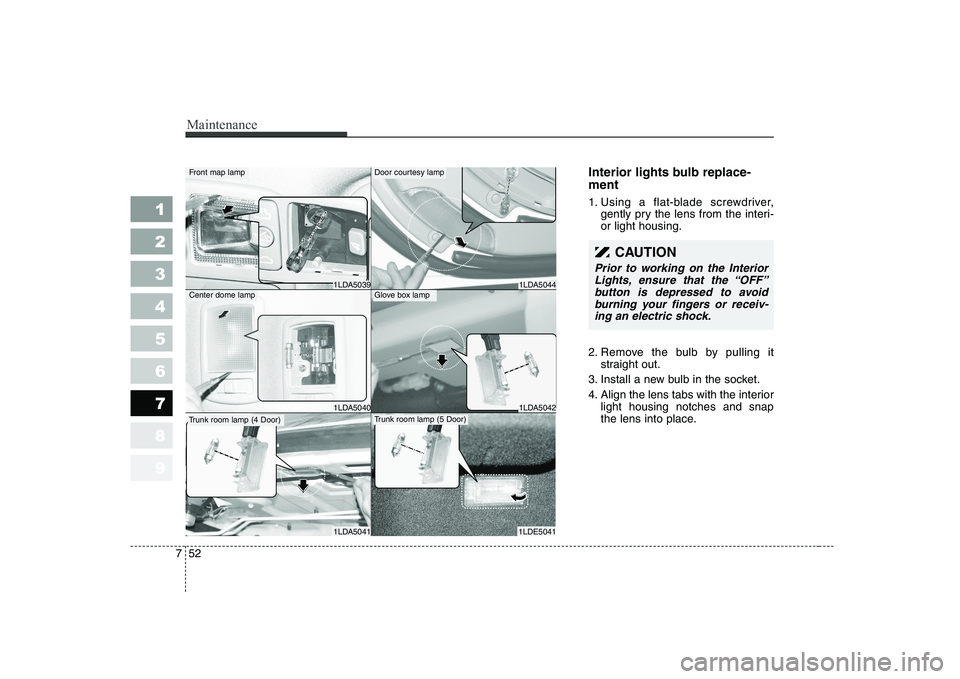
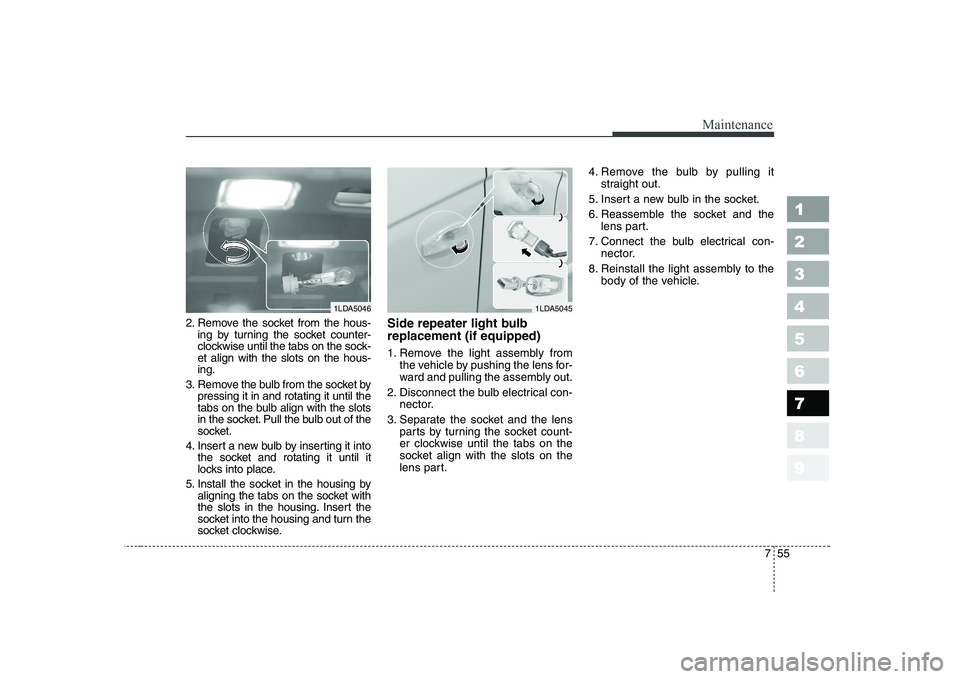
Interior lights bulb replace- ment
1. Using a flat-blade screwdriver,
gently pry the lens from the interi- or light housing.
2. Remove the bulb by pulling it straight out.
3. Install a new bulb in the socket.
4. Align the lens tabs with the interior light housing notches and snap
the lens into place.
CAUTION
Prior to working on the Interior
Lights, ensure that the “OFF”button is depressed to avoidburning your fingers or receiv- ing an electric shock.
1LDA5044
1LDA5042
1LDE5041
Door courtesy lamp
Glove box lamp
Trunk room lamp (5 Door)
1LDA5039
1LDA5040
1LDA5041
Front map lamp
Center dome lamp
Trunk room lamp (4 Door)
Page 298 of 315
753
Maintenance
1 23456789
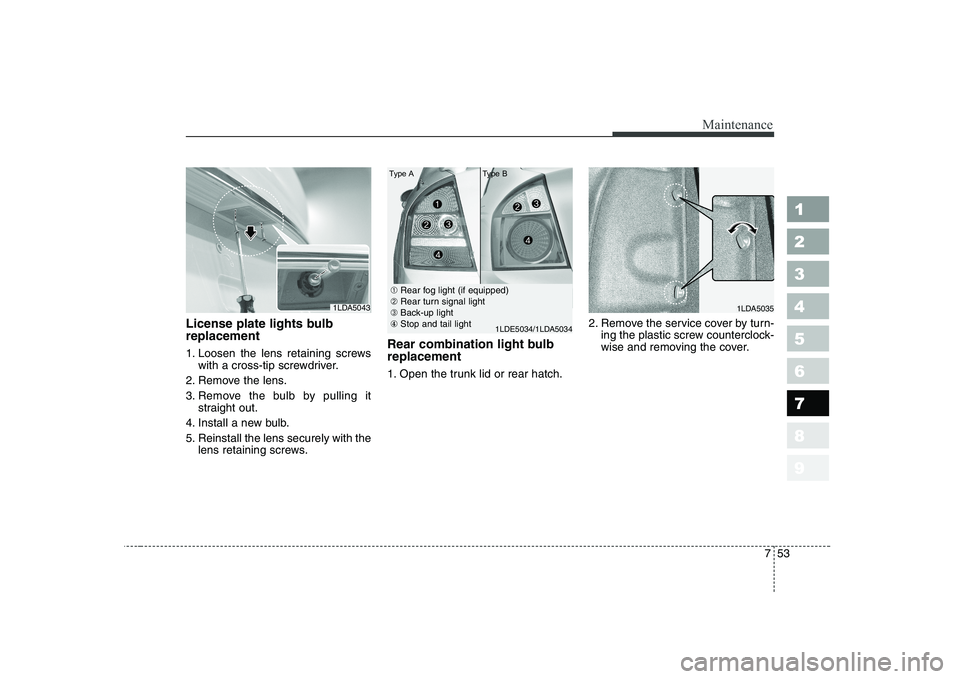
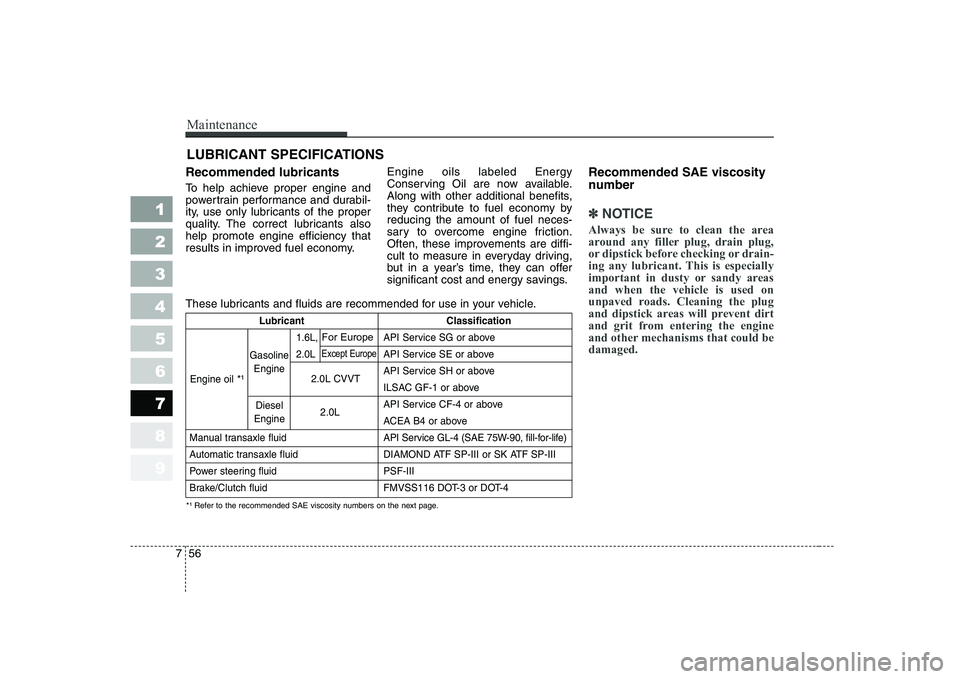
License plate lights bulb replacement
1. Loosen the lens retaining screwswith a cross-tip screwdriver.
2. Remove the lens.
3. Remove the bulb by pulling it straight out.
4. Install a new bulb.
5. Reinstall the lens securely with the lens retaining screws. Rear combination light bulb replacement
1. Open the trunk lid or rear hatch.
2. Remove the service cover by turn-
ing the plastic screw counterclock-
wise and removing the cover.
1LDA50431LDA5035
➀Rear fog light (if equipped)
➁ Rear turn signal light
➂ Back-up light
④ Stop and tail light
1LDE5034/1LDA5034
Type A Type B
Page 299 of 315
Maintenance
54
7
1 23456789
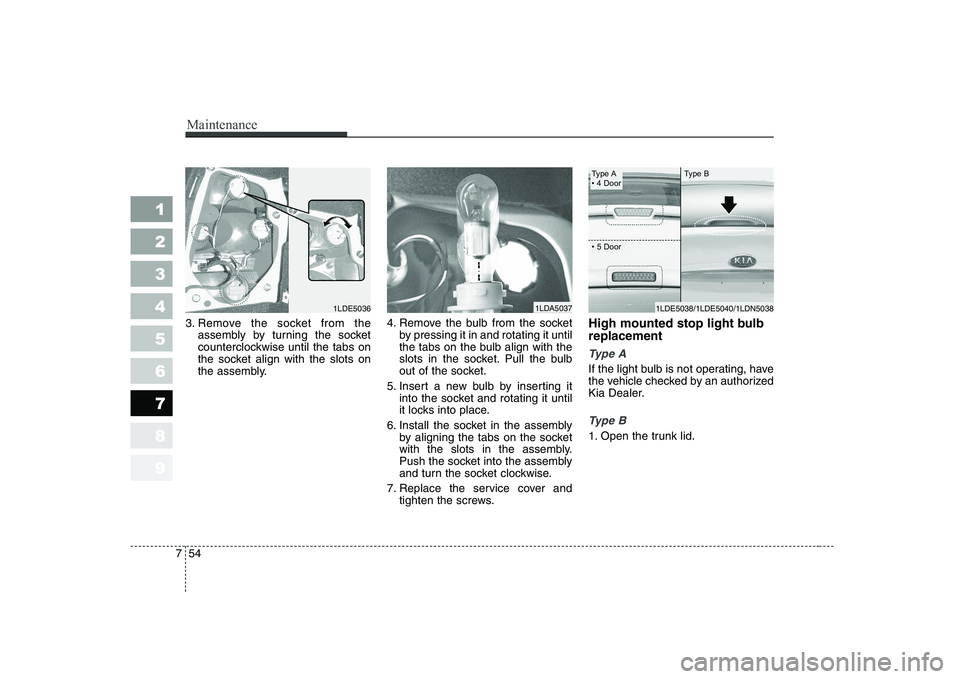
3. Remove the socket from the
assembly by turning the socket
counterclockwise until the tabs on
the socket align with the slots on
the assembly. 4. Remove the bulb from the socket
by pressing it in and rotating it until
the tabs on the bulb align with the
slots in the socket. Pull the bulb
out of the socket.
5. Insert a new bulb by inserting it into the socket and rotating it until
it locks into place.
6. Install the socket in the assembly by aligning the tabs on the socket
with the slots in the assembly.
Push the socket into the assembly
and turn the socket clockwise.
7. Replace the service cover and tighten the screws. High mounted stop light bulb replacement
Ty p e A
If the light bulb is not operating, have
the vehicle checked by an authorized
Kia Dealer.
Ty p e B
1. Open the trunk lid.
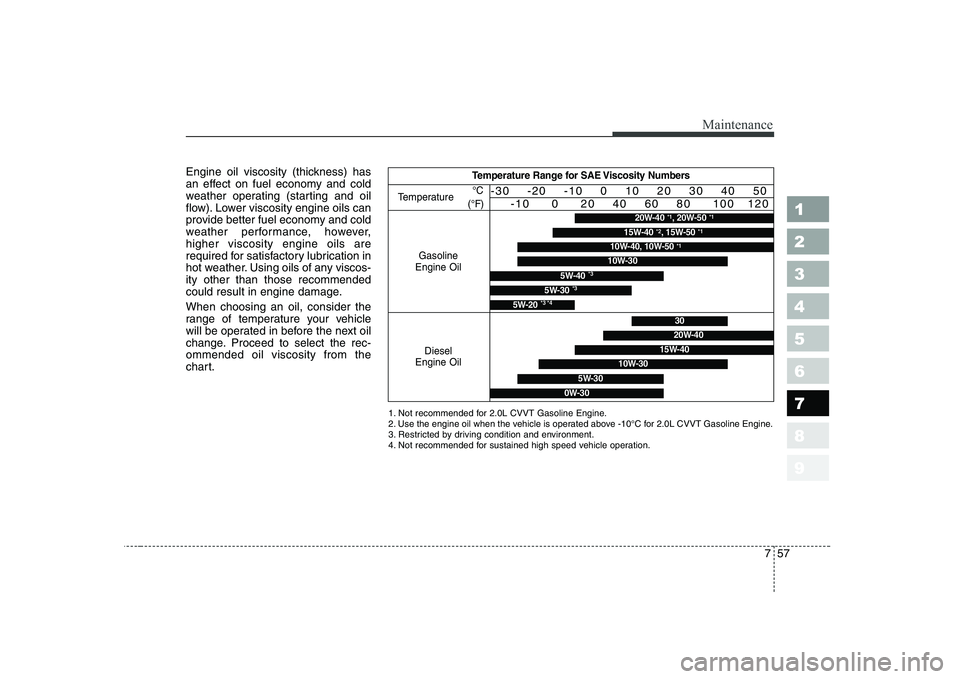
1LDA50371LDE5036
Type A
Page 300 of 315

755
Maintenance
1 23456789
2. Remove the socket from the hous-ing by turning the socket counter-
clockwise until the tabs on the sock-et align with the slots on the hous-ing.
3. Remove the bulb from the socket by pressing it in and rotating it until the
tabs on the bulb align with the slots
in the socket. Pull the bulb out of the
socket.
4. Insert a new bulb by inserting it into the socket and rotating it until it
locks into place.
5. Install the socket in the housing by aligning the tabs on the socket with
the slots in the housing. Insert the
socket into the housing and turn the
socket clockwise. Side repeater light bulb replacement (if equipped)
1. Remove the light assembly from
the vehicle by pushing the lens for-
ward and pulling the assembly out.
2. Disconnect the bulb electrical con- nector.
3. Separate the socket and the lens parts by turning the socket count-
er clockwise until the tabs on the
socket align with the slots on the
lens part. 4. Remove the bulb by pulling it
straight out.
5. Insert a new bulb in the socket.
6. Reassemble the socket and the lens part.
7. Connect the bulb electrical con- nector.
8. Reinstall the light assembly to the body of the vehicle.
1LDA50461LDA5045
Page 301 of 315

Maintenance
56
7
1 23456789
LUBRICANT SPECIFICATIONS
Recommended lubricants
To help achieve proper engine and
powertrain performance and durabil-
ity, use only lubricants of the proper
quality. The correct lubricants alsohelp promote engine efficiency that
results in improved fuel economy. Engine oils labeled Energy
Conserving Oil are now available.
Along with other additional benefits,
they contribute to fuel economy byreducing the amount of fuel neces-
sary to overcome engine friction.
Often, these improvements are diffi-
cult to measure in everyday driving,
but in a year’s time, they can offer
significant cost and energy savings.Recommended SAE viscosity
number
✽✽
NOTICE
Always be sure to clean the area
around any filler plug, drain plug,
or dipstick before checking or drain-
ing any lubricant. This is especially
important in dusty or sandy areasand when the vehicle is used on
unpaved roads. Cleaning the plug
and dipstick areas will prevent dirt
and grit from entering the engine
and other mechanisms that could bedamaged.
*¹ Refer to the recommended SAE viscosity numbers on the next page.
These lubricants and fluids are recommended for use in your vehicle.
Lubricant Classification
1.6L, API Service SG or above
2.0L API Service SE or above
2.0L CVVT API Service SH or above
ILSAC GF-1 or above
2.0L API Service CF-4 or above
ACEA B4 or above
Manual transaxle fluid API Service GL-4 (SAE 75W-90, fill-for-life)
Automatic transaxle fluid DIAMOND ATF SP-III or SK ATF SP-III
Power steering fluid PSF-III
Brake/Clutch fluid FMVSS116 DOT-3 or DOT-4
Engine oil *¹
Gasoline Engine
Diesel
Engine
For Europe
Except Europe
Page 302 of 315

757
Maintenance
1 23456789
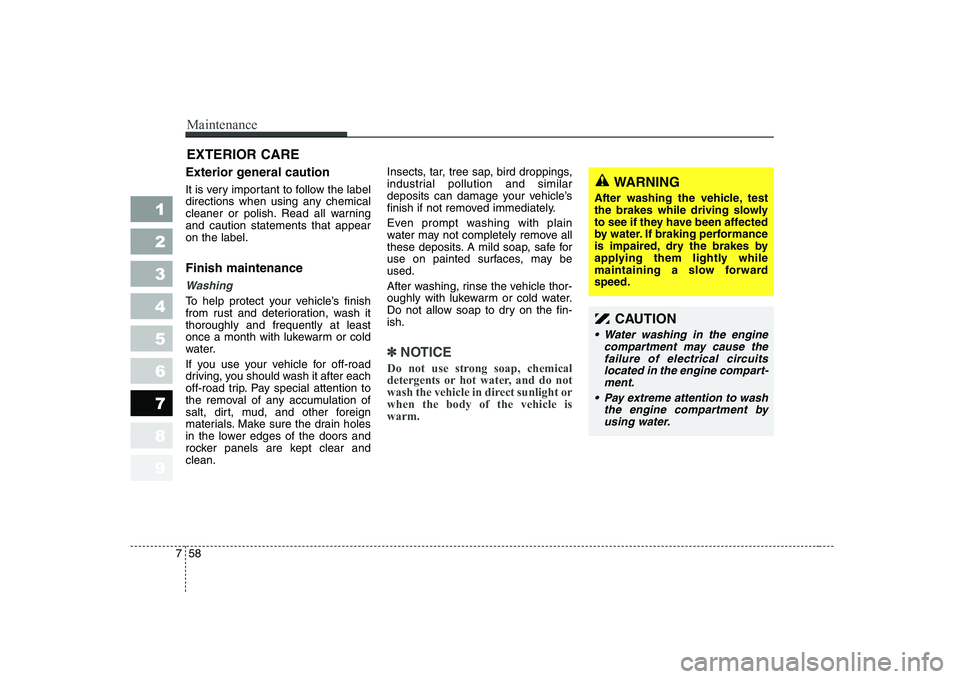
Engine oil viscosity (thickness) has
an effect on fuel economy and cold
weather operating (starting and oil
flow). Lower viscosity engine oils can
provide better fuel economy and cold
weather performance, however,higher viscosity engine oils are
required for satisfactory lubrication in
hot weather. Using oils of any viscos-ity other than those recommended
could result in engine damage. When choosing an oil, consider the
range of temperature your vehicle
will be operated in before the next oil
change. Proceed to select the rec-ommended oil viscosity from the
chart.Temperature Range for SAE Viscosity Numbers
TemperatureGasoline
Engine Oil °C
(°F)-30 -20 -10 0 10 20 30 40 50 -10 0 20 40 60 80 100 120
10W-30
20W-40 *1, 20W-50 *1
15W-40 *2, 15W-50 *1
10W-40, 10W-50 *1
5W-30*35W-40*3
5W-20*3 *4
Diesel
Engine Oil
10W-30
30
20W-40
15W-40
0W-30
5W-30
1. Not recommended for 2.0L CVVT Gasoline Engine.
2. Use the engine oil when the vehicle is operated above -10°C for 2.0L CVVT Gasoline Engine.
3. Restricted by driving condition and environment.
4. Not recommended for sustained high speed vehicle operation.
Page 303 of 315

Maintenance
58
7
1 23456789
EXTERIOR CARE
Exterior general caution
It is very important to follow the label
directions when using any chemical
cleaner or polish. Read all warningand caution statements that appearon the label. Finish maintenance
Washing
To help protect your vehicle’s finish
from rust and deterioration, wash itthoroughly and frequently at least
once a month with lukewarm or cold
water.
If you use your vehicle for off-road
driving, you should wash it after each
off-road trip. Pay special attention to
the removal of any accumulation of
salt, dirt, mud, and other foreign
materials. Make sure the drain holes
in the lower edges of the doors and
rocker panels are kept clear andclean. Insects, tar, tree sap, bird droppings,
industrial pollution and similar
deposits can damage your vehicle’s
finish if not removed immediately.
Even prompt washing with plain
water may not completely remove all
these deposits. A mild soap, safe for
use on painted surfaces, may beused.
After washing, rinse the vehicle thor-
oughly with lukewarm or cold water.
Do not allow soap to dry on the fin-ish.
✽✽
NOTICE
Do not use strong soap, chemical
detergents or hot water, and do not
wash the vehicle in direct sunlight orwhen the body of the vehicle iswarm.
CAUTION
Water washing in the engine compartment may cause thefailure of electrical circuitslocated in the engine compart- ment.
Pay extreme attention to wash the engine compartment byusing water.
WARNING
After washing the vehicle, test
the brakes while driving slowly
to see if they have been affected
by water. If braking performance
is impaired, dry the brakes by
applying them lightly while
maintaining a slow forwardspeed.
Page 304 of 315
759
Maintenance
1 23456789
Waxing
Wax the vehicle when water will no longer bead on the paint.
Always wash and dry the vehicle
before waxing. Use a good quality
liquid or paste wax, and follow the
manufacturer’s instructions. Wax all
metal trim to protect it and to main-
tain its luster.
Removing oil, tar, and similar materi-
als with a spot remover will usually
strip the wax from the finish. Be sure
to re-wax these areas even if the rest
of the vehicle does not yet need wax-ing.
✽✽NOTICE