2004 JEEP LIBERTY warning lights
[x] Cancel search: warning lightsPage 24 of 374

2. Continue to hold the9Lock9button, wait at least 4 but
no longer than 10 seconds, then press the ªRear Releaseº
button.
3. Release both buttons.
4. Repeating steps 1±3 will restore original transmitter
operation.
To Lock the Doors
Press and release the ªLockº button once to lock the
doors, swing gate flip-up window, and swing gate.
The horn will chirp and the park lights will flash once to
acknowledge the lock signal.
NOTE:The horn chirp can be enabled or disabled
(within 23±50 feet (7±15 meters) of the vehicle) by the
following procedure:
1. Press and hold the9Lock9button on the transmitter.2. Continue to hold the9Lock9button, wait at least 4 but
no longer than 10 seconds, then press the9Unlock9
button.
3. Release both buttons.
4. Repeating steps 1±3 will restore original transmitter
operation.
To Unlatch the Swing Gate Flip-Up Window
Press and hold the ªRear Releaseº button on the trans-
mitter to unlatch the swing gate flip-up window.
WARNING!
To avoid injury stand back when opening. Glass will
automatically rise.
24 THINGS TO KNOW BEFORE STARTING YOUR VEHICLE
Page 56 of 374

²The nylon airbag material may sometimes cause abra-
sions and/or skin reddening to the driver and front
passenger as the airbags deploy and unfold. The
abrasions are similar to friction rope burns or those
you might get sliding along a carpet or gymnasium
floor. They are not caused by contact with chemicals.
They are not permanent and normally heal quickly.
However, if you haven't healed significantly within a
few days, or if you have any blistering, see your doctor
immediately. As the airbags deflate you may see some
smoke-like particles. The particles are a normal by-
product of the process that generates the nontoxic gas
used for airbag inflation. These airborne particles may
irritate the skin, eyes, nose, or throat. If you have skin
or eye irritation, rinse the area with cool water. For
nose or throat irritation, move to fresh air. If the
irritation continues, see your doctor. If these particles
settle on your clothing, follow the garment manufac-
turer's instructions for cleaning.²It is not advisable to drive your vehicle after the
airbags have deployed. If you are involved in another
collision, the airbags will not be in place to protect you.
WARNING!
Deployed airbags and seat belt pretensioners cannot
protect you in another collision. Have the airbags,
seat belt pretensioners, and the front passenger seat
belt retractor assembly, replaced by an authorized
dealer as soon as possible. Also, have the Occupant
Classification System serviced as well.
Enhanced Accident Response System (E.A.R.S.)
If the airbags deploy after an impact and the electrical
system remains functional, the interior lights will turn on
and the power door locks (if equipped) will unlock 10
seconds after airbag deployment.
56 THINGS TO KNOW BEFORE STARTING YOUR VEHICLE
Page 98 of 374

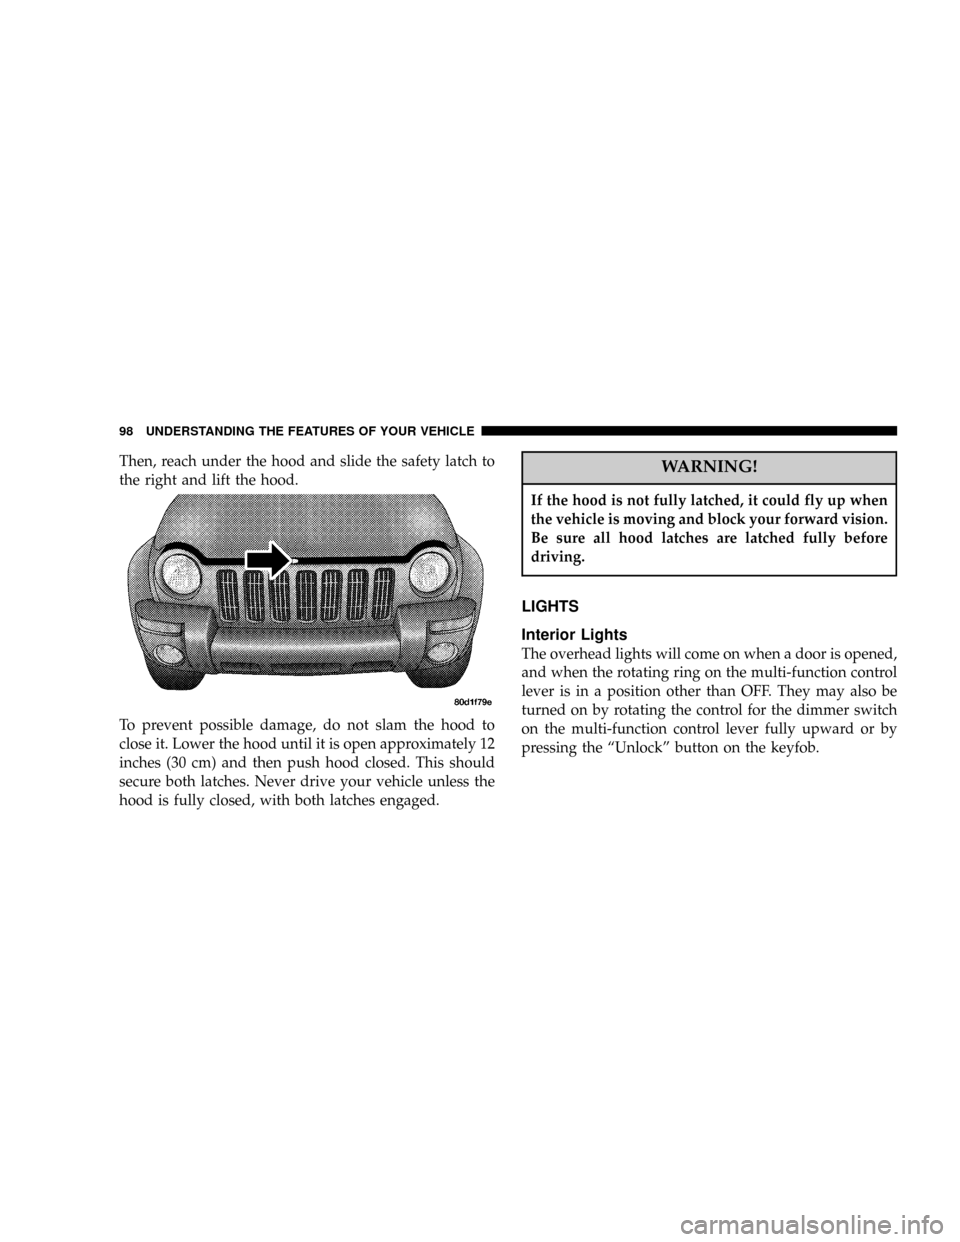
Then, reach under the hood and slide the safety latch to
the right and lift the hood.
To prevent possible damage, do not slam the hood to
close it. Lower the hood until it is open approximately 12
inches (30 cm) and then push hood closed. This should
secure both latches. Never drive your vehicle unless the
hood is fully closed, with both latches engaged.WARNING!
If the hood is not fully latched, it could fly up when
the vehicle is moving and block your forward vision.
Be sure all hood latches are latched fully before
driving.
LIGHTS
Interior Lights
The overhead lights will come on when a door is opened,
and when the rotating ring on the multi-function control
lever is in a position other than OFF. They may also be
turned on by rotating the control for the dimmer switch
on the multi-function control lever fully upward or by
pressing the ªUnlockº button on the keyfob.
98 UNDERSTANDING THE FEATURES OF YOUR VEHICLE
Page 110 of 374

NOTE:When driving uphill, at elevations above 2,000
ft. (610 meters), or when the vehicle is heavily loaded
(especially when towing) the vehicle may slow below the
SET speed. (If the vehicle speed drops below 30 mph (48
km/h), the Speed Control will automatically disengage).
If this happens, you can push down on the accelerator
pedal to maintain the desired speed.
A full throttle (high RPM) acceleration, while the system
is engaged, will cause the system to disengage.
Vehicles may exhibit several 4-3 downshifts under the
above conditions. To reduce the frequency of the down-
shifts and to improve vehicle performance, it is advisable
to lock out overdrive. Press the O/D OFF button on the
right side of the shift lever.WARNING!
Leaving the Speed Control on when not in use is
dangerous. You could accidentally set the system or
cause it to go faster than you want. You could lose
control and have an accident. Always turn the system
off when you are not using it.
OVERHEAD CONSOLE Ð IF EQUIPPED
The overhead console contains dome/reading lights, an
optional universal garage door opener (HomeLinkt), an
optional sunroof switch, and an Electronic Vehicle Infor-
mation Center (EVIC) that consists of the following:
²Compass/temperature display
²Trip information displays
²Vehicle information warning message displays
²Customer programmable features
110 UNDERSTANDING THE FEATURES OF YOUR VEHICLE
Page 121 of 374

a resettable function is currently being displayed (Aver-
age Economy, Trip Miles, and Time Elapsed). A single
chime will sound to indicate that a reset has occurred.
Global Reset
If the RESET button is pressed twice within 3 seconds
while in any of the three resettable displays, the RESET
button will reset all three displays.
A chime (two beeps) will sound to indicate that a reset
has occurred.
Menu Button
Press the Menu button to scroll through the following
screens: LANGUAGE, DISPLAY U.S. OR METRIC,
AUTO DOOR LOCKS, AUTO UNLOCK ON EXIT, RE-
MOTE UNLOCK DRIV DOOR 1ST, SOUND HORN
WITH LOCK, FLASH LIGHTS WITH LOCKS, HEAD-
LAMP DELAY, SERVICE INTV, LOW FUEL CHIME,
TRAIN REMOTE, and RETRAIN TIRE SENSORS.
C/T Button
Press the C/T button to display the outside temperature
and one of eight compass readings to indicate the direc-
tion the vehicle is facing.
WARNING!
Even if the display still reads a few degrees above
32ÉF (0ÉC), the road surface may be icy, particularly
in woods or on bridges. Drive carefully under such
conditions to prevent an accident and possible per-
sonal injury or property damage.
Step Button
Press the STEP button to cycle through all of the displays.
The displays are: Average Miles/GAL, Miles To Empty,
Trip Miles, Time Elapsed, Miles To Service, Tire PSI, and
Blank Screen.
UNDERSTANDING THE FEATURES OF YOUR VEHICLE 121
3
Page 151 of 374

INSTRUMENT CLUSTER DESCRIPTION
1. Tachometer
Indicates the permissible engine revolutions-per-minute
for each gear range. Before reaching the red area, ease up
on the accelerator to prevent engine damage.
2. Turn Signal Indicator Light
The arrows will flash in unison with the exterior
turn signals, when using the multi-function control
lever. A chime will sound if the turn signals are left on
continuously for 2 miles (3 km) until they are deacti-
vated.
3. High Beam Indicator Light
This light shows that the headlights are on high
beam. Pull the multi-function control lever to-
wards the steering wheel to switch the headlights from
high to low beam.4. Speedometer
Indicates vehicle speed.
5. Tire Pressure Monitor Warning Light Ð If Equipped
This light will turn on when there is a low tire
pressure condition. The light will also turn on
if a problem exist with any tire sensor. The light
will remain on until the tire pressure is prop-
erly set or the problem with the sensor is corrected.
This light will turn on momentarily as a bulb check when
the engine is started.
When the ªTire Pressure Monitor Warning Lightº is lit,
one or more of your tires is significantly under-inflated.
You should stop and check your tires as soon as possible,
and inflate them to the proper pressure as indicated on
the vehicle's tire information placard. Driving on a
significantly under-inflated tire causes the tire to over-
heat and can lead to tire failure. Under-inflation also
reduces fuel efficiency and tire tread life, and may affect
UNDERSTANDING YOUR INSTRUMENT PANEL 151
4
Page 152 of 374

the vehicle's handling and stopping ability. Each tire,
including the spare, should be checked monthly when
cold and set to the recommended inflation pressure as
specified on the vehicle placard.
6. 4LO Mode Indicator Light Ð If Equipped
This light alerts the driver that the vehicle is in
the 4 LO four±wheel drive mode. The front and
rear driveshafts are mechanically locked to-
gether forcing the front and rear wheels to
rotate at the same speed.
7. Fog Light Indicator Light Ð If Equipped
This light shows when the front fog lights are on.
8. Malfunction Indicator Light
This light is part of an onboard diagnostic system
called OBD II which monitors engine and auto-
matic transmission control systems. This light
will illuminate when the ignition is in the ON positionbefore engine start. If the bulb does not come on when
turning the ignition key from OFF to ON, have the
condition checked promptly.
Certain conditions such has a loose or missing gas cap,
poor fuel quality, etc. may illuminate the light after
engine start. The vehicle should be serviced if the light
stays on through several typical driving cycles. In most
situations, the vehicle will drive normally and will not
require towing.
When the engine is running, the ªMalfunction Indicator
Lightº may flash to alert of serious conditions that could
lead to immediate loss of power or severe catalytic
converter damage. The vehicle should be serviced as
soon as possible if this occurs.
9. Anti-Lock Warning Light (ABS) Ð If Equipped
This light monitors the Anti-Lock Brake System
(ABS) described elsewhere in this manual. This
152 UNDERSTANDING YOUR INSTRUMENT PANEL
Page 155 of 374

14. Cruise Indicator Light
This indicator lights when the speed control
system is turned ON.
15. Oil Pressure Warning Light
Shows low engine oil pressure. The light will come
on and remain on when the ignition switch is
turned from the OFF to the ON position, and the light
will turn off after the engine is started. If the bulb does
not come on, have the system checked by your autho-
rized dealer.
If the warning light comes on and remains on while
driving, stop the vehicle and shut off the engine. DO
NOT OPERATE THE VEHICLE UNTIL THE CAUSE IS
CORRECTED. Also, a single chime will sound.
16. Transmission Temperature Warning Light
This light indicates that there is excessive trans-
mission fluid temperature that might occur with
severe usage such as trailer towing or snow plowing. Ifthis light comes on, stop the vehicle and run the engine at
idle or faster, with the transmission in N (Neutral) until
the light goes off.
17. Part Time Indicator Light Ð If Equipped
This light alerts the driver that the vehicle is in
the PART TIME four±wheel drive high range
mode, and the front and rear driveshafts are
mechanically locked together forcing the front and rear
wheels to rotate at the same speed.
18. Brake Warning Light
This light monitors various brake functions,
including brake fluid level and parking brake
application. If the light comes on, it may indi-
cate that the parking brake is applied, or there
is a low brake fluid level. On vehicles equipped with
Anti-Lock brakes (ABS), it may also indicate an ABS
malfunction that could lead to reduced braking perfor-
mance.
UNDERSTANDING YOUR INSTRUMENT PANEL 155
4