2004 ISUZU TF SERIES ignition
[x] Cancel search: ignitionPage 1733 of 4264
4JA1/4JH1 ENGINE DRIVEABILITY AND EMISSIONS 6E–361
SYMPTOM DIAGNOSIS
PRELIMINARY CHECKS
Before using this section, perform the “On-Board
Diagnostic (OBD) System Check” and verify all of the
following items:
The engine control module (ECM) and check engine
lamp (MIL=malfunction indicator lamp are operating
correctly.
There are no Diagnostic Trouble Code(s) stored.
Tech 2 data is within normal operating range. Refer to
Typical Scan Data Values.
Verify the customer complaint and locate the correct
symptom in the table of contents. Perform the
procedure included in the symptom chart.
VISUAL/PHYSICAL CHECK
Several of the symptom procedures call for a careful
visual/physical check. This can lead to correcting a
problem without further checks and can save valuable
time. This check should include the following items:
ECM grounds for cleanliness, tightness and proper
location.
Vacuum hoses for splits, kinks, and proper
connection. Check thoroughly for any type of leak or
restriction.
Air intake ducts for collapsed or damaged areas.
Air leaks at throttle body mounting area, mass air flow
(MAF) sensor and intake manifold sealing surfaces.
Wiring for proper connections, pinches and cuts.
INTERMITTENT
Important: An intermittent problem may or may not turn
on the check engine lamp (MIL=malfunction indicator
lamp) or store a Diagnostic Trouble Code. Do NOT use
the Diagnostic Trouble Code (DTC) charts for
intermittent problems.
The fault must be present to locate the problem.
Most intermittent problems are cased by faulty electrical
connections or wiring. Perform a careful visual/physical
check for the following conditions.
Poor mating of the connector halves or a terminal not
fully seated in the connector (backed out).
Improperly formed or damaged terminal.
All connector terminals in the problem circuit should
be carefully checked for proper contact tension.
Poor terminal-to-wire connection. This requires
removing the terminal form the connector body to
check.
Check engine lamp (MIL=malfunction indicator lamp)
wire to ECM shorted to ground.
Poor ECM grounds. Refer to the ECM wiring
diagrams.Road test the vehicle with a Digital Multimeter
connected to a suspected circuit. An abnormal voltage
when the malfunction occurs is a good indication that
there is a fault in the circuit being monitored.
Using Tech 2 to help detect intermittent conditions. The
Tech 2 have several features that can be used to
located an intermittent condition. Use the following
features to find intermittent faults:
To check for loss of diagnostic code memory,
disconnect the MAF sensor and idle the engine until the
check engine lamp (MIL=malfunction indicator lamp)
comes on. Diagnostic Trouble Code P0100 should be
stored and kept in memory when the ignition is turned
OFF.
If not, the ECM is faulty. When this test is completed,
make sure that you clear the Diagnostic Trouble Code
P0100 from memory.
An intermittent check engine lamp (MIL=malfunction
indicator lamp) with no stored Diagnostic Trouble Code
may be caused by the following:
Check engine lamp (MIL=malfunction indicator lamp)
wire to ECM short to ground.
Poor ECM grounds. Refer to the ECM wiring
diagrams.
Check for improper installation of electrical options such
as light, cellular phones, etc. Check all wires from ECM
to the ignition control module for poor connections.
Check for an open diode across the A/C compressor
clutch and check for other open diodes (refer to wiring
diagrams in Electrical Diagnosis).
If problem has not been found, refer to ECM connector
symptom tables.
Check the “Broadcast Code” of the ECM, and
compare it with the latest Isuzu service bulletins and/
or Isuzu EEPROM reprogramming equipment to
determine if an update to the ECM's reprogrammable
memory has been released.
This identifies the contents of the reprogrammable
software and calibration contained in the ECM.
If the “Broadcast Code” is not the most current
available, it is advisable to reprogram the ECM's
EEPROM memory, which may either help identify a
hard-to find problem or may fix the problem.
The Service Programming System (SPS) will not allow
incorrect software programming or incorrect calibration
changes.
Page 1734 of 4264
6E–362 4JA1/4JH1 ENGINE DRIVEABILITY AND EMISSIONS
ENGINE CRANKS BUT WILL NOT RUN
DEFINITIONS: Engine cranks, but will not run. (The engine never start.)
NOTE: The vehicle with immobilizer system, this system may be activated. Check the immobilizer system diagnosis.
Step Action Value(s) Yes No
1Was the “On-Board Diagnostic (OBD) System Check”
performed?
—Go to Step 2Go to On Board
Diagnostic
(OBD) System
Check
2 1. Perform a bulletin search.
2. If a bulletin that addresses the symptom is found,
correct the condition as instructed in the bulletin.
Was a bulletin found that addresses the symptom?—Verify repair Go to Step 3
3 Was a visually/physical check performed?
—Go to Step 4Go to Visual /
physical Check
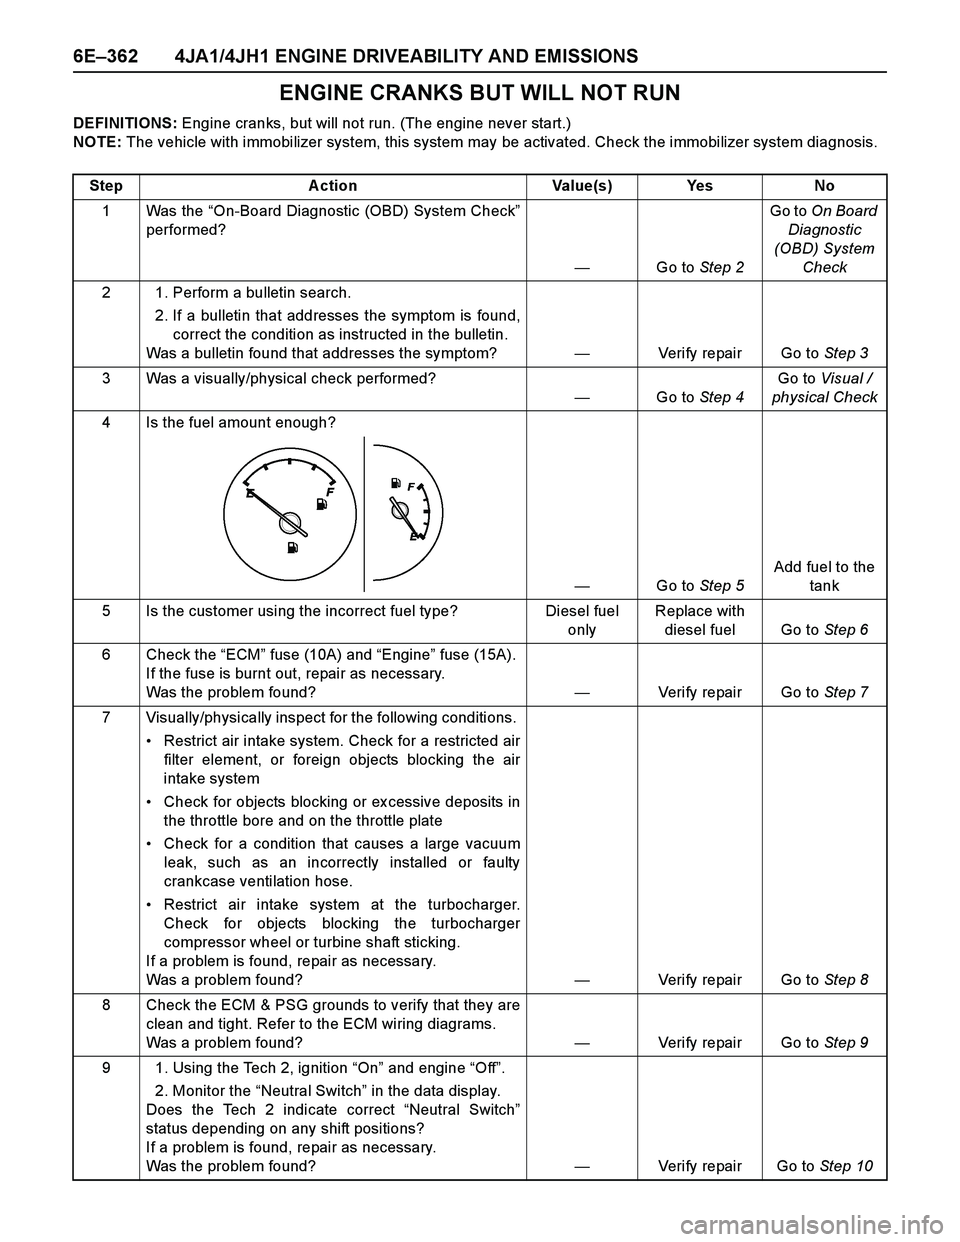
4 Is the fuel amount enough?
—Go to Step 5Add fuel to the
tank
5 Is the customer using the incorrect fuel type? Diesel fuel
onlyReplace with
diesel fuel Go to Step 6
6 Check the “ECM” fuse (10A) and “Engine” fuse (15A).
If the fuse is burnt out, repair as necessary.
Was the problem found?—Verify repair Go to Step 7
7 Visually/physically inspect for the following conditions.
Restrict air intake system. Check for a restricted air
filter element, or foreign objects blocking the air
intake system
Check for objects blocking or ex cessive deposits in
the throttle bore and on the throttle plate
Check for a condition that causes a large vacuum
leak, such as an incorrectly installed or faulty
crankcase ventilation hose.
Restrict air intake system at the turbocharger.
Check for objects blocking the turbocharger
compressor wheel or turbine shaft sticking.
If a problem is found, repair as necessary.
Was a problem found?—Verify repair Go to Step 8
8 Check the ECM & PSG grounds to verify that they are
clean and tight. Refer to the ECM wiring diagrams.
Was a problem found?—Verify repair Go to Step 9
9 1. Using the Tech 2, ignition “On” and engine “Off”.
2. Monitor the “Neutral Switch” in the data display.
Does the Tech 2 indicate correct “Neutral Switch”
status depending on any shift positions?
If a problem is found, repair as necessary.
Was the problem found?—Verify repair Go to Step 10
Page 1738 of 4264
6E–366 4JA1/4JH1 ENGINE DRIVEABILITY AND EMISSIONS
HARD START SYMPTOM
DEFINITIONS: Engine cranks, but does not start for a long time. Does eventually start, or may start and then
immediately stall.
Step Action Value(s) Yes No
1Was the “On-Board Diagnostic (OBD) System Check”
performed?
—Go to Step 2Go to On Board
Diagnostic
(OBD) System
Check
2 1. Perform a bulletin search.
2. If a bulletin that addresses the symptom is found,
correct the condition as instructed in the bulletin.
Was a bulletin found that addresses the symptom?—Verify repair Go to Step 3
3 Was a visually/physical check performed?
—Go to Step 4Go to Visual /
physical Check
4 Is the customer using the incorrect fuel type? Diesel fuel
onlyReplace with
diesel fuel Go to Step 6
5 Visually/physically inspect for the following conditions.
Restrict air intake system. Check for a restricted air
filter element, or foreign objects blocking the air
intake system
Check for objects blocking or ex cessive deposits in
the throttle bore and on the throttle plate
Check for a condition that causes a large vacuum
leak, such as an incorrectly installed or faulty
crankcase ventilation hose.
Restrict air intake system at the turbocharger.
Check for objects blocking the turbocharger
compressor wheel or turbine shaft sticking.
If a problem is found, repair as necessary.
Was a problem found?—Verify repair Go to Step 6
6 Check the ECM & PSG grounds to verify that they are
clean and tight. Refer to the ECM wiring diagrams.
Was a problem found?—Verify repair Go to Step 7
7 1. Using the Tech 2, display the ECT sensor and IAT
sensor value.
2 . C h e c k t h e d i s p l a y e d v a l u e .
Does the Tech 2 indicate correct temperature
depending on engine condition?
If a problem is found, repair as necessary.
Was the problem found?—Verify repair Go to Step 8
8 1. Using the Tech 2, display the FT sensor value.
2. Check the displayed value.
Does the Tech 2 indicate correct temperature
depending on engine condition?
If a problem is found, repair as necessary.
Was the problem found?—Go to Step 20Go to Step 9
9 1. Using the Tech 2, ignition “On”.
2. Monitor the “Glow Time Relay” in the data display.
Does the Tech 2 indicate correct “Glow Time Relay”
status depending on the time from ignition switch
“On”?
If a problem is found, repair as necessary.
Was the problem found?—Go to Step 20Go to Step 10
Page 1739 of 4264
4JA1/4JH1 ENGINE DRIVEABILITY AND EMISSIONS 6E–367
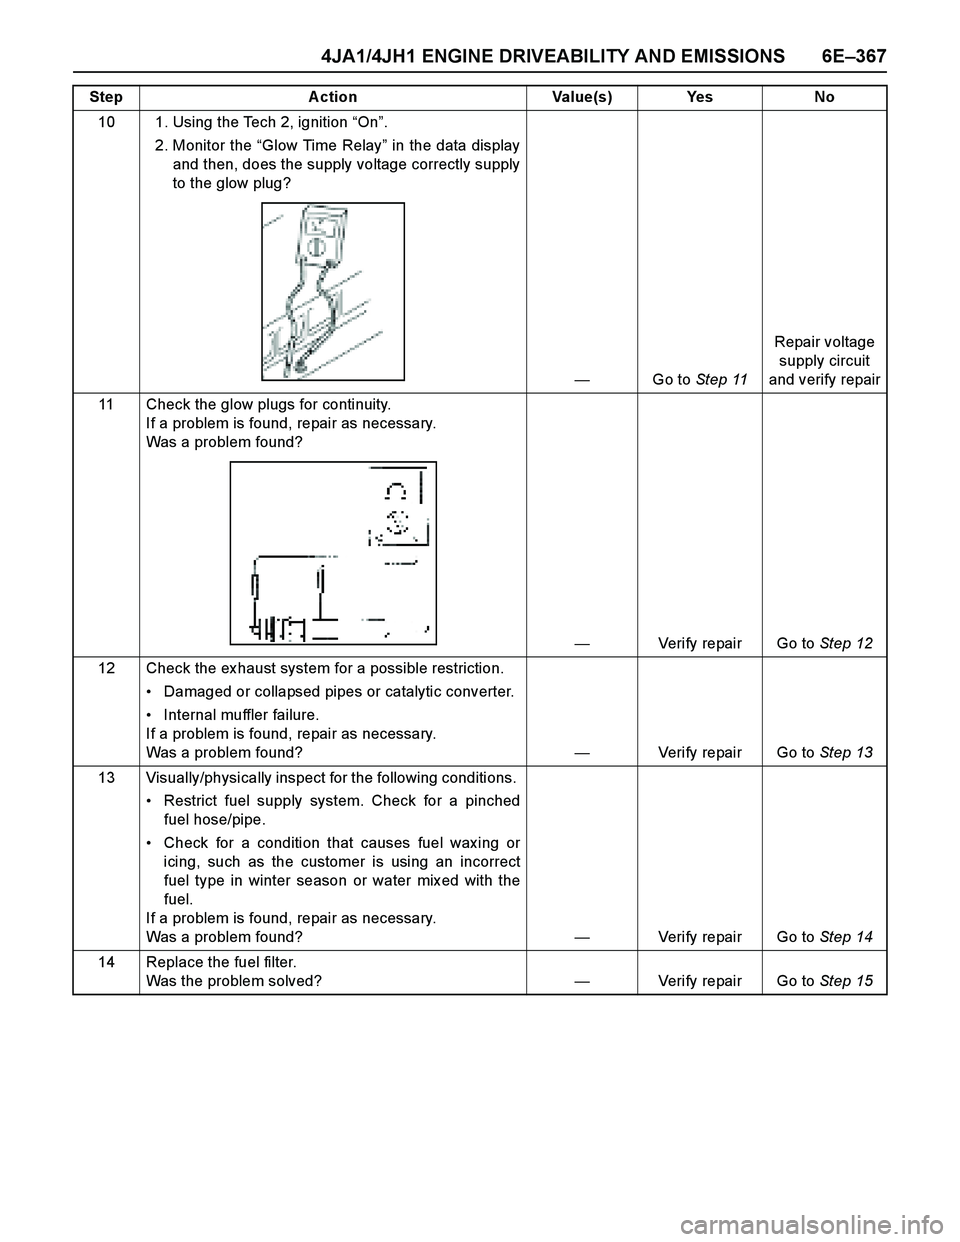
10 1. Using the Tech 2, ignition “On”.
2. Monitor the “Glow Time Relay” in the data display
and then, does the supply voltage correctly supply
to the glow plug?
—Go to Step 11Repair voltage
supply circuit
and verify repair
11 Check the glow plugs for continuity.
If a problem is found, repair as necessary.
Was a problem found?
—Verify repair Go to Step 12
12 Check the ex haust system for a possible restriction.
Damaged or collapsed pipes or catalytic converter.
Internal muffler failure.
If a problem is found, repair as necessary.
Was a problem found?—Verify repair Go to Step 13
13 Visually/physically inspect for the following conditions.
Restrict fuel supply system. Check for a pinched
fuel hose/pipe.
Check for a condition that causes fuel wax ing or
icing, such as the customer is using an incorrect
fuel type in winter season or water mix ed with the
fuel.
If a problem is found, repair as necessary.
Was a problem found?—Verify repair Go to Step 14
14 Replace the fuel filter.
Was the problem solved?—Verify repair Go to Step 15 Step Action Value(s) Yes No
Page 1743 of 4264
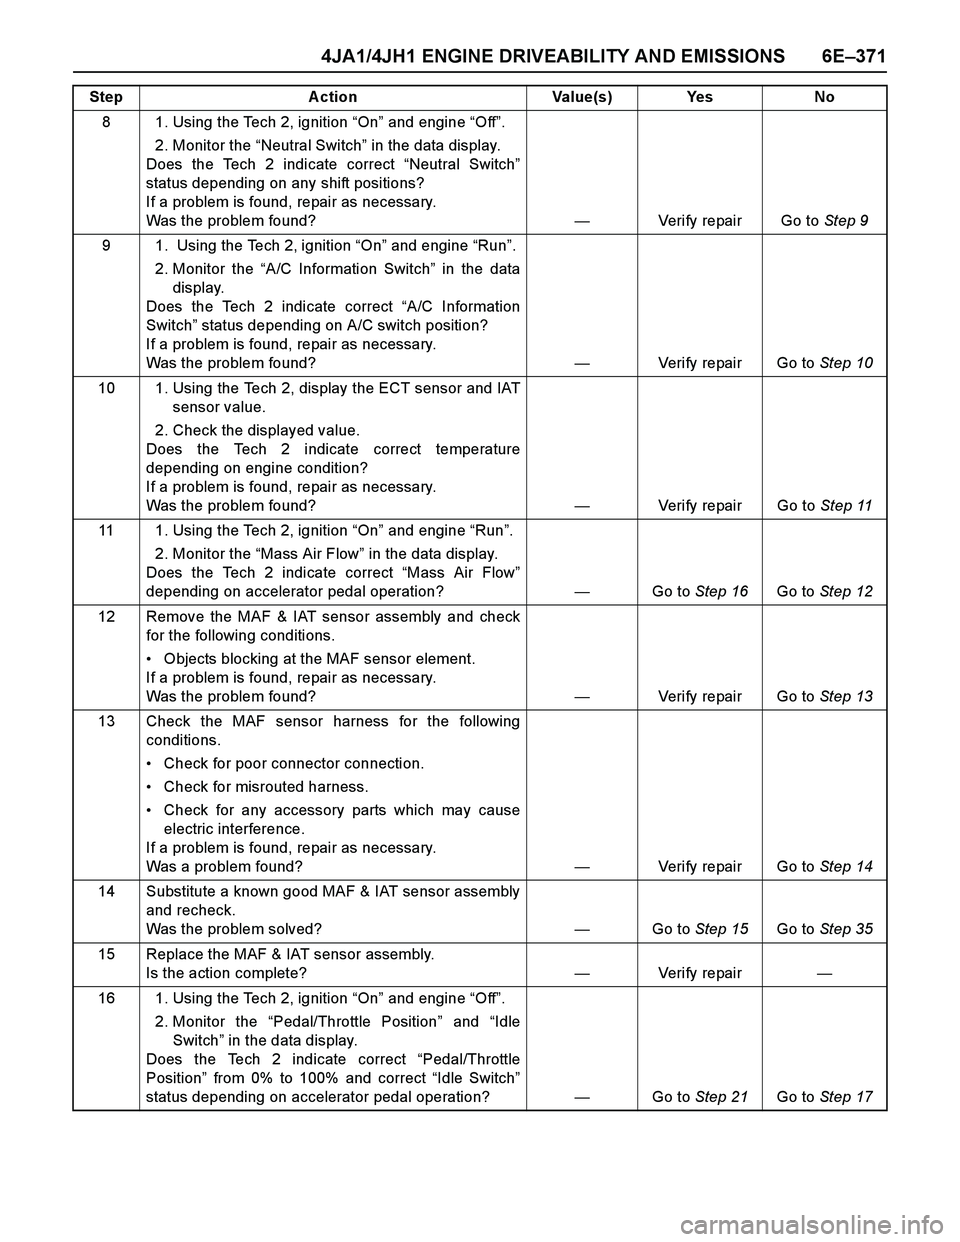
4JA1/4JH1 ENGINE DRIVEABILITY AND EMISSIONS 6E–371
8 1. Using the Tech 2, ignition “On” and engine “Off”.
2. Monitor the “Neutral Switch” in the data display.
Does the Tech 2 indicate correct “Neutral Switch”
status depending on any shift positions?
If a problem is found, repair as necessary.
Was the problem found?—Verify repair Go to Step 9
9 1. Using the Tech 2, ignition “On” and engine “Run”.
2. Monitor the “A/C Information Switch” in the data
display.
Does the Tech 2 indicate correct “A/C Information
Switch” status depending on A/C switch position?
If a problem is found, repair as necessary.
Was the problem found?—Verify repair Go to Step 10
10 1. Using the Tech 2, display the ECT sensor and IAT
sensor value.
2. Check the displayed value.
Does the Tech 2 indicate correct temperature
depending on engine condition?
If a problem is found, repair as necessary.
Was the problem found?—Verify repair Go to Step 11
11 1. Using the Tech 2, ignition “On” and engine “Run”.
2. Monitor the “Mass Air Flow” in the data display.
Does the Tech 2 indicate correct “Mass Air Flow”
depending on accelerator pedal operation? —Go to Step 16Go to Step 12
12 Remove the MAF & IAT sensor assembly and check
for the following conditions.
Objects blocking at the MAF sensor element.
If a problem is found, repair as necessary.
Was the problem found?—Verify repair Go to Step 13
13 Check the MAF sensor harness for the following
conditions.
Check for poor connector connection.
Check for misrouted harness.
Check for any accessory parts which may cause
electric interference.
If a problem is found, repair as necessary.
Was a problem found? —Verify repair Go to Step 14
14 Substitute a known good MAF & IAT sensor assembly
and recheck.
Was the problem solved?—Go to Step 15Go to Step 35
15 Replace the MAF & IAT sensor assembly.
Is the action complete?—Veri fy repai r—
16 1. Using the Tech 2, ignition “On” and engine “Off”.
2. Monitor the “Pedal/Throttle Position” and “Idle
Switch” in the data display.
Does the Tech 2 indicate correct “Pedal/Throttle
Position” from 0% to 100% and correct “Idle Switch”
status depending on accelerator pedal operation?—Go to Step 21Go to Step 17 Step Action Value(s) Yes No
Page 1744 of 4264
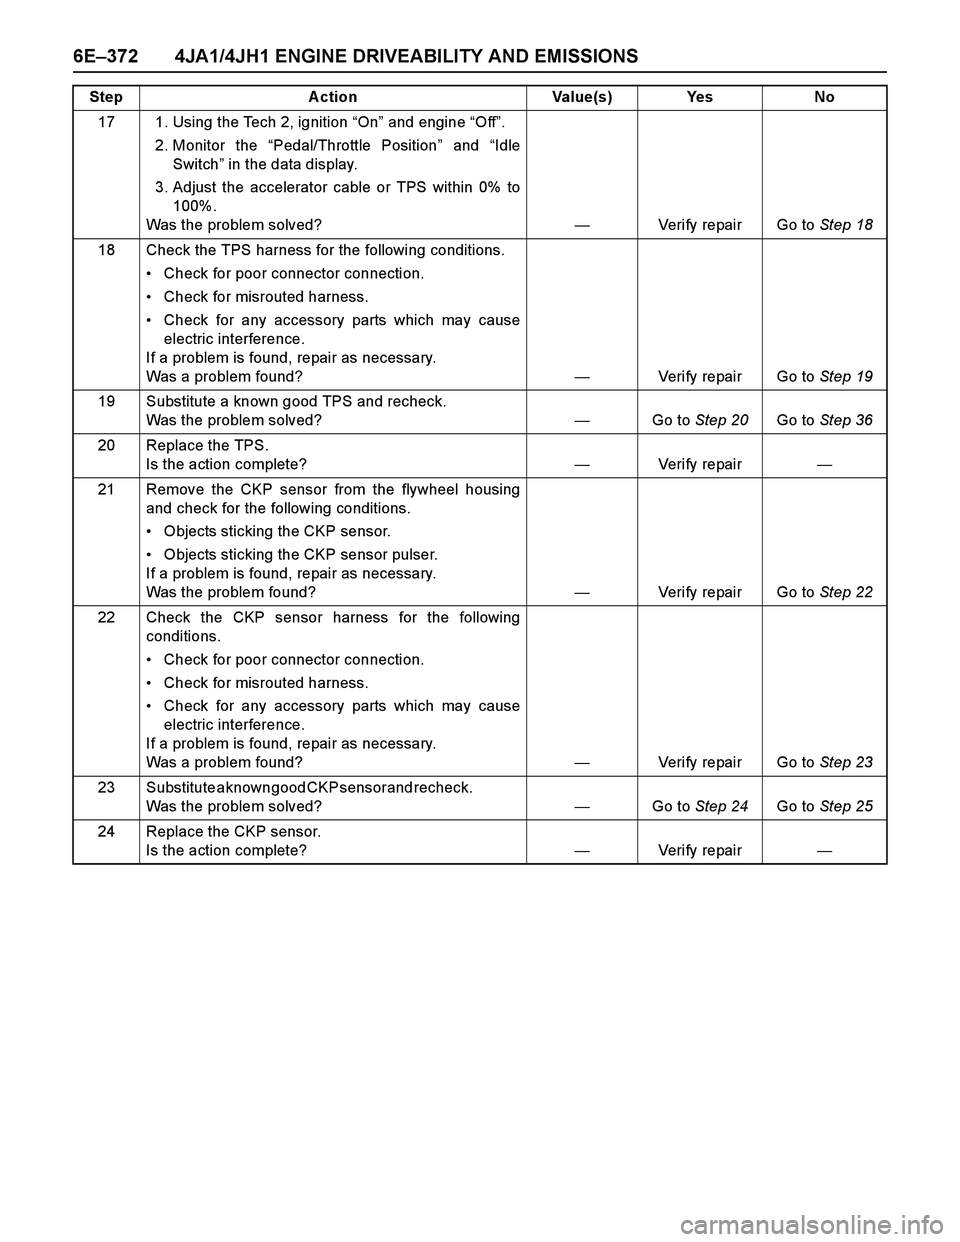
6E–372 4JA1/4JH1 ENGINE DRIVEABILITY AND EMISSIONS
17 1. Using the Tech 2, ignition “On” and engine “Off”.
2. Monitor the “Pedal/Throttle Position” and “Idle
Switch” in the data display.
3. Adjust the accelerator cable or TPS within 0% to
100%.
Was the problem solved?—Verify repair Go to Step 18
18 Check the TPS harness for the following conditions.
Check for poor connector connection.
Check for misrouted harness.
Check for any accessory parts which may cause
electric interference.
If a problem is found, repair as necessary.
Was a problem found? —Verify repair Go to Step 19
19 Substitute a known good TPS and recheck.
Was the problem solved?—Go to Step 20Go to Step 36
20 Replace the TPS.
Is the action complete?—Veri fy repai r—
21 Remove the CKP sensor from the flywheel housing
and check for the following conditions.
Objects sticking the CKP sensor.
Objects sticking the CKP sensor pulser.
If a problem is found, repair as necessary.
Was the problem found? —Verify repair Go to Step 22
22 Check the CKP sensor harness for the following
conditions.
Check for poor connector connection.
Check for misrouted harness.
Check for any accessory parts which may cause
electric interference.
If a problem is found, repair as necessary.
Was a problem found? —Verify repair Go to Step 23
23 Substitute a known good CKP sensor and recheck.
Was the problem solved?—Go to Step 24Go to Step 25
24 Replace the CKP sensor.
Is the action complete?—Veri fy repai r— Step Action Value(s) Yes No
Page 1745 of 4264
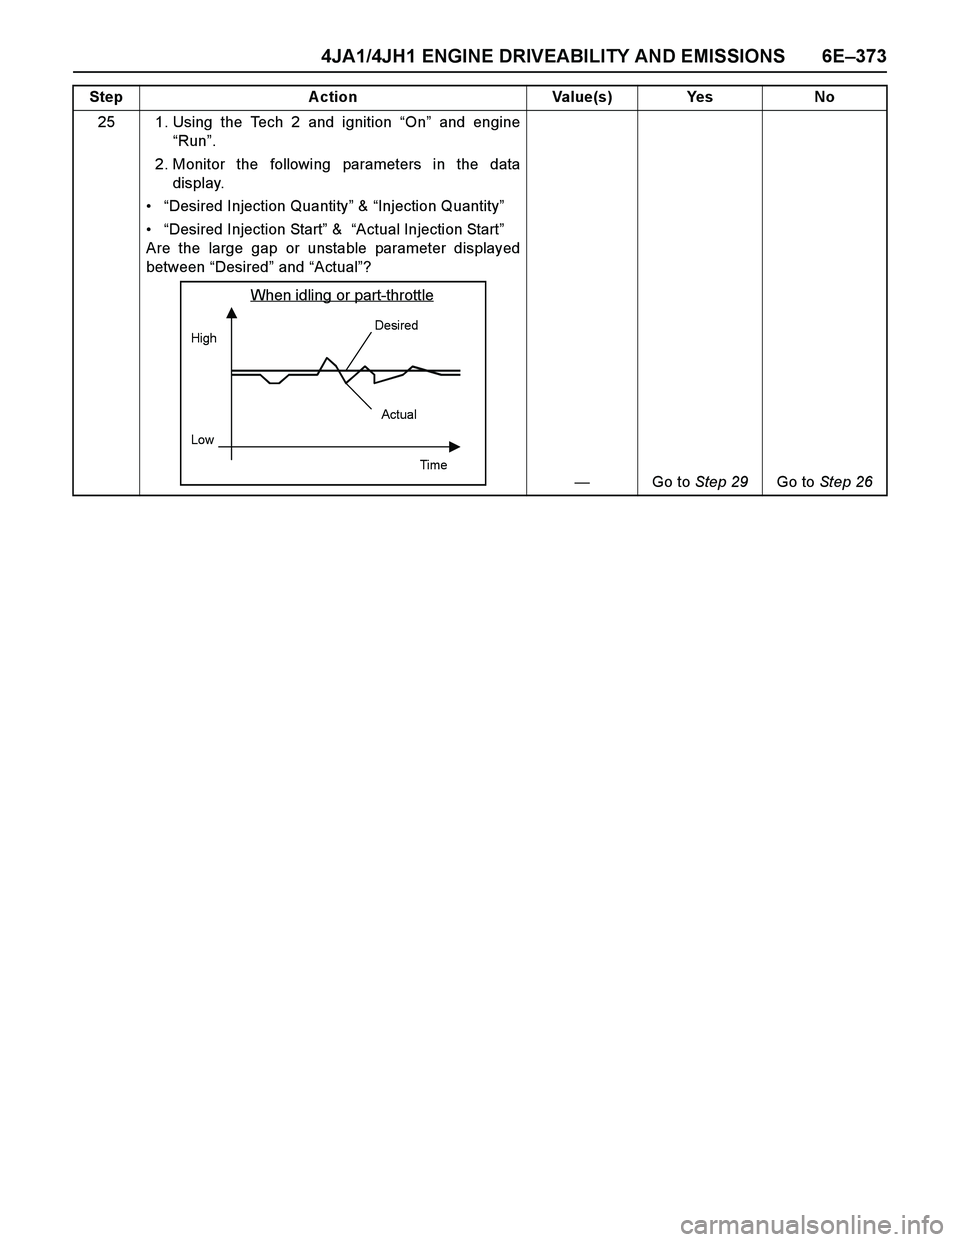
4JA1/4JH1 ENGINE DRIVEABILITY AND EMISSIONS 6E–373
25 1. Using the Tech 2 and ignition “On” and engine
“Run”.
2. Monitor the following parameters in the data
display.
“Desired Injection Quantity” & “Injection Quantity”
“Desired Injection Start” & “Actual Injection Start”
Are the large gap or unstable parameter displayed
between “Desired” and “Actual”?
—Go to Step 29Go to Step 26 Step Action Value(s) Yes No
When idling or part-throttle
Hi ghDesired
Low
Ti m e
Actual
Page 1746 of 4264
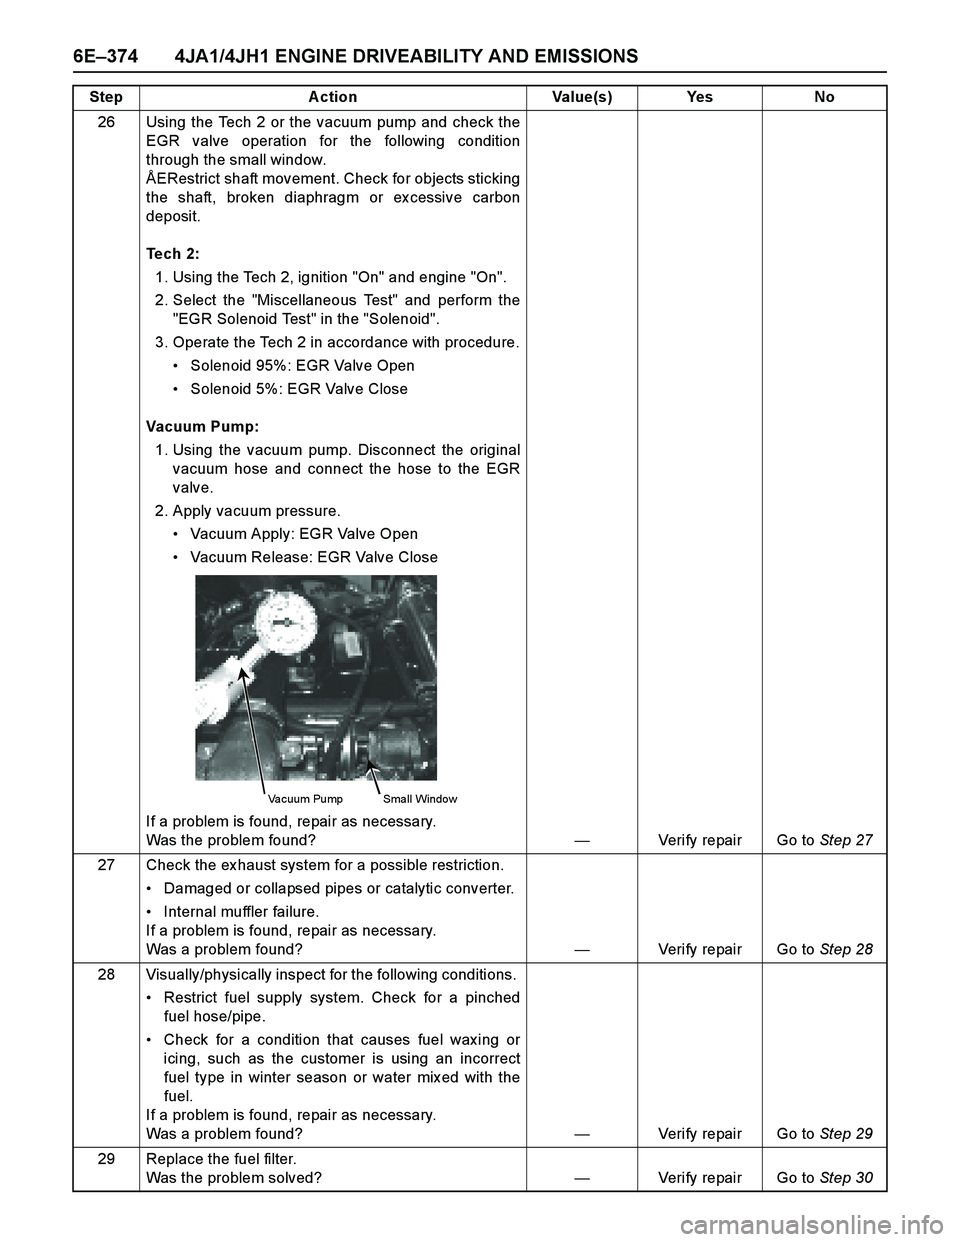
6E–374 4JA1/4JH1 ENGINE DRIVEABILITY AND EMISSIONS
26 Using the Tech 2 or the vacuum pump and check the
EGR valve operation for the following condition
through the small window.
ÅERestrict shaft movement. Check for objects sticking
the shaft, broken diaphragm or ex cessive carbon
deposit.
Tech 2:
1. Using the Tech 2, ignition "On" and engine "On".
2. Select the "Miscellaneous Test" and perform the
"EGR Solenoid Test" in the "Solenoid".
3. Operate the Tech 2 in accordance with procedure.
Solenoid 95%: EGR Valve Open
Solenoid 5%: EGR Valve Close
Vacuum Pump:
1. Using the vacuum pump. Disconnect the original
vacuum hose and connect the hose to the EGR
valve.
2. Apply vacuum pressure.
Vacuum Apply: EGR Valve Open
Vacuum Release: EGR Valve Close
If a problem is found, repair as necessary.
Was the problem found?—Verify repair Go to Step 27
27 Check the ex haust system for a possible restriction.
Damaged or collapsed pipes or catalytic converter.
Internal muffler failure.
If a problem is found, repair as necessary.
Was a problem found?—Verify repair Go to Step 28
28 Visually/physically inspect for the following conditions.
Restrict fuel supply system. Check for a pinched
fuel hose/pipe.
Check for a condition that causes fuel wax ing or
icing, such as the customer is using an incorrect
fuel type in winter season or water mix ed with the
fuel.
If a problem is found, repair as necessary.
Was a problem found?—Verify repair Go to Step 29
29 Replace the fuel filter.
Was the problem solved?—Verify repair Go to Step 30 Step Action Value(s) Yes No
Vacuum Pump Small Window