Page 1250 of 4264
6A – 110 ENGINE MECHANICAL
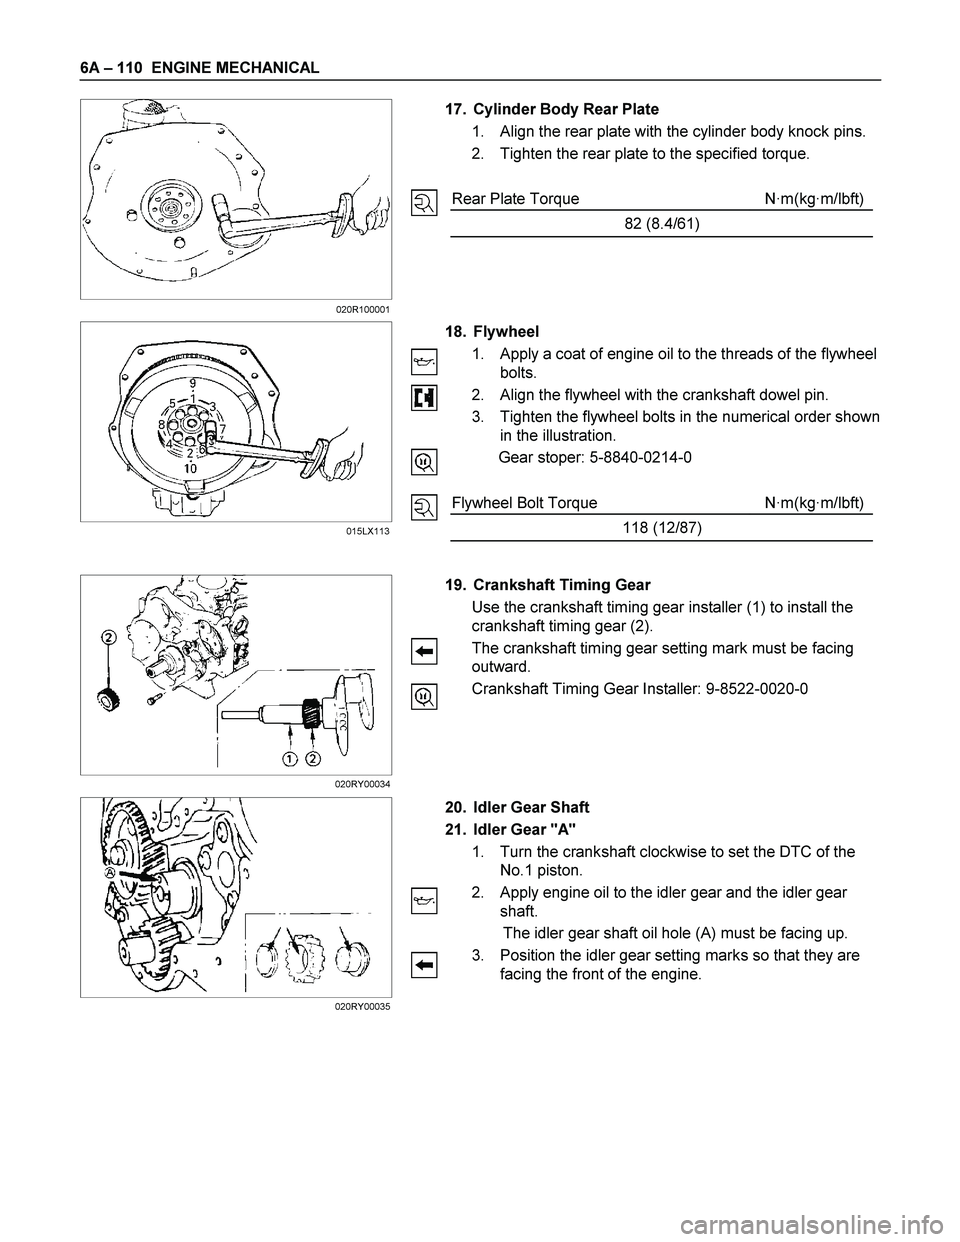
17. Cylinder Body Rear Plate
1. Align the rear plate with the cylinder body knock pins.
2. Tighten the rear plate to the specified torque.
Rear Plate Torque N·m(kg·m/lbft)
82 (8.4/61)
18. Flywheel
1. Apply a coat of engine oil to the threads of the flywheel
bolts.
2. Align the flywheel with the crankshaft dowel pin.
3. Tighten the flywheel bolts in the numerical order shown
in the illustration.
Gear stoper: 5-8840-0214-0
Flywheel Bolt Torque N·m(kg·m/lbft)
118 (12/87)
19. Crankshaft Timing Gear
Use the crankshaft timing gear installer (1) to install the
crankshaft timing gear (2).
The crankshaft timing gear setting mark must be facing
outward.
Crankshaft Timing Gear Installer: 9-8522-0020-0
20. Idler Gear Shaft
21. Idler Gear "A"
1. Turn the crankshaft clockwise to set the DTC of the
No.1 piston.
2. Apply engine oil to the idler gear and the idler gear
shaft.
The idler gear shaft oil hole (A) must be facing up.
3. Position the idler gear setting marks so that they are
facing the front of the engine.
015LX113 020R100001
020RY00034
020RY00035
Page 1366 of 4264
6D – 28 ENGINE ELECTRICAL
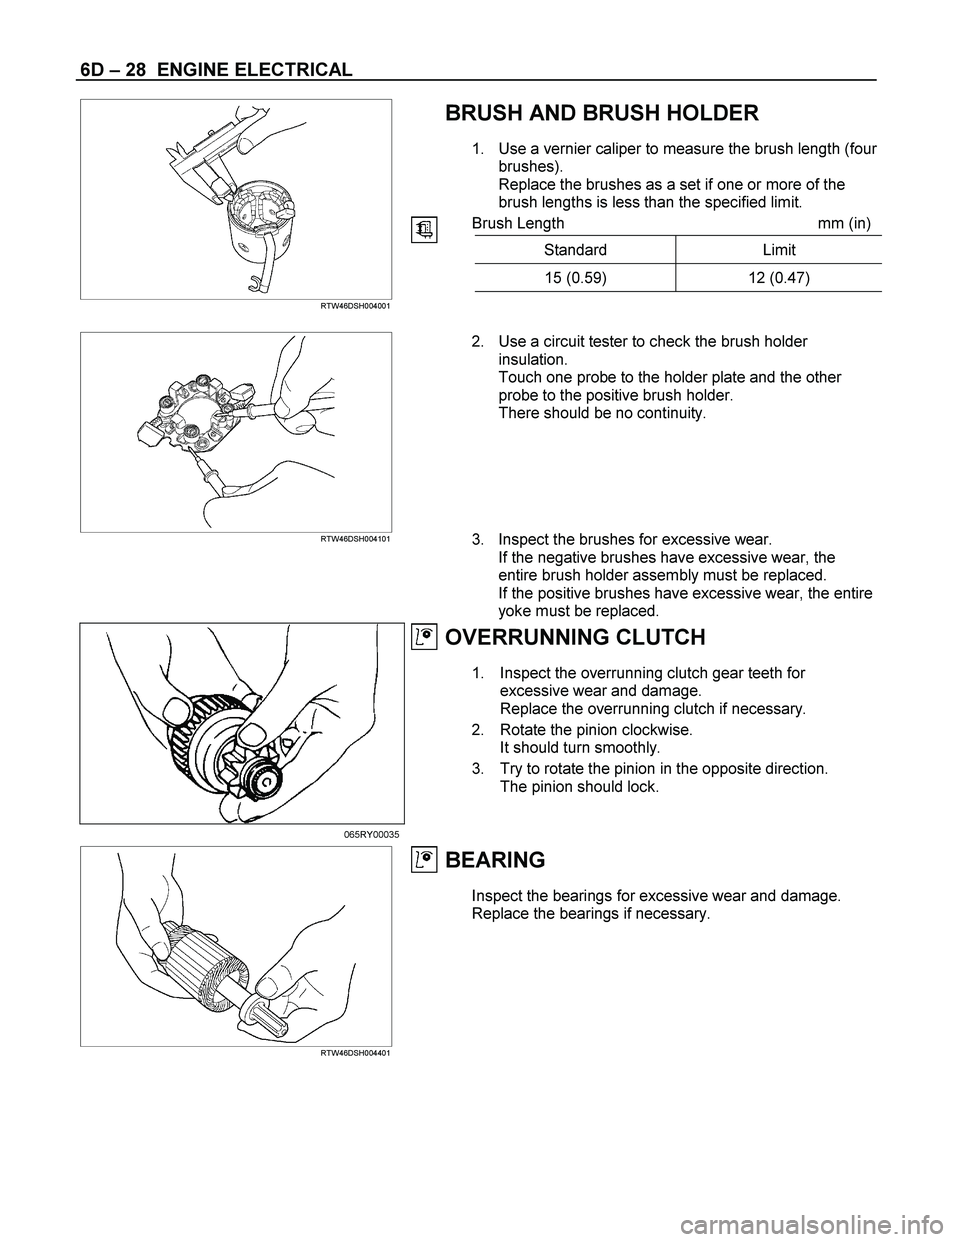
BRUSH AND BRUSH HOLDER
1. Use a vernier caliper to measure the brush length (four
brushes).
Replace the brushes as a set if one or more of the
brush lengths is less than the specified limit.
Brush Length mm (in)
Standard Limit
15 (0.59) 12 (0.47)
RTW46DSH004001
RTW46DSH004101
2. Use a circuit tester to check the brush holder
insulation.
Touch one probe to the holder plate and the other
probe to the positive brush holder.
There should be no continuity.
3. Inspect the brushes for excessive wear.
If the negative brushes have excessive wear, the
entire brush holder assembly must be replaced.
If the positive brushes have excessive wear, the entire
yoke must be replaced.
OVERRUNNING CLUTCH
1. Inspect the overrunning clutch gear teeth for
excessive wear and damage.
Replace the overrunning clutch if necessary.
2. Rotate the pinion clockwise.
It should turn smoothly.
3. Try to rotate the pinion in the opposite direction.
The pinion should lock.
065RY00035
RTW46DSH004401
BEARING
Inspect the bearings for excessive wear and damage.
Replace the bearings if necessary.
Page 3043 of 4264
HEATER AND AIR CONDITIONING 1-33
refrigerant container.
1) Make sure the evacuation process is correctly completed.
2) Connect the center-hose of the manifold gauge to the
refrigerant container.
�
�� �
Turn the charge valve handle counterclockwise to purge
to the charging line and purge any air exiting in the
center-hose of the manifold gauge.
3) Open the low-pressure hand valve and charge the
refrigerant about 200 g (0.44 lbs.).
�
�� �
Make sure the high-pressure hand valve is closed.
�
�� �
Avoid charging the refrigerant by turning the refrigerant
container upside down.
4) Close the low-pressure hand valve of the manifold gauge.
�
�� �
Check to ensure that the degree of pressure does not
change.
5) Check the refrigerant leaks by using a HFC-134a leak
detector.
�
�� �
If a leak occurs, repair the leak connection, and start all
over again from the first step of evacuation.
6) If no leaks are found, open the low-pressure hand valve of
the manifold gauge. Then continue charging refrigerant to
the system.
�
�� �
When charging the system becomes difficult:
(1) Run the engine at Idling and close the all vehicle
doors.
(2) A/C switch is "ON".
(3) Set the fan control knob (fan switch) to its highest
position.
(4) Set air soure selector lever to “RECIRC”
WARNING
BE ABSOLUTELY SURE NOT TO OPEN THE HIGH-
PRESSURE HAND VALVE. SHOULD THE HIGH-
PRESSURE HAND VALVE BE OPENED, THE HIGH-
PRESSURE REFRIGERANT GAS WOULD FLOW
BACKWARD, AND THIS MAY CAUSE THE REFRIGERANT
CONTAINER TO BURST.
7) When the refrigerant container is emptied, use the following
procedure to replace it with a new refrigerant container.
(1) Close the low-pressure hand valve.
(2) Raise the needle upward and remove the charge valve.
(3) Reinstall the charge valve to the new refrigerant
container.
(4) Purge any air existing in the center hose of the manifold
gauge.
8) Charge the system to the specified amount and then close
the low-pressure hand valve.
Refrigerant Amount g(lbs.)
720 (1.59)
Page 3490 of 4264
3B-60 POWER-ASSISTED STEERING SYSTEM
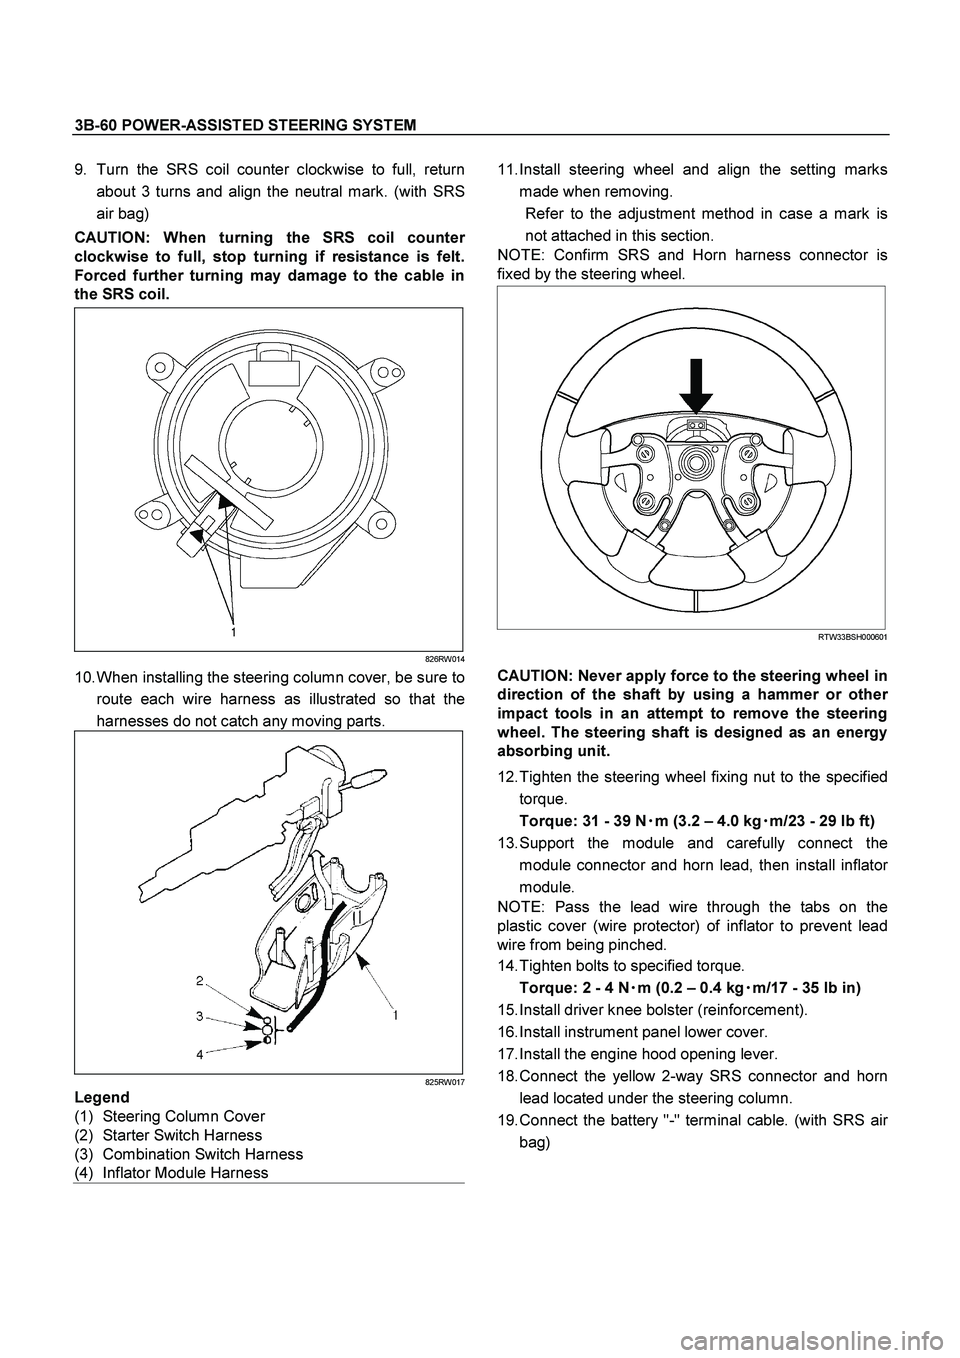
9. Turn the SRS coil counter clockwise to full, return
about 3 turns and align the neutral mark. (with SRS
air bag)
CAUTION: When turning the SRS coil counte
r
clockwise to full, stop turning if resistance is felt.
Forced further turning may damage to the cable in
the SRS coil.
826RW014
10. When installing the steering column cover, be sure to
route each wire harness as illustrated so that the
harnesses do not catch any moving parts.
825RW017
Legend
(1) Steering Column Cover
(2) Starter Switch Harness
(3) Combination Switch Harness
(4) Inflator Module Harness
11. Install steering wheel and align the setting marks
made when removing.
Refer to the adjustment method in case a mark is
not attached in this section.
NOTE: Confirm SRS and Horn harness connector is
fixed by the steering wheel.
RTW33BSH000601
CAUTION: Never apply force to the steering wheel in
direction of the shaft by using a hammer or othe
r
impact tools in an attempt to remove the steering
wheel. The steering shaft is designed as an energy
absorbing unit.
12. Tighten the steering wheel fixing nut to the specified
torque.
Torque: 31 - 39 N�
�� �m (3.2 – 4.0 kg�
�� �m/23 - 29 lb ft)
13. Support the module and carefully connect the
module connector and horn lead, then install inflato
r
module.
NOTE: Pass the lead wire through the tabs on the
plastic cover (wire protector) of inflator to prevent lead
wire from being pinched.
14. Tighten bolts to specified torque.
Torque: 2 - 4 N�
�� �m (0.2 – 0.4 kg�
�� �m/17 - 35 lb in)
15. Install driver knee bolster (reinforcement).
16. Install instrument panel lower cover.
17. Install the engine hood opening lever.
18. Connect the yellow 2-way SRS connector and horn
lead located under the steering column.
19. Connect the battery "-" terminal cable. (with SRS ai
r
bag)
Page 3982 of 4264
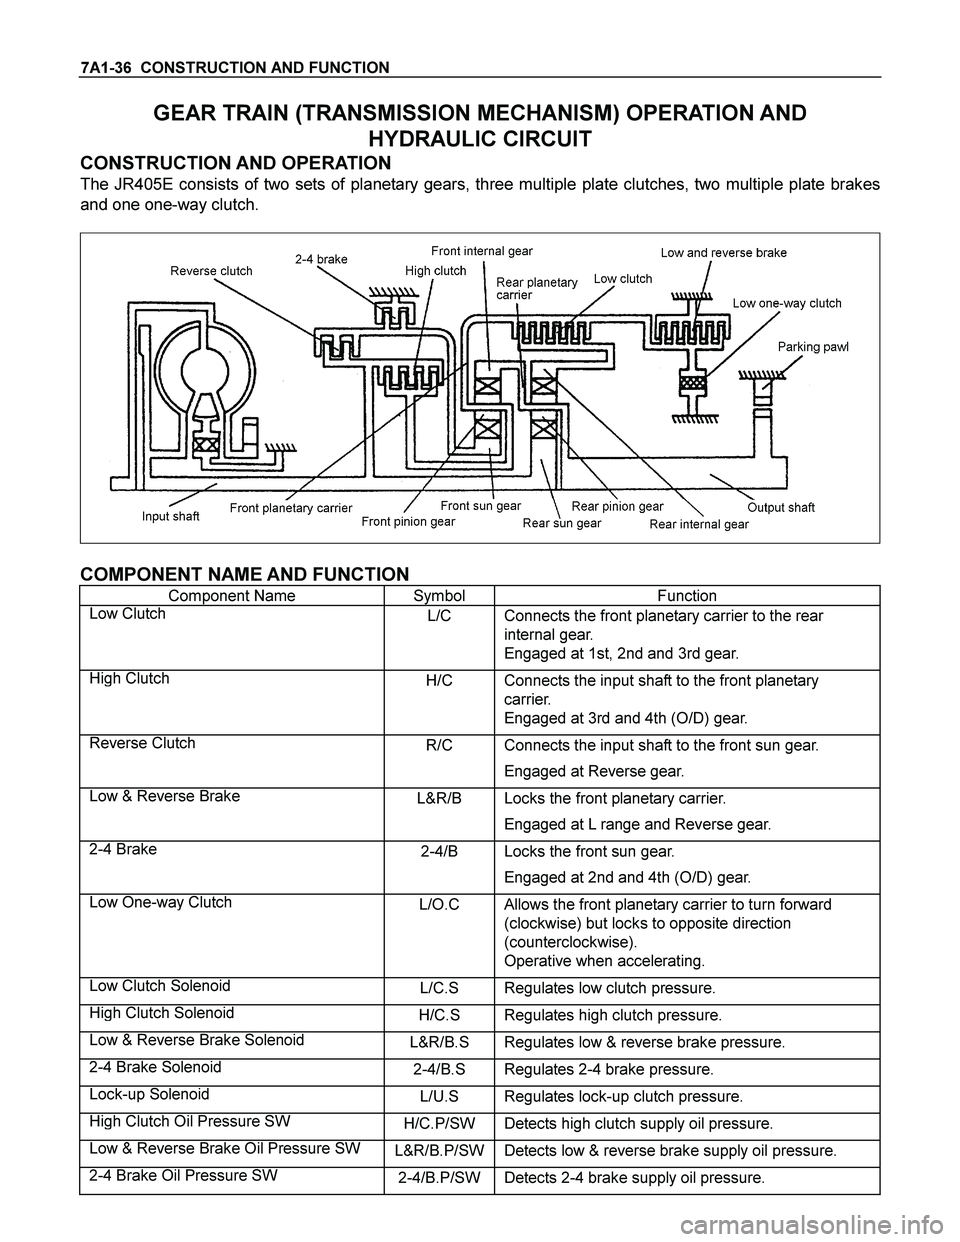
7A1-36 CONSTRUCTION AND FUNCTION
GEAR TRAIN (TRANSMISSION MECHANISM) OPERATION AND
HYDRAULIC CIRCUIT
CONSTRUCTION AND OPERATION
The JR405E consists of two sets of planetary gears, three multiple plate clutches, two multiple plate brakes
and one one-way clutch.
COMPONENT NAME AND FUNCTION
Component Name Symbol Function
Low Clutch L/C Connects the front planetary carrier to the rear
internal gear.
Engaged at 1st, 2nd and 3rd gear.
High Clutch H/C Connects the input shaft to the front planetary
carrier.
Engaged at 3rd and 4th (O/D) gear.
Reverse Clutch R/C Connects the input shaft to the front sun gear.
Engaged at Reverse gear.
Low & Reverse Brake L&R/B Locks the front planetary carrier.
Engaged at L range and Reverse gear.
2-4 Brake 2-4/B Locks the front sun gear.
Engaged at 2nd and 4th (O/D) gear.
Low One-way Clutch L/O.C Allows the front planetary carrier to turn forward
(clockwise) but locks to opposite direction
(counterclockwise).
Operative when accelerating.
Low Clutch Solenoid L/C.S Regulates low clutch pressure.
High Clutch Solenoid H/C.S Regulates high clutch pressure.
Low & Reverse Brake Solenoid L&R/B.S Regulates low & reverse brake pressure.
2-4 Brake Solenoid 2-4/B.S Regulates 2-4 brake pressure.
Lock-up Solenoid L/U.S Regulates lock-up clutch pressure.
High Clutch Oil Pressure SW H/C.P/SW Detects high clutch supply oil pressure.
Low & Reverse Brake Oil Pressure SW L&R/B.P/SWDetects low & reverse brake supply oil pressure.
2-4 Brake Oil Pressure SW 2-4/B.P/SWDetects 2-4 brake supply oil pressure.