Page 2929 of 3371
SC-8
BATTERY
Revision: August 20072004 QX56
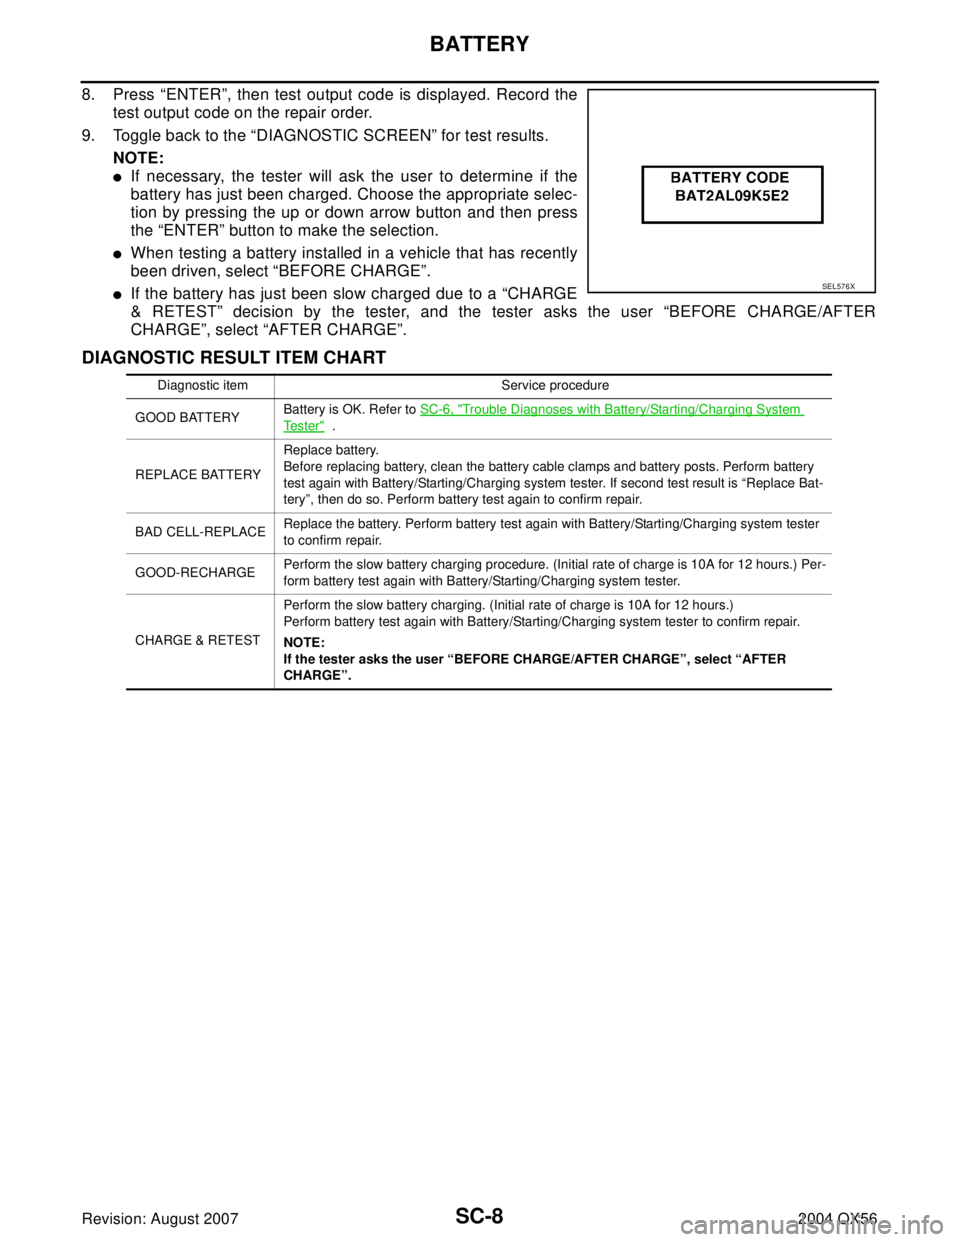
8. Press “ENTER”, then test output code is displayed. Record the
test output code on the repair order.
9. Toggle back to the “DIAGNOSTIC SCREEN” for test results.
NOTE:
�If necessary, the tester will ask the user to determine if the
battery has just been charged. Choose the appropriate selec-
tion by pressing the up or down arrow button and then press
the “ENTER” button to make the selection.
�When testing a battery installed in a vehicle that has recently
been driven, select “BEFORE CHARGE”.
�If the battery has just been slow charged due to a “CHARGE
& RETEST” decision by the tester, and the tester asks the user “BEFORE CHARGE/AFTER
CHARGE”, select “AFTER CHARGE”.
DIAGNOSTIC RESULT ITEM CHART
SEL576X
Diagnostic item Service procedure
GOOD BATTERYBattery is OK. Refer to SC-6, "
Trouble Diagnoses with Battery/Starting/Charging System
Te s t e r" .
REPLACE BATTERYReplace battery.
Before replacing battery, clean the battery cable clamps and battery posts. Perform battery
test again with Battery/Starting/Charging system tester. If second test result is “Replace Bat-
tery”, then do so. Perform battery test again to confirm repair.
BAD CELL-REPLACEReplace the battery. Perform battery test again with Battery/Starting/Charging system tester
to confirm repair.
GOOD-RECHARGEPerform the slow battery charging procedure. (Initial rate of charge is 10A for 12 hours.) Per-
form battery test again with Battery/Starting/Charging system tester.
CHARGE & RETESTPerform the slow battery charging. (Initial rate of charge is 10A for 12 hours.)
Perform battery test again with Battery/Starting/Charging system tester to confirm repair.
NOTE:
If the tester asks the user “BEFORE CHARGE/AFTER CHARGE”, select “AFTER
CHARGE”.
Page 2930 of 3371
BATTERY
SC-9
C
D
E
F
G
H
I
J
L
MA
B
SC
Revision: August 20072004 QX56
Removal and Installation EKS00797
REMOVAL
1. Disconnect the negative battery terminal and positive battery
terminal.
CAUTION:
When removing, remove negative battery terminal first.
2. Remove the battery cover.
3. Remove the battery clamp bolt and battery clamp.
4. Remove the battery.
INSTALLATION
Installation is in the reverse order of removal.
CAUTION:
When installing, install positive battery terminal first.
WKIA1385E
Battery clamp bolt : 14.7 N·m (1.5 kg-m, 11 ft-lb)
Battery terminal nut : 3.5 N·m (0.36 kg-m, 31 in-lb)
Page 2935 of 3371
SC-14
STARTING SYSTEM
Revision: August 20072004 QX56
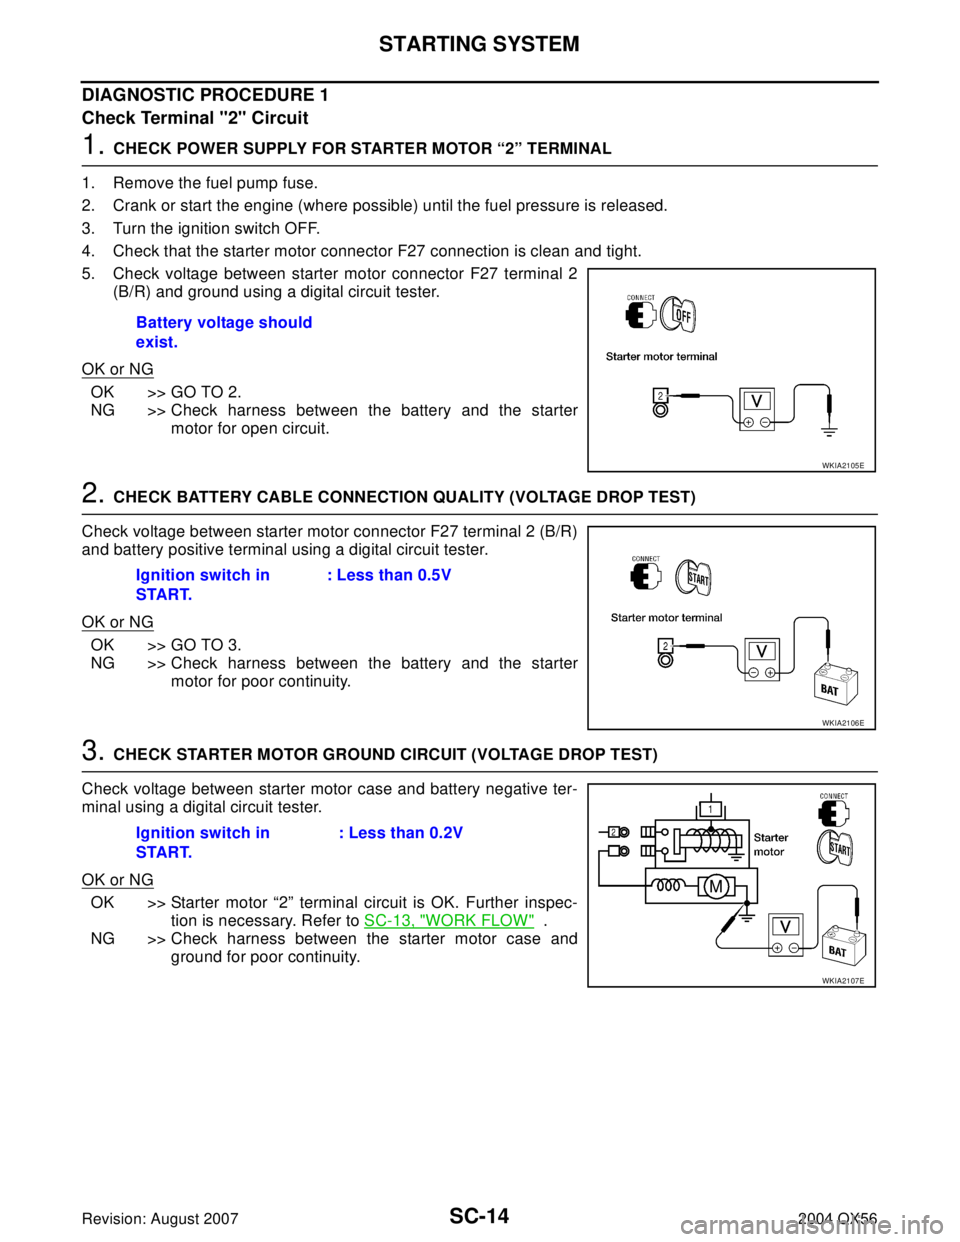
DIAGNOSTIC PROCEDURE 1
Check Terminal "2" Circuit
1. CHECK POWER SUPPLY FOR STARTER MOTOR “2” TERMINAL
1. Remove the fuel pump fuse.
2. Crank or start the engine (where possible) until the fuel pressure is released.
3. Turn the ignition switch OFF.
4. Check that the starter motor connector F27 connection is clean and tight.
5. Check voltage between starter motor connector F27 terminal 2
(B/R) and ground using a digital circuit tester.
OK or NG
OK >> GO TO 2.
NG >> Check harness between the battery and the starter
motor for open circuit.
2. CHECK BATTERY CABLE CONNECTION QUALITY (VOLTAGE DROP TEST)
Check voltage between starter motor connector F27 terminal 2 (B/R)
and battery positive terminal using a digital circuit tester.
OK or NG
OK >> GO TO 3.
NG >> Check harness between the battery and the starter
motor for poor continuity.
3. CHECK STARTER MOTOR GROUND CIRCUIT (VOLTAGE DROP TEST)
Check voltage between starter motor case and battery negative ter-
minal using a digital circuit tester.
OK or NG
OK >> Starter motor “2” terminal circuit is OK. Further inspec-
tion is necessary. Refer to SC-13, "
WORK FLOW" .
NG >> Check harness between the starter motor case and
ground for poor continuity. Battery voltage should
exist.
WKIA2105E
Ignition switch in
START.: Less than 0.5V
WKIA2106E
Ignition switch in
START.: Less than 0.2V
WKIA2107E
Page 2936 of 3371
STARTING SYSTEM
SC-15
C
D
E
F
G
H
I
J
L
MA
B
SC
Revision: August 20072004 QX56
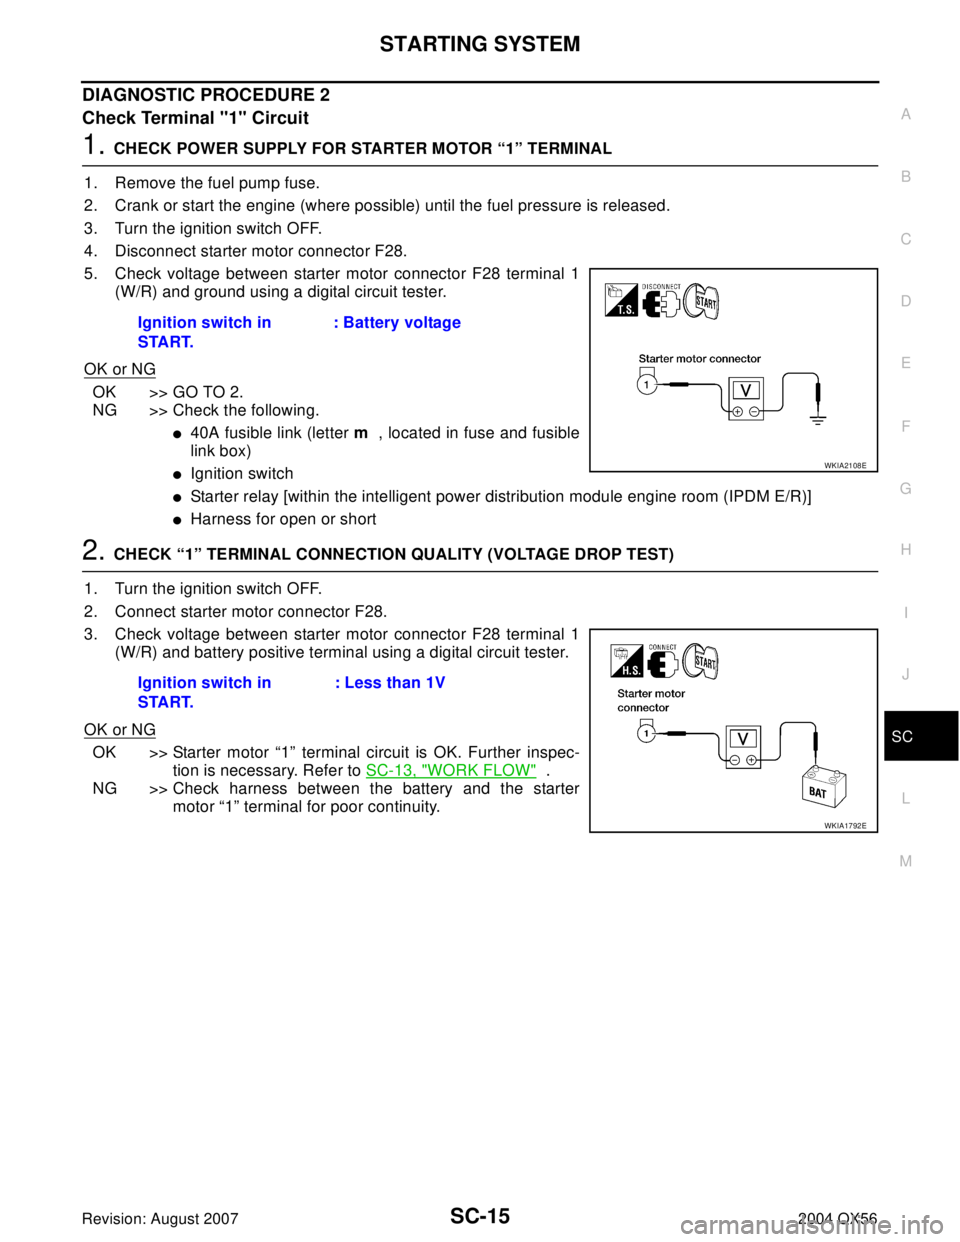
DIAGNOSTIC PROCEDURE 2
Check Terminal "1" Circuit
1. CHECK POWER SUPPLY FOR STARTER MOTOR “1” TERMINAL
1. Remove the fuel pump fuse.
2. Crank or start the engine (where possible) until the fuel pressure is released.
3. Turn the ignition switch OFF.
4. Disconnect starter motor connector F28.
5. Check voltage between starter motor connector F28 terminal 1
(W/R) and ground using a digital circuit tester.
OK or NG
OK >> GO TO 2.
NG >> Check the following.
�40A fusible link (letter m , located in fuse and fusible
link box)
�Ignition switch
�Starter relay [within the intelligent power distribution module engine room (IPDM E/R)]
�Harness for open or short
2. CHECK “1” TERMINAL CONNECTION QUALITY (VOLTAGE DROP TEST)
1. Turn the ignition switch OFF.
2. Connect starter motor connector F28.
3. Check voltage between starter motor connector F28 terminal 1
(W/R) and battery positive terminal using a digital circuit tester.
OK or NG
OK >> Starter motor “1” terminal circuit is OK. Further inspec-
tion is necessary. Refer to SC-13, "
WORK FLOW" .
NG >> Check harness between the battery and the starter
motor “1” terminal for poor continuity. Ignition switch in
START.: Battery voltage
WKIA2108E
Ignition switch in
START.: Less than 1V
WKIA1792E
Page 2937 of 3371
SC-16
STARTING SYSTEM
Revision: August 20072004 QX56
MINIMUM SPECIFICATION OF CRANKING VOLTAGE REFERENCING COOLANT TEMPERA-
TURE
Removal and InstallationEKS0079B
REMOVAL
1. Remove the intake manifold. Refer to EM-15, "Removal and Installation" .
2. Disconnect the starter harness connectors.
3. Remove the two starter bolts, using power tools.
4. Remove the starter.
INSTALLATION
Installation is in the reverse order of removal.
CAUTION:
Tighten terminal "2" nut carefully.
Engine coolant temperature Voltage V
−30°C to −20°C (−22°F to −4°F) 8.4
−19°C to −10°C (−2°F to 14°F) 8.9
−9°C to 0°C (16°F to 32°F) 9.3
More than 1°C (More than 34°F) 9.7
WKIA1388E
Terminal "2"nut : 10.8 N·m (1.1 kg-m, 8 ft-lb)
Page 2944 of 3371
CHARGING SYSTEM
SC-23
C
D
E
F
G
H
I
J
L
MA
B
SC
Revision: August 20072004 QX56
DIAGNOSTIC PROCEDURE 2
Check Terminal "1" Circuit
1. CHECK “1” TERMINAL CONNECTION
1. Turn the ignition switch OFF.
2. Check to see if “1” terminal is clean and tight.
OK or NG
OK >> GO TO 2.
NG >> Repair “1” terminal connection. Confirm repair by performing complete Battery/Starting/Charging
system test.
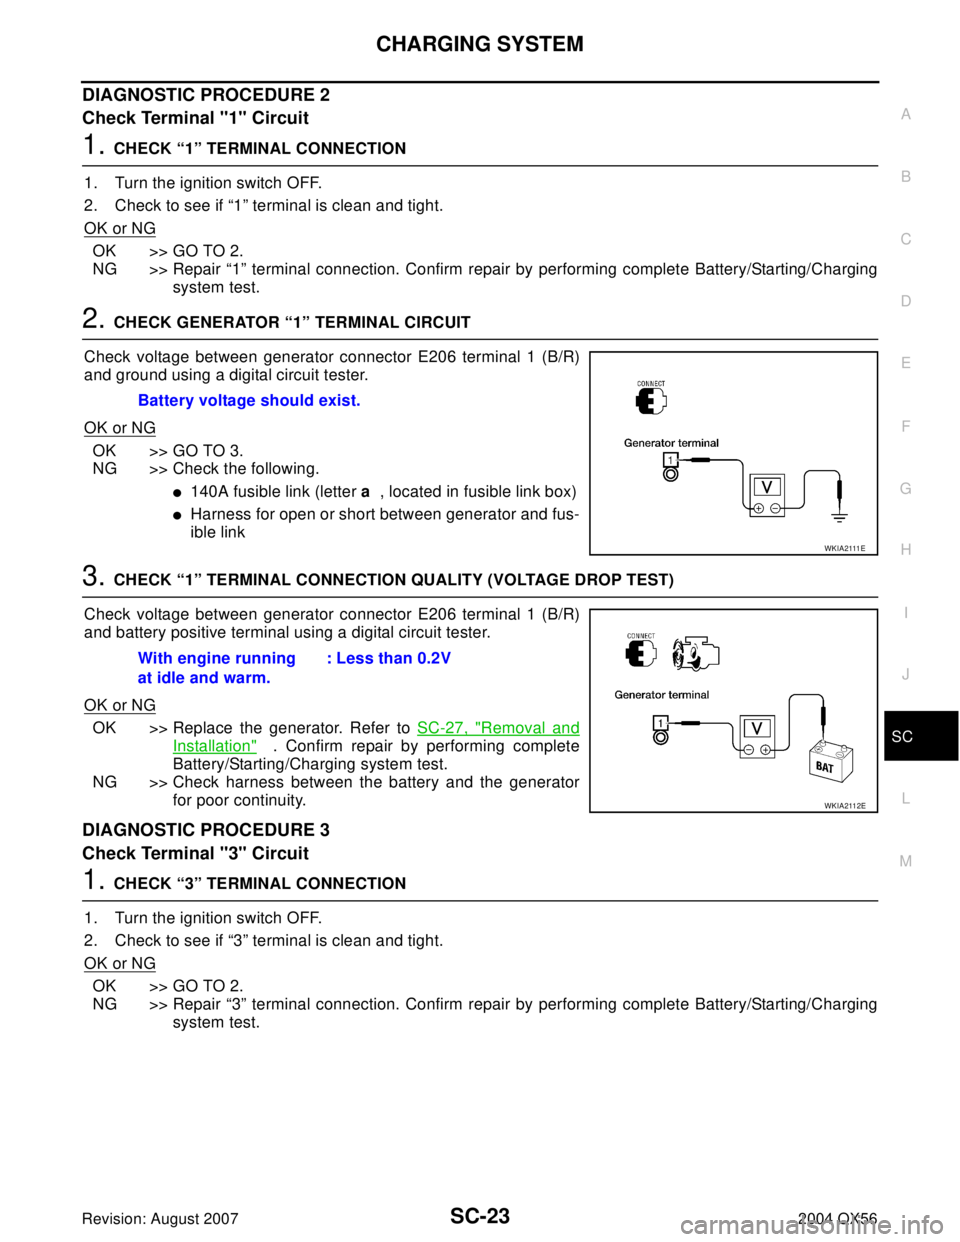
2. CHECK GENERATOR “1” TERMINAL CIRCUIT
Check voltage between generator connector E206 terminal 1 (B/R)
and ground using a digital circuit tester.
OK or NG
OK >> GO TO 3.
NG >> Check the following.
�140A fusible link (letter a , located in fusible link box)
�Harness for open or short between generator and fus-
ible link
3. CHECK “1” TERMINAL CONNECTION QUALITY (VOLTAGE DROP TEST)
Check voltage between generator connector E206 terminal 1 (B/R)
and battery positive terminal using a digital circuit tester.
OK or NG
OK >> Replace the generator. Refer to SC-27, "Removal and
Installation" . Confirm repair by performing complete
Battery/Starting/Charging system test.
NG >> Check harness between the battery and the generator
for poor continuity.
DIAGNOSTIC PROCEDURE 3
Check Terminal "3" Circuit
1. CHECK “3” TERMINAL CONNECTION
1. Turn the ignition switch OFF.
2. Check to see if “3” terminal is clean and tight.
OK or NG
OK >> GO TO 2.
NG >> Repair “3” terminal connection. Confirm repair by performing complete Battery/Starting/Charging
system test. Battery voltage should exist.
W K I A 2111 E
With engine running
at idle and warm.: Less than 0.2V
WKIA2112E
Page 2945 of 3371
SC-24
CHARGING SYSTEM
Revision: August 20072004 QX56
2. CHECK “3” TERMINAL CIRCUIT
1. Disconnect E205 connector from generator.
2. Apply ground to connector E205 terminal 3 (BR/W) with the igni-
tion switch in the ON position.
OK or NG
OK >> Replace the generator. Refer to SC-27, "Removal and
Installation" . Confirm repair by performing complete
battery/starting/charging system test.
NG >> Check the following.
�10A fuse [No. 14, located in fuse block (J/B)]
�CHARGE lamp
�Harness for open or short between combination meter and fuse
�Harness for open or short between combination meter and generator CHARGE lamp should light up.
WKIA2110E
Page 2946 of 3371
CHARGING SYSTEM
SC-25
C
D
E
F
G
H
I
J
L
MA
B
SC
Revision: August 20072004 QX56
DIAGNOSTIC PROCEDURE 4
Check Terminal "1" Circuit
1. CHECK “1” TERMINAL CONNECTION
1. Turn the ignition switch OFF.
2. Check to see if “1” terminal is clean and tight.
OK or NG
OK >> GO TO 2.
NG >> Repair “1” terminal connection. Confirm repair by performing complete Battery/Starting/Charging
system test.
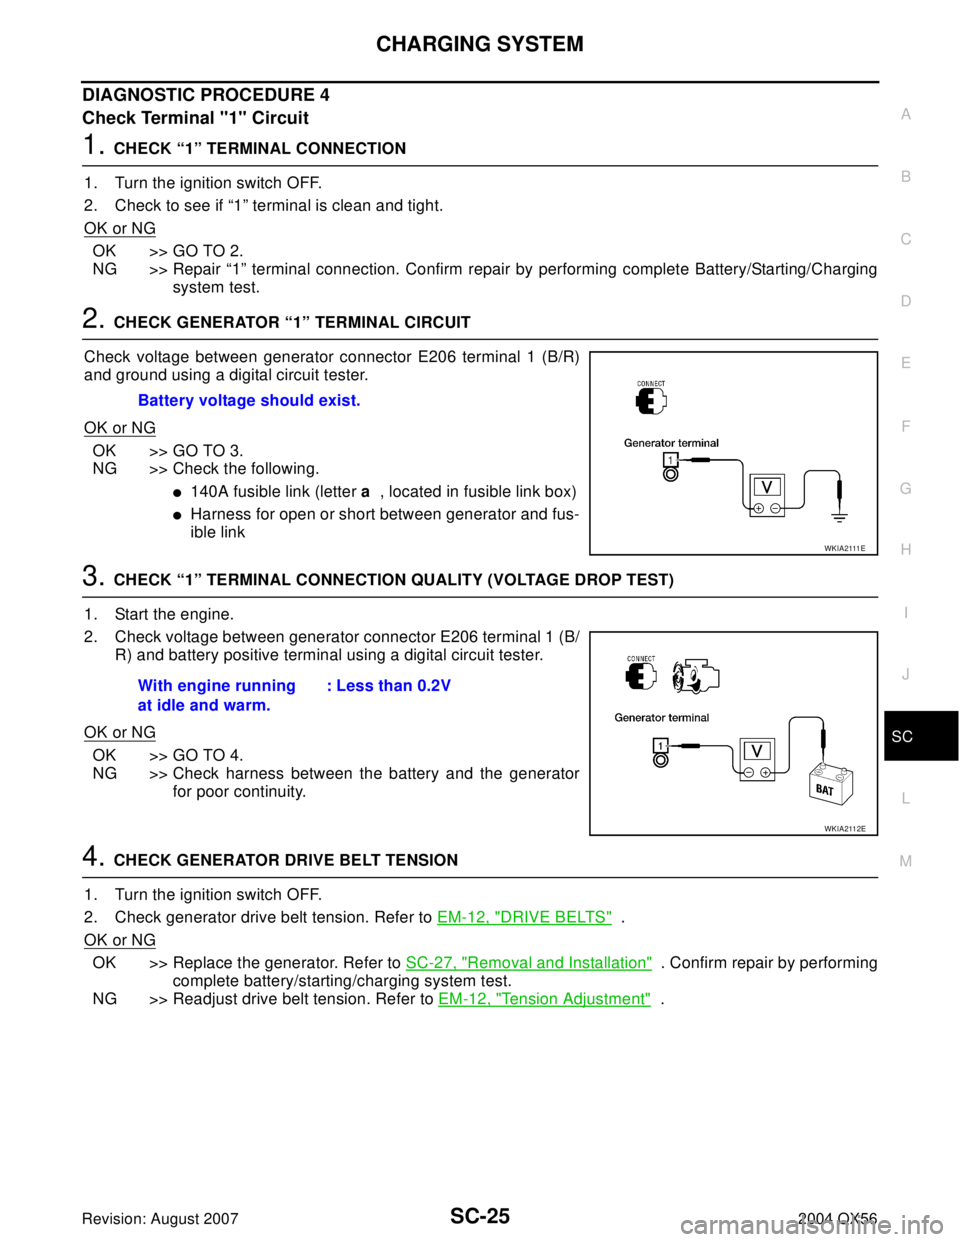
2. CHECK GENERATOR “1” TERMINAL CIRCUIT
Check voltage between generator connector E206 terminal 1 (B/R)
and ground using a digital circuit tester.
OK or NG
OK >> GO TO 3.
NG >> Check the following.
�140A fusible link (letter a , located in fusible link box)
�Harness for open or short between generator and fus-
ible link
3. CHECK “1” TERMINAL CONNECTION QUALITY (VOLTAGE DROP TEST)
1. Start the engine.
2. Check voltage between generator connector E206 terminal 1 (B/
R) and battery positive terminal using a digital circuit tester.
OK or NG
OK >> GO TO 4.
NG >> Check harness between the battery and the generator
for poor continuity.
4. CHECK GENERATOR DRIVE BELT TENSION
1. Turn the ignition switch OFF.
2. Check generator drive belt tension. Refer to EM-12, "
DRIVE BELTS" .
OK or NG
OK >> Replace the generator. Refer to SC-27, "Removal and Installation" . Confirm repair by performing
complete battery/starting/charging system test.
NG >> Readjust drive belt tension. Refer to EM-12, "
Tension Adjustment" . Battery voltage should exist.
W K I A 2111 E
With engine running
at idle and warm.: Less than 0.2V
WKIA2112E