Page 2581 of 3371
LT-150
INTERIOR ROOM LAMP
Revision: August 20072004 QX56
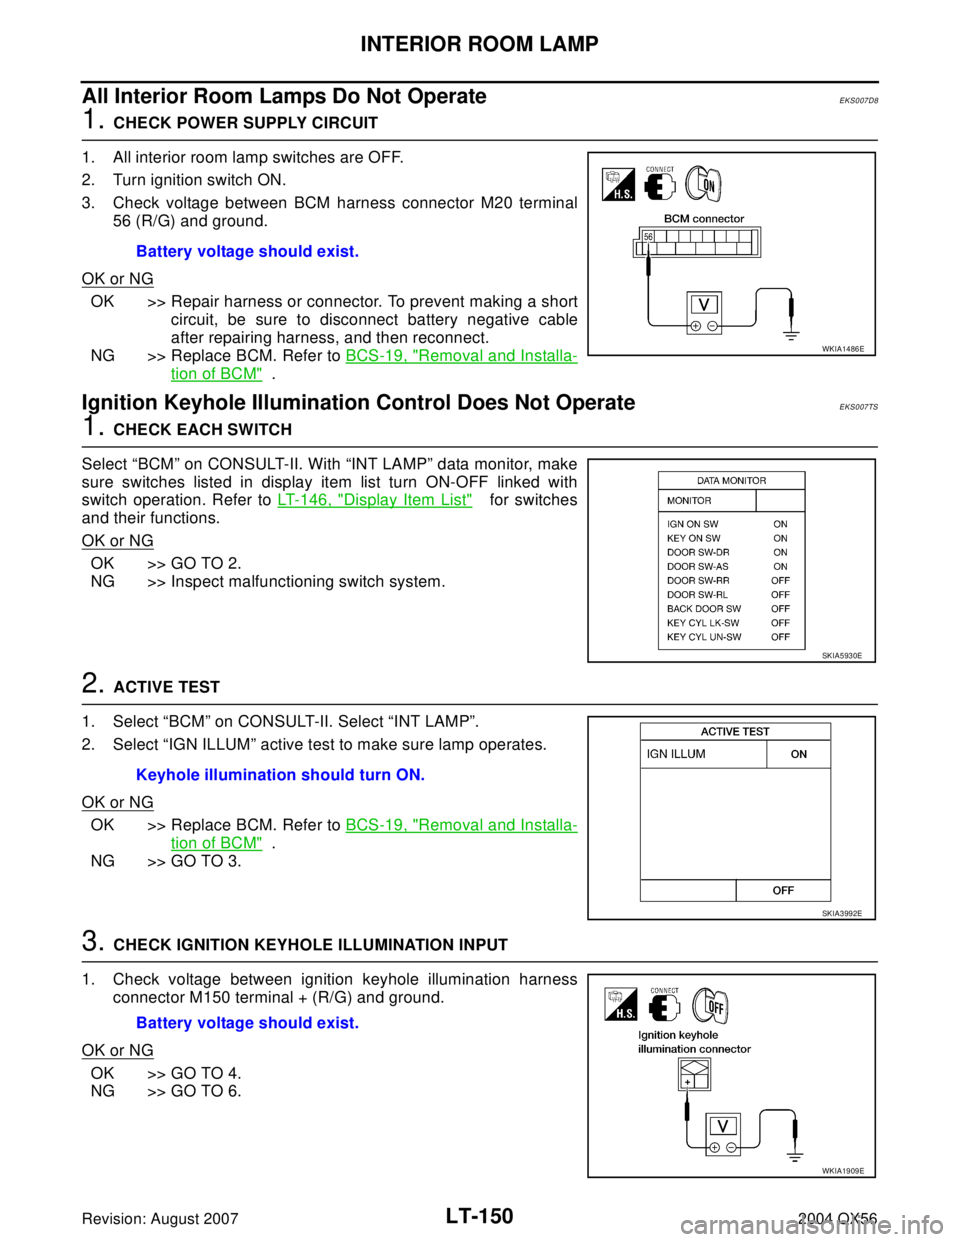
All Interior Room Lamps Do Not OperateEKS007D8
1. CHECK POWER SUPPLY CIRCUIT
1. All interior room lamp switches are OFF.
2. Turn ignition switch ON.
3. Check voltage between BCM harness connector M20 terminal
56 (R/G) and ground.
OK or NG
OK >> Repair harness or connector. To prevent making a short
circuit, be sure to disconnect battery negative cable
after repairing harness, and then reconnect.
NG >> Replace BCM. Refer to BCS-19, "
Removal and Installa-
tion of BCM" .
Ignition Keyhole Illumination Control Does Not OperateEKS007TS
1. CHECK EACH SWITCH
Select “BCM” on CONSULT-II. With “INT LAMP” data monitor, make
sure switches listed in display item list turn ON-OFF linked with
switch operation. Refer to LT-146, "
Display Item List" for switches
and their functions.
OK or NG
OK >> GO TO 2.
NG >> Inspect malfunctioning switch system.
2. ACTIVE TEST
1. Select “BCM” on CONSULT-II. Select “INT LAMP”.
2. Select “IGN ILLUM” active test to make sure lamp operates.
OK or NG
OK >> Replace BCM. Refer to BCS-19, "Removal and Installa-
tion of BCM" .
NG >> GO TO 3.
3. CHECK IGNITION KEYHOLE ILLUMINATION INPUT
1. Check voltage between ignition keyhole illumination harness
connector M150 terminal + (R/G) and ground.
OK or NG
OK >> GO TO 4.
NG >> GO TO 6.Battery voltage should exist.
WKIA1486E
SKIA5930E
Keyhole illumination should turn ON.
SKIA3992E
Battery voltage should exist.
WKIA1909E
Page 2582 of 3371
INTERIOR ROOM LAMP
LT-151
C
D
E
F
G
H
I
J
L
MA
B
LT
Revision: August 20072004 QX56
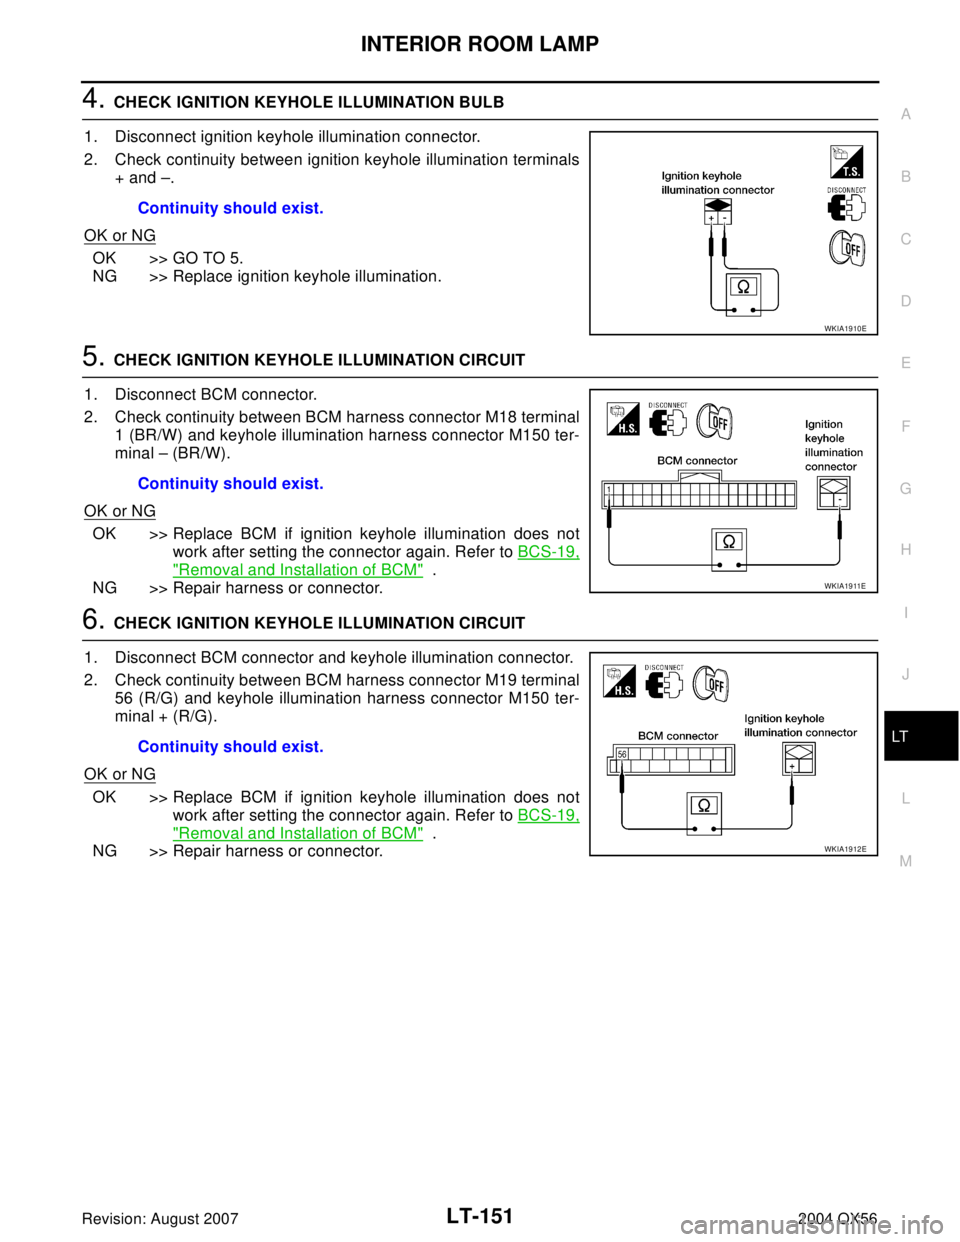
4. CHECK IGNITION KEYHOLE ILLUMINATION BULB
1. Disconnect ignition keyhole illumination connector.
2. Check continuity between ignition keyhole illumination terminals
+ and –.
OK or NG
OK >> GO TO 5.
NG >> Replace ignition keyhole illumination.
5. CHECK IGNITION KEYHOLE ILLUMINATION CIRCUIT
1. Disconnect BCM connector.
2. Check continuity between BCM harness connector M18 terminal
1 (BR/W) and keyhole illumination harness connector M150 ter-
minal – (BR/W).
OK or NG
OK >> Replace BCM if ignition keyhole illumination does not
work after setting the connector again. Refer to BCS-19,
"Removal and Installation of BCM" .
NG >> Repair harness or connector.
6. CHECK IGNITION KEYHOLE ILLUMINATION CIRCUIT
1. Disconnect BCM connector and keyhole illumination connector.
2. Check continuity between BCM harness connector M19 terminal
56 (R/G) and keyhole illumination harness connector M150 ter-
minal + (R/G).
OK or NG
OK >> Replace BCM if ignition keyhole illumination does not
work after setting the connector again. Refer to BCS-19,
"Removal and Installation of BCM" .
NG >> Repair harness or connector.Continuity should exist.
WKIA1910E
Continuity should exist.
WKIA1911E
Continuity should exist.
WKIA1912E
Page 2600 of 3371
ILLUMINATION
LT-169
C
D
E
F
G
H
I
J
L
MA
B
LT
Revision: August 20072004 QX56
Removal and InstallationEKS007DE
ILLUMINATION CONTROL SWITCH
1. Remove cluster lid A. Refer to DI-25, "Removal and Installation of Combination Meter" .
2. Carefully pry tabs and remove illumination control switch from
cluster lid A.
Installation is in the reverse order of removal.
WKIA1403E
Page 2602 of 3371
LU-1
ENGINE LUBRICATION SYSTEM
B ENGINE
CONTENTS
C
D
E
F
G
H
I
J
K
L
M
SECTION LU
A
LU
Revision: August 20072004 QX56 PRECAUTIONS .......................................................... 2
Precautions for Liquid Gasket .................................. 2
REMOVAL OF LIQUID GASKET SEALING .......... 2
LIQUID GASKET APPLICATION PROCEDURE ..... 2
PREPARATION ........................................................... 3
Special Service Tools ............................................... 3
Commercial Service Tool ......................................... 4
LUBRICATION SYSTEM ............................................ 5
Lubrication Circuit .................................................... 5
System Drawing ....................................................... 6
ENGINE OIL ............................................................... 7
Inspection ................................................................. 7
OIL LEVEL ............................................................ 7
OIL APPEARANCE ............................................... 7
OIL LEAKAGE ....................................................... 7
OIL PRESSURE CHECK ...................................... 7
Changing Engine Oil ................................................ 8
OIL FILTER ............................................................... 10
Removal and Installation ........................................ 10
REMOVAL ........................................................... 10
INSTALLATION ................................................... 10
INSPECTION AFTER INSTALLATION ............... 10OIL COOLER ............................................................ 11
Removal and Installation ........................................ 11
REMOVAL ........................................................... 11
INSPECTION AFTER REMOVAL ....................... 11
INSTALLATION ................................................... 12
INSPECTION AFTER INSTALLATION ................ 12
OIL PUMP ................................................................. 13
Removal and Installation ........................................ 13
REMOVAL ........................................................... 13
INSTALLATION ................................................... 13
INSPECTION AFTER INSTALLATION ................ 14
Disassembly and Assembly .................................... 14
DISASSEMBLY ................................................... 14
INSPECTION AFTER DISASSEMBLY ................ 14
ASSEMBLY ......................................................... 15
SERVICE DATA AND SPECIFICATIONS (SDS) ...... 16
Standard and Limit .................................................. 16
OIL PRESSURE .................................................. 16
OIL PUMP ........................................................... 16
REGULATOR VALVE .......................................... 16
ENGINE OIL CAPACITY (APPROXIMATE) ........ 16
Page 2603 of 3371
LU-2Revision: August 2007
PRECAUTIONS
2004 QX56
PRECAUTIONSPFP:00001
Precautions for Liquid GasketEBS00I4E
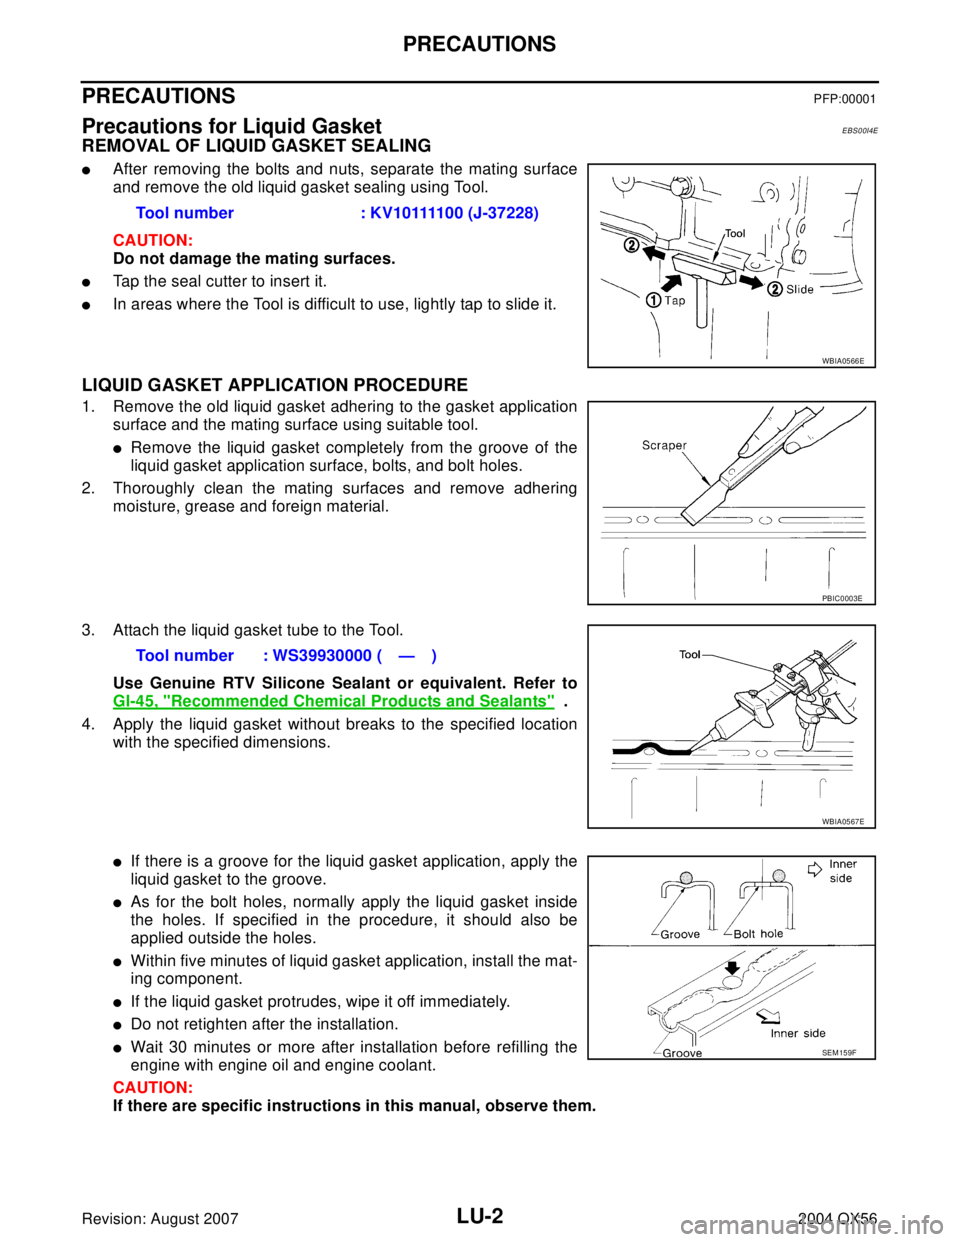
REMOVAL OF LIQUID GASKET SEALING
�After removing the bolts and nuts, separate the mating surface
and remove the old liquid gasket sealing using Tool.
CAUTION:
Do not damage the mating surfaces.
�Tap the seal cutter to insert it.
�In areas where the Tool is difficult to use, lightly tap to slide it.
LIQUID GASKET APPLICATION PROCEDURE
1. Remove the old liquid gasket adhering to the gasket application
surface and the mating surface using suitable tool.
�Remove the liquid gasket completely from the groove of the
liquid gasket application surface, bolts, and bolt holes.
2. Thoroughly clean the mating surfaces and remove adhering
moisture, grease and foreign material.
3. Attach the liquid gasket tube to the Tool.
Use Genuine RTV Silicone Sealant or equivalent. Refer to
GI-45, "
Recommended Chemical Products and Sealants" .
4. Apply the liquid gasket without breaks to the specified location
with the specified dimensions.
�If there is a groove for the liquid gasket application, apply the
liquid gasket to the groove.
�As for the bolt holes, normally apply the liquid gasket inside
the holes. If specified in the procedure, it should also be
applied outside the holes.
�Within five minutes of liquid gasket application, install the mat-
ing component.
�If the liquid gasket protrudes, wipe it off immediately.
�Do not retighten after the installation.
�Wait 30 minutes or more after installation before refilling the
engine with engine oil and engine coolant.
CAUTION:
If there are specific instructions in this manual, observe them.Too l n u mb er : K V 1011110 0 (J -37228)
WBIA0566E
PBIC0003E
Tool number : WS39930000 ( — )
WBIA0567E
SEM 15 9F
Page 2604 of 3371
PREPARATION
LU-3
C
D
E
F
G
H
I
J
K
L
MA
LU
Revision: August 20072004 QX56
PREPARATIONPFP:00002
Special Service ToolsEBS00I4F
The actual shapes of Kent-Moore tools may differ from those of special service tools illustrated here.
Tool number
(Kent-Moore No.)
Tool nameDescription
ST25051001
(J-25695-1)
Oil pressure gaugeMeasuring oil pressure
Maximum measuring range:
2,452 kPa (25 kg/cm
2 , 356 psi)
ST25052000
(J-25695-2)
HoseAdapting oil pressure gauge to cylinder block
KV10111100
(J-37228)
Seal cutterRemoving steel oil pan and rear timing chain
case
KV10115801
(J-38956)
Oil filter wrenchRemoving and installing oil filter
a: 64.3 mm (2.531 in)
WS39930000
(—)
Tube presserPressing the tube of liquid gasket
S-NT050
S-NT559
NT046
S-NT375
S-NT052
Page 2605 of 3371
LU-4Revision: August 2007
PREPARATION
2004 QX56
Commercial Service ToolEBS00I4G
Tool nameDescription
Power toolLoosening bolts and nuts
Deep socketRemoving and installing oil pressure sensor
Deep socket 26 mm (1.02 in)
PBIC0190E
NT818
Page 2608 of 3371
ENGINE OIL
LU-7
C
D
E
F
G
H
I
J
K
L
MA
LU
Revision: August 20072004 QX56
ENGINE OILPFP:KLA92
InspectionEBS00I4J
OIL LEVEL
�Before starting the engine make sure the vehicle is parked on a
flat and level surface, then check the oil level. If the engine is
already running, turn it off and allow 10 minutes before check-
ing.
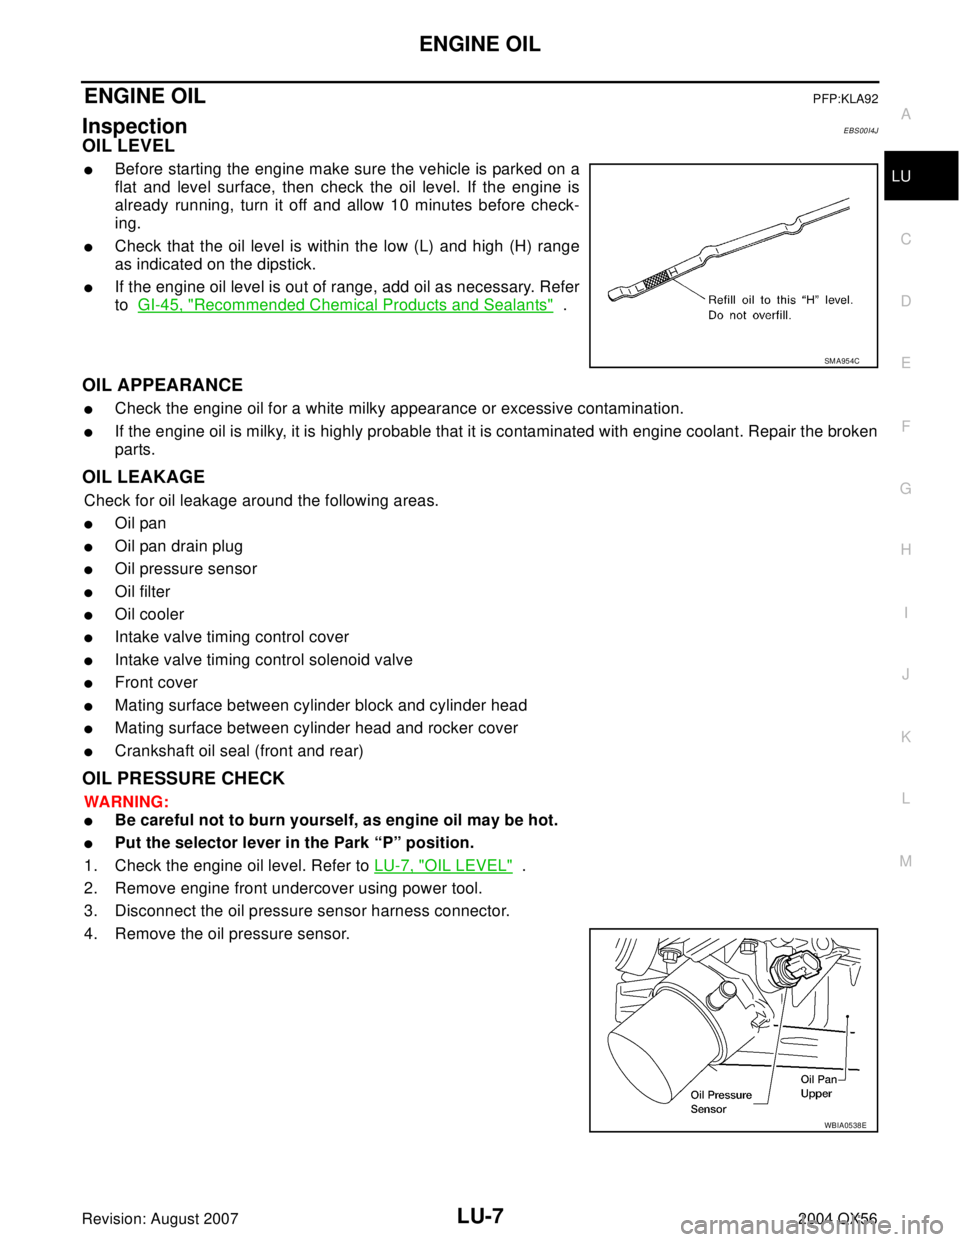
�Check that the oil level is within the low (L) and high (H) range
as indicated on the dipstick.
�If the engine oil level is out of range, add oil as necessary. Refer
to GI-45, "
Recommended Chemical Products and Sealants" .
OIL APPEARANCE
�Check the engine oil for a white milky appearance or excessive contamination.
�If the engine oil is milky, it is highly probable that it is contaminated with engine coolant. Repair the broken
parts.
OIL LEAKAGE
Check for oil leakage around the following areas.
�Oil pan
�Oil pan drain plug
�Oil pressure sensor
�Oil filter
�Oil cooler
�Intake valve timing control cover
�Intake valve timing control solenoid valve
�Front cover
�Mating surface between cylinder block and cylinder head
�Mating surface between cylinder head and rocker cover
�Crankshaft oil seal (front and rear)
OIL PRESSURE CHECK
WA RN ING:
�Be careful not to burn yourself, as engine oil may be hot.
�Put the selector lever in the Park “P” position.
1. Check the engine oil level. Refer to LU-7, "
OIL LEVEL" .
2. Remove engine front undercover using power tool.
3. Disconnect the oil pressure sensor harness connector.
4. Remove the oil pressure sensor.
SM A95 4C
WBIA0538E