Page 2988 of 4449
![INFINITI FX35 2004 Service Manual CYLINDER BLOCK
EM-263
[VK45DE]
C
D
E
F
G
H
I
J
K
L
MA
EM
Revision: 2004 November 2004 FX35/FX45
CONNECTING ROD BEARING OIL CLEARANCE
Method by Calculation
�Install connecting rod bearings to connectin INFINITI FX35 2004 Service Manual CYLINDER BLOCK
EM-263
[VK45DE]
C
D
E
F
G
H
I
J
K
L
MA
EM
Revision: 2004 November 2004 FX35/FX45
CONNECTING ROD BEARING OIL CLEARANCE
Method by Calculation
�Install connecting rod bearings to connectin](/manual-img/42/57021/w960_57021-2987.png)
CYLINDER BLOCK
EM-263
[VK45DE]
C
D
E
F
G
H
I
J
K
L
MA
EM
Revision: 2004 November 2004 FX35/FX45
CONNECTING ROD BEARING OIL CLEARANCE
Method by Calculation
�Install connecting rod bearings to connecting rod and cap, and
tighten connecting rod bolts to the specified torque. Refer to
EM-244, "
ASSEMBLY" for the tightening procedure.
�Measure the inner diameter of connecting rod bearing with
inside micrometer.
(Bearing oil clearance) = (Connecting rod bearing inner diameter) –
(Crankshaft pin journal diameter)
�If clearance exceeds the limit, select proper connecting rod bearing according to connecting rod big end
diameter and crankshaft pin journal diameter to obtain specified bearing oil clearance. Refer to EM-251,
"HOW TO SELECT CONNECTING ROD BEARING" .
Method of Using Plastigage
�Remove oil and dust on crankshaft pin journal and the surfaces of each bearing completely.
�Cut plastigage slightly shorter than the bearing width, and place it in crankshaft axial direction, avoiding oil
holes.
�Install connecting rod bearings to connecting rod and cap, and tighten connecting rod bolts to the speci-
fied torque. Refer to EM-244, "
ASSEMBLY" for the tightening procedure.
CAUTION:
Do not rotate crankshaft.
�Remove connecting rod cap and bearing, and using scale on
plastigage bag, measure the plastigage width.
NOTE:
The procedure when the measured value exceeds the limit is
same as that described in the “Method by Calculation”.Standard : 0.020 - 0.045 mm (0.0008 - 0.0018 in)
(actual clearance)
Limit : 0.055 mm (0.0022 in)
PBIC1642E
PBIC1149E
Page 2989 of 4449
![INFINITI FX35 2004 Service Manual EM-264
[VK45DE]
CYLINDER BLOCK
Revision: 2004 November 2004 FX35/FX45
MAIN BEARING OIL CLEARANCE
Method by Calculation
�Install main bearings to cylinder block and main bearing caps,
and tighten main INFINITI FX35 2004 Service Manual EM-264
[VK45DE]
CYLINDER BLOCK
Revision: 2004 November 2004 FX35/FX45
MAIN BEARING OIL CLEARANCE
Method by Calculation
�Install main bearings to cylinder block and main bearing caps,
and tighten main](/manual-img/42/57021/w960_57021-2988.png)
EM-264
[VK45DE]
CYLINDER BLOCK
Revision: 2004 November 2004 FX35/FX45
MAIN BEARING OIL CLEARANCE
Method by Calculation
�Install main bearings to cylinder block and main bearing caps,
and tighten main bearing cap bolts with main bearing beam to
the specified torque. Refer to EM-244, "
ASSEMBLY" for the
tightening procedure.
�Measure the inner diameter of main bearing with bore gauge.
(Bearing clearance) = (Main bearing inner diameter) – (Crankshaft main journal diameter)
�If clearance exceeds the limit, select proper main bearing according to main bearing inner diameter and
crankshaft main journal diameter to obtain specified bearing oil clearance. Refer to EM-252, "
HOW TO
SELECT MAIN BEARING" .
Method of Using Plastigage
�Remove oil and dust on crankshaft main journal and the surfaces of each bearing completely.
�Cut plastigage slightly shorter than the bearing width, and place it in crankshaft axial direction, avoiding oil
holes.
�Install main bearings to cylinder block and main bearing caps, and tighten main bearing bolts with main
bearing beam to the specified torque. Refer to EM-244, "
ASSEMBLY" for the tightening procedure.
CAUTION:
Do not rotate crankshaft.
�Remove main bearing caps and bearings, and using scale on
plastigage bag, measure the plastigage width.
NOTE:
The procedure when the measured value exceeds the limit is
same as that described in the “Method by Calculation”.
PBIC1644E
Standard
No . 1 and 5 journal : 0.001 - 0.011 mm (0.00004 - 0.0004 in)
No. 2, 3 and 4 journal : 0.007 - 0.017 mm (0.0003 - 0.0007 in)
Limit
No . 1 and 5 journal : 0.021 mm (0.0008 in)
No. 2, 3 and 4 journal : 0.027 mm (0.0011 in)
PBIC1149E
Page 3154 of 4449
IDENTIFICATION INFORMATION
GI-51
C
D
E
F
G
H
I
J
K
L
MB
GI
Revision: 2004 November 2004 FX35/FX45
AUTOMATIC TRANSMISSION NUMBER
Dimensions AAS000EM
Unit: mm (in)
Wheels & Tires AAS000EN
PAIA0054E
Overall length 4,803 (189.1)
Overall width 1,925 (75.8)
Overall heightwithout roof rack rail 1,652 (65.0)
with roof rack rail 1,672.6 (65.9)
Front tread 1,592 (62.7)
Rear tread 1,642 (64.6)
Wheelbase 2,850 (112.2)
Conventional Spare
Road wheel/offset mm (in)18 X 8JJ Aluminum/40 (1.57)
20 X 8JJ Aluminum/40 (1.57)
T175/90D18
Conventional
Tire sizeP265/60R18
P265/50R20
Page 4096 of 4449

BATTERY
SC-7
C
D
E
F
G
H
I
J
L
MA
B
SC
Revision: 2004 November 2004 FX35/FX45
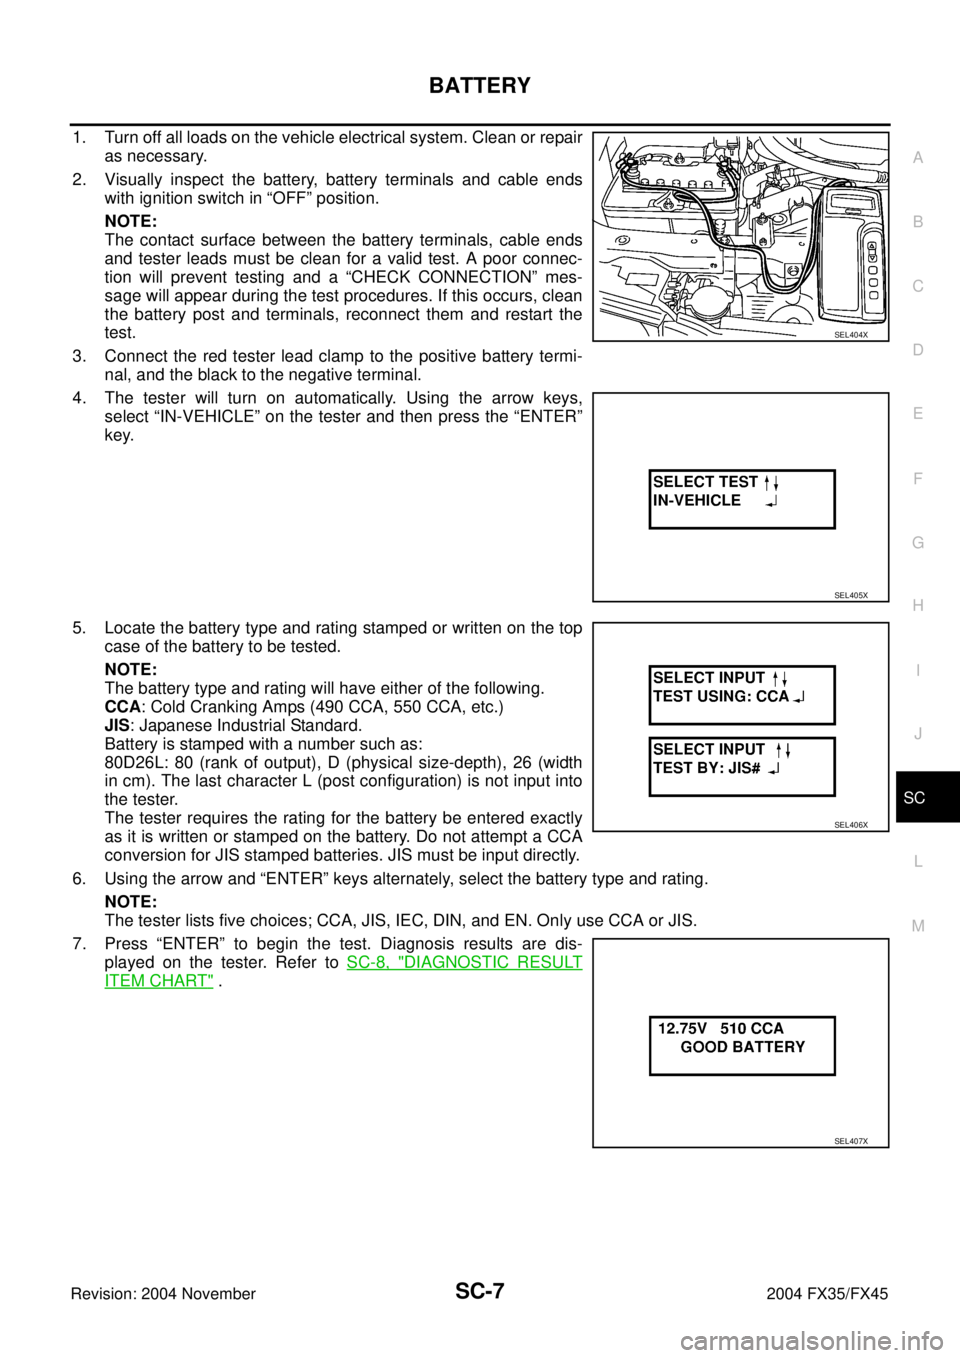
1. Turn off all loads on the vehicle electrical system. Clean or repair
as necessary.
2. Visually inspect the battery, battery terminals and cable ends
with ignition switch in “OFF” position.
NOTE:
The contact surface between the battery terminals, cable ends
and tester leads must be clean for a valid test. A poor connec-
tion will prevent testing and a “CHECK CONNECTION” mes-
sage will appear during the test procedures. If this occurs, clean
the battery post and terminals, reconnect them and restart the
test.
3. Connect the red tester lead clamp to the positive battery termi-
nal, and the black to the negative terminal.
4. The tester will turn on automatically. Using the arrow keys,
select “IN-VEHICLE” on the tester and then press the “ENTER”
key.
5. Locate the battery type and rating stamped or written on the top
case of the battery to be tested.
NOTE:
The battery type and rating will have either of the following.
CCA: Cold Cranking Amps (490 CCA, 550 CCA, etc.)
JIS: Japanese Industrial Standard.
Battery is stamped with a number such as:
80D26L: 80 (rank of output), D (physical size-depth), 26 (width
in cm). The last character L (post configuration) is not input into
the tester.
The tester requires the rating for the battery be entered exactly
as it is written or stamped on the battery. Do not attempt a CCA
conversion for JIS stamped batteries. JIS must be input directly.
6. Using the arrow and “ENTER” keys alternately, select the battery type and rating.
NOTE:
The tester lists five choices; CCA, JIS, IEC, DIN, and EN. Only use CCA or JIS.
7. Press “ENTER” to begin the test. Diagnosis results are dis-
played on the tester. Refer to SC-8, "
DIAGNOSTIC RESULT
ITEM CHART" .
SEL404X
SEL405X
SEL406X
SEL407X
Page 4324 of 4449

TROUBLE DIAGNOSIS
TF-23
C
E
F
G
H
I
J
K
L
MA
B
TF
Revision: 2004 November 2004 FX35/FX45
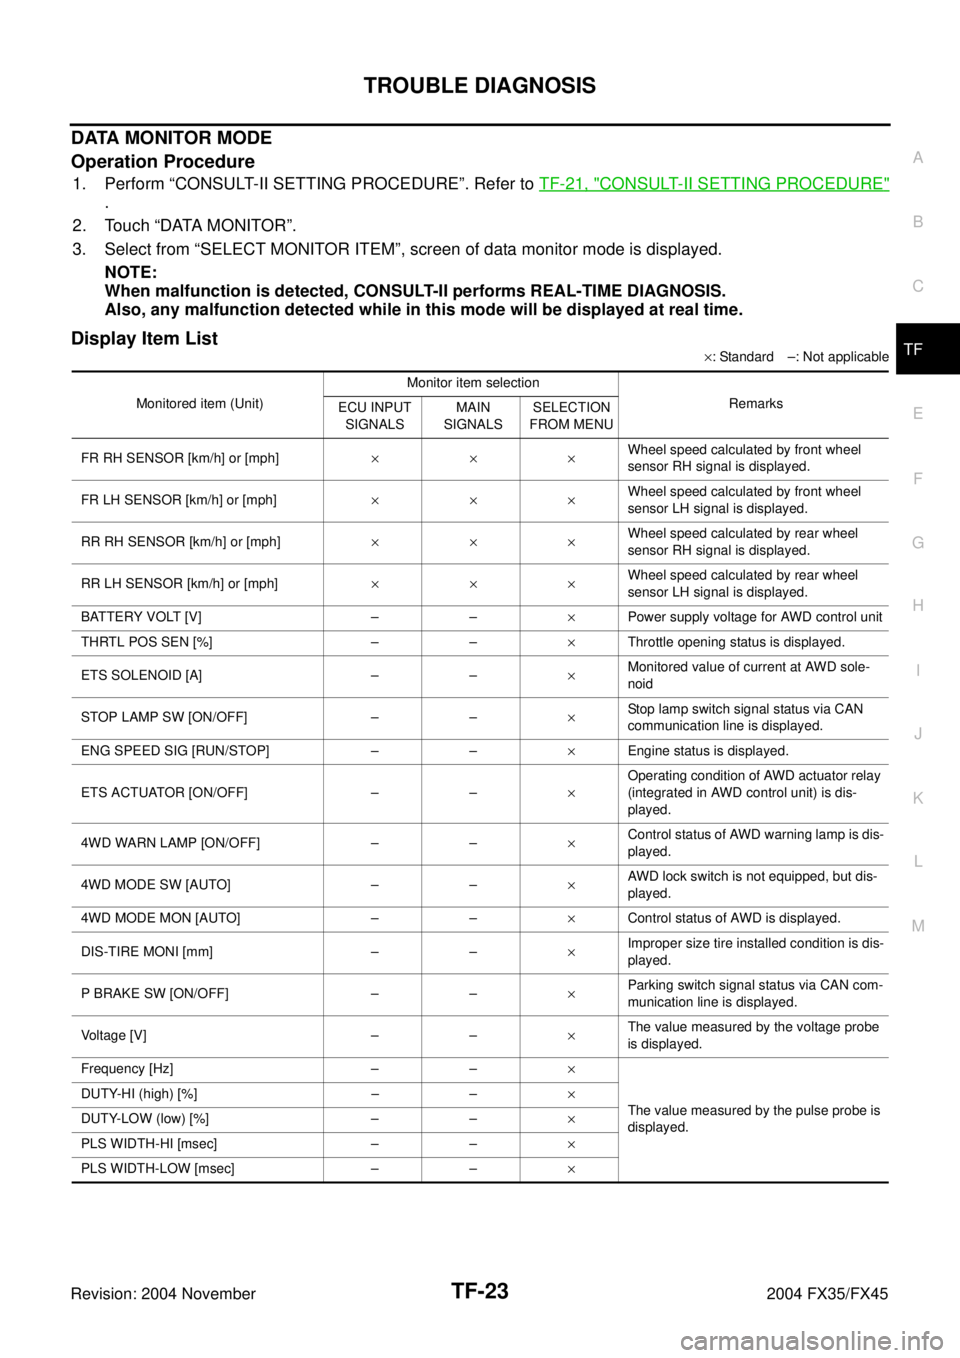
DATA MONITOR MODE
Operation Procedure
1. Perform “CONSULT-II SETTING PROCEDURE”. Refer to TF-21, "CONSULT-II SETTING PROCEDURE"
.
2. Touch “DATA MONITOR”.
3. Select from “SELECT MONITOR ITEM”, screen of data monitor mode is displayed.
NOTE:
When malfunction is detected, CONSULT-II performs REAL-TIME DIAGNOSIS.
Also, any malfunction detected while in this mode will be displayed at real time.
Display Item List
×: Standard –: Not applicable
Monitored item (Unit)Monitor item selection
Remarks
ECU INPUT
SIGNALSMAIN
SIGNALSSELECTION
FROM MENU
FR RH SENSOR [km/h] or [mph]×××Wheel speed calculated by front wheel
sensor RH signal is displayed.
FR LH SENSOR [km/h] or [mph]×××Wheel speed calculated by front wheel
sensor LH signal is displayed.
RR RH SENSOR [km/h] or [mph]×××Wheel speed calculated by rear wheel
sensor RH signal is displayed.
RR LH SENSOR [km/h] or [mph]×××Wheel speed calculated by rear wheel
sensor LH signal is displayed.
BATTERY VOLT [V] – –×Power supply voltage for AWD control unit
THRTL POS SEN [%] – –×Throttle opening status is displayed.
ETS SOLENOID [A] – –×Monitored value of current at AWD sole-
noid
STOP LAMP SW [ON/OFF] – –×Stop lamp switch signal status via CAN
communication line is displayed.
ENG SPEED SIG [RUN/STOP] – –×Engine status is displayed.
ETS ACTUATOR [ON/OFF] – –×Operating condition of AWD actuator relay
(integrated in AWD control unit) is dis-
played.
4WD WARN LAMP [ON/OFF] – –×Control status of AWD warning lamp is dis-
played.
4WD MODE SW [AUTO] – –×AWD lock switch is not equipped, but dis-
played.
4WD MODE MON [AUTO] – –×Control status of AWD is displayed.
DIS-TIRE MONI [mm] – –×Improper size tire installed condition is dis-
played.
P BRAKE SW [ON/OFF] – –×Parking switch signal status via CAN com-
munication line is displayed.
Voltage [V] – –×The value measured by the voltage probe
is displayed.
Frequency [Hz] – –×
The value measured by the pulse probe is
displayed. DUTY-HI (high) [%] – –×
DUTY-LOW (low) [%] – –×
PLS WIDTH-HI [msec] – –×
PLS WIDTH-LOW [msec] – –×
Page 4440 of 4449

REAR WIPER AND WASHER SYSTEM
WW-49
C
D
E
F
G
H
I
J
L
MA
B
WW
Revision: 2004 November 2004 FX35/FX45
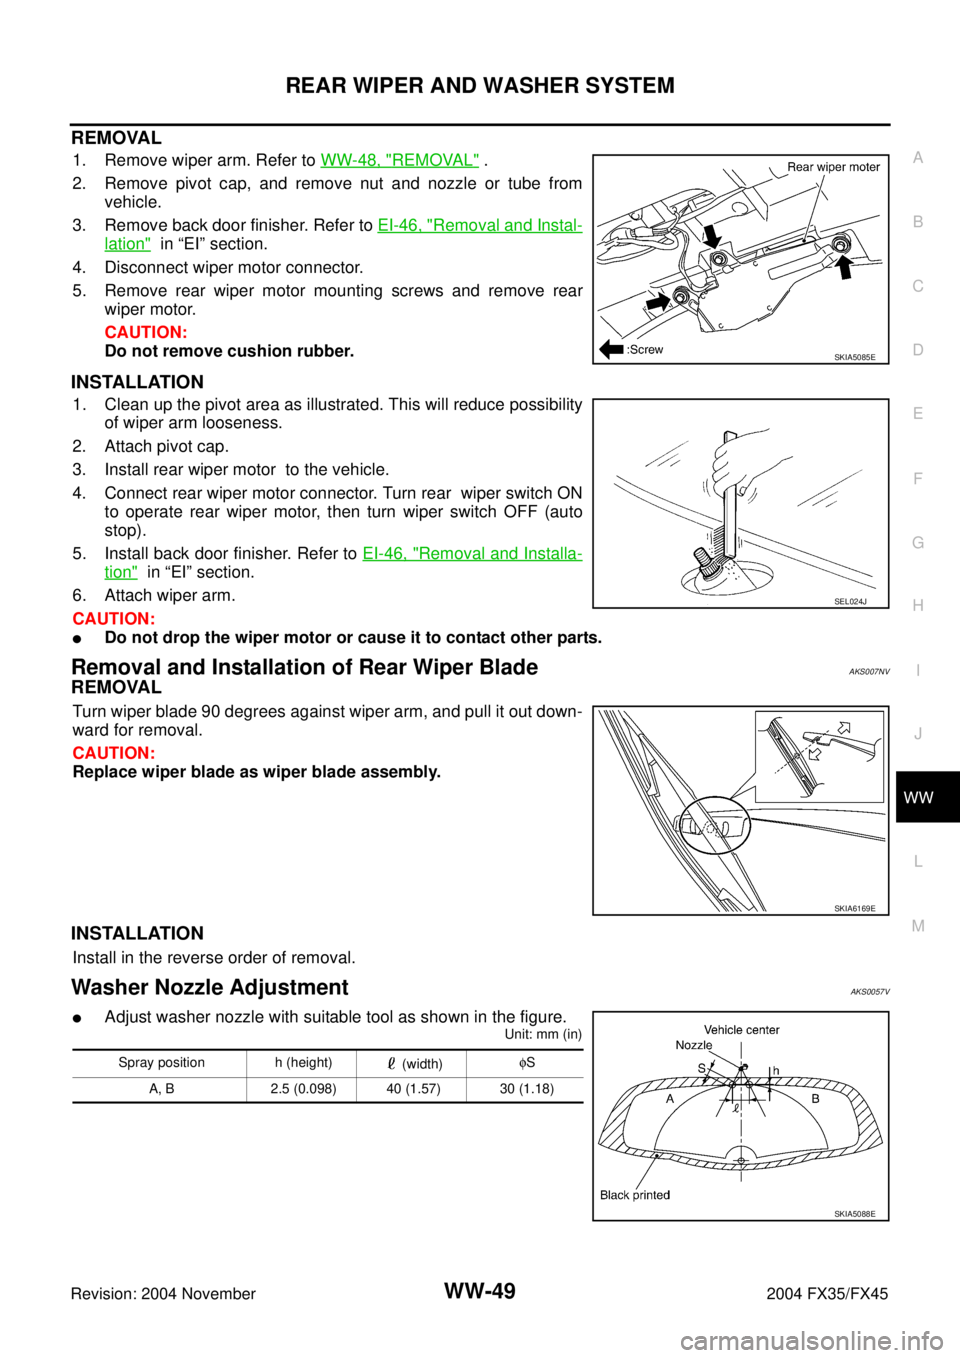
REMOVAL
1. Remove wiper arm. Refer to WW-48, "REMOVAL" .
2. Remove pivot cap, and remove nut and nozzle or tube from
vehicle.
3. Remove back door finisher. Refer to EI-46, "
Removal and Instal-
lation" in “EI” section.
4. Disconnect wiper motor connector.
5. Remove rear wiper motor mounting screws and remove rear
wiper motor.
CAUTION:
Do not remove cushion rubber.
INSTALLATION
1. Clean up the pivot area as illustrated. This will reduce possibility
of wiper arm looseness.
2. Attach pivot cap.
3. Install rear wiper motor to the vehicle.
4. Connect rear wiper motor connector. Turn rear wiper switch ON
to operate rear wiper motor, then turn wiper switch OFF (auto
stop).
5. Install back door finisher. Refer to EI-46, "
Removal and Installa-
tion" in “EI” section.
6. Attach wiper arm.
CAUTION:
�Do not drop the wiper motor or cause it to contact other parts.
Removal and Installation of Rear Wiper BladeAKS007NV
REMOVAL
Turn wiper blade 90 degrees against wiper arm, and pull it out down-
ward for removal.
CAUTION:
Replace wiper blade as wiper blade assembly.
INSTALLATION
Install in the reverse order of removal.
Washer Nozzle AdjustmentAKS0057V
�Adjust washer nozzle with suitable tool as shown in the figure.
Unit: mm (in)
SKIA5085E
SEL024J
SKIA6169E
Spray position h (height)
(width)φS
A, B 2.5 (0.098) 40 (1.57) 30 (1.18)
SKIA5088E