Page 961 of 4449
BL-154
FRONT DOOR LOCK
Revision: 2004 November 2004 FX35/FX45
10. Remove the TORX bolt (T30) of the outside handle bracket.
11. While pulling outside handle bracket, slide toward front of vehi-
cle to remove outside handle bracket.
12. Reach to separate outside handle cable connection.
13. Remove the TORX bolts (T30) of door lock assembly.
14. Disconnect the door lock actuator connector and remove door lock assembly.
INSTALLATION
Install in the reverse order of removal.
CAUTION:
To install each rod, be sure to rotate the rod holder until a click is felt.
PIIA7117E
PIIA3558E
PIIA6026E
PIIA1090E
Page 964 of 4449
REAR DOOR LOCK
BL-157
C
D
E
F
G
H
J
K
L
MA
B
BL
Revision: 2004 November 2004 FX35/FX45
CAUTION:
Do not forcibly remove the TORX bolt (T30).
5. While pulling the outside handle, remove outside handle
escutcheon.
6. While pulling outside handle, slide toward rear of vehicle to
remove outside handle.
7. Remove the front gasket and rear gasket.
PIIA3553E
PIIA6344E
PIIA3555E
PIIA3557E
Page 965 of 4449
BL-158
REAR DOOR LOCK
Revision: 2004 November 2004 FX35/FX45
8. Remove the TORX bolt (T30), and remove the outside handle
bracket.
9. While pulling outside handle, slide toward front of vehicle to
remove outside handle bracket.
10. Reach to separate outside handle cable connection.
11. Remove the TORX bolts (T30) of door lock assembly.
12. Disconnect the door lock actuator connector and remove door lock assembly.
INSTALLATION
Install in the reverse order of removal.
CAUTION:
To install each rod, be sure to rotate the rod holder until a click is felt.
PIIA7117E
PIIA3558E
PIIA5059E
PIIA1090E
Page 1129 of 4449
![INFINITI FX35 2004 Service Manual BRC-4
[VDC/TCS/ABS]
PRECAUTIONS
Revision: 2004 November 2004 FX35/FX45
�If aftermarket parts (car stereo, CD player, etc.) have been installed, check for incidents such as harness
pinches, open circui INFINITI FX35 2004 Service Manual BRC-4
[VDC/TCS/ABS]
PRECAUTIONS
Revision: 2004 November 2004 FX35/FX45
�If aftermarket parts (car stereo, CD player, etc.) have been installed, check for incidents such as harness
pinches, open circui](/manual-img/42/57021/w960_57021-1128.png)
BRC-4
[VDC/TCS/ABS]
PRECAUTIONS
Revision: 2004 November 2004 FX35/FX45
�If aftermarket parts (car stereo, CD player, etc.) have been installed, check for incidents such as harness
pinches, open circuits, and improper wiring.
�If the following components are replaced with non-genuine components or converted, VDC OFF indicator
lamp and SLIP indicator lamp may turn on or the VDC system may not operate properly. Components
related to suspension (Shock Absorber, Strut, Spring, Bush, etc.), Tires, wheels (exclude specified size),
components related to brake (Pad, Rotor, Caliper, etc.), components related to engine (Muffler, ECM,
etc.), components related to body reinforcement (Roll bar, Tower bar, etc.).
�Driving in the condition of breakage or excessive wear of suspension, tires or components related to the
brakes may cause VDC OFF indicator lamp and SLIP indicator lamp turn on, and the VDC system may
not operate properly.
�When the TCS or VDC is activated by sudden acceleration or sudden turn, some noise may occur. The
noise is a result of the normal operation of the TCS and VDC.
�When driving on roads which have extreme slopes (such as mountainous roads) or high banks (such as
sharp carves on a freeway), the VDC may not operate normally, or VDC OFF indicator lamp and SLIP
indicator lamp may turn on. However, this is not a malfunction, if normal operation can be resumed after
restarting engine.
�Sudden turns (such as spin turns, acceleration turns), drifting, etc. When VDC function is OFF (VDC SW
ON) may cause the G -sensor system indicate a malfunction. However, this is not a malfunction, if normal
operation can be resumed after restarting engine.
Page 1268 of 4449

COMBINATION METERS
DI-25
C
D
E
F
G
H
I
J
L
MA
B
DI
Revision: 2004 November 2004 FX35/FX45
Fuel Gauge Does Not Move to FULL positionAKS005N4
1. QUESTION 1
Does it take a long time for the pointer to move to FULL position?
YES >> GO TO 2.
NO >> GO TO 3.
2. QUESTION 2
Was the vehicle fueled with the ignition switch ON?
YES >> Be sure to fuel the vehicle with the ignition switch OFF. Otherwise, it will take a long time to move
to FULL position because of the characteristic of the fuel gauge.
NO >> GO TO 3.
3. QUESTION 3
Is the vehicle parked on an incline?
YES >> Check the fuel level indication with vehicle on a level surface.
NO >> GO TO 4.
4. QUESTION 4
During driving, does the fuel gauge pointer move gradually toward EMPTY position?
YES >> Check the fuel level sensor unit. Refer to DI-25, "CHECK FUEL LEVEL SENSOR UNIT" .
NO >> The float arm may interfere or bind with any of the components in the fuel tank.
Electrical Components InspectionAKS005N5
CHECK FUEL LEVEL SENSOR UNIT
For removal, refer to FL-4, "FUEL LEVEL SENSOR UNIT, FUEL FILTER AND FUEL PUMP ASSEMBLY" .
Check Fuel Level Sensor Unit and Fuel Pump (Main)
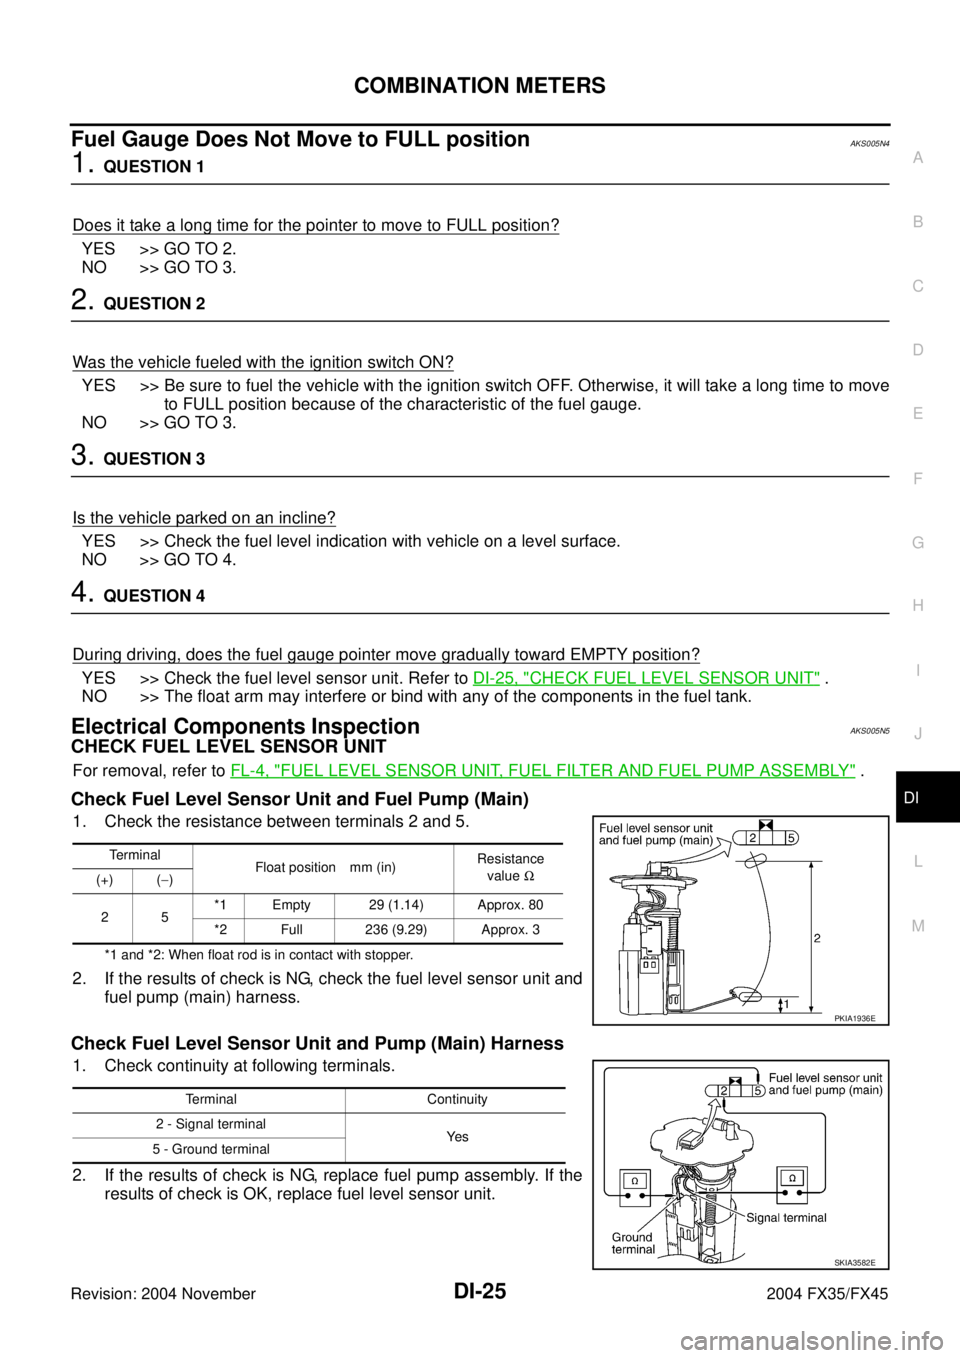
1. Check the resistance between terminals 2 and 5.
*1 and *2: When float rod is in contact with stopper.
2. If the results of check is NG, check the fuel level sensor unit and
fuel pump (main) harness.
Check Fuel Level Sensor Unit and Pump (Main) Harness
1. Check continuity at following terminals.
2. If the results of check is NG, replace fuel pump assembly. If the
results of check is OK, replace fuel level sensor unit.
Terminal
Float position mm (in)Resistance
value Ω
(+) (−)
25*1 Empty 29 (1.14) Approx. 80
*2 Full 236 (9.29) Approx. 3
PKIA1936E
Terminal Continuity
2 - Signal terminal
Ye s
5 - Ground terminal
SKIA3582E
Page 1278 of 4449

COMPASS
DI-35
C
D
E
F
G
H
I
J
L
MA
B
DI
Revision: 2004 November 2004 FX35/FX45
COMPASSPFP:24835
System DescriptionAKS007AO
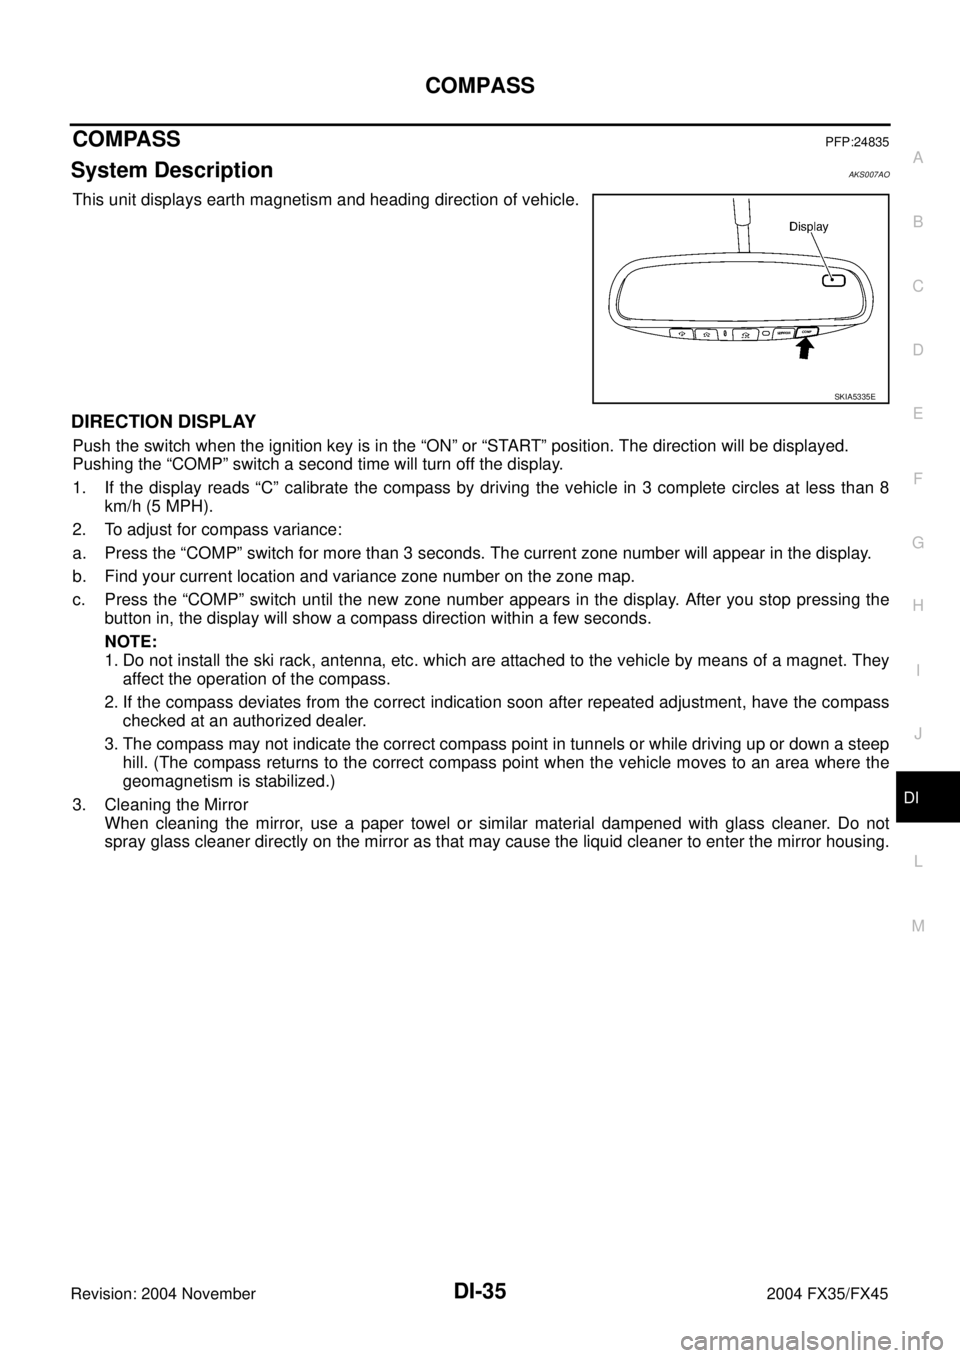
This unit displays earth magnetism and heading direction of vehicle.
DIRECTION DISPLAY
Push the switch when the ignition key is in the “ON” or “START” position. The direction will be displayed.
Pushing the “COMP” switch a second time will turn off the display.
1. If the display reads “C” calibrate the compass by driving the vehicle in 3 complete circles at less than 8
km/h (5 MPH).
2. To adjust for compass variance:
a. Press the “COMP” switch for more than 3 seconds. The current zone number will appear in the display.
b. Find your current location and variance zone number on the zone map.
c. Press the “COMP” switch until the new zone number appears in the display. After you stop pressing the
button in, the display will show a compass direction within a few seconds.
NOTE:
1. Do not install the ski rack, antenna, etc. which are attached to the vehicle by means of a magnet. They
affect the operation of the compass.
2. If the compass deviates from the correct indication soon after repeated adjustment, have the compass
checked at an authorized dealer.
3. The compass may not indicate the correct compass point in tunnels or while driving up or down a steep
hill. (The compass returns to the correct compass point when the vehicle moves to an area where the
geomagnetism is stabilized.)
3. Cleaning the Mirror
When cleaning the mirror, use a paper towel or similar material dampened with glass cleaner. Do not
spray glass cleaner directly on the mirror as that may cause the liquid cleaner to enter the mirror housing.
SKIA5335E
Page 1331 of 4449
DI-88
REAR VIEW MONITOR
Revision: 2004 November 2004 FX35/FX45
1. With the ignition switch OFF, connect “CONSULT-II” and “CON-
SULT-II CONVERTER” to the data link connector, then turn igni-
tion switch ON.
2. Touch “START (NISSAN BASED VHCL)”.
3. Touch “REARVIEW CAMERA” on “SELECT SYSTEM” screen. If
“REARVIEW CAMERA” is not indicated, go to GI-40, "
CON-
SULT-II Data Link Connector (DLC) Circuit" .
4. Select “WORK SUPPORT”, “DATA MONITOR” or “ECU PART
NUMBER”.
WORK SUPPORT
Operation Procedure
1. Touch “DATA MONITOR” on “SELECT DIAG MODE” screen.
2. Touch either “SELCT GUIDELINE PATTERN” or “ADJ GUIDELINE POSITION” on the “WORK SUP-
PORT” screen.
Refer to DI-89, "
SIDE DISTANCE GUIDELINE CORRECTION PROCEDURE" for detail.
PBIB1503E
SKIA3098E
SKIA5036E
SKIA5748E
SELCT GUIDELINE PATTERN Side distance guideline is optional from two patterns.
ADJ GUIDELINE POSITION Side distance guideline is adjustable toward up and down, right and left.
Page 1455 of 4449
![INFINITI FX35 2004 Service Manual EC-114
[VQ35DE]
TROUBLE DIAGNOSIS
Revision: 2004 November 2004 FX35/FX45
DATA MONITOR MODE
Monitored Item
×: Applicable
Monitored item [Unit]ECM
INPUT
SIG-
NALSMAIN
SIG-
NALSDescription Remarks
EN INFINITI FX35 2004 Service Manual EC-114
[VQ35DE]
TROUBLE DIAGNOSIS
Revision: 2004 November 2004 FX35/FX45
DATA MONITOR MODE
Monitored Item
×: Applicable
Monitored item [Unit]ECM
INPUT
SIG-
NALSMAIN
SIG-
NALSDescription Remarks
EN](/manual-img/42/57021/w960_57021-1454.png)
EC-114
[VQ35DE]
TROUBLE DIAGNOSIS
Revision: 2004 November 2004 FX35/FX45
DATA MONITOR MODE
Monitored Item
×: Applicable
Monitored item [Unit]ECM
INPUT
SIG-
NALSMAIN
SIG-
NALSDescription Remarks
ENG SPEED [rpm]××
�Indicates the engine speed computed from
the signal of the crankshaft position sensor
(POS) and camshaft position sensor
(PHASE).�Accuracy becomes poor if engine
speed drops below the idle rpm.
�If the signal is interrupted while the
engine is running, an abnormal value
may be indicated.
MAS A/F SE-B1 [V]××
�The signal voltage of the mass air flow sen-
sor is displayed.�When the engine is stopped, a cer-
tain value is indicated.
B/FUEL SCHDL
[msec]×
�Base fuel schedule indicates the fuel injec-
tion pulse width programmed into ECM,
prior to any learned on board correction.
A/F ALPHA-B1 [%]×
�The mean value of the air-fuel ratio feed-
back correction factor per cycle is indicated.
�When the engine is stopped, a cer-
tain value is indicated.
�This data also includes the data for
the air-fuel ratio learning control. A/F ALPHA-B2 [%]×
COOLAN TEMP/S
[°C] or [°F]××
�The engine coolant temperature (deter-
mined by the signal voltage of the engine
coolant temperature sensor) is displayed.
�When the engine coolant tempera-
ture sensor is open or short-circuited,
ECM enters fail-safe mode. The
engine coolant temperature deter-
mined by the ECM is displayed.
HO2S1 (B1) [V]××
�The signal voltage of the heated oxygen
sensor 1 is displayed.
HO2S1 (B2) [V]×
HO2S2 (B1) [V]×
�The signal voltage of the heated oxygen
sensor 2 is displayed.
HO2S2 (B2) [V]×
HO2S1 MNTR (B1)
[RICH/LEAN]××
�Display of heated oxygen sensor 1 signal
during air-fuel ratio feedback control:
RICH: means the mixture became rich, and
control is being affected toward a leaner
mixture.
LEAN: means the mixture became lean,
and control is being affected toward a rich
mixture.�After turning ON the ignition switch,
RICH is displayed until air-fuel mix-
ture ratio feedback control begins.
�When the air-fuel ratio feedback is
clamped, the value just before the
clamping is displayed continuously. HO2S1 MNTR (B2)
[RICH/LEAN]×
HO2S2 MNTR (B1)
[RICH/LEAN]×
�Display of heated oxygen sensor 2 signal:
RICH: means the amount of oxygen after
three way catalyst is relatively small.
LEAN: means the amount of oxygen after
three way catalyst is relatively large.
�When the engine is stopped, a cer-
tain value is indicated.
HO2S2 MNTR (B2)
[RICH/LEAN]×
VHCL SPEED SE
[km/h] or [mph]××
�The vehicle speed computed from the vehi-
cle speed signal sent from combination
meter is displayed.
BATTERY VOLT [V]××
�The power supply voltage of ECM is dis-
played.
ACCEL SEN 1 [V]××
�The accelerator pedal position sensor sig-
nal voltage is displayed.�ACCEL SEN2 signal is converted by
ECM internally. Thus, they differs
from ECM terminal voltage signal. ACCEL SEN 2 [V]×
THRTL SEN 1 [V]××
�The throttle position sensor signal voltage
is displayed.�THRTL SEN2 signal is converted by
ECM internally. Thus, they differs
from ECM terminal voltage signal. THRTL SEN 2 [V]×