Page 3225 of 4449

GW-66
POWER WINDOW SYSTEM
Revision: 2004 November 2004 FX35/FX45
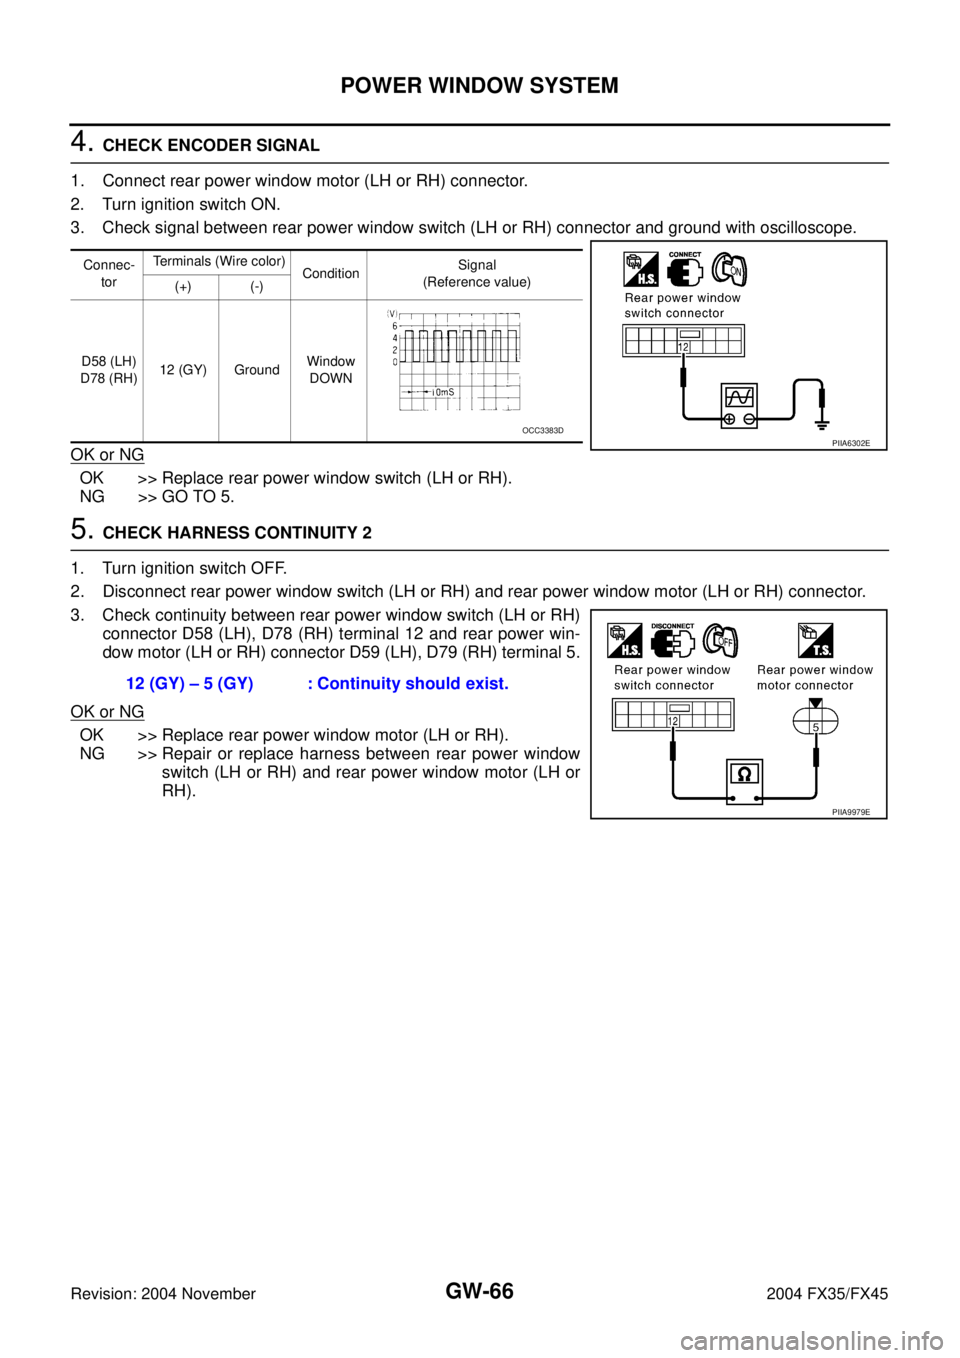
4. CHECK ENCODER SIGNAL
1. Connect rear power window motor (LH or RH) connector.
2. Turn ignition switch ON.
3. Check signal between rear power window switch (LH or RH) connector and ground with oscilloscope.
OK or NG
OK >> Replace rear power window switch (LH or RH).
NG >> GO TO 5.
5. CHECK HARNESS CONTINUITY 2
1. Turn ignition switch OFF.
2. Disconnect rear power window switch (LH or RH) and rear power window motor (LH or RH) connector.
3. Check continuity between rear power window switch (LH or RH)
connector D58 (LH), D78 (RH) terminal 12 and rear power win-
dow motor (LH or RH) connector D59 (LH), D79 (RH) terminal 5.
OK or NG
OK >> Replace rear power window motor (LH or RH).
NG >> Repair or replace harness between rear power window
switch (LH or RH) and rear power window motor (LH or
RH).
Connec-
torTerminals (Wire color)
ConditionSignal
(Reference value)
(+) (-)
D58 (LH)
D78 (RH)12 (GY) GroundWindow
DOWN
PIIA6302EOCC3383D
12 (GY) – 5 (GY) : Continuity should exist.
PIIA9979E
Page 3232 of 4449

POWER WINDOW SYSTEM
GW-73
C
D
E
F
G
H
J
K
L
MA
B
GW
Revision: 2004 November 2004 FX35/FX45
Power Window Serial Link Check (Rear LH or RH) / With Front and Rear Power
Window Anti-pinch System
AIS004QW
1. CHECK POWER WINDOW SWITCH
Change with operative rear power window switch (LH or RH).
Whether operates normally is confirmed?
YES >> Replace rear power window switch (LH or RH).
NO >> GO TO 2.
2. CHECK HARNESS CONTINUITY
1. Turn ignition switch OFF.
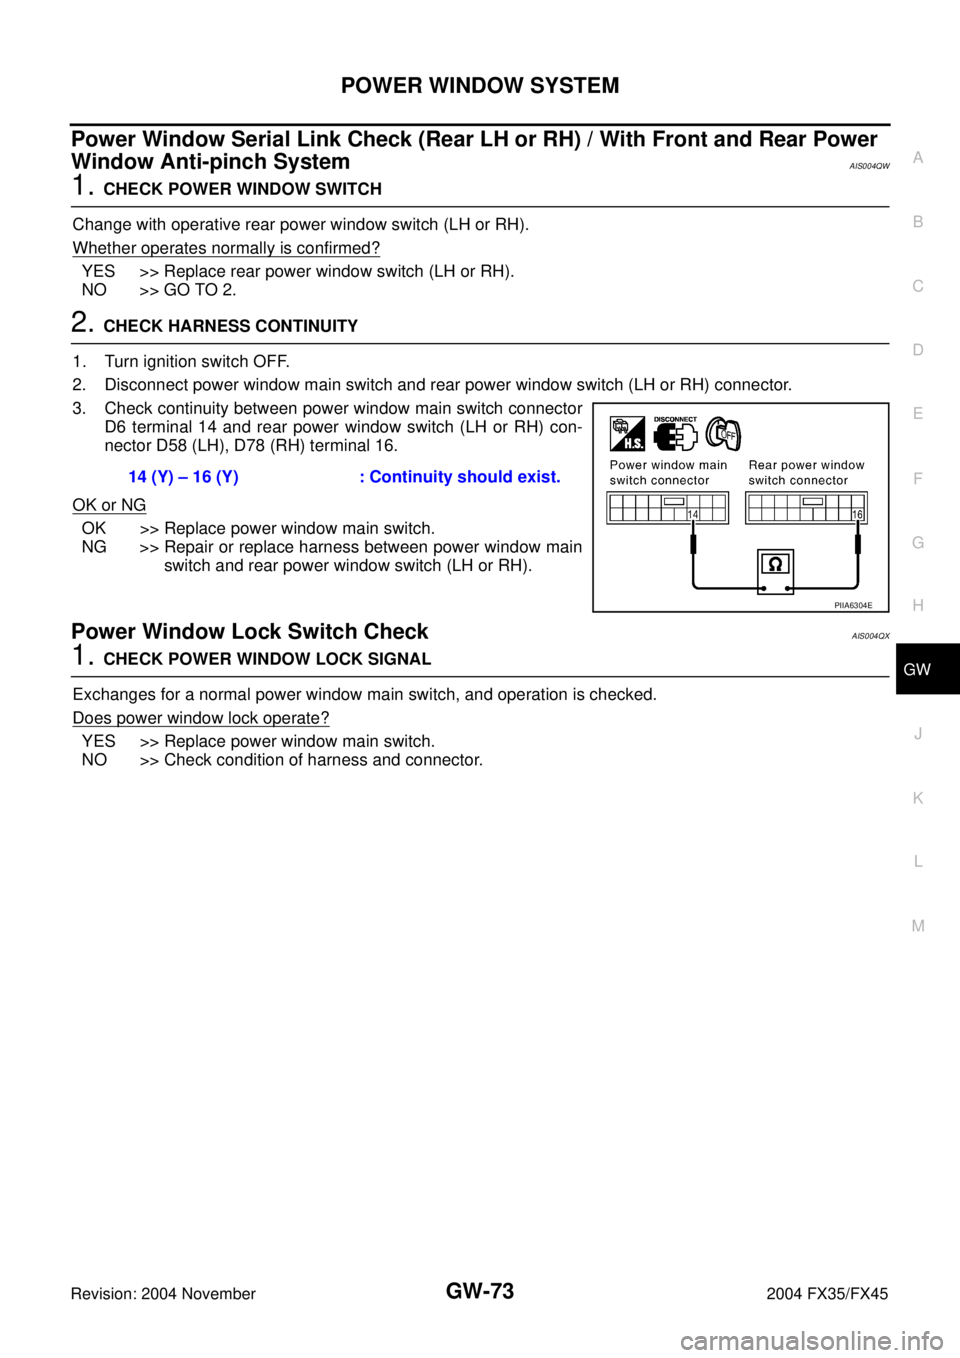
2. Disconnect power window main switch and rear power window switch (LH or RH) connector.
3. Check continuity between power window main switch connector
D6 terminal 14 and rear power window switch (LH or RH) con-
nector D58 (LH), D78 (RH) terminal 16.
OK or NG
OK >> Replace power window main switch.
NG >> Repair or replace harness between power window main
switch and rear power window switch (LH or RH).
Power Window Lock Switch CheckAIS004QX
1. CHECK POWER WINDOW LOCK SIGNAL
Exchanges for a normal power window main switch, and operation is checked.
Does power window lock operate?
YES >> Replace power window main switch.
NO >> Check condition of harness and connector.14 (Y) – 16 (Y) : Continuity should exist.
PIIA6304E
Page 3233 of 4449
GW-74
SIDE WINDOW GLASS
Revision: 2004 November 2004 FX35/FX45
SIDE WINDOW GLASSPFP:83300
Removal and InstallationAIS003A5
REMOVAL
1. Remove the roof rear garnish. Refer toEI-44, "Removal and Installation" .
2. Remove the luggage side finisher. Refer to EI-44, "
Removal and Installation" .
3. Remove the rear pillar upper garnish. Refer to EI-44, "
Removal and Installation" .
WARNING:
When cutting the glass from the vehicle, always wear safety glasses and heavy gloves to help prevent
glass splinters from entering your eyes or cutting your hands.
CAUTION:
�Be careful not to scratch the glass when removing.
�Do not set or stand the glass on its edge. Small chips may develop into cracks.
PIIA9192E
1. Side window glass molding (upper) 2. Side window glass 3. Clip
4. Side window glass molding (lower) 5. Fastener 6. Adhesive
7. Body side outer panel 8. Side window glass molding (pillar) 9. Dam rubber
Page 3236 of 4449
FRONT DOOR GLASS AND REGULATOR
GW-77
C
D
E
F
G
H
J
K
L
MA
B
GW
Revision: 2004 November 2004 FX35/FX45
6. While holding the door glass, raise it at the rear end to pull the
glass out of the sash toward the outside of the door.
Installation
Install in the reverse order of removal.
REGULATOR ASSEMBLY
Removal
1. Remove the front door finisher. Refer to EI-35, "DOOR FINISHER" .
2. Remove speaker unit. Refer to AV- 4 6 , "
Removal and Installation for Front Door Speaker" .
3. Operate the power window main switch to raise/lower the door
window until the glass mounting bolts can be seen.
4. Remove the glass mounting bolts.
5. Remove the module stop bolts.
6. Raise up the door glass and hold with a suction lifter.
7. Remove the mounting bolts, and remove the module assembly.
8. Disconnect the harness connector for the module assembly, and
unclip the harness from the back.
Installation
Install in the reverse order of removal.
PIIA4004E
PIIA4729E
PIIB1811E
SIIA0287E
Page 3239 of 4449
GW-80
REAR DOOR GLASS AND REGULATOR
Revision: 2004 November 2004 FX35/FX45
REAR DOOR GLASS AND REGULATORPFP:82300
Removal and InstallationAIS006NX
DOOR GLASS
Removal
1. Remove the rear door finisher. Refer to EI-35, "DOOR FINISHER" .
2. Remove the rear door outside molding. Refer to EI-26, "
DOOR OUTSIDE MOLDING" .
3. Remove the sealing screen.
4. Lower the door glass.
5. Remove the corner piece screws and bolt.
6. Remove the corner piece assembly.
1. Door glass 2. Corner piece assembly 3. Screw
4. Bolt 5. Regulator assembly 6. Power window motor
7. Bolt
PIIA4733E
PIIA4735E
Page 3240 of 4449
REAR DOOR GLASS AND REGULATOR
GW-81
C
D
E
F
G
H
J
K
L
MA
B
GW
Revision: 2004 November 2004 FX35/FX45
7. Operate the power window switch to raise/lower the door win-
dow until the glass mounting bolts can be seen.
8. Remove the glass mounting bolts, and remove the glass from
the inside of the panel.
Installation
Install in the reverse order of removal.
REGULATOR ASSEMBLY
Removal
1. Remove the rear door finisher. Refer to EI-35, "DOOR FINISHER" .
2. Remove the rear door outside molding. Refer to EI-26, "
DOOR OUTSIDE MOLDING" .
3. Remove the sealing screen.
4. Lower the door glass.
5. Remove the corner piece screws and bolt.
6. Remove the corner piece assembly.
7. Operate the power window switch to raise/lower the door win-
dow until the glass mounting bolts can be seen.
8. Remove the glass mounting bolts.
9. Raise up the door glass and hold with a suction lifter.
PIIA4734E
PIIA4735E
PIIA4734E
PIIB1817E
Page 3241 of 4449

GW-82
REAR DOOR GLASS AND REGULATOR
Revision: 2004 November 2004 FX35/FX45
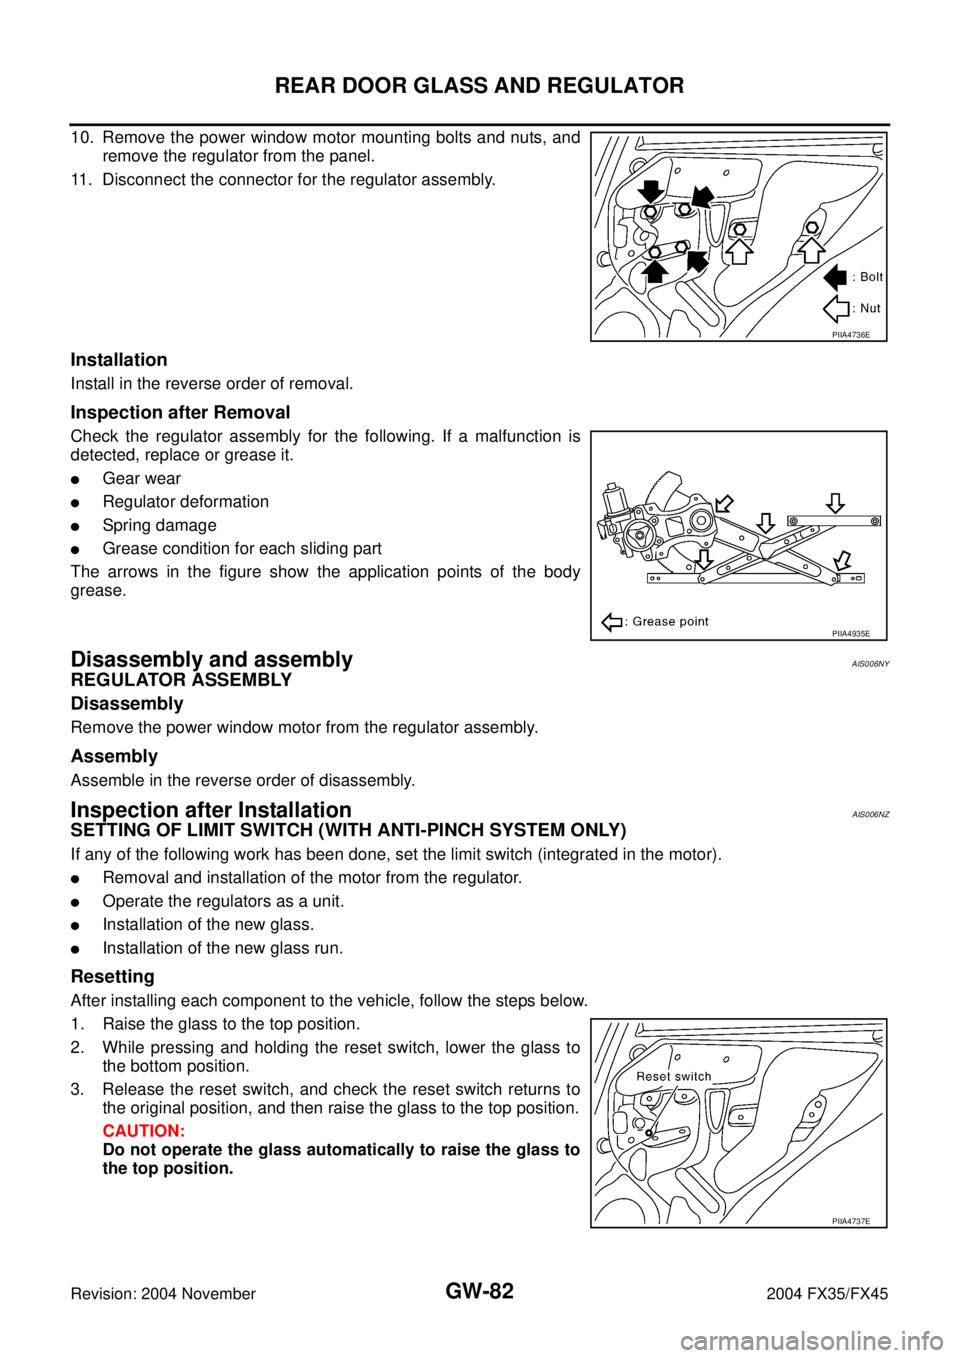
10. Remove the power window motor mounting bolts and nuts, and
remove the regulator from the panel.
11. Disconnect the connector for the regulator assembly.
Installation
Install in the reverse order of removal.
Inspection after Removal
Check the regulator assembly for the following. If a malfunction is
detected, replace or grease it.
�Gear wear
�Regulator deformation
�Spring damage
�Grease condition for each sliding part
The arrows in the figure show the application points of the body
grease.
Disassembly and assemblyAIS006NY
REGULATOR ASSEMBLY
Disassembly
Remove the power window motor from the regulator assembly.
Assembly
Assemble in the reverse order of disassembly.
Inspection after InstallationAIS006NZ
SETTING OF LIMIT SWITCH (WITH ANTI-PINCH SYSTEM ONLY)
If any of the following work has been done, set the limit switch (integrated in the motor).
�Removal and installation of the motor from the regulator.
�Operate the regulators as a unit.
�Installation of the new glass.
�Installation of the new glass run.
Resetting
After installing each component to the vehicle, follow the steps below.
1. Raise the glass to the top position.
2. While pressing and holding the reset switch, lower the glass to
the bottom position.
3. Release the reset switch, and check the reset switch returns to
the original position, and then raise the glass to the top position.
CAUTION:
Do not operate the glass automatically to raise the glass to
the top position.
PIIA4736E
PIIA4935E
PIIA4737E
Page 3245 of 4449
GW-86
REAR WINDOW DEFOGGER
Revision: 2004 November 2004 FX35/FX45
REAR WINDOW DEFOGGERPFP:25350
Component Parts and Harness Connector LocationAIS004QY
System DescriptionAIS004QZ
The rear window defogger system is controlled by BCM (Body Control Module) and IPDM E/R (Intelligent
Power Distribution Module Engine Room).
The rear window defogger operates only for approximately 15 minutes.
Power is at all times supplied
�through 20A fuse [No. 75, and 80, located in the IPDM E/R]
�to rear window defogger relay terminals 3 and 6.
�through 10A fuse [No.12, located in the fuse block]
�to rear window defogger relay terminal 1.
�through 15A fuse [No. 32, located in the fuse block (J/B)]
PIIA6408E