2004 Hyundai Tiburon ESP
[x] Cancel search: ESPPage 5 of 224
A010A02A-AAT
WARRANTIES FOR YOUR HYUNDAI VEHICLE
o New Vehicle 60 Months/60,000 Miles Limited Warranty
o New Vehicle 120 Months/100,000 Miles Limited Powertrain Warranty (original owner only)
o Anti-Perforation Limited Warranty
o Emission Defect Warranty - Federal Vehicle
o California Emission Control System Warranty (if applicable)
o Emission Performance Warranty - Federal Vehicle
o Replacement Parts and Accessories Limited Warranty
NOTE:Detailed warranty information is provided in your Hyundai Owner's Handbook.
A020A01A-AATRESPONSIBILITY FOR MAINTENANCE
The maintenance requirements for your new Hyundai are found in Section 5. As the owner, it is your responsibility
to see that all maintenance operations specified by the manufacturer are carried out at the appropriate intervals.
When the vehicle is used in severe driving conditions, more frequent maintenance is required for some operations.
Maintenance requirements for severe operating conditions are also included in Section 5.
Page 17 of 224
1FEATURES OF YOUR HYUNDAI
4
WARNING:o Unlocked doors can be dangerous. Be-
fore you drive away (especially if there
are children in the car), be sure that all the
doors are securely closed and locked so
that the doors cannot be inadvertently
opened from the inside. This helps en-
sure that the doors will not be opened
accidentally. Also, when combined with
the proper use of seat belts, locking the
doors helps keep occupants from being
ejected from the car in case of an acci-
dent.
o Before opening the door, always look for
and avoid oncoming traffic.
o In case of accident, the door is unlocked
automatically (If installed).
!
DOOR
B030B01S-AAT
Record Your Key Number
A code number is stamped on the key number
plate that came with the keys to your Hyundai.
This key number plate should be kept in a safe
place, not in the vehicle. The key number should
also be recorded in a place where it can be found
in an emergency.
If you need additional keys, or if you should lose
your keys, your authorized Hyundai dealer can
make new keys if you can supply the key
number.
B030B01EB040A02Y-AAT
DOOR LOCKS
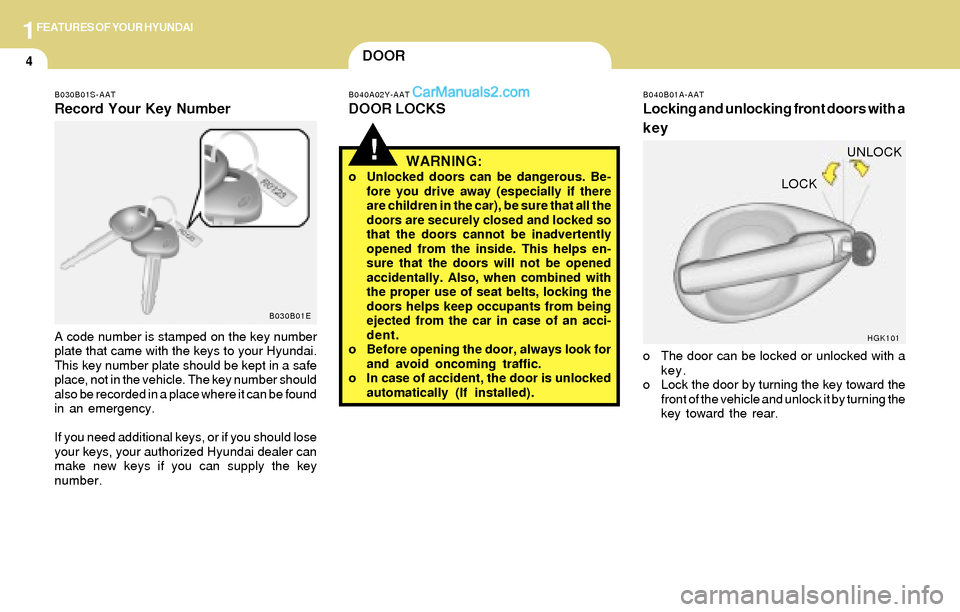
B040B01A-AAT
Locking and unlocking front doors with a
key
o The door can be locked or unlocked with a
key.
o Lock the door by turning the key toward the
front of the vehicle and unlock it by turning the
key toward the rear.
HGK101
LOCKUNLOCK
Page 21 of 224

1FEATURES OF YOUR HYUNDAI
8WINDOW
B050A01GK-AAT
Power Window
The power windows operate only when the
ignition key is in the "ON" position. The main
switches are located on the driver's arm rest
and control the front windows on the respective
sides of the vehicle. The windows may be
opened by depressing the front portion of the
switch. To stop at the desired opening, release
the switch. The window may be closed by pulling
the front portion of the switch. In order to prevent
operation of the passenger front window by the
passenger, a window lock switch (1) is provided
on the arm rest of the driver's door. To disable
the passenger's power window, push the win-
dow lock switch. To revert to normal operation,
push in on the window lock switch again.CAUTION:Never try to operate the main switch and
sub-switch in opposing directions at the
same time. If this is done, the window will
stop and cannot be opened or closed.
!
Auto-Down Window (Driver's Side)
(If Installed)
The Auto-Down window is moved to its fully
open position by pushing the switch. To stop at
the desired position push in on the switch again.
HGK096HGK097
(1)
2. Remove the old battery from the case and
note the polarity. Make sure the polarity of
the new battery is the same(+side facing
down), then insert it in the transmitter.
NOTE:Install a new battery within 30 seconds after
removing the old one. If installing a new
battery takes more than 30 seconds, take
the following steps.
1) Turn the ignition key to the "ACC" posi-
tion.
2) Make sure that the turn signal lamps
blink once by pushing the "LOCK" or
"UNLOCK" button on the transmitter.
HGK121
Battery
Page 22 of 224

1FEATURES OF YOUR HYUNDAI
9
!
!
!WARNING:o Be careful that head, hands and body are
not trapped by a closing window.
o If passengers remain in the car when you
leave, especially if a child remains alone,
always remove the ignition key for their
safety.
B050A02GK
SEAT
B080A01A-AAT
ADJUSTABLE FRONT SEATS
WARNING:
Never attempt to adjust the seat while the
vehicle is moving. This could result in loss
of control or an accident which may cause
death, serious injury or property damage.
B080B02A-AAT
Adjusting Seat Forward and Rearward
To move the seat toward the front or rear, pull
the lock release lever upward. This will release
the seat on its track so you can move it forward
or rearward to the desired position. When you
find the position you want, release the lever and
slide the seat forward or rearward on its track
until it locks into the desired position and cannot
be moved further.
HGK054
WARNING:To ensure the seat is locked securely, at-
tempt to move the seat forward or rearward
without using the lock release lever.
Page 53 of 224
1FEATURES OF YOUR HYUNDAI
40MULTI GAUGE
B330C01GK-GAT
(If installed)
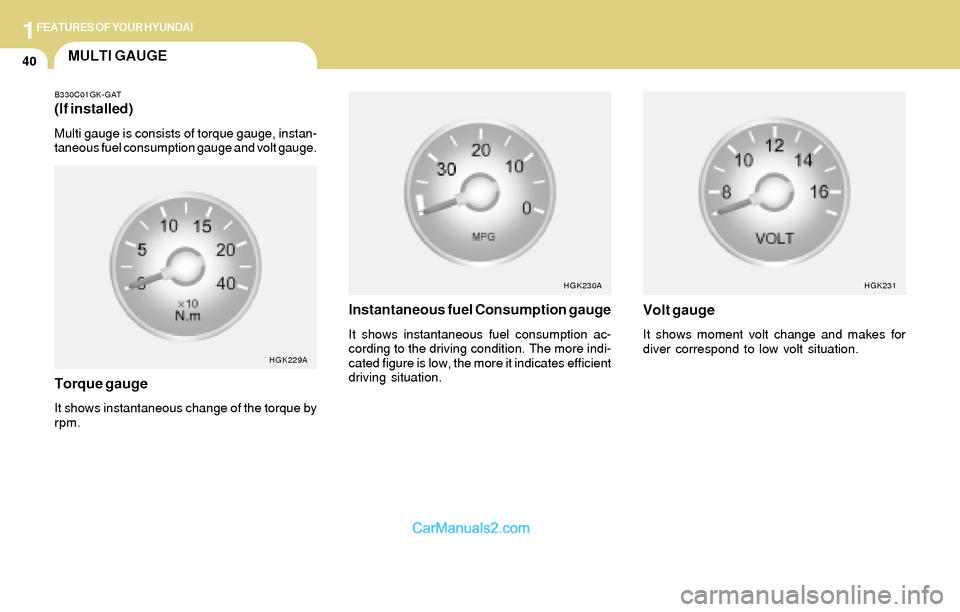
Multi gauge is consists of torque gauge, instan-
taneous fuel consumption gauge and volt gauge.
HGK229A
Torque gauge
It shows instantaneous change of the torque by
rpm.
Instantaneous fuel Consumption gauge
It shows instantaneous fuel consumption ac-
cording to the driving condition. The more indi-
cated figure is low, the more it indicates efficient
driving situation.
HGK230A
Volt gauge
It shows moment volt change and makes for
diver correspond to low volt situation.
HGK231
Page 63 of 224
1FEATURES OF YOUR HYUNDAI
50GLOVE BOXMIRROR
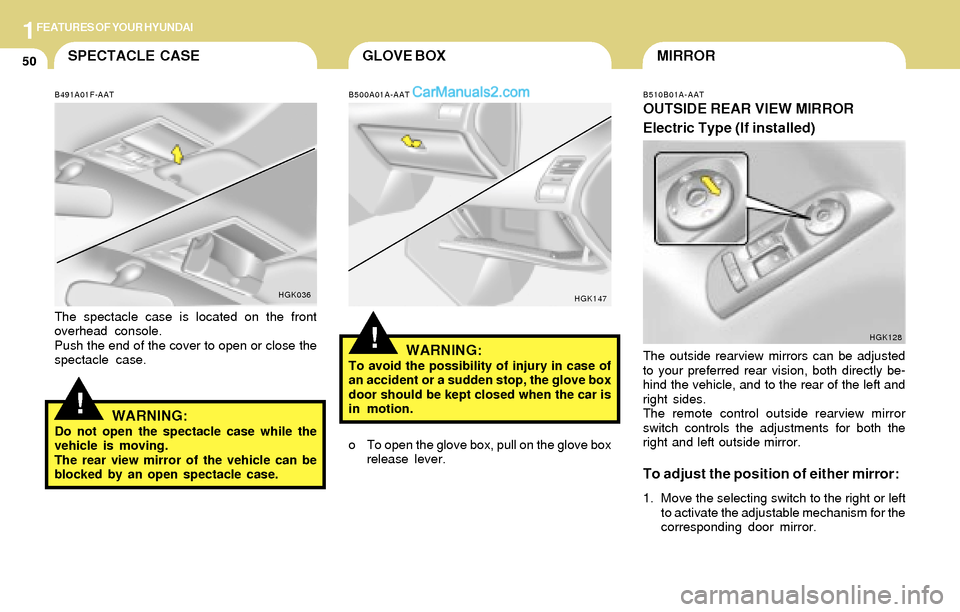
B510B01A-AAT
OUTSIDE REAR VIEW MIRROR
Electric Type (If installed)
HGK128
The outside rearview mirrors can be adjusted
to your preferred rear vision, both directly be-
hind the vehicle, and to the rear of the left and
right sides.
The remote control outside rearview mirror
switch controls the adjustments for both the
right and left outside mirror.
To adjust the position of either mirror:
1. Move the selecting switch to the right or left
to activate the adjustable mechanism for the
corresponding door mirror.
!
SPECTACLE CASE
!
B491A01F-AAT
The spectacle case is located on the front
overhead console.
Push the end of the cover to open or close the
spectacle case.
HGK036
WARNING:Do not open the spectacle case while the
vehicle is moving.
The rear view mirror of the vehicle can be
blocked by an open spectacle case.
B500A01A-AAT
WARNING:To avoid the possibility of injury in case of
an accident or a sudden stop, the glove box
door should be kept closed when the car is
in motion.
HGK147
o To open the glove box, pull on the glove box
release lever.
Page 96 of 224
1FEATURES OF YOUR HYUNDAI
83
6. BAND Selector
Pressing the button changes the AM,
FM1 and FM2 bands. The mode selected is
displayed on LCD.
7. PRESET STATION SELECT Button
Six (6) stations for AM, FM or FM2 respectively
can be preset in the electronic memory circuit
on this unit.
HOW TO PRESET STATIONS
Six AM and twelve FM stations may be pro-
grammed into the memory of the radio. Then, by
simply pressing the band select button and/or
one of the six station select buttons, you may
recall any of these stations instantly. To pro-
gram the stations, follow these steps:
FM/AM
o Press band selector to set the band for AM,
FM or FM2.
o Select the desired station to be stored by
seek, scan or manual tuning.
o Determine the preset station select button
you wish to use to access that station.
o Press the station select button for more than
two seconds. A select button indicator will
show in the display indicating which select
button you have depressed. The frequency
display will flash after it has been stored into
the memory.
You should then release the button, and
proceed to program the next desired station.
A total of 18 stations can be programmed by
selecting one AM and two FM stations per
button.
o When completed, any preset station may be
recalled by selecting AM, FM or FM2 band
and the appropriate station button.
CAUTION:o Do not place beverages close to the
audio system. The audio system mecha-
nism may be damaged if you spill them.
o Do not impact on the audio system, or
the audio system mechanism could be
damaged.
!
Page 104 of 224
1FEATURES OF YOUR HYUNDAI
91
H290B03E-GAT
1. POWER ON-OFF Control Knob
The radio unit may be operated when the ignition
key is in the "ACC" or "ON" position. Press the
button to switch the power on. The display
shows the radio frequency in the radio mode,
the tape direction indicator in the tape mode or
CD track in either the CD mode or CD AUTO
CHANGER mode. To switch the power off,
press the button again.
VOLUME Control
Rotate the knob clockwise to increase the
volume and turn the knob counterclockwise to
reduce the volume.
2. BASS/BALANCE Control Knob
BASS Control Knob
Press to pop the knob out. To increase the bass,
rotate the knob clockwise, while to decrease the
bass, rotate the knob counterclockwise.
BALANCE Control knob
Pull the Bass control knob out further. Rotate the
knob clockwise to emphasize right speaker
sound (left speaker sound will be attenuated).
When the control knob is turned counterclock-
wise, left speaker sound will be emphasized
(right speaker sound will be attenuated).
3. TREBLE/FAD Knob
TREBLE Control Knob
Press to pop the knob out and turn to the left or
right for the desired treble tone.
FAD (Fader Control) Knob
Pull the Treble control knob out further. Turn the
control knob counterclockwise to emphasize
front speaker sound (rear speaker sound will be
attenuated). When the control knob is turned
clockwise, rear speaker sound will be empha-
sized (front speaker sound will be attenuated).
4. TUNE (Manual) Select Button
Press the ( ) side or ( ) side to increase or to
decrease the frequency. Press either button
and hold down to continuously scroll. Release
button once the desired station is reached.
SEEK Operation (Automatic Channel
Selection)
Press the TUNE select button for 0.5 sec or
more. Releasing it will automatically tune to the
next available station with a beep sound.
When the ( ) side is pressed longer than 0.5
second, releasing will automatically tune to the
next higher frequency and when the ( ) side is
pressed longer than 0.5 second, releasing will
automatically tune to the next lower frequency.
5. PRESET STATION Select Buttons
Six (6) stations for AM, FM and FM2 respec-
tively can be preset in the electronic memory
circuit.
HOW TO PRESET STATIONS
Six AM and twelve FM stations may be pro-
grammed into the memory of the radio. Then, by
simply pressing the band select button and/or
one of the six station select buttons, you may
recall any of these stations instantly. To pro-
gram the stations, follow these steps: