2004 Hyundai Tiburon radiator cap
[x] Cancel search: radiator capPage 51 of 224

1FEATURES OF YOUR HYUNDAI
38
!
!
B290A02A-AAT
ENGINE COOLANT TEMPERATURE
GAUGE
WARNING:
Never remove the radiator cap when the
engine is hot. The engine coolant is under
pressure and could erupt and cause severe
burns. Wait until the engine is cool before
removing the radiator cap.The needle on the engine coolant temperature
gauge should stay in the normal range. If it
moves across the dial to "H" (Hot), pull over and
stop as soon as possible and turn off the engine.
Then open the hood and after the engine has
cooled, check the coolant level and the water
pump drive belt. If you suspect cooling system
trouble, have your cooling system checked by
a Hyundai dealer as soon as possible.
B300A01A-AATSPEEDOMETER
Your Hyundai's speedometer is calibrated in
miles per hour (on the outer scale) and kilome-
ters per hour (on the inner scale).
HGK132
HGK130BB330A02A-AAT
TACHOMETER
The tachometer registers the speed of your
engine in revolutions per minute (rpm).
HGK131A
CAUTION:The engine should not be raced to such a
speed that the needle enters the red zone
on the tachometer face. This can cause
severe engine damage and may void your
warranty.
Page 68 of 224

1FEATURES OF YOUR HYUNDAI
55
!
TAIL GATE
B540A01F-AAT
Remote Tail Gate Release
To open the tail gate without using the key, pull
up the lid release lever located on the driver's
door panel.
To close, lower the tail gate, then press down on
it until it locks. To be sure the tail gate is securely
fastened, always try to pull it up again.
HGK103
WARNING:The tail gate should always be kept com-
pletely closed while the vehicle is in motion.
If it is left open or ajar, poisonous exhaust
gases may enter the car resulting in serious
illness or death to the occupants. See addi-
tional warnings concerning exhaust gases
on page 2-2.
WARNING:o The fuel cap must be tightened at least
3 clicks, otherwise " " light will
illuminate.
o Gasoline vapors are dangerous. Before
refueling, always stop the engine and
never allow sparks or open flames near
the filler area. If you need to replace the
filler cap, use a genuine Hyundai re-
placement part.
o If you open the fuel filler cap during high
ambient temperatures, a slight "pres-
sure sound" may be heard. This is nor-
mal and not a cause for concern.
Whenever you open the fuel filler cap,
turn it slowly.
o Make sure the fuel filler cap is replaced
and securely seated after fueling. Failure
to replace or fully seat the fuel filler cap
will result in fuel vapors escaping into
the atmosphere and the MIL indicator
illuminating.
o Do not "TOP-OFF" after the first nozzle
shut off when refueling.
!
NOTE:If the fuel-filler lid will not open because ice
has formed around it, tap lightly or push on
the lid to break the ice and release the lid. Do
not pry on the lid. If necessary, spray around
the lid with an approved deicer fluid (do not
use radiator anti-freeze) or move the ve-
hicle to a warm place and allow the ice to
melt.
HGK124Q
Page 142 of 224

3
4
WHAT TO DO IN AN EMERGENCY
IF THE ENGINE OVERHEATS
!
!WARNING:While the engine is running, keep hair,
hands, and clothing away from moving
parts such as the fan and drive belts to
prevent injury.
5. If the water pump drive belt is broken or
engine coolant is leaking out, stop the engine
immediately and call the nearest Hyundai
dealer for assistance.
WARNING:Do not remove the radiator cap when the
engine is hot. This can allow coolant to be
blown out of the opening and cause seri-
ous burns.
D030A01A-AAT
If your temperature gauge indicates overheat-
ing, you experience a loss of power, or hear loud
pinging or knocking and the engine is probably
too hot. If this happens and, you should:
1. Pull off the road and stop as soon as it is safe
to do so.
2. Place the gear selector lever in "P" (auto-
matic), or neutral (manual transaxle) and set
the parking brake. If the air conditioning is on,
turn it off.
3. If engine coolant is running out under the car
or steam is coming out from the hood, stop
the engine. Do not open the hood until the
engine coolant has stopped running or the
steaming has stopped. If there is no visible
loss of engine coolant and no steam, leave
the engine running and check to be sure the
engine cooling fan is operating. If the fan is
not running, turn the engine off.
4. Check to see if the water pump drive belt is
missing. If it is not missing, check to see that
it is tight. If the drive belt seems to be
satisfactory, check for engine coolant leak-
ing from the radiator, hoses or under the car.
(If the air conditioning had been in use, it is
normal for cold water to be draining from it
when you stop). 6. Carefully remove the jumper cables in the
reverse order of attachment.
If you do not know why your battery became
discharged (because the lights were left on,
etc.), have the charging system checked by
your Hyundai dealer.
Page 168 of 224

6DO-IT-YOURSELF MAINTENANCE
2ENGINE COMPARTMENT
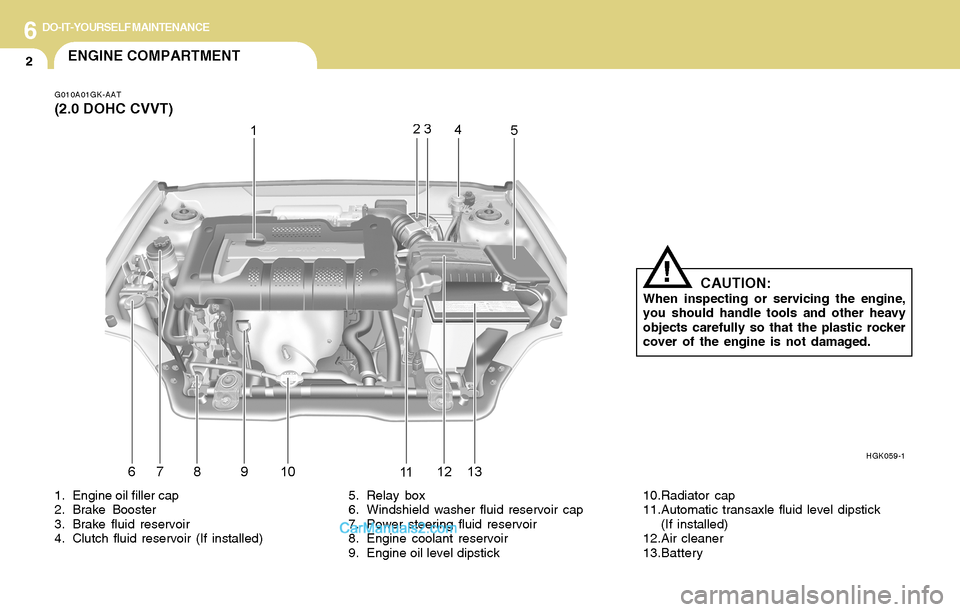
G010A01GK-AAT
(2.0 DOHC CVVT)
HGK059-1
1. Engine oil filler cap
2. Brake Booster
3. Brake fluid reservoir
4. Clutch fluid reservoir (If installed)5. Relay box
6. Windshield washer fluid reservoir cap
7. Power steering fluid reservoir
8. Engine coolant reservoir
9. Engine oil level dipstick10.Radiator cap
11.Automatic transaxle fluid level dipstick
(If installed)
12.Air cleaner
13.Battery
CAUTION:When inspecting or servicing the engine,
you should handle tools and other heavy
objects carefully so that the plastic rocker
cover of the engine is not damaged.
!
Page 169 of 224

6DO-IT-YOURSELF MAINTENANCE
3
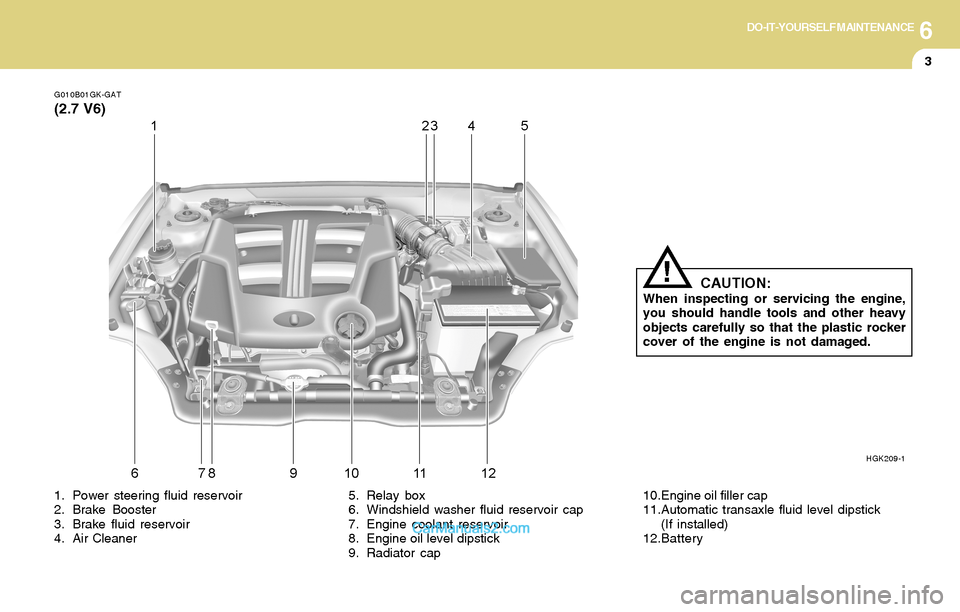
G010B01GK-GAT
(2.7 V6)
HGK209-1
1. Power steering fluid reservoir
2. Brake Booster
3. Brake fluid reservoir
4. Air Cleaner5. Relay box
6. Windshield washer fluid reservoir cap
7. Engine coolant reservoir
8. Engine oil level dipstick
9. Radiator cap10.Engine oil filler cap
11.Automatic transaxle fluid level dipstick
(If installed)
12.Battery
CAUTION:When inspecting or servicing the engine,
you should handle tools and other heavy
objects carefully so that the plastic rocker
cover of the engine is not damaged.
!
Page 173 of 224

6DO-IT-YOURSELF MAINTENANCE
7
!
CHECKING AND CHANGING THE
ENGINE COOLANT
!
G050A01A-AAT
WARNING:Do not remove the radiator cap when the
engine is hot. When the engine is hot, the
engine coolant is under pressure and may
erupt through the opening if the cap is
removed. You could be seriously burned if
you do not observe this precaution. Do not
remove the radiator cap until the radiator is
cool to the touch. Be sure that the mounting surface on the
engine is clean and that the old gasket is
removed completely. Lubricate the new
gasket on the filter with clean engine oil
before installation.
7. Refill the crankcase with the recommended
engine oil. Refer to the specification in chap-
ter 9 for engine oil capacity.
8. Start the engine and check to be sure no oil
is leaking from the drain plug or oil filter.
9. Shut off the engine and recheck the oil level.
NOTE:Always dispose of used engine oil in an
environmentally acceptable manner. It is
suggested that it be placed in a sealed
container and taken to a service station for
reclamation. Do not pour the oil on the
ground or put it in with the household
trash.
PROPOSITION 65 WARNING:Used engine oil may cause irritation or
cancer of the skin if left in contact with the
skin for prolonged periods of time. Used
engine oil contains chemicals that have
caused cancer in laboratory animals. Al-
ways protect your skin by washing your
hands thoroughly with soap and warm
water as soon as possible after handling
used oil.
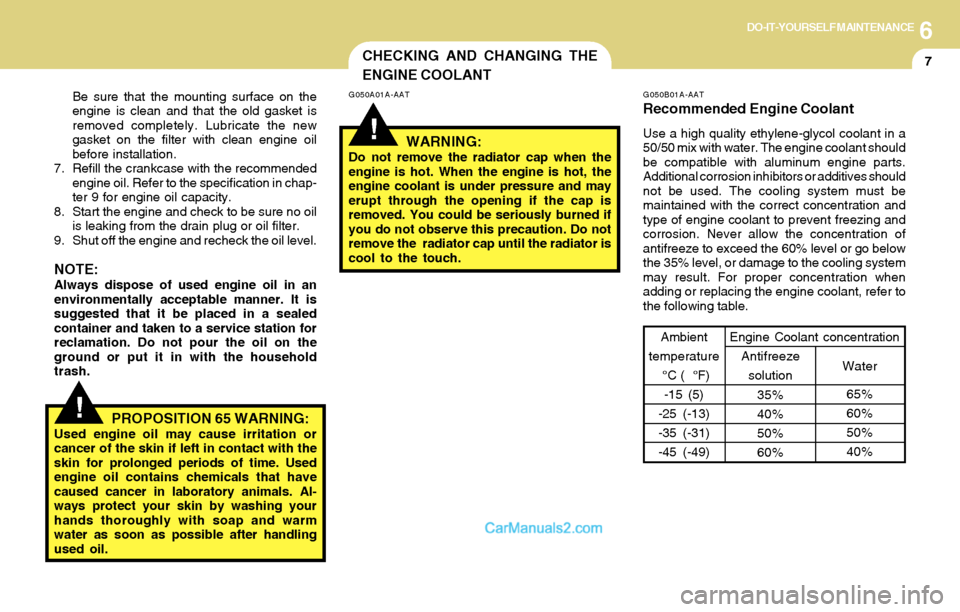
G050B01A-AAT
Recommended Engine Coolant
Use a high quality ethylene-glycol coolant in a
50/50 mix with water. The engine coolant should
be compatible with aluminum engine parts.
Additional corrosion inhibitors or additives should
not be used. The cooling system must be
maintained with the correct concentration and
type of engine coolant to prevent freezing and
corrosion. Never allow the concentration of
antifreeze to exceed the 60% level or go below
the 35% level, or damage to the cooling system
may result. For proper concentration when
adding or replacing the engine coolant, refer to
the following table.
Ambient
temperature
°C ( °F)
-15 (5)
-25 (-13)
-35 (-31)
-45 (-49)
65%
60%
50%
40% 35%
40%
50%
60%Water Antifreeze
solution Engine Coolant concentration
Page 174 of 224

6DO-IT-YOURSELF MAINTENANCE
8
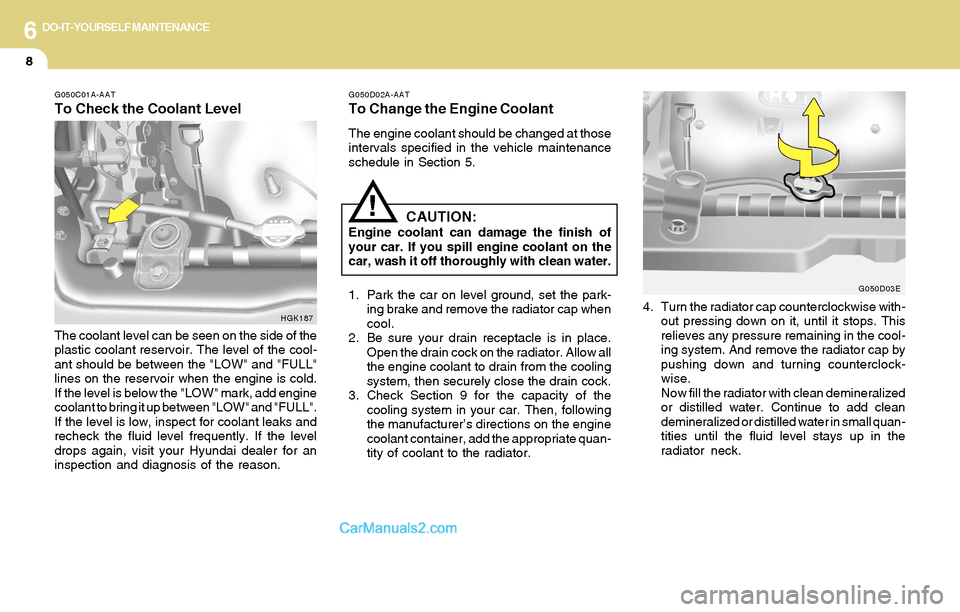
G050C01A-AAT
To Check the Coolant Level
G050D02A-AAT
To Change the Engine Coolant
The engine coolant should be changed at those
intervals specified in the vehicle maintenance
schedule in Section 5.
CAUTION:Engine coolant can damage the finish of
your car. If you spill engine coolant on the
car, wash it off thoroughly with clean water.
1. Park the car on level ground, set the park-
ing brake and remove the radiator cap when
cool.
2. Be sure your drain receptacle is in place.
Open the drain cock on the radiator. Allow all
the engine coolant to drain from the cooling
system, then securely close the drain cock.
3. Check Section 9 for the capacity of the
cooling system in your car. Then, following
the manufacturer’s directions on the engine
coolant container, add the appropriate quan-
tity of coolant to the radiator.
!
4. Turn the radiator cap counterclockwise with-
out pressing down on it, until it stops. This
relieves any pressure remaining in the cool-
ing system. And remove the radiator cap by
pushing down and turning counterclock-
wise.
Now fill the radiator with clean demineralized
or distilled water. Continue to add clean
demineralized or distilled water in small quan-
tities until the fluid level stays up in the
radiator neck.
G050D03E
The coolant level can be seen on the side of the
plastic coolant reservoir. The level of the cool-
ant should be between the "LOW" and "FULL"
lines on the reservoir when the engine is cold.
If the level is below the "LOW" mark, add engine
coolant to bring it up between "LOW" and "FULL".
If the level is low, inspect for coolant leaks and
recheck the fluid level frequently. If the level
drops again, visit your Hyundai dealer for an
inspection and diagnosis of the reason.
HGK187
Page 175 of 224

6DO-IT-YOURSELF MAINTENANCE
9
!
5. Start the engine, top off the radiator with
water and then add coolant to the reservoir
until the level is between "LOW" and "FULL".
6. Replace the radiator and reservoir caps and
check to be sure the drain cocks are fully
closed and not leaking.
WARNING:The cooling fan is controlled by engine
coolant temperature and may sometimes
operate even when the engine is not run-
ning. Use extreme caution when working
near the blades of the coolant fan so that
you are not injured by a rotating fan blade.
As the engine coolant temperature de-
creases, the fan will automatically shut off.
This is a normal condition.
G050D04E
SPARK PLUGS
G060A01GK-AAT
Your engine was originally equipped with plati-
num-tipped spark plugs. Platinum-tipped spark
plugs will last longer than conventional type
spark plugs and can be identified by blue lines
on the ceramic shell.
NOTE:Do not clean or regap platinum-tipped spark
plugs.
HSM392
DOHC CVVT V6
0.039 ~ 0.043 in. (1.0~1.1 mm)
0.039 ~ 0.043 in. (1.0~1.1 mm)