2004 Hyundai Tiburon tires
[x] Cancel search: tiresPage 155 of 224
4CORROSION PREVENTION AND APPEARANCE CARE
4
E030D01A-AAT
When to Wax Again
You should polish and wax the car again when
water no longer beads on a clean surface but
spreads out over a larger area.
E030C01A-AATPolishing and Waxing
Always wash and dry the car before polishing
or waxing or using a combination cleaner and
wax. Use a good quality commercial product
and follow the manufacturer’s directions on the
container. Polish and wax the bright trim pieces
as well as the paint.
E030B01A-AAT
Spot Cleaning
Don’t use gasoline, strong solvents or corro-
sive cleaning agents. These can damage the
finish of the car. To remove road tar, use
turpentine on a clean, soft cloth or commercially
available bug and tar remover. Be gentle.
To remove dead insects or tree sap, use warm
water and mild soap or car-washing solution.
Soak the spot and rub gently. If the paint has lost
its luster, use a commercial car-cleaning polish. If you find any nicks or scratches in the paint,
use touch-up paint to cover them to prevent
corrosion. To protect the paintwork of the car
against corrosion, you must clean your Hyundai
(at least once a month). Give special attention
to the removal of salt, mud and other sub-
stances on the underside of the splashboards
of the car. Make sure that the outlets and the
underside of the doors are open. Paint damage
can be caused by small accumulation of tar,
industrial precipitation, tree resin, insects and
bird droppings, when not removed immediately.
If water alone is not strong enough to remove the
accumulated dirt, use a mild car washing solu-
tion. Be sure to rinse the surface after washing
to remove the solution. Never allow the solution
to dry on the painted surfaces. To clean whitewall tires, use a stiff brush or
soapy steel-wool scouring pad.
To clean plastic wheel covers, use a clean
sponge or soft cloth and water.
To clean cast aluminum alloy wheels, use a mild
soap or neutral detergent. Do not use abrasive
cleaners. Protect the bare-metal surfaces by
cleaning, polishing and waxing. Because alumi-
num is subject to corrosion, be sure to give
aluminum alloy wheels special attention in win-
ter. If you drive on salted roads, clean the
wheels thoroughly afterwards.
After washing, be sure to rinse thoroughly. If
soapy water dries on the finish, streaking will
result.
When the weather is warm and the humidity low,
you may find it necessary to rinse each section
immediately after washing to avoid streaking.
After rinsing, dry the car using a damp chamois
or soft, absorbent cloth. The reason for drying
the car is to remove water from the car so it will
dry without water spots. Don't rub, this can
damage the finish.
Page 191 of 224

6DO-IT-YOURSELF MAINTENANCE
25HEADLIGHT AIMING ADJUSTMENT
G290A03GK G290A02GK-AAT
Before performing aiming adjustment, make
sure of the following.
1. Keep all tires inflated to the correct pressure.
2. Place the vehicle on level ground and press
the front bumper & rear bumper down sev-
eral times. Place vehicle at a distance of 118
in. (3m) from the test wall.
3. See that the vehicle is unloaded (except for
full levels of coolant, engine oil and fuel, and
spare tire, jack, and tools).
4. Clean the head light lenses and turn on the
headlights (low beam).
5. Open the hood.
!
6. Draw the vertical line (through the center of
each headlight beam pattern) and the hori-
zontal line (through the center of each head-
light beam pattern) on the aiming screen.
And then, draw the parallel line at 0.827 in. (21
mm) under the horizontal line.
7. Adjust each cut-off line of the low beam to the
parallel line with a phillips screwdriver -
VERTICAL AIMING.
WARNING:Horizontal aiming should be adjusted by an
authorized Hyundai Dealer. Low Beam
Vertical aiming
G290B01GK-AAT
Adjustment After Headlight Assembly
Replacement
If the vehicle has had front body repair and the
headlight assembly has been replaced, the
headlight aiming should be checked using an
aiming screen as shown in the illustration. Turn
on the headlight switch.
1. Adjust headlights so that main axis of light is
parallel to center line of the body and is
aligned with point "P" shown in the illustration.
2. Dotted lines in the illustration show the center
of headlights.
G290B01GK
L
W
H
H
Cut-off line
Ground line
"P"Horizontal line
Vertical line0.827 in. (21 mm)
Page 207 of 224
Vehicle Identification Number (VIN) .............................. 8-2
Engine Number............................................................. 8-2
Recommended Inflation Pressures............................... 8-3
Snow Tires.................................................................... 8-3
Tire Chains.................................................................... 8-4
Tire Rotation .................................................................. 8-4
Tire Balancing............................................................... 8-5
Tire Traction.................................................................. 8-5
When to Replace Tires ................................................. 8-5
Spare Tire and Tools ..................................................... 8-6
Warranties for Your Hyundai Vehicle ............................ 8-6
Consumer Information................................................... 8-6
Reporting Safety Defects .............................................. 8-8
CONSUMER INFORMATION &
REPORTING SAFETY DEFECTS
8
8
Page 208 of 224
8CONSUMER INFORMATION & REPORTING SAFETY DEFECTS
2TIREENGINE NUMBERVEHICLE IDENTIFICATION
NUMBER (VIN)
I020A01A-AAT
TIRE INFORMATION
The tires supplied on your new Hyundai are
chosen to provide the best performance for
normal driving.
I010B01A-AAT I010A01A-AAT
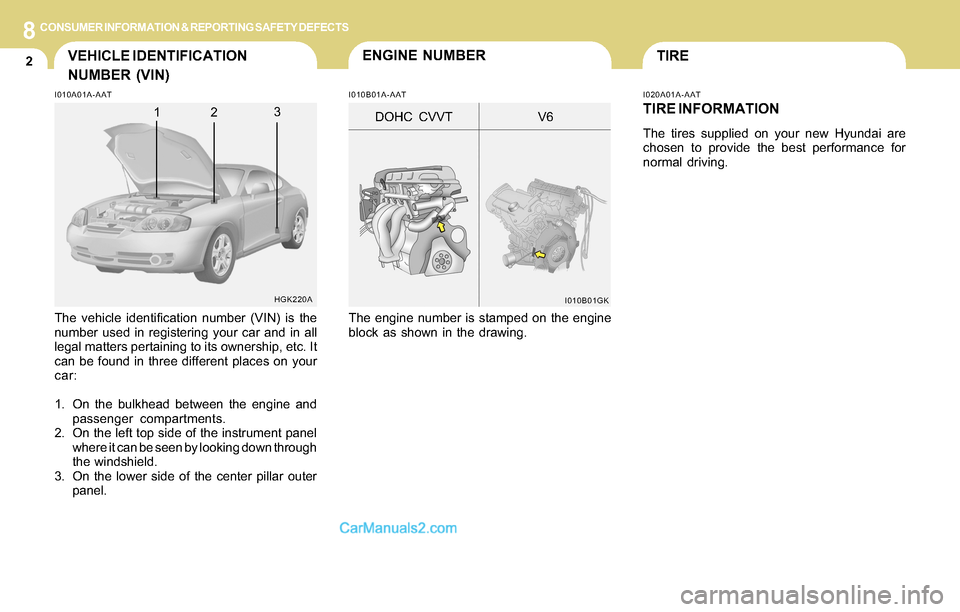
The vehicle identification number (VIN) is the
number used in registering your car and in all
legal matters pertaining to its ownership, etc. It
can be found in three different places on your
car:
1. On the bulkhead between the engine and
passenger compartments.
2. On the left top side of the instrument panel
where it can be seen by looking down through
the windshield.
3. On the lower side of the center pillar outer
panel.The engine number is stamped on the engine
block as shown in the drawing.
HGK220A
I010B01GK
DOHC CVVT V6231
Page 209 of 224
8CONSUMER INFORMATION & REPORTING SAFETY DEFECTS
3
!
I040A01S-AAT
SNOW TIRES
If you equip your car with snow tires, they should
be the same size and have the same load
capacity as the original tires. Snow tires should
be installed on all four wheels; otherwise, poor
handling may result.
Snow tires should carry 4 psi (28 kPa) more air
pressure than the pressure recommended for
the standard tires on the tire label on the driver
side center piller outer panel or up to the maxi-
mum pressure shown on the tire sidewall which-
ever is less.
Do not drive faster than 75 mph (120 km/h)
when your car is equipped with snow tires.
I030A02GK-AAT
RECOMMENDED INFLATION PRES-
SURES
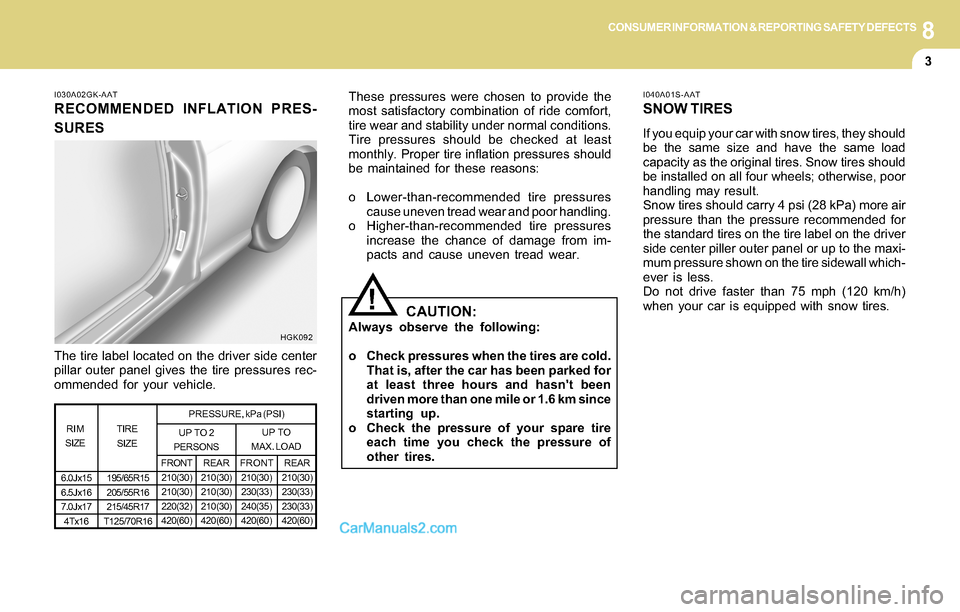
The tire label located on the driver side center
pillar outer panel gives the tire pressures rec-
ommended for your vehicle.These pressures were chosen to provide the
most satisfactory combination of ride comfort,
tire wear and stability under normal conditions.
Tire pressures should be checked at least
monthly. Proper tire inflation pressures should
be maintained for these reasons:
o Lower-than-recommended tire pressures
cause uneven tread wear and poor handling.
o Higher-than-recommended tire pressures
increase the chance of damage from im-
pacts and cause uneven tread wear.
CAUTION:Always observe the following:
o Check pressures when the tires are cold.
That is, after the car has been parked for
at least three hours and hasn't been
driven more than one mile or 1.6 km since
starting up.
o Check the pressure of your spare tire
each time you check the pressure of
other tires.HGK092
TIRE
SIZE RIM
SIZEPRESSURE, kPa (PSI)
REAR
210(30)
210(30)
210(30)
420(60)FRONT
210(30)
230(33)
240(35)
420(60) UP TO 2
PERSONSUP TO
MAX. LOAD
REAR
210(30)
230(33)
230(33)
420(60) FRONT
210(30)
210(30)
220(32)
420(60)
6.0Jx15
6.5Jx16
7.0Jx17
4Tx16195/65R15
205/55R16
215/45R17
T125/70R16
Page 210 of 224
8CONSUMER INFORMATION & REPORTING SAFETY DEFECTS
4
!
I060A02GK-AAT
TIRE ROTATION
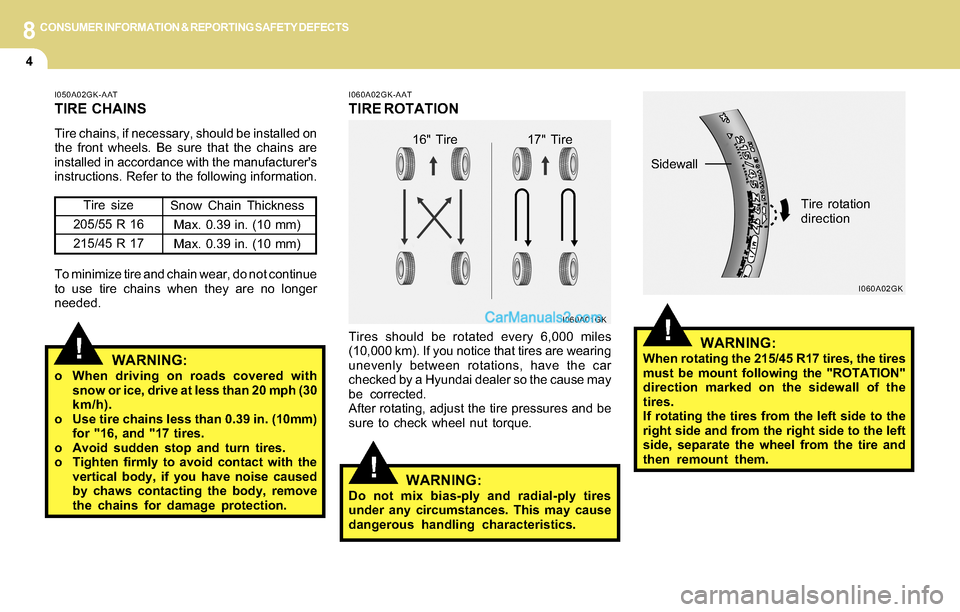
Tires should be rotated every 6,000 miles
(10,000 km). If you notice that tires are wearing
unevenly between rotations, have the car
checked by a Hyundai dealer so the cause may
be corrected.
After rotating, adjust the tire pressures and be
sure to check wheel nut torque.
WARNING:Do not mix bias-ply and radial-ply tires
under any circumstances. This may cause
dangerous handling characteristics.
I060A01GK
!
I050A02GK-AAT
TIRE CHAINS
Tire chains, if necessary, should be installed on
the front wheels. Be sure that the chains are
installed in accordance with the manufacturer's
instructions. Refer to the following information.
WARNING:o When driving on roads covered with
snow or ice, drive at less than 20 mph (30
km/h).
o Use tire chains less than 0.39 in. (10mm)
for "16, and "17 tires.
o Avoid sudden stop and turn tires.
o Tighten firmly to avoid contact with the
vertical body, if you have noise caused
by chaws contacting the body, remove
the chains for damage protection. To minimize tire and chain wear, do not continue
to use tire chains when they are no longer
needed.Tire size
205/55 R 16
215/45 R 17
Snow Chain Thickness
Max. 0.39 in. (10 mm)
Max. 0.39 in. (10 mm)
16" Tire 17" Tire
!WARNING:When rotating the 215/45 R17 tires, the tires
must be mount following the "ROTATION"
direction marked on the sidewall of the
tires.
If rotating the tires from the left side to the
right side and from the right side to the left
side, separate the wheel from the tire and
then remount them.
I060A02GK
Sidewall
Tire rotation
direction
Page 211 of 224
8CONSUMER INFORMATION & REPORTING SAFETY DEFECTS
5
I080A01A-AATTIRE TRACTION
Tire traction can be reduced if you drive on worn
tires, tires that are improperly inflated or on
slippery road surfaces. Tires should be re-
placed when tread wear indicators appear. To
reduce the possibility of losing control, slow
down whenever there is rain, snow or ice on the
road.
I070A01A-AAT
TIRE BALANCING
A tire that is out of balance may affect handling
and tire wear. The tires on your Hyundai were
balanced before the car was delivered but may
need balancing again during the years you own
the car.
Whenever a tire is dismounted for repair, it
should be rebalanced before being reinstalled
on the car.
!
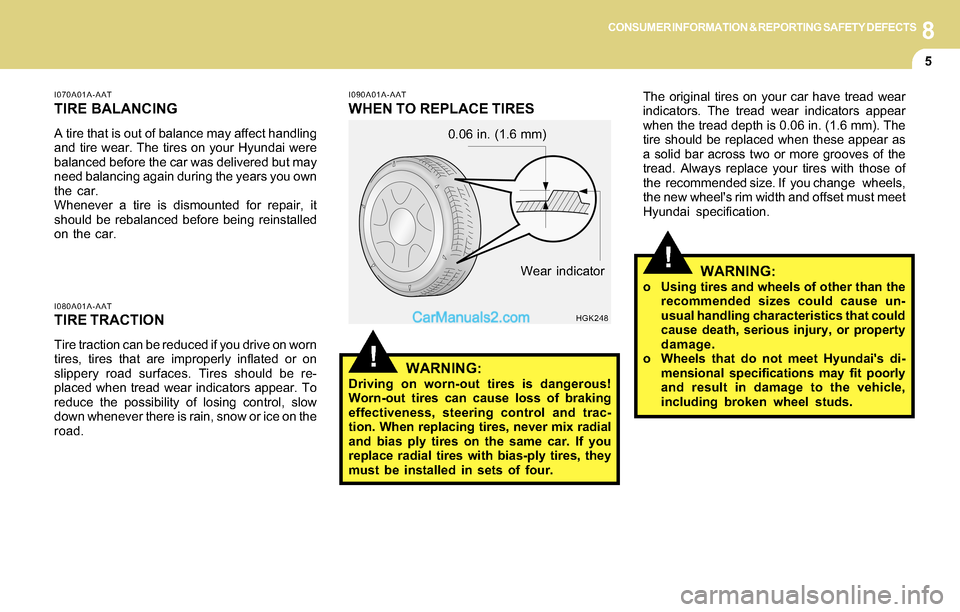
The original tires on your car have tread wear
indicators. The tread wear indicators appear
when the tread depth is 0.06 in. (1.6 mm). The
tire should be replaced when these appear as
a solid bar across two or more grooves of the
tread. Always replace your tires with those of
the recommended size. If you change wheels,
the new wheel's rim width and offset must meet
Hyundai specification.I090A01A-AAT
WHEN TO REPLACE TIRES
HGK248
Wear indicator 0.06 in. (1.6 mm)WARNING:o Using tires and wheels of other than the
recommended sizes could cause un-
usual handling characteristics that could
cause death, serious injury, or property
damage.
o Wheels that do not meet Hyundai's di-
mensional specifications may fit poorly
and result in damage to the vehicle,
including broken wheel studs.
!WARNING:Driving on worn-out tires is dangerous!
Worn-out tires can cause loss of braking
effectiveness, steering control and trac-
tion. When replacing tires, never mix radial
and bias ply tires on the same car. If you
replace radial tires with bias-ply tires, they
must be installed in sets of four.
Page 213 of 224
8CONSUMER INFORMATION & REPORTING SAFETY DEFECTS
7
!!
I130B03A-AAT
Uniform tire quality grading
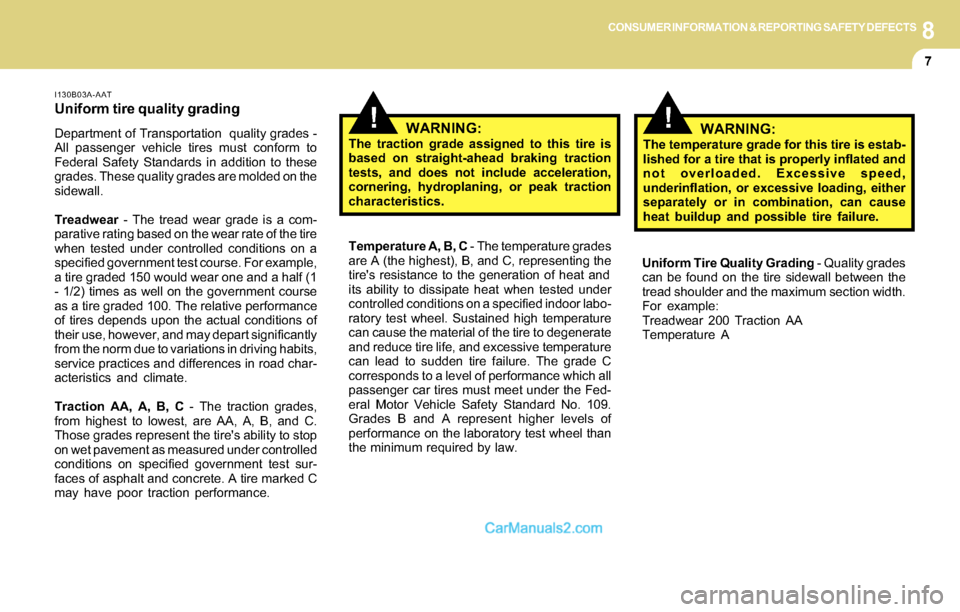
Department of Transportation quality grades -
All passenger vehicle tires must conform to
Federal Safety Standards in addition to these
grades. These quality grades are molded on the
sidewall.
Treadwear - The tread wear grade is a com-
parative rating based on the wear rate of the tire
when tested under controlled conditions on a
specified government test course. For example,
a tire graded 150 would wear one and a half (1
- 1/2) times as well on the government course
as a tire graded 100. The relative performance
of tires depends upon the actual conditions of
their use, however, and may depart significantly
from the norm due to variations in driving habits,
service practices and differences in road char-
acteristics and climate.
Traction AA, A, B, C - The traction grades,
from highest to lowest, are AA, A, B, and C.
Those grades represent the tire's ability to stop
on wet pavement as measured under controlled
conditions on specified government test sur-
faces of asphalt and concrete. A tire marked C
may have poor traction performance.WARNING:The traction grade assigned to this tire is
based on straight-ahead braking traction
tests, and does not include acceleration,
cornering, hydroplaning, or peak traction
characteristics.
Temperature A, B, C - The temperature grades
are A (the highest), B, and C, representing the
tire's resistance to the generation of heat and
its ability to dissipate heat when tested under
controlled conditions on a specified indoor labo-
ratory test wheel. Sustained high temperature
can cause the material of the tire to degenerate
and reduce tire life, and excessive temperature
can lead to sudden tire failure. The grade C
corresponds to a level of performance which all
passenger car tires must meet under the Fed-
eral Motor Vehicle Safety Standard No. 109.
Grades B and A represent higher levels of
performance on the laboratory test wheel than
the minimum required by law.WARNING:The temperature grade for this tire is estab-
lished for a tire that is properly inflated and
not overloaded. Excessive speed,
underinflation, or excessive loading, either
separately or in combination, can cause
heat buildup and possible tire failure.
Uniform Tire Quality Grading - Quality grades
can be found on the tire sidewall between the
tread shoulder and the maximum section width.
For example:
Treadwear 200 Traction AA
Temperature A