2004 Hyundai Tiburon spare wheel
[x] Cancel search: spare wheelPage 137 of 224

2DRIVING YOUR HYUNDAI
20
2. The total gross vehicle weight with trailer
must not exceed the Gross Vehicle
Weight Rating (GVWR) shown on the
vehicle identification plate (see page 8-
1). The total gross vehicle weight is the
combined weight of the vehicle, driver,
all passengers and their luggage, cargo,
hitch, trailer tongue load and other op-
tional equipment.
3. The front or rear axle weight must not
exceed the Gross Axle Weight Rating
(GAWR) shown on the vehicle identifi-
cation plate (see page 8-2). It is possible
that your towing package does not ex-
ceed the GVWR but exceeds the GAWR.
C190E02L
CAUTION:The following specifications are recom-
mended when towing a trailer. The loaded
trailer weight cannot safely exceed the val-
ues in the chart below.
!
!WARNING:Improperly loading your car and trailer can
seriously affect its steering and braking
performance causing a crash which could
cause serious injury or death.Lbs. (kg)
Maximum Towable Weight
Trailer
1000 (453)Tongue
100 (45)
C190F01S-AAT
Trailer or Vehicle Towing Tips
1. Before towing, check hitch and safety chain
connections as well as proper operation of
the trailer running lights, brake lights, and
turn signals.
2. Always drive your vehicle at a moderate
speed. (Less than 60 mph)
3. Trailer towing requires more fuel than normal
conditions.
4. To maintain engine braking efficiency and
electrical charging performance, do not use
fifth gear (manual transaxle) or overdrive
(automatic transaxle).
5. Always secure items in the trailer to prevent
load shift while driving.
6. Check the condition and air pressure of all
tires on the trailer and your car. Low tire
pressure can seriously affect the handling.
Also check the spare tire.
7. The vehicle/trailer combination is more af-
fected by crosswind and buffeting.
When being passed by a large vehicle, keep
a constant speed and steer straight ahead.
If there is too much wind buffeting, slow down
to get out of the other vehicle's air turbulence.
8. When parking your car and trailer, especially
on a hill, be sure to follow all the normal
precautions. Turn your front wheel into the
curb, set the parking brake firmly, and put the
transaxle in 1st or Reverse (manual) or Park Gross axle weight Gross vehicle weightImproper trailer loading and/or too much
luggage in the trunk can overload the
rear axle. Redistribute the load and check
the axle weight again.
Page 143 of 224

3WHAT TO DO IN AN EMERGENCY
5
!
6. If you cannot find the cause of the overheat-
ing, wait until the engine temperature has
returned to normal. Then, if the engine cool-
ant has been lost, carefully add water to the
reservoir (Page 6-8) to bring the fluid level in
the reservoir up to the halfway mark.
7. Proceed with caution, keeping alert for fur-
ther signs of overheating. If overheating
happens again, call a Hyundai dealer for
assistance.
CAUTION:Serious loss of engine coolant indicates
there is a leak in the cooling system and this
should be checked as soon as possible by
a Hyundai dealer.
TEMPORARY SPARE TIRE
D040A01GK-AAT
The following instructions for the temporary
spare tire should be observed:
1. Check inflation pressure as soon as practi-
cal after installing the spare tire, and adjust
to the specified pressure. The tire pressure
should be periodically checked and main-
tained at the specified pressure while the tire
is stored.
Tire Size
Inflation Pressure
T125/70R 16
420 kPa(60 psi)6. The temporary spare tire pressure should
be checked once a month while the tire is
stored.
2. The spare tire should only be used tempo-
rarily and should be returned to the luggage
compartment as soon as the original tire can
be repaired or replaced.
3. Continuous use at speeds of over 80 km/h
(50 mph) is not recommended.
4. As the temporary spare tire is specifically
designed for your car, it should not be used
on any other vehicle.
5. The temporary spare tire should not be used
on any other wheels, nor should standard
tires, snow tires, wheel covers or trim rings
be used with the temporary spare wheel. If
such use is attempted, damage to these
items or other car components may occur. Spare Tire Pressure
CAUTION:o Do not use snow chains with your tem-
porary spare tire.
o Do not use more than one temporary
spare tire at a time.
!
Page 145 of 224
3WHAT TO DO IN AN EMERGENCY
7
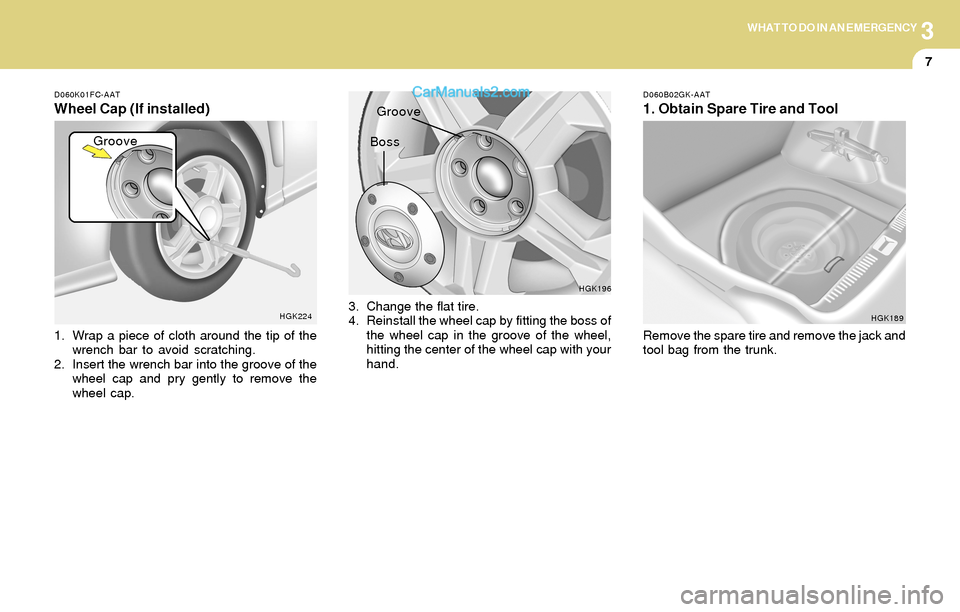
D060K01FC-AAT
Wheel Cap (If installed)
1. Wrap a piece of cloth around the tip of the
wrench bar to avoid scratching.
2. Insert the wrench bar into the groove of the
wheel cap and pry gently to remove the
wheel cap.
HGK2243. Change the flat tire.
4. Reinstall the wheel cap by fitting the boss of
the wheel cap in the groove of the wheel,
hitting the center of the wheel cap with your
hand.
HGK196D060B02GK-AAT
1. Obtain Spare Tire and Tool
Remove the spare tire and remove the jack and
tool bag from the trunk.
HGK189
GrooveGrooveBoss
Page 147 of 224
3WHAT TO DO IN AN EMERGENCY
9
!WARNING:Do not get under the car when it is sup-
ported by the jack! This is very dangerous
as the jack could fall and cause serious
injury or death. No one should stay in the
car while the jack is being used.
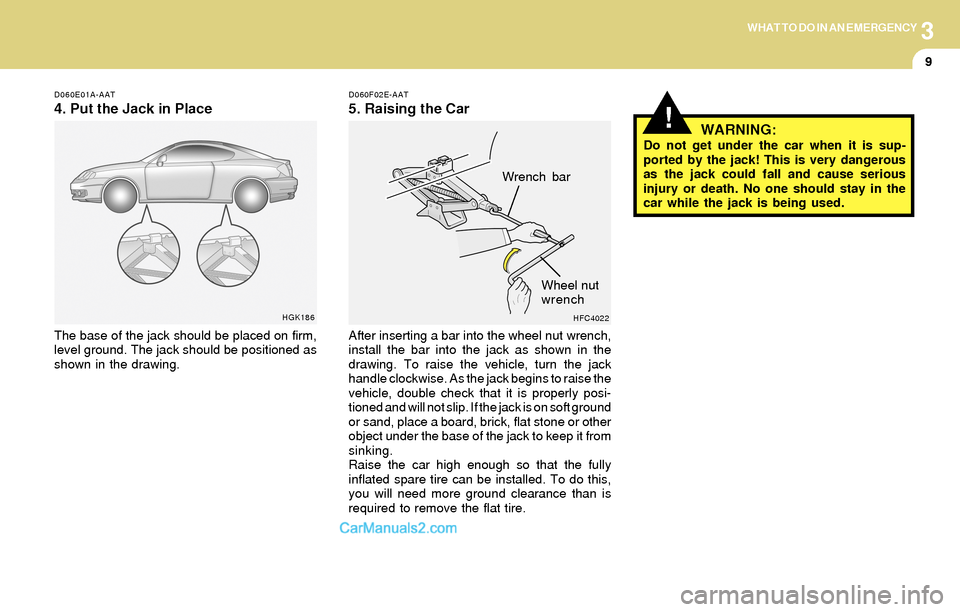
D060E01A-AAT
4. Put the Jack in Place
The base of the jack should be placed on firm,
level ground. The jack should be positioned as
shown in the drawing.
D060F02E-AAT
5. Raising the Car
After inserting a bar into the wheel nut wrench,
install the bar into the jack as shown in the
drawing. To raise the vehicle, turn the jack
handle clockwise. As the jack begins to raise the
vehicle, double check that it is properly posi-
tioned and will not slip. If the jack is on soft ground
or sand, place a board, brick, flat stone or other
object under the base of the jack to keep it from
sinking.
Raise the car high enough so that the fully
inflated spare tire can be installed. To do this,
you will need more ground clearance than is
required to remove the flat tire.
HGK186
HFC4022
Wrench bar
Wheel nut
wrench
Page 148 of 224
3
10
WHAT TO DO IN AN EMERGENCY
!
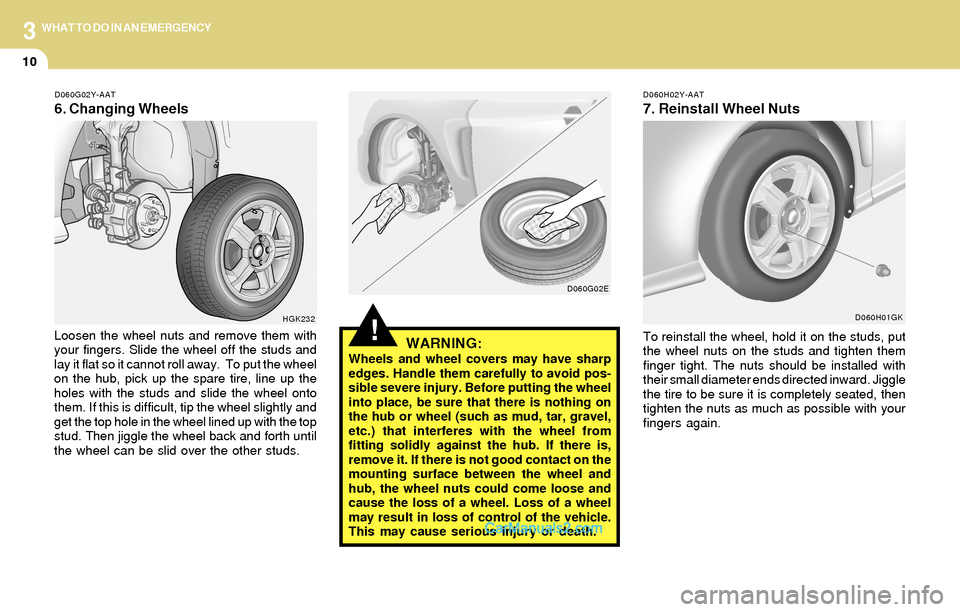
D060G02Y-AAT
6. Changing Wheels
D060H02Y-AAT
7. Reinstall Wheel Nuts
Loosen the wheel nuts and remove them with
your fingers. Slide the wheel off the studs and
lay it flat so it cannot roll away. To put the wheel
on the hub, pick up the spare tire, line up the
holes with the studs and slide the wheel onto
them. If this is difficult, tip the wheel slightly and
get the top hole in the wheel lined up with the top
stud. Then jiggle the wheel back and forth until
the wheel can be slid over the other studs.WARNING:Wheels and wheel covers may have sharp
edges. Handle them carefully to avoid pos-
sible severe injury. Before putting the wheel
into place, be sure that there is nothing on
the hub or wheel (such as mud, tar, gravel,
etc.) that interferes with the wheel from
fitting solidly against the hub. If there is,
remove it. If there is not good contact on the
mounting surface between the wheel and
hub, the wheel nuts could come loose and
cause the loss of a wheel. Loss of a wheel
may result in loss of control of the vehicle.
This may cause serious injury or death.To reinstall the wheel, hold it on the studs, put
the wheel nuts on the studs and tighten them
finger tight. The nuts should be installed with
their small diameter ends directed inward. Jiggle
the tire to be sure it is completely seated, then
tighten the nuts as much as possible with your
fingers again.
HGK232D060G02E
D060H01GK
Page 170 of 224

6DO-IT-YOURSELF MAINTENANCE
4GENERAL CHECKS
G020C01A-AAT
Vehicle Interior
The following should be checked each time
when the vehicle is driven:
o Lights operation
o Windshield wiper operation
o Horn operation
o Defroster, heating system operation (and air
conditioning, if installed)
o Steering operation and condition
o Mirror condition and operation
o Turn signal operation
o Accelerator pedal operation
o Brake operation, including parking brake
o Manual transaxle operation, including clutch
operation
o Automatic transaxle operation, including
"Park" mechanism operation
o Seat control condition and operation
o Seat belt condition and operation
o Sunvisor operation
If you notice anything that does not operate
correctly or appears to be functioning incor-
rectly, inspect it carefully and seek assistance
from your Hyundai dealer if service is needed.
G020B01A-AAT
Vehicle Exterior
The following should be checked monthly:
o Overall appearance and condition
o Wheel condition and wheel nut torque
o Exhaust system condition
o Light condition and operation
o Windshield glass condition
o Wiper blade condition
o Paint condition and body corrosion
o Fluid leaks
o Door and hood lock condition
o Tire pressure and condition (including spare
tire)
G020A01A-AAT
Engine Compartment
The following should be checked regularly:
o Engine oil level and condition
o Transaxle fluid level and condition
o Brake fluid level
o Clutch fluid level
o Engine coolant level
o Windshield washer fluid level
o Accessory drive belt condition
o Engine coolant hose condition
o Fluid leaks (on or below components)
o Power steering fluid level
o Battery condition
o Air filter condition
Page 209 of 224
8CONSUMER INFORMATION & REPORTING SAFETY DEFECTS
3
!
I040A01S-AAT
SNOW TIRES
If you equip your car with snow tires, they should
be the same size and have the same load
capacity as the original tires. Snow tires should
be installed on all four wheels; otherwise, poor
handling may result.
Snow tires should carry 4 psi (28 kPa) more air
pressure than the pressure recommended for
the standard tires on the tire label on the driver
side center piller outer panel or up to the maxi-
mum pressure shown on the tire sidewall which-
ever is less.
Do not drive faster than 75 mph (120 km/h)
when your car is equipped with snow tires.
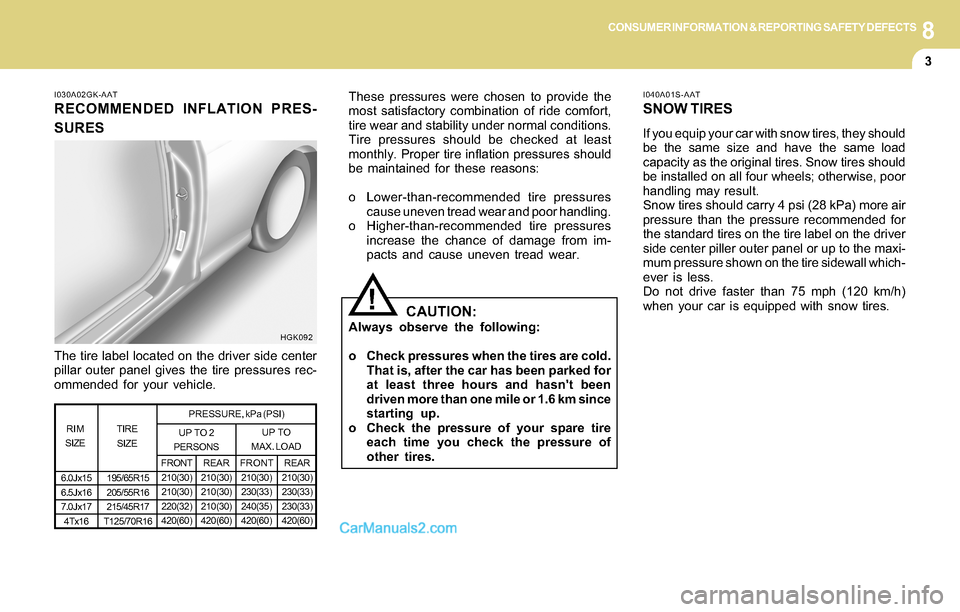
I030A02GK-AAT
RECOMMENDED INFLATION PRES-
SURES
The tire label located on the driver side center
pillar outer panel gives the tire pressures rec-
ommended for your vehicle.These pressures were chosen to provide the
most satisfactory combination of ride comfort,
tire wear and stability under normal conditions.
Tire pressures should be checked at least
monthly. Proper tire inflation pressures should
be maintained for these reasons:
o Lower-than-recommended tire pressures
cause uneven tread wear and poor handling.
o Higher-than-recommended tire pressures
increase the chance of damage from im-
pacts and cause uneven tread wear.
CAUTION:Always observe the following:
o Check pressures when the tires are cold.
That is, after the car has been parked for
at least three hours and hasn't been
driven more than one mile or 1.6 km since
starting up.
o Check the pressure of your spare tire
each time you check the pressure of
other tires.HGK092
TIRE
SIZE RIM
SIZEPRESSURE, kPa (PSI)
REAR
210(30)
210(30)
210(30)
420(60)FRONT
210(30)
230(33)
240(35)
420(60) UP TO 2
PERSONSUP TO
MAX. LOAD
REAR
210(30)
230(33)
230(33)
420(60) FRONT
210(30)
210(30)
220(32)
420(60)
6.0Jx15
6.5Jx16
7.0Jx17
4Tx16195/65R15
205/55R16
215/45R17
T125/70R16
Page 212 of 224
8CONSUMER INFORMATION & REPORTING SAFETY DEFECTS
6
I130A01A-AAT
CONSUMER INFORMATION
This consumer information has been prepared
in accordance with regulations issued by the
National Highway Traffic Safety Administration
of the U.S. Department of Transportation. It
provides the purchasers and/or prospective
purchasers of Hyundai automobiles with infor-
mation on uniform tire quality grading. Your
Hyundai dealer will help answer any questions
you may have as you read this information.
I120A01A-AAT
WARRANTIES FOR YOUR HYUNDAI
VEHICLE
o New vehicle 60 Months/60,000 Miles Limited
Warranty.
o New vehicle 120 Months/100,000 Miles Lim-
ited Powertrain Warranty (original owner
only).
o Anti-Perforation Limited Warranty
o Emission Defect Warranty - Federal Vehicle
o California Emission Control System War-
ranty (if applicable)
o Emission Performance Warranty Federal
vehicle
o Replacement Parts and Accessories Lim-
ited Warranty
NOTE:Detailed warranty information is provided
in your Hyundai Owner's Handbook.
SPARE TIRE AND TOOLS
I110A01A-AATSHOP MANUAL
A Hyundai Shop Manual is available from your
authorized Hyundai dealer. It's written for pro-
fessional technicians, but is simple enough for
most mechanically-inclined owners to under-
stand.
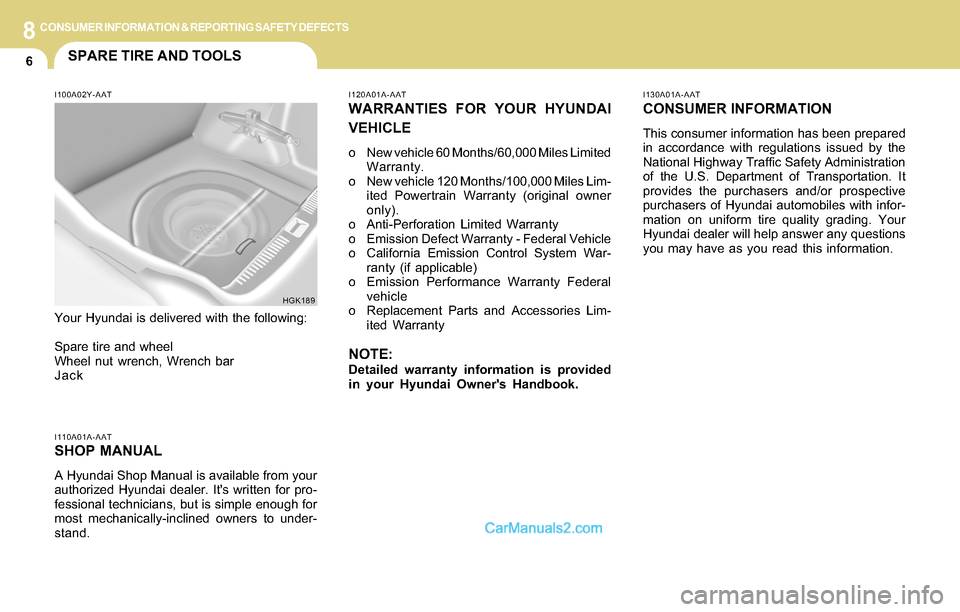
I100A02Y-AAT
Your Hyundai is delivered with the following:
Spare tire and wheel
Wheel nut wrench, Wrench bar
Jack
HGK189