2004 Hyundai Tiburon oil temperature
[x] Cancel search: oil temperaturePage 46 of 224

1FEATURES OF YOUR HYUNDAI
33
1. Speedometer
2. Turn Signal Indicator Light
3. Odometer
4. Automatic Transaxle Position Indicator Light (If installed)
5. Coolant Temperature Gauge
6. Trip odometer
7. Fuel Gauge
8. Tachometer
9. Traction Control Indicator Light (If installed)
10.Door Ajar Warning Light
11.Trip Odometer Reset Knob12.Charging System Warning Light
13.SRS (Airbag) Warning Light
14.Seat Belt Warning Light
15.High Beam Indicator Light
16.Oil Pressure Warning Light
17.Malfunction Indicator Light
18.Low Fuel Warning Light
19.Parking Brake/Brake Fluid Level Warning Light
20.Cruise Indicator (If installed)
21.Tailgate Open Warning Light
22.Anti-Lock Brake Warning Light (If installed)
Page 98 of 224

1FEATURES OF YOUR HYUNDAI
85
B260D03O-AAT
1. Playing CD
o Insert the CD with the label facing upward.
o Insert the CD to start CD playback, during
radio operation.
o When a disc is in the CD deck, if you press
the CD button, the CD player will begin
playing even if the radio is being used.
o The CD player can be used when the ignition
switch is in either the "ON" or "ACC" position.
2. FF/REW ( / )
If you want to fast forward or reverse through
the compact disc track, push and hold the FF
( ) or REW ( ) button.
When you release the button, the compact disc
player will resume playing.
3. TRACK UP/DOWN
o The desired track on the disc currently being
played can be selected using the track
number.
o Press once to skip forward to the beginn-
ing of the next track. Press once to skip
back to the beginning of the track.
4. SCAN Button
o Press the SCAN button to playback the first
10 seconds of each track.
o Press the SCAN button again within 10 sec.
When you have reached the desired track.
5. REPEAT Button
o To repeat the track you are currently listen-
ing to, press the RPT button. To cancel ,
press again.
o If you do not release RPT operation when the
track ends, it will automatically be replayed.
This process will be continued until you push
the button again.
6. EJECT Button
When the EJECT button is pressed with a
CD loaded, the CD will eject.
NOTE:o If the CD does not operate properly or if
the ER2 fault code is displayed, use one
of two methods to reset the CD deck
function.
- Remove the audio fuse for 5 minutes.
Then, reinstall the audio fuse.
- Disconnect the negative terminal of
the battery and wait 5 minutes. Then
reconnect the negative battery termi-
nal.
o To assure proper operation of the unit,
keep the vehicle interior temperature
within a normal range by using the
vehicle’s air conditioning or heating
system.
o When replacing the fuse, replace it with
a fuse having the correct capacity.
o The preset station frequencies are all
erased when the car battery is discon-
nected. Therefore, all data will have to be
set again if this should occur.
o Do not add any oil to the rotating parts.
Keep magnets, screwdrivers and other
metallic objects away from the tape
mechanism and head.
o This equipment is designed to be used
only in a 12 volt DC battery system with
negative ground.
Page 109 of 224

1FEATURES OF YOUR HYUNDAI
96
H290F01O-GAT
1. CD Select Button
o Insert the CD with the label facing upward.
o Insert the CD to start CD playback, during
radio operation or cassette tape playing.
o When a disc is in the CD deck, if you press
the CD button the CD player will begin playing
even if the radio or cassette player is being
used.
o The CD player can be used when the ignition
switch is in either the "ON" or "ACC" position.
2. FF/REW ( / )
If you want to fast forward or reverse through
the compact disc track, push and hold the FF
( ) or REW ( ) button.
When you release the button, the compact disc
player will resume playing.
3. TRACK UP/DOWN
o The desired track on the disc currently being
played can be selected using the track
number.
o Press button once to skip forward to the
beginning of the next track. Press button
once to skip back to the beginning of the
track.
4. REPEAT
o To repeat the track you are listening to,
press the RPT button. To cancel, press
again.
o If you do not release RPT operation when the
track ends, it will automatically be replayed.
This process will be continued until you push
the button again.
5. EQUALIZER Button
Press the EQ button to select the CLASSIC,
JAZZ, ROCK and DEFEAT MODE for the
desired tone quality. Each press of the button
changes the display as follows;
7. SCAN Button (If installed)
o Press the SCAN button to playback the first
10 seconds of each track.
o Press the SCAN button again within 10 sec.
When you have reached the desired track.
NOTE:o To assure proper operation of the unit,
keep the vehicle interior temperature
within a normal range by using the
vehicle’s air conditioning or heating
system.
o When replacing the fuse, replace it with
a fuse having the correct capacity.
o The preset station frequencies are all
erased when the car battery is discon-
nected. Therefore, all data will have to be
set again if this should occur.
o Do not add any oil to the rotating parts.
Keep magnets, screwdrivers and other
metallic objects away from the tape
mechanism and head.
o This equipment is designed to be used
only in a 12 volt DC battery system with
negative ground.
o This unit is made of precision parts. Do
not attempt to disassemble or adjust
any parts. CLASSIC → JAZZ → ROCK → DEFEAT
6. CD EJECT Button
When the button is pressed with a CD loaded,
the CD will eject.
Page 115 of 224

1FEATURES OF YOUR HYUNDAI
102CARE OF CASSETTE TAPESCARE OF DISC
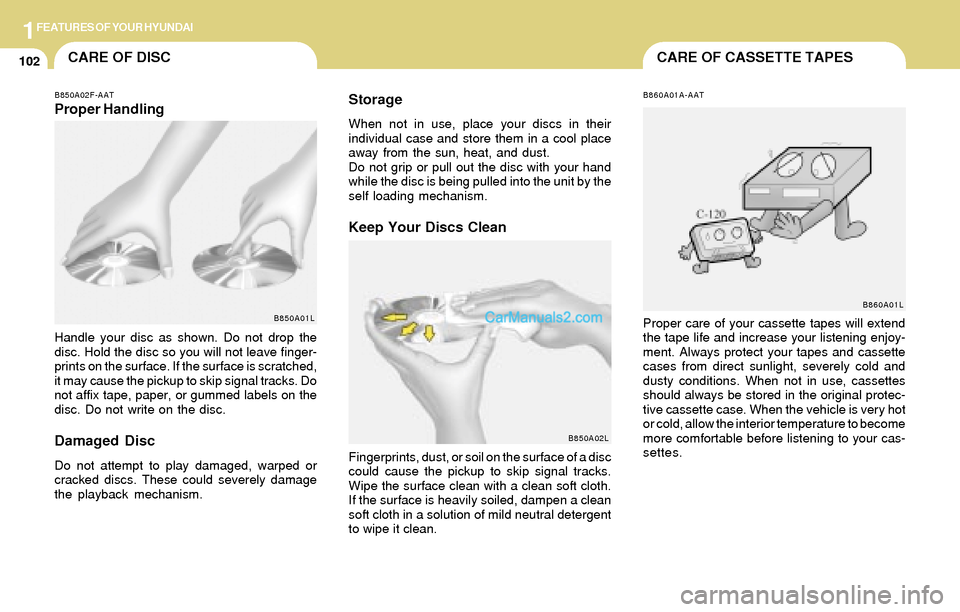
B850A02F-AATProper Handling
B850A01L
Handle your disc as shown. Do not drop the
disc. Hold the disc so you will not leave finger-
prints on the surface. If the surface is scratched,
it may cause the pickup to skip signal tracks. Do
not affix tape, paper, or gummed labels on the
disc. Do not write on the disc.
Damaged Disc
Do not attempt to play damaged, warped or
cracked discs. These could severely damage
the playback mechanism.
Storage
When not in use, place your discs in their
individual case and store them in a cool place
away from the sun, heat, and dust.
Do not grip or pull out the disc with your hand
while the disc is being pulled into the unit by the
self loading mechanism.
Keep Your Discs Clean
B850A02L
Fingerprints, dust, or soil on the surface of a disc
could cause the pickup to skip signal tracks.
Wipe the surface clean with a clean soft cloth.
If the surface is heavily soiled, dampen a clean
soft cloth in a solution of mild neutral detergent
to wipe it clean.
B860A01A-AAT
Proper care of your cassette tapes will extend
the tape life and increase your listening enjoy-
ment. Always protect your tapes and cassette
cases from direct sunlight, severely cold and
dusty conditions. When not in use, cassettes
should always be stored in the original protec-
tive cassette case. When the vehicle is very hot
or cold, allow the interior temperature to become
more comfortable before listening to your cas-
settes.
B860A01L
Page 156 of 224

4CORROSION PREVENTION AND APPEARANCE CARE
5CLEANING THE INTERIOR
E040B01A-AAT
To Clean the Leather Upholstery
(If Installed)
In the normal course of use, leather upholstered
surfaces will, like any material, pick-up dust and
dirt. This dust and dirt must be cleaned
off or it may work into the surface of the leather,
causing damage.
Fine leather needs care, and should be cleaned
when necessary. Washing leather thoroughly
with soap and water will keep your leather
lustrous, beautiful and ensure you have many
years of wear.
Take a piece of cheese cloth and using any mild
soap and lukewarm water, work up a good
lather. Thoroughly wash the leather. Wipe clean
with a slightly damp cloth and dry with soft cloth.
Do this as often as the leather becomes soiled.
During tanning operations, sufficient oils are
incorporated through processing that none need
be applied during the life of the leather. Oil
applied to the finished surface will in no way help
the leather and may do more harm than good.
Varnishes and furniture polishes should never
be used under any conditions.
E040A01A-AAT
To Clean the Vinyl Upholstery
To clean the vinyl upholstery, first remove loose
dirt and dust with a vacuum cleaner. Then apply
a solution of mild soap or detergent and water
using a clean sponge or soft cloth. Allow this to
stay on the surface to loosen the dirt, then wipe
with a clean damp sponge or cloth. If all the dirt
stains are not removed, repeat this procedure
until the upholstery is clean. Do not use gaso-
line, solvent, paint thinner or other strong clean-
ers.
E030E01A-AAT
Maintaining Bumpers
Special precautions must be observed to pre-
serve the appearance of the bumpers on your
Hyundai. They are:
o Be careful not to spill battery electrolyte or
hydraulic brake fluid on the bumpers. If you
do, wash it off immediately with clear water.
o Be gentle when cleaning the bumper sur-
faces. They are made of soft plastic and the
surface can be damaged if mistreated. Do
not use abrasive cleaners. Use warm water
and mild soap or car-washing solution.
o Do not expose the bumpers to high tem-
peratures. For example, if you have your car
repainted, do not leave the bumpers on the
car if the car is going to be placed in a high-
temperature paint booth.
Page 165 of 224

5VEHICLE MAINTENANCE REQUIREMENTS
8
F060B02A-AAT
o Drive Belts
Inspect all drive belts for evidence of cuts,
cracks, excessive wear or oil saturation and
replace if necessary. Drive belts should be
checked periodically for proper tension and
adjusted as necessary.
F070C01A-AATo Coolant
The coolant should be changed at the intervals
specified in the maintenance schedule.
F060E01A-AATo Timing belt
Inspect all parts related to the timing belt for
damage and deformation. Replace any dam-
aged parts immediately.
F070D01A-AAT
o Manual transaxle oil
Inspect the manual transaxle oil according to
the maintenance schedule.
NOTE:If the oil level is low, check for possible leaks
before adding oil. Do not overfill.
F070E04A-AATo Automatic Transaxle Fluid
The fluid level should be in the "HOT" range of
the dipstick, after the engine and transaxle are
at normal operating temperature. Check the
automatic transaxle fluid level with the engine
running and the transaxle in neutral, with the
parking brake properly applied. Use HYUNDAI
GENUINE ATF, DIAMOND ATF SP-III, SK ATF
SP-III when adding or changing fluid.
F070G02A-AAT
o Brake Fluid
Check brake fluid level in the brake fluid reser-
voir. The level should be between “MIN” and
“MAX” marks on the side of the reservoir. Use
only hydraulic brake fluid conforming to DOT 3
or DOT 4.
F070H01A-AATo Rear Brake Drums and Linings/
Parking Brake
Check the rear brake drums and linings for
scoring, burning, leaking fluid, broken parts,
and excessive wear. Inspect the parking brake
system including the parking brake lever and
cables. For detailed service procedures, refer
to the Shop Manual.
F070J01A-AATo Brake Pads, Calipers and Rotors
Check the pads for excessive wear, discs for
run out and wear, and calipers for fluid leakage.
F070F01A-AATo Brake Hoses and Lines
Visually check for proper installation, chafing,
cracks, deterioration and any leakage. Replace
any deteriorated or damaged parts immedi-
ately.
Page 171 of 224

6DO-IT-YOURSELF MAINTENANCE
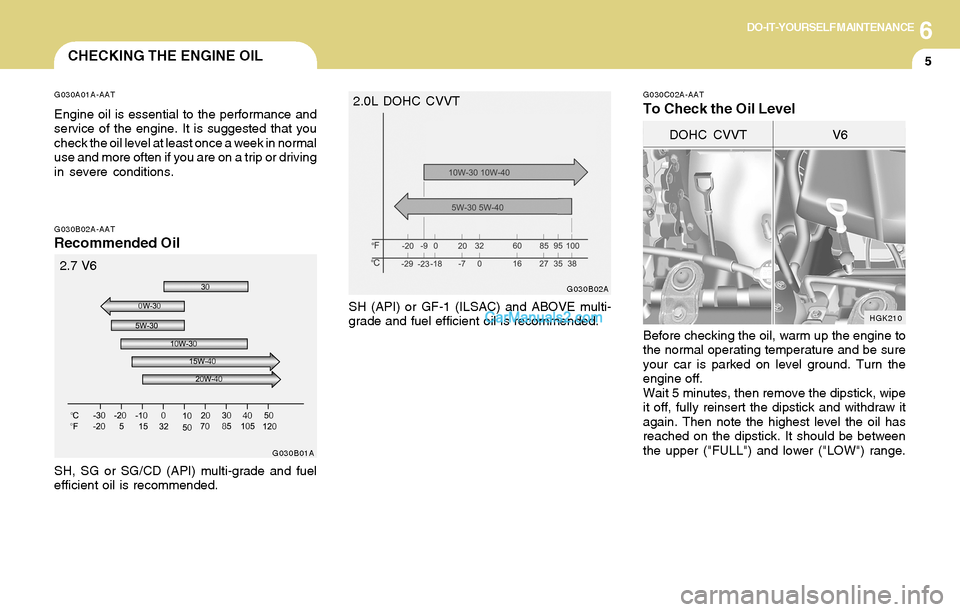
5CHECKING THE ENGINE OIL
G030A01A-AAT
Engine oil is essential to the performance and
service of the engine. It is suggested that you
check the oil level at least once a week in normal
use and more often if you are on a trip or driving
in severe conditions.
G030C02A-AAT
To Check the Oil Level
G030B02A-AATRecommended Oil
SH, SG or SG/CD (API) multi-grade and fuel
efficient oil is recommended.
G030B01AHGK210
DOHC CVVT V6
SH (API) or GF-1 (ILSAC) and ABOVE multi-
grade and fuel efficient oil is recommended.
G030B02A
2.7 V62.0L DOHC CVVT
Before checking the oil, warm up the engine to
the normal operating temperature and be sure
your car is parked on level ground. Turn the
engine off.
Wait 5 minutes, then remove the dipstick, wipe
it off, fully reinsert the dipstick and withdraw it
again. Then note the highest level the oil has
reached on the dipstick. It should be between
the upper ("FULL") and lower ("LOW") range.
Page 172 of 224

6DO-IT-YOURSELF MAINTENANCE
6CHANGING THE OIL AND FILTER
!
If the oil level is close to or below the "LOW"
mark, add oil until it reaches the "FULL" mark.
To add oil:
1. Remove the oil filler cap by turning it counter-
clockwise.
2. Add oil, then check the level again. Do not
overfill.
3. Replace the cap by turning it clockwise.
The distance between the "FULL" and "LOW"
marks is equal to about 1 quart of oil.
G040A02GK-AAT2. Open the hood and remove the engine oil
filler cap.
3. Slide underneath the car and loosen the
drain plug by turning it counterclockwise with
a wrench of the proper size. Be sure that a
drain pan is in position to catch the oil as it
drains out, then remove the drain plug.
G040A01GK
WARNING:Be very careful when draining the engine oil
as it may be hot enough to burn you!
G030D01A-AAT
Adding Oil
HGK211
DOHC CVVT V6
The engine oil and filter should be changed at
those intervals specified in the maintenance
schedule in Section 5. If the car is being driven
in severe conditions, more frequent oil and filter
changes are required.
The procedure for changing the oil and filter is
as follows:
1. Park the car on level ground and set the
parking brake. Start the engine and let it
warm up until the needle on the coolant
temperature gauge moves above the lowest
mark. Turn the engine off and place the gear
selector lever in "P" (automatic) or reverse
gear (manual transaxle).4. When the oil has stopped draining, replace
the drain plug using a new washer and
retighten by turning it clockwise.
Tightening torque is:
4.5 ~ 4.0 kgf.m (2.0L)
4.5 ~ 3.5 kgf.m (2.7L)
5. Remove the oil filter by turning it counter-
clockwise with a oil filter wrench of the proper
size. A certain amount of oil will come out
when you remove the filter. So be sure to
have your drain pan in place underneath it.
6. Install a new oil filter in accordance with the
instructions on the carton or on the filter itself.
Do not over-tighten. (Tightening torque :
1.2 ~ 1.6 kgf.m) DOHC CVVT V6