2004 Hyundai Sonata brake fluid
[x] Cancel search: brake fluidPage 148 of 208
4- 4 CORROSION PREVENTION AND APPEARANCE CARE
E040B01A-AATTo Clean the Leather Upholstery
(If installed)
In the normal course of use, leather upholstered
surfaces will, like any material, pick-up dust and
dirt. This dust and dirt must be cleaned off or it
may work into the surface of the leather, caus-
ing damage.
Fine leather needs care, and should be cleaned
when necessary. Washing leather thoroughly
with soap and water will keep your leather
lustrous, beautiful and ensure you have many
years of wear.
E040A01A-AATCLEANING THE INTERIOR
To Clean the Vinyl Upholstery
To clean the vinyl upholstery, first remove loose
dirt and dust with a vacuum cleaner. Then apply
a solution of mild soap or detergent and water
using a clean sponge or soft cloth. Allow this to
stay on the surface to loosen the dirt, then wipe
with a clean damp sponge or cloth. If all the dirt
stains are not removed, repeat this procedure
until the upholstery is clean. Do not use gaso-
line, solvent, paint thinner or other strong clean-
ers.
E030E01A-AATMaintaining Bumpers
Special precautions must be observed to pre-
serve the appearance of the bumpers on your
Hyundai. They are:
o Be careful not to spill battery electrolyte or
hydraulic brake fluid on the bumpers. If you
do, wash it off immediately with clear water.
o Be gentle when cleaning the bumper sur-
faces. They are made of soft plastic and the
surface can be damaged if mistreated. Do
not use abrasive cleaners. Use warm water
and mild soap or car-washing solution.
o Do not expose the bumpers to high tem-
peratures. For example, if you have your car
repainted, do not leave the bumpers on the
car if the car is going to be placed in a high-
temperature paint booth.
E030D01A-AATWhen to Wax Again
You should polish and wax the car again when
water no longer beads on a clean surface but
spreads out over a larger area.
E030C01A-AATPolishing and Waxing
Always wash and dry the car before polishing
or waxing or using a combination cleaner and
wax. Use a good quality commercial product
and follow the manufacturer's directions on the
container. Polish and wax the bright trim pieces
as well as the paint.
E030B01A-AAT
Spot Cleaning
Don't use gasoline, strong solvents or corro-
sive cleaning agents. These can damage the
finish of the car. To remove road tar, use
turpentine on a clean, soft cloth. Be gentle.
To remove dead insects or tree sap, use warm
water and mild soap or car-washing solution.
Soak the spot and rub gently. If the paint has lost
its luster, use a commercial car-cleaning polish. underside of the doors are open. Paint damage
can be caused by small accumulation of tar,
industrial precipitation, tree resin, insects and
bird droppings, when not removed immediately.
If water alone is not strong enough to remove the
accumulated dirt, use a mild car washing solu-
tion. Be sure to rinse the surface after washing
to remove the solution. Never allow the solution
to dry on the painted surfaces.
Page 151 of 208

5- 2 VEHICLE MAINTENANCE REQUIREMENTS
F010D01A-AATGeneral Checks
These are the regular checks you should per-
form when you drive your Hyundai or you fill the
fuel tank. A list of these items will be found on
page 6-4.
F010C01A-AATSpecified Scheduled Procedures
These are the procedures such as inspections,
adjustments and replacements that are listed in
the maintenance charts starting on page 5-4.
These procedures must be performed at the
intervals shown in the maintenance schedule to
assure that your warranty remains in effect.
Although it is strongly recommended that they
be performed by the trained technicians at your
Hyundai dealer, these procedures may be per-
formed at any qualified service facility.
It is suggested that genuine Hyundai service
parts be used for any required repairs or re-
placements. Other parts of equivalent quality
such as engine oil, engine coolant, manual or
auto transaxle oil, brake fluid and so on which
are not supplied by Hyundai Motor Company or
its distributor may be used without affecting
your warranty coverage but you should always
be sure these are equivalent to the quality of the
original Hyundai parts. Your Owner's Hand-
book provides further information about your
warranty coverage.
F010A01A-AATMAINTENANCE INTERVALS
Service Requirements
To ensure that you receive the greatest number
of miles of satisfying operation from your Hyundai,
certain maintenance procedures must be per-
formed. Although careful design and engineer-
ing have reduced these to a minimum, those that
are required are of the utmost importance.
It is your responsibility to have these mainte-
nance procedures performed to comply with
the terms of the warranties covering your new
Hyundai. The Owner's Handbook supplied with
your new vehicle provides further information
about these warranties.
F010B01A-AATMaintenance Requirements
The maintenance required for your Hyundai
can be divided into three main areas:
o Specified scheduled procedures
o General checks
o Do-it-yourself maintenance
F010E01A-AATDo-It-Yourself Maintenance
If you are mechanically inclined, own a few tools
that are required and want to take the time to do
so, you can inspect and service a number of
items. For more information about doing it your-
self, see Section 6.
F010F01A-AATA Few Tips
o Whenever you have your Hyundai serviced,
keep copies of the service records in your
glovebox. This will help ensure that you can
document that the required procedures have
been performed to keep your warranties in
effect. This is especially important when
service is not performed by an authorized
Hyundai dealer.
o If you choose to do your own maintenance
and repairs, you may find it helpful to have
an official Hyundai Shop Manual. A copy of
this publication may be purchased at your
Hyundai dealer's parts department.
Page 154 of 208
VEHICLE MAINTENANCE REQUIREMENTS 5- 5
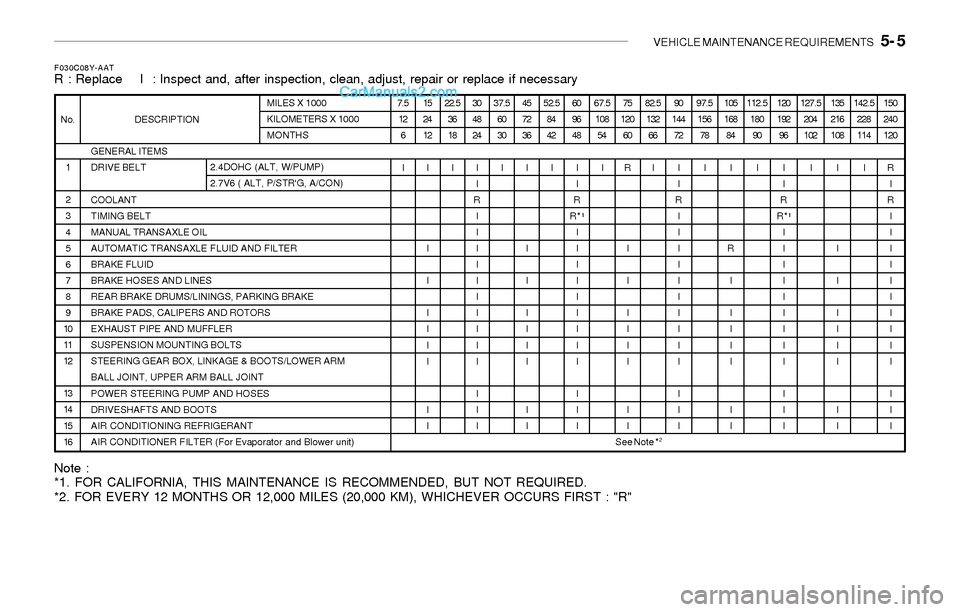
Note :
*1. FOR CALIFORNIA, THIS MAINTENANCE IS RECOMMENDED, BUT NOT REQUIRED.
*2. FOR EVERY 12 MONTHS OR 12,000 MILES (20,000 KM), WHICHEVER OCCURS FIRST : "R"
F030C08Y-AATR : Replace I : Inspect and, after inspection, clean, adjust, repair or replace if necessary
GENERAL ITEMS
DRIVE BELT
COOLANT
TIMING BELT
MANUAL TRANSAXLE OIL
AUTOMATIC TRANSAXLE FLUID AND FILTER
BRAKE FLUID
BRAKE HOSES AND LINES
REAR BRAKE DRUMS/LININGS, PARKING BRAKE
BRAKE PADS, CALIPERS AND ROTORS
EXHAUST PIPE AND MUFFLER
SUSPENSION MOUNTING BOLTS
STEERING GEAR BOX, LINKAGE & BOOTS/LOWER ARM
BALL JOINT, UPPER ARM BALL JOINT
POWER STEERING PUMP AND HOSES
DRIVESHAFTS AND BOOTS
AIR CONDITIONING REFRIGERANT
AIR CONDITIONER FILTER (For Evaporator and Blower unit) 1
2
3
4
5
6
7
8
9
10
11
12
13
14
15
16 No. DESCRIPTIONMILES X 1000
KILOMETERS X 1000
MONTHS
2.4DOHC (ALT, W/PUMP)
2.7V6 ( ALT, P/STR'G, A/CON)7.5
12
6
I15
24
12
I
I
I
I
I
I
I
I
I22.5
36
18
I30
48
24
I
I
R
I
I
I
I
I
I
I
I
I
I
I
I
I37.5
60
30
I45
72
36
I
I
I
I
I
I
I
I
I52.5
84
42
I60
96
48
I
I
R
R*¹
I
I
I
I
I
I
I
I
I
I
I
I67.5
108
54
I75
120
60
R
I
I
I
I
I
I
I
I82.5
132
66
I90
144
72
I
I
R
I
I
I
I
I
I
I
I
I
I
I
I
I97.5
156
78
I105
168
84
I
R
I
I
I
I
I
I
I112.5
180
90
I120
192
96
I
I
R
R*¹
I
I
I
I
I
I
I
I
I
I
I
I127.5
204
102
I135
216
108
I
I
I
I
I
I
I
I
I142.5
228
114
I150
240
120
R
I
R
I
I
I
I
I
I
I
I
I
I
I
I
I
See Note *
2
Page 155 of 208
5- 6 VEHICLE MAINTENANCE REQUIREMENTS
SEVERE DRIVING CONDITIONSA - Repeated short distance driving
B - Extensive idling
C - Driving in dusty, rough roads
D - Driving in areas using salt or other corrosive materials or in
very cold weather
E - Driving in sandy areas
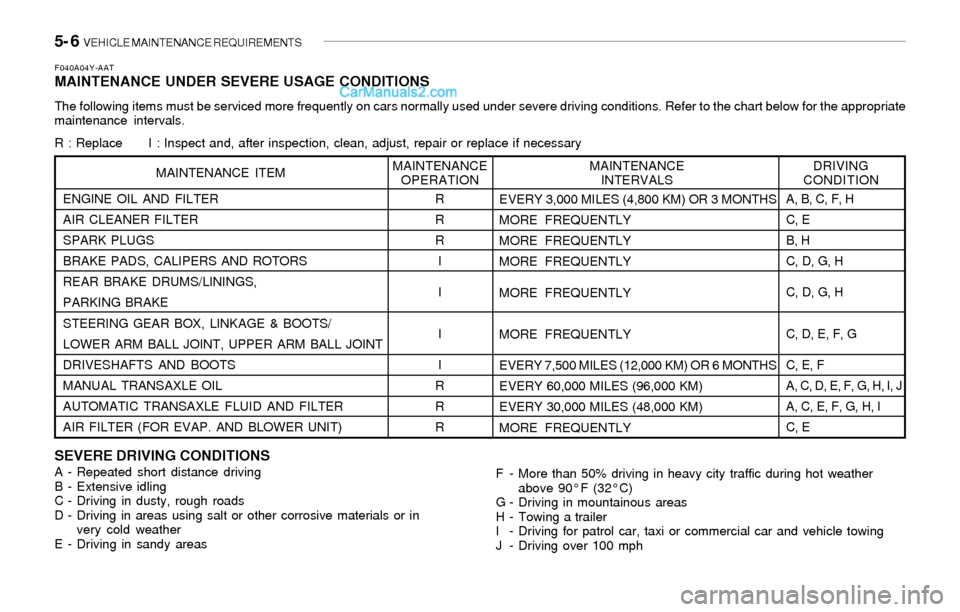
F040A04Y-AATMAINTENANCE UNDER SEVERE USAGE CONDITIONS
The following items must be serviced more frequently on cars normally used under severe driving conditions. Refer to the chart below for the appropriate
maintenance intervals.
R : Replace I : Inspect and, after inspection, clean, adjust, repair or replace if necessary
F - More than 50% driving in heavy city traffic during hot weather
above 90°F (32°C)
G - Driving in mountainous areas
H - Towing a trailer
I - Driving for patrol car, taxi or commercial car and vehicle towing
J - Driving over 100 mph ENGINE OIL AND FILTER
AIR CLEANER FILTER
SPARK PLUGS
BRAKE PADS, CALIPERS AND ROTORS
REAR BRAKE DRUMS/LININGS,
PARKING BRAKE
STEERING GEAR BOX, LINKAGE & BOOTS/
LOWER ARM BALL JOINT, UPPER ARM BALL JOINT
DRIVESHAFTS AND BOOTS
MANUAL TRANSAXLE OIL
AUTOMATIC TRANSAXLE FLUID AND FILTER
AIR FILTER (FOR EVAP. AND BLOWER UNIT)
MAINTENANCE ITEM
R
R
R
I
I
I
I
R
R
REVERY 3,000 MILES (4,800 KM) OR 3 MONTHS
MORE FREQUENTLY
MORE FREQUENTLY
MORE FREQUENTLY
MORE FREQUENTLY
MORE FREQUENTLY
EVERY 7,500 MILES (12,000 KM) OR 6 MONTHS
EVERY 60,000 MILES (96,000 KM)
EVERY 30,000 MILES (48,000 KM)
MORE FREQUENTLY
DRIVING
CONDITION MAINTENANCE
INTERVALS MAINTENANCE
OPERATION
A, B, C, F, H
C, E
B, H
C, D, G, H
C, D, G, H
C, D, E, F, G
C, E, F
A, C, D, E, F, G, H, I, J
A, C, E, F, G, H, I
C, E
Page 157 of 208
5- 8 VEHICLE MAINTENANCE REQUIREMENTS
F070M01Y-AATo Steering Gear Box, Linkage & Boots/
Lower Arm Ball Joint, Upper Arm Ball
Joint
With the vehicle stopped and engine off, check
for excessive free-play in the steering wheel.
Check the linkage for bends or damage. Check
the dust boots and ball joints for deterioration,
cracks, or damage. Replace any damaged
parts.
F070G02A-AATo Brake Fluid
Check brake fluid level in the brake fluid reser-
voir. The level should be between "MIN" and
"MAX" marks on the side of the reservoir. Use
only hydraulic brake fluid conforming to DOT 3
or DOT 4.
F070D01A-AATo Manual transaxle oil
Inspect the manual transaxle oil according to
the maintenance schedule.
NOTE:If the oil level is low, check for possible leaks
before adding oil. Do not overfill.
F070F01A-AATo Brake Hoses and Lines
Visually check for proper installation, chafing,
cracks, deterioration and any leakage. Replace
any deteriorated or damaged parts immedi-
ately.
F070E04A-AATo Automatic Transaxle Fluid and Filter
The fluid level should be in the "HOT" range of
the dipstick, after the engine and transaxle are
at normal operating temperature. Check the
automatic transaxle fluid level with the engine
running and the transaxle in neutral, with the
parking brake properly applied. Use Genuine
Hyundai ATF or DIAMOND ATF SP-III or SK
ATF SP-III when adding or changing fluid.
F070K01A-AATo Exhaust Pipe and Muffler
Visually inspect the exhaust pipes, muffler and
hangers for cracks, deterioration, or damage.
Start the engine and listen carefully for any
exhaust gas leakage. Tighten connections or
replace parts as necessary.
F070J01A-AAT
o Brake Pads, Calipers and Rotors
Check the pads for excessive wear, discs for
run out and wear, and calipers for fluid leakage.
F070H01A-AAT
o Rear Brake Drums and Linings/
Parking Brake
Check the rear brake drums and linings for
scoring, burning, leaking fluid, broken parts,
and excessive wear. Inspect the parking brake
system including the parking brake lever and
cables. For detailed service procedures, refer
to the Shop Manual.
F070L01A-AAT
o Suspension Mounting Bolts
Check the suspension connections for loose-
ness or damage. Retighten to the specified
torque.
Page 159 of 208

6. Do-It-Yourself Maintenance
Engine compartment ........................................................................ 6-2
General checks ................................................................................ 6-4
Checking the engine oil .................................................................... 6-5
Changing the oil and filter ................................................................. 6-6
Checking and changing the engine coolant ...................................... 6-7
Spark plugs ...................................................................................... 6-9
Changing the air cleaner filter .........................................................6-11
Checking the transaxle oil (Manual)...............................................6-12
Checking the transaxle fluid (Automatic) .......................................6-13
Checking the brakes......................................................................6-14
Air conditioning care.......................................................................6-15
Checking drive belts......................................................................6-18
Checking and replacing fuses ........................................................6-18
Replacement of bulbs....................................................................6-21
Junction Box description................................................................6-29
6
Page 160 of 208
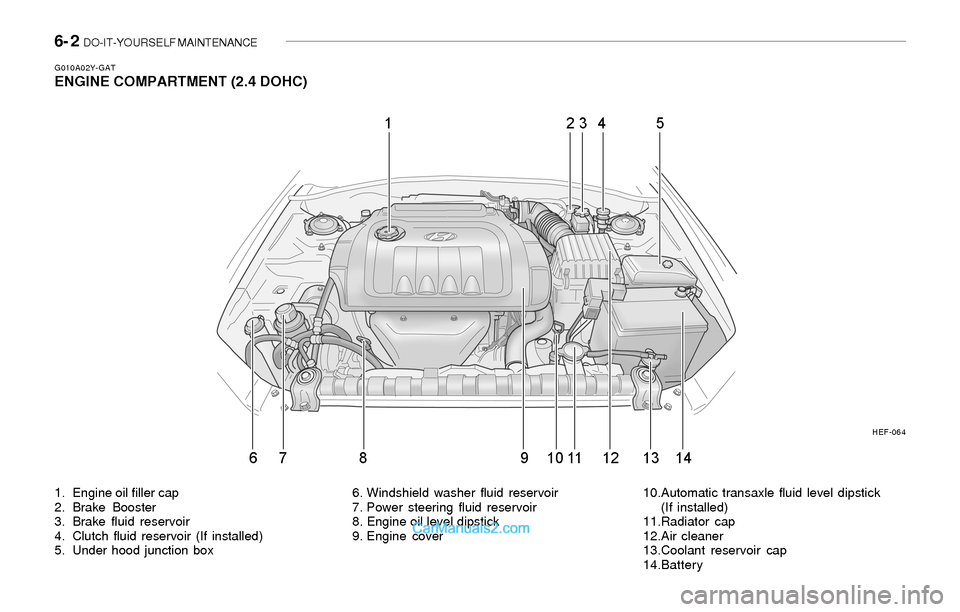
6- 2 DO-IT-YOURSELF MAINTENANCE
1. Engine oil filler cap
2. Brake Booster
3. Brake fluid reservoir
4. Clutch fluid reservoir (If installed)
5. Under hood junction box 6. Windshield washer fluid reservoir
7. Power steering fluid reservoir
8. Engine oil level dipstick
9. Engine cover
G010A02Y-GATENGINE COMPARTMENT (2.4 DOHC)
10.Automatic transaxle fluid level dipstick
(If installed)
11.Radiator cap
12.Air cleaner
13.Coolant reservoir cap
14.Battery
HEF-064
Page 161 of 208
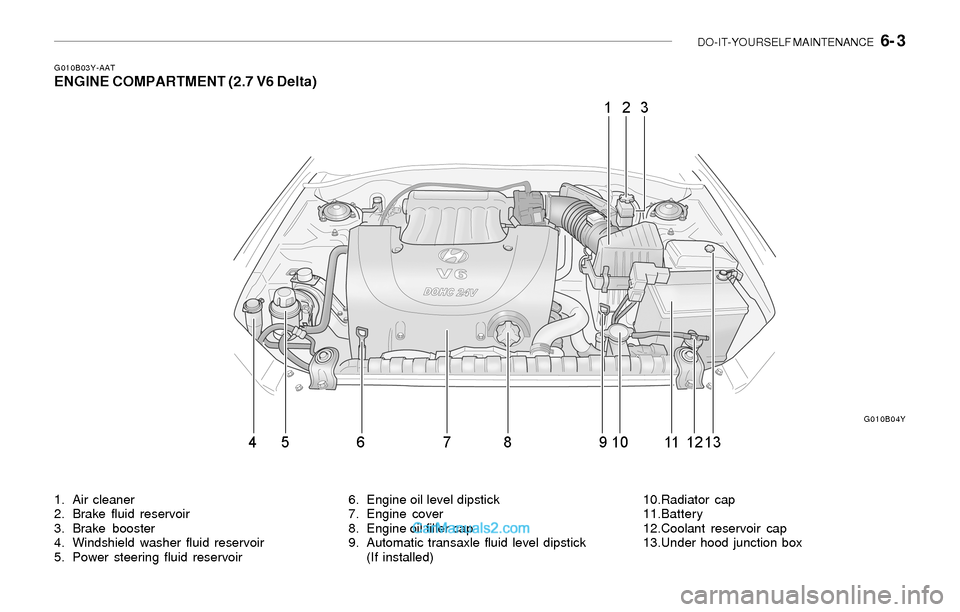
DO-IT-YOURSELF MAINTENANCE 6- 3
1. Air cleaner
2. Brake fluid reservoir
3. Brake booster
4. Windshield washer fluid reservoir
5. Power steering fluid reservoir6. Engine oil level dipstick
7. Engine cover
8. Engine oil filler cap
9. Automatic transaxle fluid level dipstick
(If installed)
G010B03Y-AATENGINE COMPARTMENT (2.7 V6 Delta)
10.Radiator cap
11.Battery
12.Coolant reservoir cap
13.Under hood junction box
G010B04Y