2004 Hyundai Santa Fe recommended oil
[x] Cancel search: recommended oilPage 125 of 253

1FEATURES OF YOUR HYUNDAI
112
8. Care of Your Compact Discs
Handle disc careful. Store them in their original
cases or other protective cases away from
direct sunlight and dust. If the surface of a disc
is soiled, dampen a clean, soft cloth in a mild,
neutral detergent solution and clean it, wiping
from the center to the edge.
Be sure never to touch the side without writing
when handling discs. Pick up discs by grasping
the outer edges or the edge of the hole and the
outer edge.
9. Care of Your Compact Disc Player
The use of CD lens cleaner discs is not advised,
due to the risk of contaminating the lens of the
CD optics with lubricants internal to the CD
mechanism.
10. CD Adapter Kits
It is possible to use a portable CD player adapter
kit with your cassette tape player after disabling
the tight/loose tape sensing feature on your tape
player.To disable the feature, use the following steps:
1. Turn the radio off.
2. Press and hold the TAPE CD Button. The
radio will display READY and flash the cas-
sette icon.
3. Insert the adapter into the cassette slot. It will
power up the radio and begin playing
This override routine will remain active until
EJECT button is pressed.
NOTE:Before you add any sound equipment to
your vehicle--like a tape player, CB radio,
mobile telephone or two-way radio--be sure
you can add what you want. If you can, it's
very important to do it properly. Added
sound equipment may interfere with the
operation of your vehicle's engine, Delphi
Electronics radio or other systems, and
even damage them. Your vehicle's systems
may interfere with the operation of sound
equipment that has been added improp-
erly. So, before adding sound equipment,
check with your dealer and be sure to check
federal rules covering mobile radio and
telephone units.
!CAUTION:o Do not insert warped or poor quality
discs into the CD player as damage to the
unit may occur.
o Do not insert anything like coins into the
player slot as damage to the unit may
occur.
o Do not place beverages close to the
audio system. The playback mechanism
may be damaged if you spill them.
o Do not impact on the audio system, or
the playback mechanism could be dam-
aged.
o Driving on the off-roads or other vibra-
tions may skip your compact disc.
Do not use the audio system on off-
roads as the discs could be scratched
and damaged.
o Do not grip or pull out the disc with your
hand while the disc is being pulled into
the unit by the self loading mechanism.
These can cause poor disc scratching to
occur or trouble in the compact disc
player.
o Avoid using CD-Recordable or CD-
Rewritable as the player could not be
operated in recording way of the CD
maker. When using the compact disc
player, genuine CDs are recommended.
Page 161 of 253

2DRIVING YOUR HYUNDAI
24
C160J01A-AATDon't Let Ice and Snow Accumulate
Underneath
Under some conditions, snow and ice can build
up under the fenders and interfere with the
steering. When driving in severe winter condi-
tions where this may happen, you should peri-
odically check underneath the car to be sure the
movement of the front wheels and the steering
components is not obstructed.
C160I01A-AATDon't Let Your Parking Brake Freeze
Under some conditions your parking brake can
freeze in the engaged position. This is most
likely to happen when there is an accumulation
of snow or ice around or near the rear brakes
or if the brakes are wet. If there is a risk the
parking brake may freeze, apply it only tempo-
rarily while you put the gear selector lever in "P"
(automatic) or in first or reverse gear (manual
transaxle) and block the rear wheels so the car
cannot roll. Then release the parking brake.
C160H01A-AATUse Approved Anti-Freeze in Window
Washer System
To keep the water in the window washer system
from freezing, add an approved anti-freeze
solution in accordance with instructions on the
container. Window washer anti-freeze is avail-
able from Hyundai dealers and most auto parts
outlets. Do not use engine coolant or other types
of anti-freeze as these may damage the finish.
C160G01A-AAT
To Keep Locks from Freezing
To keep the locks from freezing, squirt an
approved de-icer fluid or glycerine into the key
opening. If a lock is covered with ice, squirt it with
an approved de-icing fluid to remove the ice. If
the lock is frozen internally, you may be able to
thaw it out by using a heated key. Handle the
heated key with care to avoid injury.
C160F01A-AATCheck Spark Plugs and Ignition
System
Inspect your spark plugs as described in Sec-
tion 6 and replace them if necessary. Also
check all ignition wiring and components to be
sure they are not cracked, worn or damaged in
any way.
C160E01A-AAT
Change to "Winter Weight" Oil if
Necessary
In some climates it is recommended that a lower
viscosity "winter weight" oil be used during cold
weather. See Section 9 for recommendations.
If you aren't sure what weight oil you should use,
consult your Hyundai dealer.
Page 187 of 253

5VEHICLE MAINTENANCE REQUIREMENTS
2
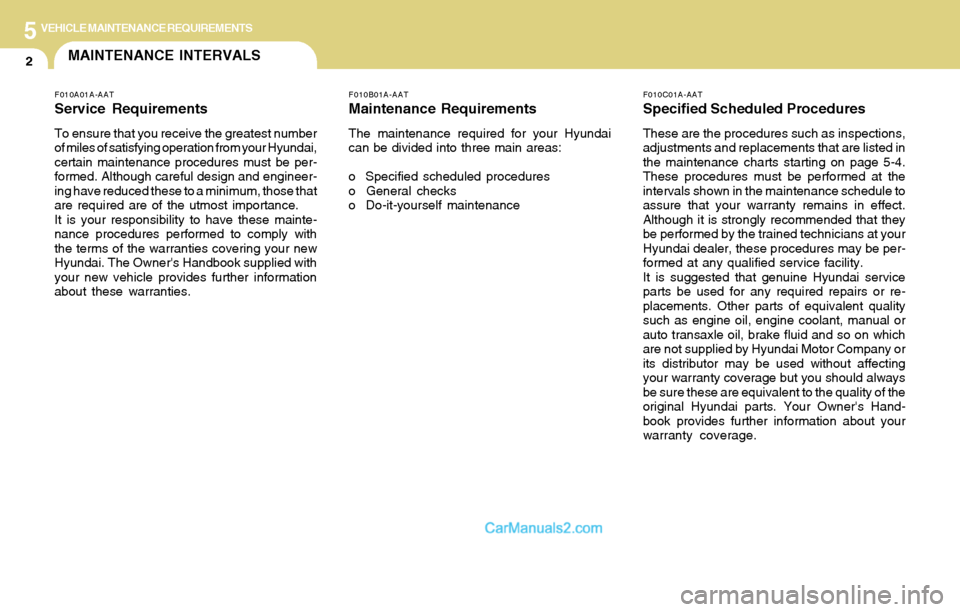
F010C01A-AAT
Specified Scheduled Procedures
These are the procedures such as inspections,
adjustments and replacements that are listed in
the maintenance charts starting on page 5-4.
These procedures must be performed at the
intervals shown in the maintenance schedule to
assure that your warranty remains in effect.
Although it is strongly recommended that they
be performed by the trained technicians at your
Hyundai dealer, these procedures may be per-
formed at any qualified service facility.
It is suggested that genuine Hyundai service
parts be used for any required repairs or re-
placements. Other parts of equivalent quality
such as engine oil, engine coolant, manual or
auto transaxle oil, brake fluid and so on which
are not supplied by Hyundai Motor Company or
its distributor may be used without affecting
your warranty coverage but you should always
be sure these are equivalent to the quality of the
original Hyundai parts. Your Owner's Hand-
book provides further information about your
warranty coverage.
F010A01A-AAT
Service Requirements
To ensure that you receive the greatest number
of miles of satisfying operation from your Hyundai,
certain maintenance procedures must be per-
formed. Although careful design and engineer-
ing have reduced these to a minimum, those that
are required are of the utmost importance.
It is your responsibility to have these mainte-
nance procedures performed to comply with
the terms of the warranties covering your new
Hyundai. The Owner's Handbook supplied with
your new vehicle provides further information
about these warranties.
F010B01A-AAT
Maintenance Requirements
The maintenance required for your Hyundai
can be divided into three main areas:
o Specified scheduled procedures
o General checks
o Do-it-yourself maintenance
MAINTENANCE INTERVALS
Page 190 of 253

5VEHICLE MAINTENANCE REQUIREMENTS
5
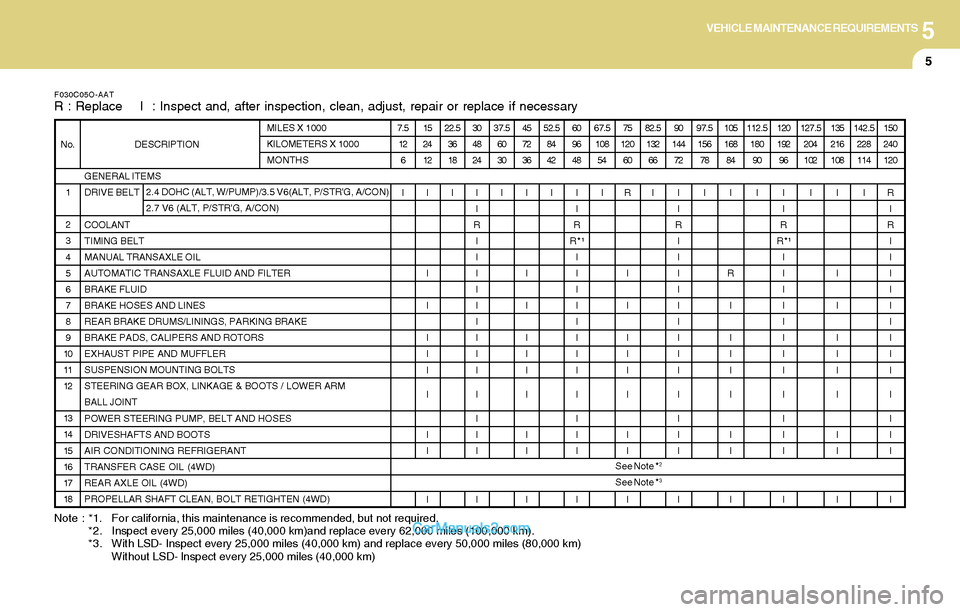
Note : *1. For california, this maintenance is recommended, but not required.
*2. Inspect every 25,000 miles (40,000 km)and replace every 62,000 miles (100,000 km).
*3. With LSD- Inspect every 25,000 miles (40,000 km) and replace every 50,000 miles (80,000 km)
Without LSD- lnspect every 25,000 miles (40,000 km)
F030C05O-AATR : Replace I : Inspect and, after inspection, clean, adjust, repair or replace if necessary
GENERAL ITEMS
DRIVE BELT
COOLANT
TIMING BELT
MANUAL TRANSAXLE OIL
AUTOMATIC TRANSAXLE FLUID AND FILTER
BRAKE FLUID
BRAKE HOSES AND LINES
REAR BRAKE DRUMS/LININGS, PARKING BRAKE
BRAKE PADS, CALIPERS AND ROTORS
EXHAUST PIPE AND MUFFLER
SUSPENSION MOUNTING BOLTS
STEERING GEAR BOX, LINKAGE & BOOTS / LOWER ARM
BALL JOINT
POWER STEERING PUMP, BELT AND HOSES
DRIVESHAFTS AND BOOTS
AIR CONDITIONING REFRIGERANT
TRANSFER CASE OIL (4WD)
REAR AXLE OIL (4WD)
PROPELLAR SHAFT CLEAN, BOLT RETIGHTEN (4WD) 1
2
3
4
5
6
7
8
9
10
11
12
13
14
15
16
17
18 No. DESCRIPTIONMILES X 1000
KILOMETERS X 1000
MONTHS
2.4 DOHC (ALT, W/PUMP)/3.5 V6(ALT, P/STR'G, A/CON)
2.7 V6 (ALT, P/STR'G, A/CON)7.5
12
6
I15
24
12
I
I
I
I
I
I
I
I
I
I22.5
36
18
I30
48
24
I
I
R
I
I
I
I
I
I
I
I
I
I
I
I
I
I37.5
60
30
I45
72
36
I
I
I
I
I
I
I
I
I
I52.5
84
42
I60
96
48
I
I
R
R*¹
I
I
I
I
I
I
I
I
I
I
I
I
I67.5
108
54
I75
120
60
R
I
I
I
I
I
I
I
I
I82.5
132
66
I90
144
72
I
I
R
I
I
I
I
I
I
I
I
I
I
I
I
I
I97.5
156
78
I105
168
84
I
R
I
I
I
I
I
I
I
I112.5
180
90
I120
192
96
I
I
R
R*¹
I
I
I
I
I
I
I
I
I
I
I
I
I127.5
204
102
I135
216
108
I
I
I
I
I
I
I
I
I
I142.5
228
114
I150
240
120
R
I
R
I
I
I
I
I
I
I
I
I
I
I
I
I
I See Note *
2
See Note *3
Page 200 of 253

6DO-IT-YOURSELF MAINTENANCE
6CHECKING THE ENGINE OIL
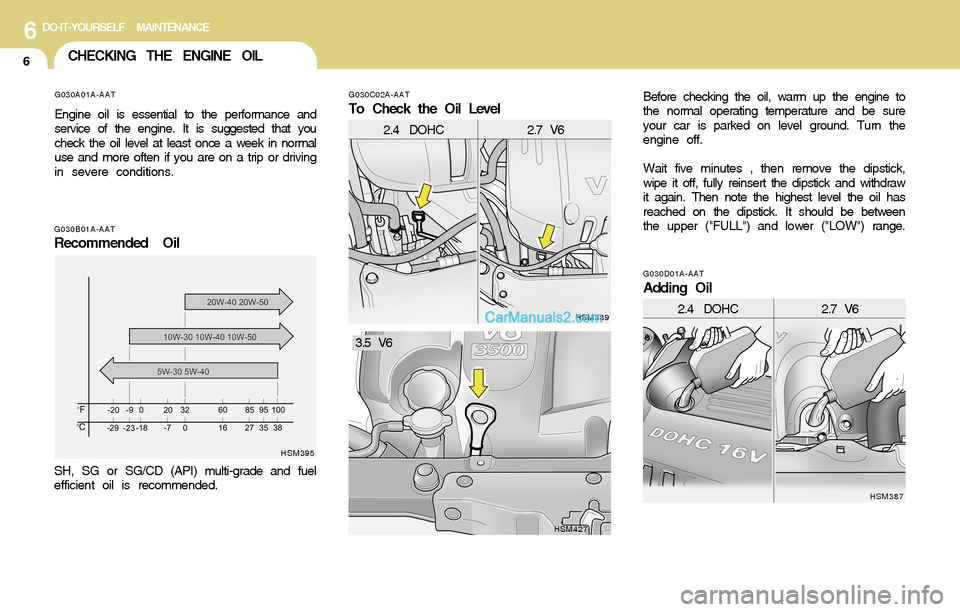
G030A01A-AAT
Engine oil is essential to the performance and
service of the engine. It is suggested that you
check the oil level at least once a week in normal
use and more often if you are on a trip or driving
in severe conditions.
G030C02A-AAT
To Check the Oil Level
G030B01A-AATRecommended Oil
SH, SG or SG/CD (API) multi-grade and fuel
efficient oil is recommended.Before checking the oil, warm up the engine to
the normal operating temperature and be sure
your car is parked on level ground. Turn the
engine off.
Wait five minutes , then remove the dipstick,
wipe it off, fully reinsert the dipstick and withdraw
it again. Then note the highest level the oil has
reached on the dipstick. It should be between
the upper ("FULL") and lower ("LOW") range.
HSM395HSM389G030D01A-AAT
Adding Oil
HSM387
2.4 DOHC2.7 V6
2.4 DOHC2.7 V6
HSM427
3.5 V6
Page 202 of 253

6DO-IT-YOURSELF MAINTENANCE
8CHECKING AND CHANGING THE
ENGINE COOLANT
!
!
G050A01A-AAT
WARNING:Do not remove the radiator cap when the
engine is hot. When the engine is hot, the
engine coolant is under pressure and may
erupt through the opening if the cap is
removed. You could be seriously burned if
you do not observe this precaution. Do not
remove the radiator cap until the radiator is
cool to the touch. 4 . When the oil has stopped draining, replace
the drain plug using a new washer and
retighten by turning it clockwise.
Oil pan drain plug tightening torque:
3.5 ~ 4.5 kgf.m
5. Remove the oil filter by turning it counter-
clockwise with a oil filter wrench of the proper
size. A certain amount of oil will come out
when you remove the filter. So be sure to
have your drain pan in place underneath it.
6 . Install a new oil filter in accordance with the
instructions on the carton or on the filter itself.
Do not over-tighten. (Tightening torque :
1.2 ~ 1.6 kgf.m) Be sure that the mounting
surface on the engine is clean and that the
old gasket is removed completely. Lubricate
the new gasket on the filter with clean engine
oil before installation.
7 . Refill the crankcase with the recommended
engine oil. Refer to the specification in chap-
ter 9 for engine oil capacity.
8 . Start the engine and check to be sure no oil
is leaking from the drain plug or oil filter.
9 . Shut off the engine and recheck the oil level.
NOTE:Always dispose of used engine oil in an
environmentally acceptable manner. It is
suggested that it be placed in a sealed
container and taken to a service station for
reclamation. Do not pour the oil on the
ground or put it in with the household
trash.
WARNING:Used motor oil may cause irritation or can-
cer of the skin if left in contact with the skin
for prolonged periods of time. Wash your
hands thoroughly with soap and warm
water as soon as possible after handling
used oil.
!PROPOSITION 65 WARNING:Used engine oil may cause irritation or
cancer of the skin if left in contact with the
skin for prolonged periods of time. Used
engine oil contains chemicals that have
caused cancer in laboratory animals. Al-
ways protect your skin by washing your
hands thoroughly with soap and warm
water as soon as possible after handling
used oil.
Page 206 of 253

6DO-IT-YOURSELF MAINTENANCE
12WINDSHIELD WIPER BLADESCHANGING THE AIR CLEANER
FILTER
G080A02A-AAT
The wiper blades should be carefully inspected
from time to time and cleaned to remove accu-
mulations of road film or other debris. To clean
the wiper blades and arms, use a clean sponge
or cloth with a mild soap or detergent and water.
If the wipers continue to streak or smear the
glass, replace them with genuine Hyundai re-
placement parts or their equivalent.
HEF119
G070A01E-AAT
To change the filter, unsnap the clips around the
cover. When this is done, the cover can be lifted
off, the old filter removed and the new filter put
in its place. Genuine Hyundai Replacement
Parts are recommended.
CAUTION:o Operating your vehicle without a proper
air filter in place can result in excessive
engine wear.
o When removing the air cleaner filter, be
careful that dust or dirt does not enter
the air intake. These may result in dam-
age to the air cleaner filter.
G070A01O
!
!CAUTION:o Do not operate the wipers on dry glass.
This can result in more rapid wear of the
wiper blades and may scratch the glass.
o Keep the blade rubber out of contact
with petroleum products such as engine
oil, gasoline, etc.
6. To install the new spark plug, guide the
socket down over the spark plug, being
careful not to damage the ceramic insulator.
G060C03O
NOTE:Spark plugs should be tightened to speci-
fication. Over-tightening can damage the
threads in the aluminum cylinder head.
Also, leaving them too loose can cause the
spark plug to get very hot and possibly
result in damage to the engine.
7 . Replace the cable by pushing the insulated
connector directly down onto the electrode.
Check to be sure it has snapped into place
and can't fall off.
Page 207 of 253

6DO-IT-YOURSELF MAINTENANCE
13CHECKING THE TRANSAXLE OIL
(MANUAL)FILLING THE WASHER RESERVOIR
G090A01O-AAT
The washer fluid reservoir supplies fluid to the
windshield washer system.
A good quality washer fluid should be used to fill
the washer reservoir. The fluid level should be
checked more frequently during inclement
weather or whenever the washer system is in
more frequent use.
The capacity of the washer reservoir is 3.59
U.S. quarts (3.4 Liters).
CAUTION:o Radiator anti-freeze (engine coolant)
should not be used in the washer system
because it will damage the car's finish.
o The washer should not be operated if the
washer reservoir is empty. This can dam-
age the washer fluid pump.
G090A01O
!
G100A02O-AAT
Transaxle lubricant in the manual transaxle
should be checked at those intervals specified
in the vehicle maintenance schedule in Section
5.
Recommended Oil
Use only HYUNDAI GENUINE PARTS MTF
75W/90 (API GL-4) or EQUIVALENT in the
manual transaxle.
Manual Transaxle Oil Capacity
The oil capacity of the manual transaxle is 2.43
U.S. quarts (2.3 liters).
HSM435
Filler plug
Drain plug