2004 Hyundai Santa Fe display
[x] Cancel search: displayPage 61 of 253

1FEATURES OF YOUR HYUNDAI
48MULTI-FUNCTION LIGHT SWITCH
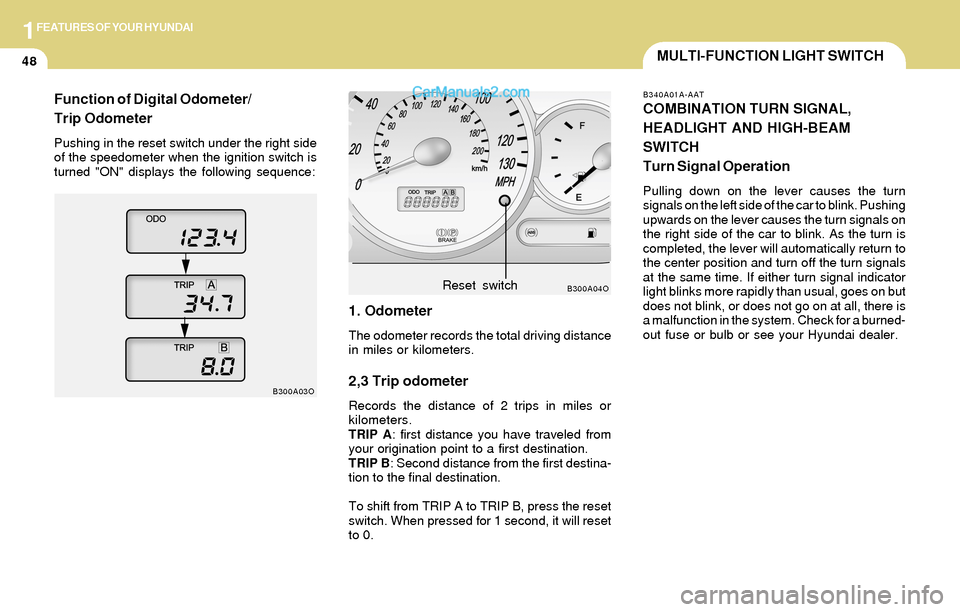
1. Odometer
The odometer records the total driving distance
in miles or kilometers.
2,3 Trip odometer
Records the distance of 2 trips in miles or
kilometers.
TRIP A: first distance you have traveled from
your origination point to a first destination.
TRIP B: Second distance from the first destina-
tion to the final destination.
To shift from TRIP A to TRIP B, press the reset
switch. When pressed for 1 second, it will reset
to 0.
B300A04O
B300A03OReset switch
B340A01A-AAT
COMBINATION TURN SIGNAL,
HEADLIGHT AND HIGH-BEAM
SWITCH
Turn Signal Operation
Pulling down on the lever causes the turn
signals on the left side of the car to blink. Pushing
upwards on the lever causes the turn signals on
the right side of the car to blink. As the turn is
completed, the lever will automatically return to
the center position and turn off the turn signals
at the same time. If either turn signal indicator
light blinks more rapidly than usual, goes on but
does not blink, or does not go on at all, there is
a malfunction in the system. Check for a burned-
out fuse or bulb or see your Hyundai dealer.
Function of Digital Odometer/
Trip Odometer
Pushing in the reset switch under the right side
of the speedometer when the ignition switch is
turned "ON" displays the following sequence:
Page 66 of 253

1FEATURES OF YOUR HYUNDAI
53DIGITAL CALENDARDIGITAL CLOCK
NOTE:The ignition must be in the "ON" position
for the rear window defroster to operate.
B400A01A-AAT
There are three control buttons for the digital
clock. Their functions are:
HOUR - Push "H" to advance the hour indi-
cated.
MIN - Push "M" to advance the minute indicated.
RESET - Push "R" to reset minutes to ":00" to
facilitate resetting the clock to the correct time.
When this is done:
Pressing "R" between 10 : 30 and 11 : 29
changes the readout to 11 : 00.
Pressing "R" between 11 : 30 and 12 : 29
changes the readout to 12 : 00.
B400B02O-GAT
(If installed)
How to adjust the date & the time
1. Whenever "M" button is pushed, the "YEAR",
"MONTH", "DAY", "HOUR" and "MINUTE"
blinks in order.
2. Adjust the date & the time by pushing
" (UP)", " (DOWN)" button when the
year/month/day/hour/minute each blinks.
3. After adjusting the date & the time, push "M"
button once more and the adjustment is
completed.
NOTE:When the battery has been reconnected or
charged, set the date and time as described
above. However, the first display mode is
set on DEC 01.
HSM100
HSM292
CAUTION:Do not clean the inner side of the rear
window glass with an abrasive type of glass
cleaner or use a scraper to remove foreign
deposits from the inner surface of the glass
as this may cause damage to the defroster
elements.
!
Page 101 of 253

1FEATURES OF YOUR HYUNDAI
88AUTOMATIC HEATING AND COOLING CONTROL SYSTEM
B970A01Y-AAT
(If installed)
Your Hyundai is equipped with an automatic
heating and cooling control system controlled
by simply setting the desired temperature.
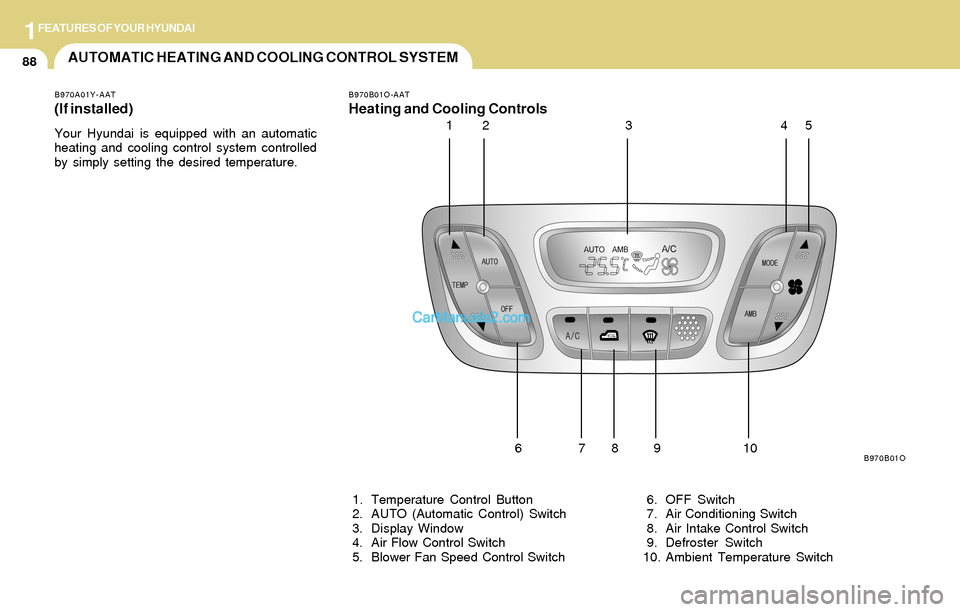
B970B01O-AAT
Heating and Cooling Controls
1. Temperature Control Button
2. AUTO (Automatic Control) Switch
3. Display Window
4. Air Flow Control Switch
5. Blower Fan Speed Control Switch 6. OFF Switch
7. Air Conditioning Switch
8. Air Intake Control Switch
9. Defroster Switch
10. Ambient Temperature Switch
B970B01O
12 3 45
6789 10
Page 102 of 253

1FEATURES OF YOUR HYUNDAI
89
B970C01O-GAT
Automatic OperationNOTE:If the battery has been discharged or dis-
connected, the temperature mode will reset
to Fahrenheit degree.
This is a normal condition and you can
adjust the temperature mode from Fahren-
heit to Centigrade as follows;
Press the TEMP down ( ) button 3 seconds
or more with the AMB button held down.
The display shows that the unit of tempera-
ture is adjusted to Fahrenheit or Centigrade
(°F
→ →→ →
→ °C or °C
→ →→ →
→ °F).
The FATC (Full Automatic Temperature Con-
trol) system automatically controls the heating
and cooling by doing as follows:
1. Push the "AUTO" switch. The indicator light
will come on confirming that the Face, Floor
and/or Bi-Level modes as well as the blower
speed and, the air conditioning will operate if
ambient temperature is higher than 32°F
(0°C) and automatically turns off if the ambi-
ent temperature drops below 32°F(0°C).
NOTE:Never place things on the sensor which is
located in the car on the instrument panel
to ensure better control of the heating and
cooling system.
B970C01O
HSM502
Photo sensor 2. Push the "TEMP" button to set the desired
temperature.
The temperature will increase to the maxi-
mum "HI" by pushing on the button. Each
push of the button will cause the temperature
to increase by 1°F(0.5°C).
The temperature will decrease to the mini-
mum "LO" by pushing on the button. Each
push of the button will cause the temperature
to decrease by 1°F(0.5°C).
B970C03O
Page 103 of 253

1FEATURES OF YOUR HYUNDAI
90
B980B01Y-AAT
Fan Speed Control
The fan speed can be set to the desired speed
by pressing the appropriate fan speed control
button. The higher the fan speed is, the more air
is delivered. Pressing the "OFF" button turns off
the fan.
B670C02S-AAT
Air Intake Control Switch
This is used to select fresh outside air or
recirculation inside air.
To change the air intake control mode, (Fresh
mode, Recirculation mode) push the control
button.
FRESH MODE ( ) : The indicator light on the
button goes off when the air intake control is in
fresh mode.
RECIRCULATION MODE ( ) : The indicator
light on the button is illuminated when the air
intake control is in recirculation mode.
B670C01O B980B01O
B995A01O-GAT
AMBIENT TEMPERATURE SWITCH
Pressing the "AMB" button displays the ambient
temperature on display window.
B980A01Y-AATMANUAL OPERATION
The heating and cooling system can be con-
trolled manually as well as by pushing buttons
other than the "AUTO" button. At this state, the
system sequentially works according to the
order of buttons selected.
The function of the buttons which are not se-
lected will be controlled automatically.
Press the "AUTO" button in order to convert to
automatic control of the system.
B995A01O
Page 111 of 253

1FEATURES OF YOUR HYUNDAI
98
HOW TO PRESET STATIONS
Six AM and twelve FM stations may be pro-
grammed into the memory of the radio. Then, by
simply pressing the band select button and/or
one of the six station select buttons, you may
recall any of these stations instantly. To pro-
gram the stations, follow these steps:
o Press band selector to set the band for AM,
FM1 or FM2.
o Select the desired station to be stored by
seek, scan or manual tuning.
o Determine the preset station select button
you wish to use to access that station.
o Press the station select button for more than
two seconds. A select button indicator will
show in the display indicating which select
button you have depressed. The frequency
display will flash after it has been stored into
the memory.
You should then release the button, and
proceed to program the next desired station.
A total of 18 stations can be programmed by
selecting one AM and two FM stations per
button.
o When completed, any preset station may be
recalled by selecting AM, FM1 or FM2 band
and the appropriate station button.CAUTION:o Do not place beverages close to the
audio system. The audio system mecha-
nism may be damaged if you spill them.
o Do not impact on the audio system, or
the audio system mechanism could be
damaged.
!
Page 113 of 253

1FEATURES OF YOUR HYUNDAI
100
B260D04O-AAT
1. Playing CD
o Insert the CD with the label facing upward.
o Insert the CD to start CD playback, during
radio operation.
o When a disc is in the CD deck, if you press
the CD button, the CD player will begin
playing even if the radio is being used.
o The CD player can be used when the ignition
switch is in either the "ON" or "ACC" position.
2. FF/REW ( / )
If you want to fast forward or reverse through
the compact disc track, push and hold the FF
( ) or REW ( ) button.
When you release the button, the compact disc
player will resume playing.
3. TRACK UP/DOWN
o The desired track on the disc currently being
played can be selected using the track
number.
o Press once to skip forward to the beg-
inning of the next track. Press once to
skip back to the beginning of the track.
4. SCAN Button
o Press the SCAN button to playback the first
10 seconds of each track.
o Press the SCAN button again within 10 sec.
when you have reached the desired track.
5. REPEAT Button
o To repeat the track you are currently listen-
ing to, press the RPT button. To cancel ,
press again.
o If you do not release RPT operation when the
track ends, it will automatically be replayed.
This process will be continued until you push
the button again.
6. EJECT Button
When the EJECT button is pressed with a
CD loaded, the CD will eject.
NOTE:o If the CD does not operate properly or if
the ER2 fault code is displayed, use one
of two methods to reset the CD deck
function.
- Remove the audio fuse for 5 minutes.
Then, reinstall the audio fuse.
- Diconnect the negative terminal of the
battery and wait 5 minutes. Then re-
connect the negative battery terminal.
o To assure proper operation of the unit,
keep the vehicle interior temperature
within a normal range by using the
vehicle's air conditioning or heating
system.
o When replacing the fuse, replace it with
a fuse having the correct capacity.
o The preset station frequencies are all
erased when the car battery is discon-
nected. Therefore, all data will have to be
set again if this should occur.
o Do not add any oil to the rotating parts.
Keep magnets, screwdrivers and other
metallic objects away from the tape
mechanism and head.
Page 115 of 253

1FEATURES OF YOUR HYUNDAI
102
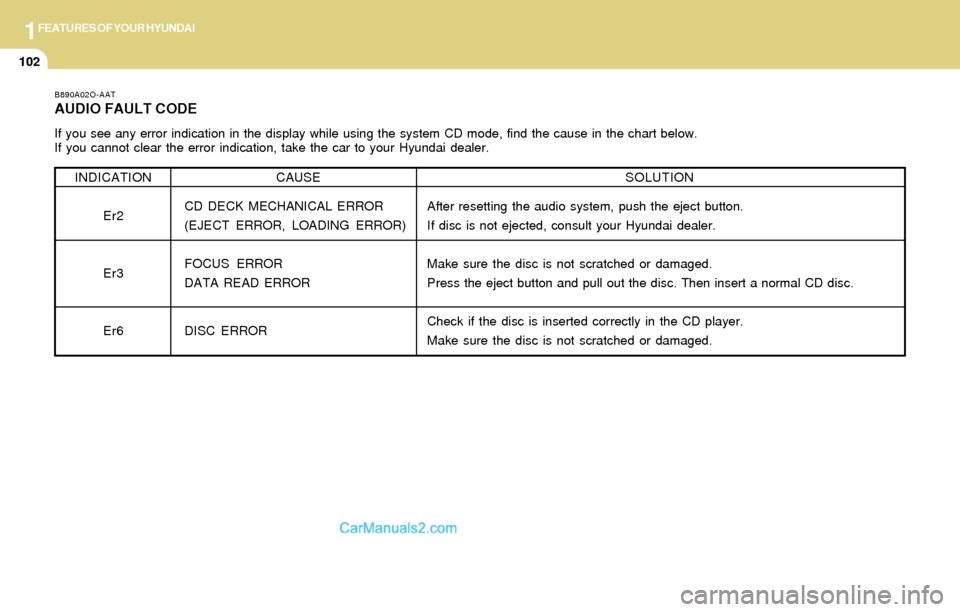
B890A02O-AAT
AUDIO FAULT CODE
If you see any error indication in the display while using the system CD mode, find the cause in the chart below.
If you cannot clear the error indication, take the car to your Hyundai dealer.
SOLUTION
After resetting the audio system, push the eject button.
If disc is not ejected, consult your Hyundai dealer.
Make sure the disc is not scratched or damaged.
Press the eject button and pull out the disc. Then insert a normal CD disc.
Check if the disc is inserted correctly in the CD player.
Make sure the disc is not scratched or damaged. INDICATION
Er2
Er3
Er6CAUSE
CD DECK MECHANICAL ERROR
(EJECT ERROR, LOADING ERROR)
FOCUS ERROR
DATA READ ERROR
DISC ERROR