2004 Hyundai Santa Fe ignition
[x] Cancel search: ignitionPage 78 of 253

1FEATURES OF YOUR HYUNDAI
65
NOTE:If programming a garage door opener or
gate, it is advised to unplug the device
during the "cycling" process to prevent
possible motor burnout.
Programming
Ensure the ignition switch is turned to the "ACC"
position to program and/or operate HomeLink
system. It is also recommended that a new
battery be placed in the handheld transmitter of
the device being programmed to HomeLink for
quicker programming and accurate transmis-
sion of the radio-frequency.
Follow these steps to program your HomeLink
mirror:1. When programming the buttons for the first
time, press and hold the two outside
HomeLink buttons ( , ), releasing when
the indicator light begins to flash (approxi-
mately 20 seconds). This procedure erases
the factory-set default codes. Do not per-
form this step when programming additional
transmitters.
B520C02L
Flashing
Flashing
2. Hold the transmitter of the device you want
to program 1 to 3 inches away from the
bottom of the mirror. Simultaneously press
the handheld transmitter button and the
HomeLink button you wish to program. The
indicator light will flash slowly at first, then
rapidly, indicating successful programming.
B520C03L
Transmitter
1 ~ 3 inches
Additional Programming for Rolling Code
Devices
For any rolling-code-equipped device; follow
the steps additional below after completing the
"Programming" section. A second person may
make the following steps easier.
1. Locate the "learn" or "smart" button on the
device's motor head unit. The exact location
and color of the button varies by product
brand, but is usually referenced in the device's
owner's manual. Contact HomeLink at 1-
800-355-3515 or www.homelink.com for
help.
2. Press and release the "learn" or "smart"
button on the device's motor head unit.
NOTE:You now have 30 seconds to initiate step 3. 3. If the garage door opener or other device you
wish to program is rolling-code equipped,
proceed to the "Rolling Code Programming"
section.
4. Repeat step 2 to program the remaining
HomeLink buttons.
Page 93 of 253

1FEATURES OF YOUR HYUNDAI
80
B670D03O-AAT
Air Flow Control
This is used to turn the blower fan on/off and to
direct the flow of air. Air can be directed to the
floor, dashboard outlets, or windshield. Five
symbols are used to represent Face, Bi-Level,
Floor, Floor-Defrost and Defrost air position.
The MAX A/C mode is used to cool the inside of
the vehicle faster. The "OFF" mode is used to
turn the blower fan off.
B670D01O-1B670D02O
NOTE:o It should be noted that prolonged opera-
tion of the heating system in " " mode
will give rise to fogging of the wind-
shield and side windows and the air
within the passenger compartment will
become stale. In addition prolonged use
of the air conditioning with the " "
mode selected may result in the air within
the passenger compartment becoming
excessively dry.
o When the ignition switch is turned "ON"
the air intake control switch will change
to " " mode in floor, floor-defrost and
defrost position. This is normal opera-
tion. But, the air intake control switch
will change to " " mode when the
ignition switch is turned "ON" with the
MAX A/C mode selected.
Face-Level
Selecting the "Face" mode will cause air to be
discharged through the face level vents.
Page 95 of 253

1FEATURES OF YOUR HYUNDAI
82
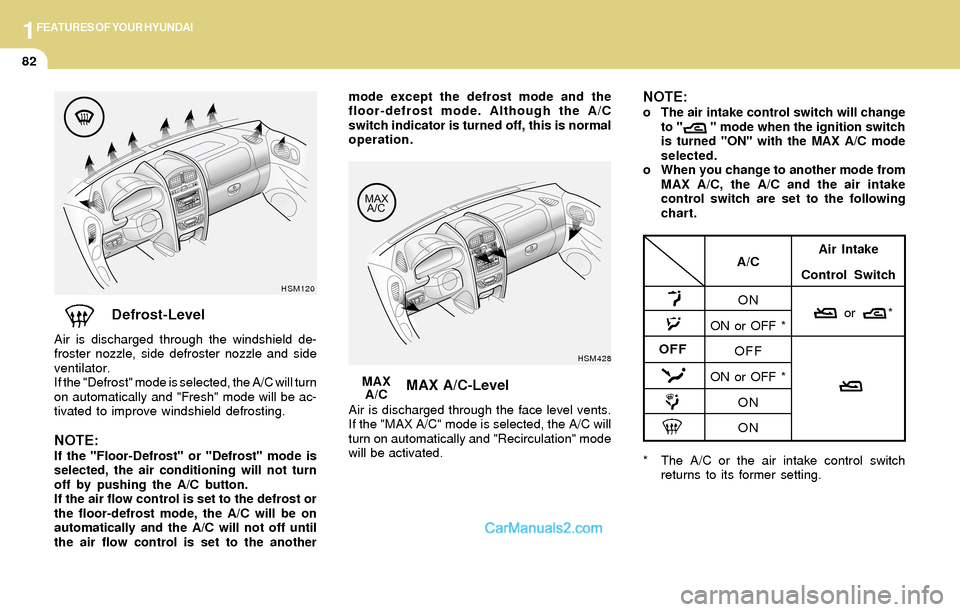
Defrost-Level
Air is discharged through the windshield de-
froster nozzle, side defroster nozzle and side
ventilator.
If the "Defrost" mode is selected, the A/C will turn
on automatically and "Fresh" mode will be ac-
tivated to improve windshield defrosting.
NOTE:If the "Floor-Defrost" or "Defrost" mode is
selected, the air conditioning will not turn
off by pushing the A/C button.
If the air flow control is set to the defrost or
the floor-defrost mode, the A/C will be on
automatically and the A/C will not off until
the air flow control is set to the another
HSM120
MAX A/C-Level
Air is discharged through the face level vents.
If the "MAX A/C" mode is selected, the A/C will
turn on automatically and "Recirculation" mode
will be activated.MAX
A/C
HSM428
* The A/C or the air intake control switch
returns to its former setting.
A/C
ON
ON or OFF *
OFF
ON or OFF *
ON
ONAir Intake
Control Switch
or *
OFF
mode except the defrost mode and the
floor-defrost mode. Although the A/C
switch indicator is turned off, this is normal
operation.NOTE:o The air intake control switch will change
to " " mode when the ignition switch
is turned "ON" with the MAX A/C mode
selected.
o When you change to another mode from
MAX A/C, the A/C and the air intake
control switch are set to the following
chart.
Page 104 of 253

1FEATURES OF YOUR HYUNDAI
91
With the "Fresh" mode selected, air enters the
vehicle from the outside and is heated or cooled
according to the function selected.
With the "Recirculation" mode selected, air from
within the passenger compartment will be drawn
through the heating system and heated or
cooled according to the function selected.
NOTE:o It should be noted that prolonged opera-
tion of the heating system in "recircula-
tion" mode will give rise to fogging of the
windshield and side windows and the air
within the passenger compartment will
become stale. In addition, prolonged
use of the air conditioning with the "Re-
circulation" mode selected may result in
the air within the passenger compart-
ment becoming excessively dry.
o When the ignition switch is turned "ON"
the air intake control will change to
"FRESH" mode (regardless of the switch
position). This is normal operation. The
air intake control operates in "AUTO"
mode when turning the ignition to the
"ON" position if the "AUTO" mode was
used before shutting off the engine.
B980D01Y-AAT
Heating and Cooling System Off
B980E01O-AAT
Air Flow Control
This is used to direct the flow of air. Air can be
directed to the floor, dashboard outlets, or
windshield. Four symbols are used to represent
Face, Bi-Level, Floor and Floor-Defrost posi-
tion.
HSM218
Press the "OFF" button to stop the operation of
the heating and cooling system.
B980D01O
Page 110 of 253

1FEATURES OF YOUR HYUNDAI
97
H260B04O-AAT
1. POWER ON-OFF Control Knob
The radio unit may be operated when the ignition
key is in the "ACC" or "ON" position. Press the
knob to switch the power on. The LCD shows
the radio frequency in the radio mode or the CD
track indicator in the CD mode. To switch the
power off, press the knob again.
VOLUME Control
Rotate the knob clockwise to increase the
volume and turn the knob counterclockwise to
reduce the volume.
BALANCE Control
Pull and turn the control knob clockwise to
emphasize right speaker sound (left speaker
sound will be attenuated). When the control
knob is turned counterclockwise, left speaker
sound will be emphasized (right speaker sound
will be attenuated).
2. FAD (Fader Control) Knob
Turn the control knob counterclockwise to
emphasize front speaker sound (rear speaker
sound will be attenuated). When the control
knob is turned clockwise, rear speaker sound
will be emphasized (front speaker sound will be
attenuated).
3. BASS Control Knob
Press to pop the knob out and turn to the left or
right for the desired bass tone.
TREB (Treble Control) Knob
Pull the bass control knob further out.
Turn to the left or right for the desired treble tone.
4. SCAN Button
When the scan button is pressed, the frequency
will increase and the receivable stations will be
tuned in one after another, receiving each sta-
tion for 5 seconds. To stop scanning, press the
scan button again.
5. TUNE (Manual) Select Button
Press the ( ) side or ( ) side to increase or to
decrease the frequency. Press either button
and hold down to continuously scroll.
Release button once the desired station is
reached.
SEEK Operation
(Automatic Channel Selection)
Press the TUNE select button for 0.5 sec or
more. Releasing it will automatically tune to the
next available station with a beep sound.
When the ( ) side is pressed longer than 0.5
second, releasing will automatically tune to the
next higher frequency and when the ( ) side is
pressed longer than 0.5 second, releasing will
automatically tune to the next lower frequency.
6. BAND Selector
Pressing the button changes the AM, FM1
and FM2 bands. The mode selected is dis-
played on LCD.
7. PRESET STATION SELECT Button
Six (6) stations for AM, FM1 or FM2 respec-
tively can be preset in the electronic memory
circuit on this unit.
FM/AM
Page 113 of 253

1FEATURES OF YOUR HYUNDAI
100
B260D04O-AAT
1. Playing CD
o Insert the CD with the label facing upward.
o Insert the CD to start CD playback, during
radio operation.
o When a disc is in the CD deck, if you press
the CD button, the CD player will begin
playing even if the radio is being used.
o The CD player can be used when the ignition
switch is in either the "ON" or "ACC" position.
2. FF/REW ( / )
If you want to fast forward or reverse through
the compact disc track, push and hold the FF
( ) or REW ( ) button.
When you release the button, the compact disc
player will resume playing.
3. TRACK UP/DOWN
o The desired track on the disc currently being
played can be selected using the track
number.
o Press once to skip forward to the beg-
inning of the next track. Press once to
skip back to the beginning of the track.
4. SCAN Button
o Press the SCAN button to playback the first
10 seconds of each track.
o Press the SCAN button again within 10 sec.
when you have reached the desired track.
5. REPEAT Button
o To repeat the track you are currently listen-
ing to, press the RPT button. To cancel ,
press again.
o If you do not release RPT operation when the
track ends, it will automatically be replayed.
This process will be continued until you push
the button again.
6. EJECT Button
When the EJECT button is pressed with a
CD loaded, the CD will eject.
NOTE:o If the CD does not operate properly or if
the ER2 fault code is displayed, use one
of two methods to reset the CD deck
function.
- Remove the audio fuse for 5 minutes.
Then, reinstall the audio fuse.
- Diconnect the negative terminal of the
battery and wait 5 minutes. Then re-
connect the negative battery terminal.
o To assure proper operation of the unit,
keep the vehicle interior temperature
within a normal range by using the
vehicle's air conditioning or heating
system.
o When replacing the fuse, replace it with
a fuse having the correct capacity.
o The preset station frequencies are all
erased when the car battery is discon-
nected. Therefore, all data will have to be
set again if this should occur.
o Do not add any oil to the rotating parts.
Keep magnets, screwdrivers and other
metallic objects away from the tape
mechanism and head.
Page 120 of 253

1FEATURES OF YOUR HYUNDAI
107
D285D02O-AAT
Playing a Cassette Tape
Your tape player is built to work best with tapes
that are up to 30 to 45 minutes long on each side.
Tapes longer than that are so thin they may not
work well in this player. The longer side with the
tape visible should face to the right. If the ignition
is on, but the radio is off, the tape can be inserted
and will begin playing. A tape symbol is shown
on the display whenever a tape is inserted. If you
hear nothing but a garbled sound, the tape may
not be in squarely. Press EJECT to remove the
tape and start over.
While the tape is playing, use the VOL, AUDIO
and SEEK controls just as you do for the radio.
The display will show TAPE and an arrow
showing which side of the tape is playing. You
can insert a tape when the ignition is off.
If an error appears on the display, see "Cas-
sette Tape Message" later in this section.
1. SEEK Button
SEEK
Press this pushbutton to go to the next selection
on the tape if you press pushbutton more than
once, the player will continue moving forward
through the tape. SEEK and a positive number
will appear on the display. Your tape must have
at least three seconds of silence between each
selection for next to work. The sound still mute
while seeking.
SEEK
Press this pushbutton to go to the previous
selection on the tape if the selection has been
playing for less than three seconds. If this
pushbutton is pressed and the current selection
had been playing for more than 13 seconds, it
will go to the beginning of the previous selection
or the beginning of the current selection, de-
pending upon the position on the tape. SEEK and
a negative number will appear on the display
while the cassette player is in the previous
mode. If this pushbutton is pressed additional
times or held, the radio will go to the displayed
number of previous selections up to 9. SEEK
and a negative number will appear on the dis-
play. Your tape must have at least three sec-
onds of silence between each selection for
previous to work. The sound will mute while
seeking.
2. REVERSE Button
Press this pushbutton to reverse the tape rap-
idly. Press it again to return to playing speed.
The radio will play the last selected station while
the tape reverses. The station frequency and
REV will appear on the display. You may select
stations during reverse operation by using
TUNE, SEEK or PRESET SCAN.
3. FORWARD Button
Press this pushbutton to advance quickly to
another part of the tape. Press this pushbutton
again to return to playing speed. The radio will
play the last selected station while the tape
advances. The station frequency and FWD will
appear on the display. You may select stations
during forward operation by using TUNE, SEEK
or PRESET SCAN.
4. SIDE Button
Press this pushbutton to play the other side of
the tape.
5. (Dolby)
Press this pushbutton to reduce background
noise. DOLBY B ON will appear on the display.
Press it again to turn Dolby B off. DOLBY B OFF
will appear on the display. Dolby Noise Reduc-
tion is manufactured under a license form Dolby
Laboratories Licensing Corporation. Dolby and
the double-D symbol are trademarks of Dolby
laboratories Licensing Corporation.
6. BAND Select Button
Press this button to listen to the radio when a
tape is playing. The tape will stop but remain in
the player.
Page 121 of 253

1FEATURES OF YOUR HYUNDAI
108
7. TAPE/CD Select Button
Press this button to play a tape when listening
to the radio. Press TAPE/CD to switch between
the tape and compact disc if both are loaded.
The inactive tape or CD will remain safe inside
the radio for future listening.
8. Cassette Tape EJECT Button
Press this button, located to the right of the
cassette tape slot to eject a tape. The tape is
ejected with the radio off. Cassette tape may be
loaded with the radio off.
9. Cassette Tape Messages
CHECK TAPE
If this message appears on the radio display, the
tape won't play because of one of the following
errors.
o The tape is tight and the player can't turn the
tape hubs. Remove the tape. Hold the tape
with the open end down and try to turn the
right hub counterclockwise with a pencil.
Turn the tape over and repeat. If the hubs do
not turn easily, your tape may be damaged
and should not be used in the player. Try a
new tape to make sure your player is work-
ing properly.o The tape is broken. Try a new tape.
o The tape is wrapped around the tape head.
Attempt to get the cassette out. Try a new
tape.
CLEAN
If this message appears on the display, the
cassette tape player needs to be cleaned. It will
still play tapes, but you should clean it as soon
as possible to prevent damage to the tapes and
player. See "Care of Your Cassette Tape Player"
in the Index.
If any error occurs repeatedly or if an error can't
be corrected, contact your dealer.
10. Care of Your Cassette Tape Player
A tape player that is not cleaned regularly can
cause reduced sound quality, reined cassettes
or a damaged mechanism. Cassette tapes
should be stored in their case away from con-
taminants, direct sunlight and extreme heat. If
they aren't they may not operate properly or
may cause failure of the tape player.Your tape player should be cleaned regularly
after every 59 hours of use. Your radio may
display CLEAN to indicate that you have used
your tape player needs to be cleaned. It will still
play tapes, but you should clean it as soon as
possible to prevent damage to your tapes and
player. If you notice a reduction in sound quality,
try a known good cassette to see of it is the tape
or the tape player or fault. If this other cassette
has no improvement in sound quality, clean the
tape player.
The recommended cleaning method for your
cassette tape player is the use of a scrubbing
action, non-abrasive cleaning cassette with
pads which scrub the tape head as the hubs of
the cleaner cassette turn. The recommended
cleaning cassette is available through your
dealer.
When cleaning the cassette tape player with the
recommended non-abrasive cleaning cassette,
it is possible that the cassette may eject, be-
cause the cut tape detection feature on your
radio may recognize it as a broken tape. To
prevent the cleaning cassette from being
ejected, use the following steps:
1. Turn the ignition to ON or ACC.
2. Turn the radio off.