2004 Hyundai Santa Fe check oil
[x] Cancel search: check oilPage 202 of 253

6DO-IT-YOURSELF MAINTENANCE
8CHECKING AND CHANGING THE
ENGINE COOLANT
!
!
G050A01A-AAT
WARNING:Do not remove the radiator cap when the
engine is hot. When the engine is hot, the
engine coolant is under pressure and may
erupt through the opening if the cap is
removed. You could be seriously burned if
you do not observe this precaution. Do not
remove the radiator cap until the radiator is
cool to the touch. 4 . When the oil has stopped draining, replace
the drain plug using a new washer and
retighten by turning it clockwise.
Oil pan drain plug tightening torque:
3.5 ~ 4.5 kgf.m
5. Remove the oil filter by turning it counter-
clockwise with a oil filter wrench of the proper
size. A certain amount of oil will come out
when you remove the filter. So be sure to
have your drain pan in place underneath it.
6 . Install a new oil filter in accordance with the
instructions on the carton or on the filter itself.
Do not over-tighten. (Tightening torque :
1.2 ~ 1.6 kgf.m) Be sure that the mounting
surface on the engine is clean and that the
old gasket is removed completely. Lubricate
the new gasket on the filter with clean engine
oil before installation.
7 . Refill the crankcase with the recommended
engine oil. Refer to the specification in chap-
ter 9 for engine oil capacity.
8 . Start the engine and check to be sure no oil
is leaking from the drain plug or oil filter.
9 . Shut off the engine and recheck the oil level.
NOTE:Always dispose of used engine oil in an
environmentally acceptable manner. It is
suggested that it be placed in a sealed
container and taken to a service station for
reclamation. Do not pour the oil on the
ground or put it in with the household
trash.
WARNING:Used motor oil may cause irritation or can-
cer of the skin if left in contact with the skin
for prolonged periods of time. Wash your
hands thoroughly with soap and warm
water as soon as possible after handling
used oil.
!PROPOSITION 65 WARNING:Used engine oil may cause irritation or
cancer of the skin if left in contact with the
skin for prolonged periods of time. Used
engine oil contains chemicals that have
caused cancer in laboratory animals. Al-
ways protect your skin by washing your
hands thoroughly with soap and warm
water as soon as possible after handling
used oil.
Page 206 of 253

6DO-IT-YOURSELF MAINTENANCE
12WINDSHIELD WIPER BLADESCHANGING THE AIR CLEANER
FILTER
G080A02A-AAT
The wiper blades should be carefully inspected
from time to time and cleaned to remove accu-
mulations of road film or other debris. To clean
the wiper blades and arms, use a clean sponge
or cloth with a mild soap or detergent and water.
If the wipers continue to streak or smear the
glass, replace them with genuine Hyundai re-
placement parts or their equivalent.
HEF119
G070A01E-AAT
To change the filter, unsnap the clips around the
cover. When this is done, the cover can be lifted
off, the old filter removed and the new filter put
in its place. Genuine Hyundai Replacement
Parts are recommended.
CAUTION:o Operating your vehicle without a proper
air filter in place can result in excessive
engine wear.
o When removing the air cleaner filter, be
careful that dust or dirt does not enter
the air intake. These may result in dam-
age to the air cleaner filter.
G070A01O
!
!CAUTION:o Do not operate the wipers on dry glass.
This can result in more rapid wear of the
wiper blades and may scratch the glass.
o Keep the blade rubber out of contact
with petroleum products such as engine
oil, gasoline, etc.
6. To install the new spark plug, guide the
socket down over the spark plug, being
careful not to damage the ceramic insulator.
G060C03O
NOTE:Spark plugs should be tightened to speci-
fication. Over-tightening can damage the
threads in the aluminum cylinder head.
Also, leaving them too loose can cause the
spark plug to get very hot and possibly
result in damage to the engine.
7 . Replace the cable by pushing the insulated
connector directly down onto the electrode.
Check to be sure it has snapped into place
and can't fall off.
Page 207 of 253

6DO-IT-YOURSELF MAINTENANCE
13CHECKING THE TRANSAXLE OIL
(MANUAL)FILLING THE WASHER RESERVOIR
G090A01O-AAT
The washer fluid reservoir supplies fluid to the
windshield washer system.
A good quality washer fluid should be used to fill
the washer reservoir. The fluid level should be
checked more frequently during inclement
weather or whenever the washer system is in
more frequent use.
The capacity of the washer reservoir is 3.59
U.S. quarts (3.4 Liters).
CAUTION:o Radiator anti-freeze (engine coolant)
should not be used in the washer system
because it will damage the car's finish.
o The washer should not be operated if the
washer reservoir is empty. This can dam-
age the washer fluid pump.
G090A01O
!
G100A02O-AAT
Transaxle lubricant in the manual transaxle
should be checked at those intervals specified
in the vehicle maintenance schedule in Section
5.
Recommended Oil
Use only HYUNDAI GENUINE PARTS MTF
75W/90 (API GL-4) or EQUIVALENT in the
manual transaxle.
Manual Transaxle Oil Capacity
The oil capacity of the manual transaxle is 2.43
U.S. quarts (2.3 liters).
HSM435
Filler plug
Drain plug
Page 208 of 253
6DO-IT-YOURSELF MAINTENANCE
14CHECKING THE TRANSAXLE
FLUID (AUTOMATIC)
G110A01E-AAT
Transaxle fluid in the automatic transaxle should
be checked at those intervals specified in the
vehicle maintenance schedule in Section 5.
NOTE:Automatic transaxle fluid is basically red
color. As driving distance increases, the
fluid color turns darkish red gradually. It is
a normal condition and you should not
judge the need to replace based upon the
changing color.
You must replace the automatic transaxle
fluid in accordance with intervals specified
in the vehicle maintenance schedule in
section 5.
!
G100B02A-AAT
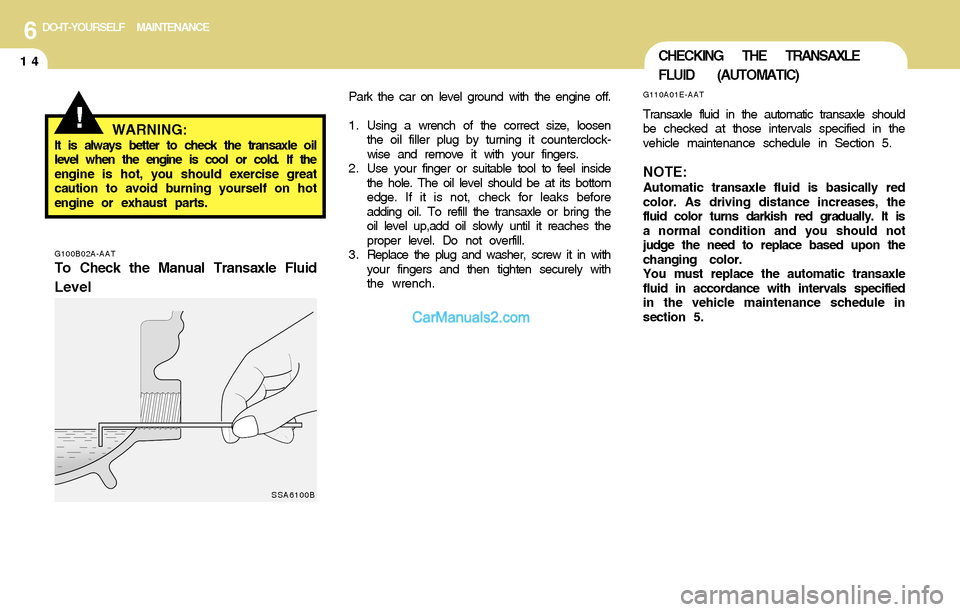
To Check the Manual Transaxle Fluid
LevelWARNING:
It is always better to check the transaxle oil
level when the engine is cool or cold. If the
engine is hot, you should exercise great
caution to avoid burning yourself on hot
engine or exhaust parts.Park the car on level ground with the engine off.
1 . Using a wrench of the correct size, loosen
the oil filler plug by turning it counterclock-
wise and remove it with your fingers.
2 . Use your finger or suitable tool to feel inside
the hole. The oil level should be at its bottom
edge. If it is not, check for leaks before
adding oil. To refill the transaxle or bring the
oil level up,add oil slowly until it reaches the
proper level. Do not overfill.
3 . Replace the plug and washer, screw it in with
your fingers and then tighten securely with
the wrench.
SSA6100B
Page 217 of 253

6DO-IT-YOURSELF MAINTENANCE
23CHECKING ELECTRIC COOLING
FANS
!
!
G220A01A-AAT
WARNING:The cooling fan is controlled by engine
coolant temperature and may sometimes
operate even when the engine is not run-
ning. Use extreme caution when working
near the blades of the cooling fan, so that
you are not injured by a rotating fan blade.
As the engine coolant temperature de-
creases the fan will automatically shut off.
This is a normal condition.
G210B03A-AAT
Checking the Battery
Keep the battery clean. Any evidence of corro-
sion around the battery posts or terminals
should be removed using a solution of house-
hold baking soda and warm water. After the
battery terminals are dry, cover them with a light
coating of grease. o If battery fluid is on your skin, flush the
affected areas with water for at least 15
minutes and then seek medical assistance.
o If battery fluid is in your eyes, rinse out your
eyes with water and get medical assistance
as soon as possible. While you are being
driven to get medical assistance, continue to
rinse your eyes by using a sponge or soft
cloth saturated with water.
o If you swallow battery fluid, drink a large
quantity of water or milk followed by milk of
magnesia, eat a raw egg or drink vegetable
oil. Get medical assistance as soon as
possible.
While batteries are being charged (either by a
battery charger or by the vehicle's generator),
they produce explosive gases. Always ob-
serve these warnings to prevent injuries from
occurring:
o Charge batteries only in a well ventilated
area.
o Do not permit flames, sparks or smoking in
the area.
o Keep children away from the area.
PROPOSITION 65 WARNING:Battery posts, terminals, and related acces-
sories contain lead and lead compounds,
chemicals known to the State of California
to cause cancer and reproductive harm.
Batteries also contain other chemicals
known to the State of California to cause
cancer. Wash hands after handling.
Page 218 of 253
6DO-IT-YOURSELF MAINTENANCE
24POWER STEERING FLUID LEVEL
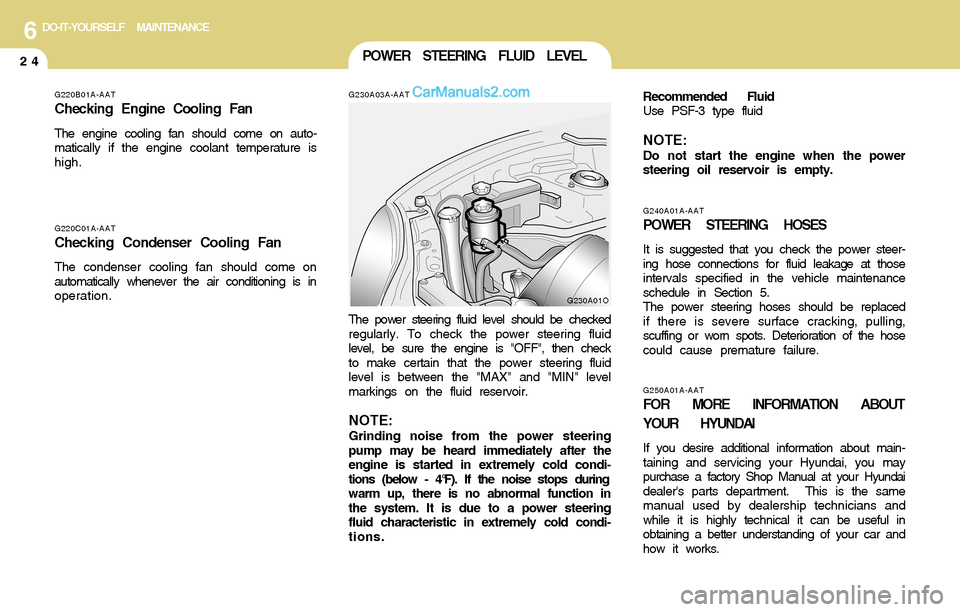
G230A03A-AAT
G220C01A-AAT
Checking Condenser Cooling Fan
The condenser cooling fan should come on
automatically whenever the air conditioning is in
operation.
The power steering fluid level should be checked
regularly. To check the power steering fluid
level, be sure the engine is "OFF", then check
to make certain that the power steering fluid
level is between the "MAX" and "MIN" level
markings on the fluid reservoir.
NOTE:Grinding noise from the power steering
pump may be heard immediately after the
engine is started in extremely cold condi-
tions (below - 4°F). If the noise stops during
warm up, there is no abnormal function in
the system. It is due to a power steering
fluid characteristic in extremely cold condi-
tions.
G230A01O
G250A01A-AAT
FOR MORE INFORMATION ABOUT
YOUR HYUNDAI
If you desire additional information about main-
taining and servicing your Hyundai, you may
purchase a factory Shop Manual at your Hyundai
dealer's parts department. This is the same
manual used by dealership technicians and
while it is highly technical it can be useful in
obtaining a better understanding of your car and
how it works.
G240A01A-AAT
POWER STEERING HOSES
It is suggested that you check the power steer-
ing hose connections for fluid leakage at those
intervals specified in the vehicle maintenance
schedule in Section 5.
The power steering hoses should be replaced
if there is severe surface cracking, pulling,
scuffing or worn spots. Deterioration of the hose
could cause premature failure. Recommended Fluid
Use PSF-3 type fluid
NOTE:Do not start the engine when the power
steering oil reservoir is empty.
G220B01A-AAT
Checking Engine Cooling Fan
The engine cooling fan should come on auto-
matically if the engine coolant temperature is
high.
Page 219 of 253

6DO-IT-YOURSELF MAINTENANCE
25HEADLIGHT AIMING ADJUSTMENT
G290B01O-AAT
Adjustment After Headlight Assembly
Replacement
If the vehicle has had front body repair and the
headlight assembly has been replaced, the
headlight aiming should be checked using an
aiming chart as shown in the illustration. Turn on
the headlight switch. (Low Beam Position)
1 . Adjust headlights so that main axis of light is
parallel to center line of the body and is
aligned with point "P" shown in the illustration.
2 . Dotted lines in the illustration show the center
of headlights.
G290A03O
L
W
H
H
Cut-off line
Ground line
"P"
Horizontal line
Vertical line
!
6 . Draw the vertical line (through the center of
each headlight beam pattern) and the hori-
zontal line (through the center of each head-
light beam pattern) on the aiming screen.
And then, draw a parallel line at 0.8 in. (21
mm) under the horizontal line.
7. Adjust each cut-off line of the low beam to the
parallel line with a phillips screwdriver -
VERTICAL AIMING.
WARNING:Horizontal aiming should be adjusted by
an authorized Hyundai dealer.
G290A01O
Vertical
aiming
G290A02O-AAT
Before performing aiming adjustment, make
sure of the following.
1 . Keep all tires inflated to the correct pressure.
2 . Place the vehicle on level ground and press
the front bumper & rear bumper down sev-
eral times.
Place vehicle at a distance of 118 in. (3m)
from the test wall.
3 . See that the vehicle is unloaded (except for
full levels of coolant, engine oil and fuel, and
spare tire, jack, and tools). Have the driver
or equivalent weight placed in driver's seat.
4 . Clean the head light lenses and turn on the
headlights (Low beam).
5 . Open the hood.
Page 249 of 253

10INDEX
3
Corrosion protection
Cleaning the interior ....................................................................... 4-5
Protecting your Hyundai from corrosion ....................................... 4-2
Washing and waxing ...................................................................... 4-3
Cruise Control ...................................................................................1-75
D
Defrosting / Defogging ......................................................................1-87
Door
Central door lock ............................................................................ 1-7
Door locks ...................................................................................... 1-4
Front door edge warning light ......................................................1-74
Locking, unlocking front door with a key ...................................... 1-5
Drink Holder ......................................................................................1-55
Drive Belts .........................................................................................6-20
Driving
Driving for economy .....................................................................2-22
Smooth cornering.........................................................................2-23
Winter driving ...............................................................................2-23
E
Emission Control System................................................................... 7-2
Engine
Before starting the engine .............................................................. 2-3
Compartment (2.4 DOHC) ............................................................ 6-2
Compartment (2.7 V6) ................................................................... 6-3
Compartment (3.5 V6) ................................................................... 6-4
Coolant ........................................................................................... 6-8
Coolant temperature gauge .........................................................1-46If the engine overheats .................................................................. 3-4
Number........................................................................................... 8-2
Oil ................................................................................................... 6-6
Starting ........................................................................................... 2-5
Engine Exhaust Can Be Dangerous .................................................. 2-2
F
Fan Speed Control ............................................................................1-79
Floor Mat Anchor ..............................................................................1-73
Fog Light
Front.............................................................................................1-52
Front Seats
Adjustable front seats ..................................................................1-11
Adjustable headrests ...................................................................1-13
Adjusting seat forward and rearward ..........................................1-12
Adjusting seatback angle .............................................................1-12
Fuel
Auto fuel cut switch ......................................................................1-71
Capacity......................................................................................... 9-2
Gauge...........................................................................................1-46
Recommendations......................................................................... 1-2
Fuel Filler Lid
Remote release............................................................................1-71
Full-time 4WD Operation ..................................................................2-18
Fuses................................................................................................6-21
G
General Checks.................................................................................. 6-5
Glove Box ..........................................................................................1-60