Page 11 of 273

1. Multi-function light switch
2. Seat warmer switch (If installed)
3. Horn/Driver's side airbag (If installed)
4. Rear heater switch (If installed)
5. Windshield wiper/Washer switch
6. Hazard warning switch
7. Front fog light switch (If installed)
8. 4WD Switch (If installed)
9. Rear fog light switch (If installed)
10. Rear window defroster switch
11. Passenger's side airbag (If installed)
12. Glove box13. Headlight leveling device switch (If installed)
14. ECT switch (Automatic transmission only)
15. Fuel-filler lid release lever
16. Hood release lever
17. Panel brightness control knob (Rheostat) (If installed)
18. Engine RPM adjustment knob (If installed)
19. Heater/Air conditioner control panel
20. Cigarette lighter
21. Ashtray
22. Drink holder
23. Audio system (If installed)
24. Digital clock (If installed)
CAUTION:
When installing the container of liquid air refresher inside a vehicle, do not place it near theinstrument cluster nor on the crash pad surface. If there is any leakage from the air refresher onto these areas (Instrument cluster, crash pad or air ventilator), it may damage these parts. If the liquid from air refresher does leak onto these areas, wash them with water immediately.
!
Page 13 of 273
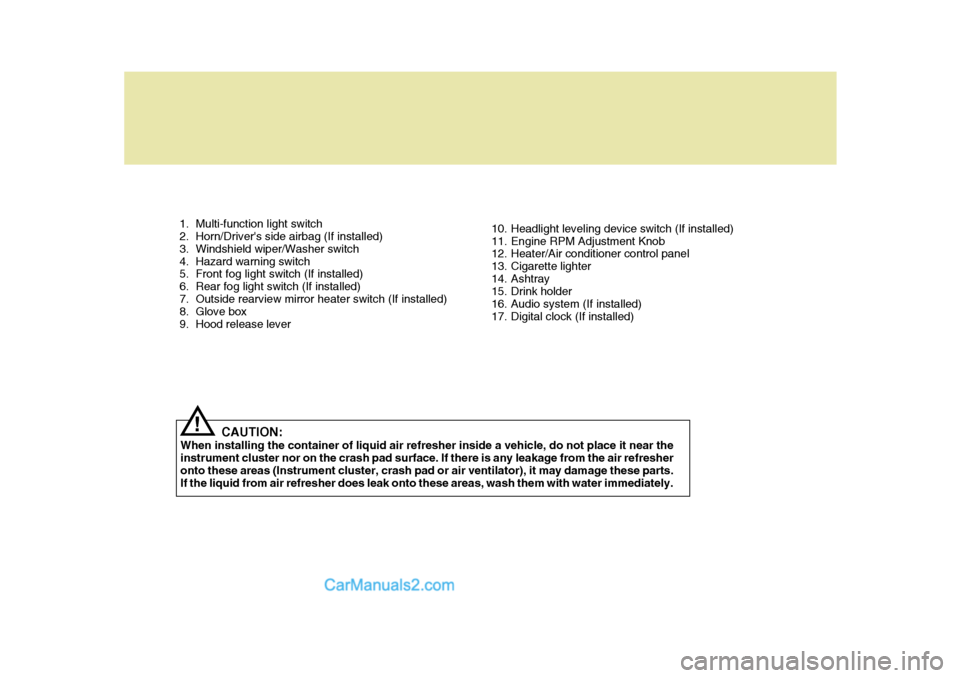
1. Multi-function light switch
2. Horn/Driver's side airbag (If installed)
3. Windshield wiper/Washer switch
4. Hazard warning switch
5. Front fog light switch (If installed)
6. Rear fog light switch (If installed)
7. Outside rearview mirror heater switch (If installed)
8. Glove box
9. Hood release lever10. Headlight leveling device switch (If installed)
11. Engine RPM Adjustment Knob
12. Heater/Air conditioner control panel
13. Cigarette lighter
14. Ashtray
15. Drink holder
16. Audio system (If installed)
17. Digital clock (If installed)
CAUTION:
When installing the container of liquid air refresher inside a vehicle, do not place it near theinstrument cluster nor on the crash pad surface. If there is any leakage from the air refresheronto these areas (Instrument cluster, crash pad or air ventilator), it may damage these parts. If the liquid from air refresher does leak onto these areas, wash them with water immediately.
!
Page 45 of 273

1
BEFORE DRIVING YOUR VEHICLE
31
5
!
B290C03P-GAT Pull the lever and rotate the seat clock- wise.
WARNING:
o Never rotate the seat while the vehicle is in motion.
o When the seat is rotated, be sure that the seat is securely locked inposition.
o While driving, ensure the seat is locked facing forward.If the seat is not facing forward,this may result in serious injury in the event of a sudden stop.
B290A01P-GAT SECOND AND THIRD SEATS Adjusting Seat Forward andRearward (Minibus) Pull the lever up and hold it while you slide the seat forward or backward to desired position. Release the lever tolock the seat in position.
B290B02P-GAT To rotate (Second Seat Only)
1. Position the driver's seat at the fore-
front. And then position the third seat at the end of rearward.
2. Pull the reclining lever and fold the seatback of the front seat.
3. Fold the auxiliary seat. (See page 1-33)
4. Pull the lever (a) and slide the seat at the end of rearward.
5. Pull the lever (b) and incline the seatback forward.
6. Rotate the seat clockwise.
7. After rotating the seat 90° or 180°, it can be fixed.
8. Adjust the seatback or seat the de-
sired position.
9. Reverse the above procedure to re-
turn the seat to the original position.
HSRFL084
Type 1
HSRFL085Type 2
B290C01P
3
4 67
Page 66 of 273

2
Instrument Cluster And Indicator Lights ....................... 2-2
Warning And Indicator Lights ....................................... 2-8
Instrument Cluster ......................................................2-12
Odometer/Trip odmeter .............................................. 2-14
Multim eter ................................................................... 2-16
Muti-funition Light Switch ........................................... 2-19
Windshield Wiper And Washer Switch .......................2-21
Headlamp Leveling Device System ........................... 2-23
Instrument Panel Light Control (Rheostat) ................ 2-24
Engine Rpm Adjustment Knob ................................... 2-24
Fog Lamp Switch ....................................................... 2-25
Front/Rear Window Defroster Switch ......................... 2-26
Interior Light ............................................................... 2-28
Sunroof ....................................................................... 2-30
Mirror .......................................................................... 2-34
Drink Holder ................................................................ 2-35
Ashtray ....................................................................... 2-36
Digital Clock ................................................................ 2-37
Horn ............................................................................ 2-37
Heating And Cooling Control ..................................... 2-38
Rear Heater And Air Conditioner ............................... 2-45
Overhead Air Conditioning ......................................... 2-47
Air Conditioner Filter ................................................... 2-47
Stereo Sound System ................................................ 2-49
Audio System ............................................................. 2-51
Antenna ...................................................................... 2-73
INSTRUMENTS AND CONTROLS
2
Page 89 of 273

2 INSTRUMENTS AND CONTROLS
24INSTRUMENT PANEL LIGHT CONTROL (RHEOSTAT)
C220A01P-GAT (Minibus/Van) (If installed)
HSRFL220
The instrument panel lights can be made brighter or dimmer by turning the instrument panel light control knob.
For loading conditions other than thoselisted, adjust the switch position sothat the beam level may be the nearest as the condition obtained according to the list.
MINIBUS2WD4WD 2WD
7/9
0 0 1 1 2 3 3 0
- - - -
1 6 0 0 0 0 1 2
7 0 0 1 1 2 3
LOADING
CONDITION
Driver only Driver + Frontpassenger Driver, front pas- senger + FarthestRear Seat Full Full passengers Full passengers +Maximum Permis- sible loading Driver+MaximumPermissible loading12 0
- - - -
1
LOADING CONDITION Driver onlyDriver + PermissibleRear axle load
TRUCK 0 1
VAN
ENGINE RPM ADJUSTMENT KNOB
C230A01P-GAT (Diesel) (If installed)
When the outside air temperature is very low, or when it is necessary to warm up the engine, then turn the knobclockwise to that point at which the engine runs smoothly, and then, once the warming up is completed, fully turnthe knob counterclockwise. CAUTION:
Never attempt to adjust the vehicleduring driving by using the control knob.
! HSRFL230
Page 96 of 273

2
INSTRUMENTS AND CONTROLS
31
!
! B460D01P-GAT Manual Operation of Sunroof If the sunroof does not electrically op- erate:
1. Remove the rectangular plastic
cover in the front of the roof panel.
2. Insert the hexagonal head wrench
into the socket. This wrench can be found in the tool bag at the right corner of the vehicle.
3. Turn the wrench clockwise to open or counterclockwise to close.
WARNING:
o Do not close a sunroof if anyone's hands, arms or body are betweenthe sliding glass and the sunroofsash, as this could result in an injury.
o Do not stand up or extend any portion of your body out of theopening while the vehicle is mov- ing.
CAUTION:
o Do not open the sunroof in se- verely cold temperature or when it is covered with ice or snow.
o Periodically remove any dirt that may have accumulated on theguide rails.
o After washing the car or after
there being rain, be sure to wipeoff any water that is on the sunroof before operating it. B460D01P
B460B03P-GAT OPERATING THE SUNROOF SYSTEMOpening or closing the sunroof The sunfoof can be electrically opened or closed. To open or close, press and hold the button located in the front ofthe roof panel. And release the button when the sunfoof reaches the desired position.In case of closing the rear sunroof, it stops at a half position before full clos- ing. Therefore, release the button andthen press and hold it again to close it completely. Front
B460B01P
Rear
Page 97 of 273

2 INSTRUMENTS AND CONTROLS
32
B460E01P-GAT REAR SUNROOF The rear sunroof can be electrically opened or closed. To open or to close, press and hold the button located onthe center of the roof panel. Release the button when the sunroof reaches the desired position. As a precautionwhen closing , it stops at a half position before fully closing. Therefore, release the button and then press it again toclose it completely. B460E01P
SUNVISOR
Manual Operation of Sunroof If the sunroof does not electrically op- erate:
1. Remove the plastic cover in the roof panel.
2. Insert the hexagonal head wrench in to the socket. This wrench can be founded in the tool bag at the rightcorner of the vehicle.
3. Turn the wrench clockwise to open
or counter clockwise to close. C340A01L-GAT Your Hyundai is equipped with sunvisors to give the driver and front passenger either frontal or sidewardshade. The sunvisors are installed on both sides. To reduce glare or to shut outdirect rays of the sun, turn the sunvisor down to block the annoyance. A vanity mirror is provided on the backof the sunvisor for the front passenger. (If installed)
Vanity Mirror
C340A01P
Page 102 of 273
2
INSTRUMENTS AND CONTROLS
37DIGITAL CLOCK
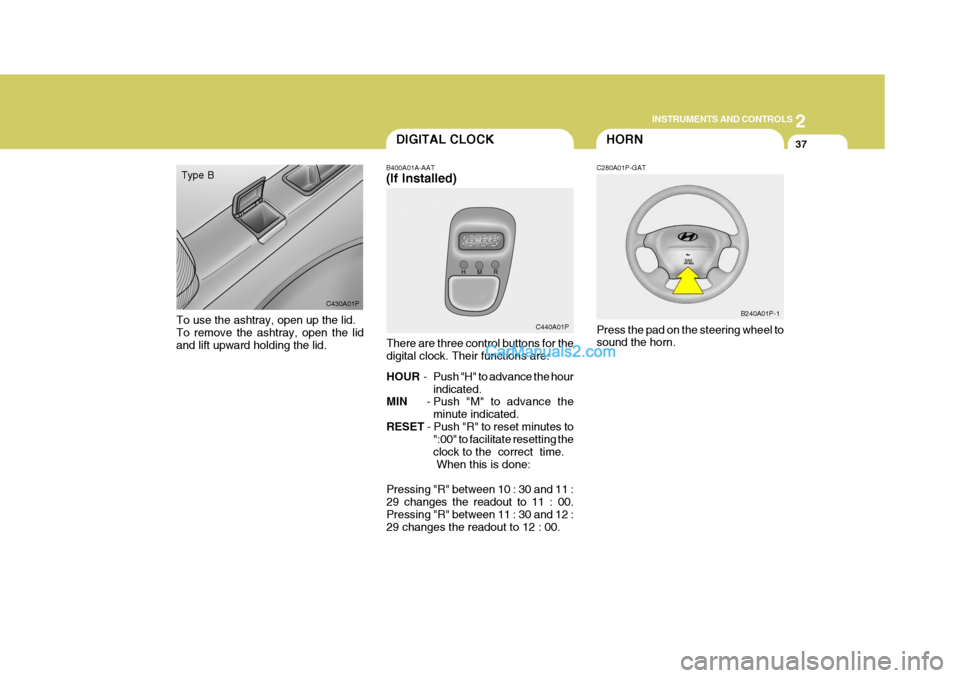
B400A01A-AAT (If Installed)
There are three control buttons for the digital clock. Their functions are: HOUR - Push "H" to advance the hour
indicated.
MIN - Push "M" to advance the
minute indicated.
RESET - Push "R" to reset minutes to
":00" to facilitate resetting the clock to the correct time. When this is done:
Pressing "R" between 10 : 30 and 11 :29 changes the readout to 11 : 00. Pressing "R" between 11 : 30 and 12 : 29 changes the readout to 12 : 00. C440A01PHORN
C280A01P-GAT Press the pad on the steering wheel to sound the horn. B240A01P-1
C430A01P
Type B
To use the ashtray, open up the lid.To remove the ashtray, open the lid and lift upward holding the lid.